Week 10: Data Persistence
Introduction to Databases and SQL
Use SQL to read and write to a database
Note
Most of this is revision for IS112 Data Management, you can skip the parts you already know.
Many of the apps you use store data directly on the device. The Clock app stores your recurring alarms, the Google Maps app saves a list of your recent searches, and the Contacts app lets you add, edit, and remove your contacts’ information.
Data persistence — storing or persisting data on the device — is a big part of Android development. Persistent data ensures user-generated content isn’t lost when the app is closed, or data downloaded from the internet is saved so it doesn’t need to be redownloaded later.
SQLite is a common way provided by the Android SDK for Android apps to persist data. SQLite provides a relational database that allows you to represent data in a similar way to how you structure data with Kotlin classes.
After you gain a fundamental knowledge of SQL, you’ll be prepared to use the Room library to add persistence to your apps later in this unit.
Note
Android apps have a number of ways to store data, including both internal and external storage. This unit discusses Room and Preferences Datastore. To learn more about the different methods for storing data on Android, refer to the Data and file storage overview.
Key concepts of relational databases
What is a database?
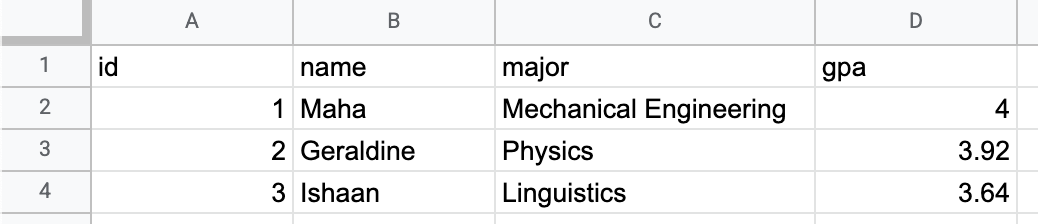
If you are familiar with a spreadsheet program like Google Sheets, you are already familiar with a basic analogy for a database.
A spreadsheet consists of separate data tables, or individual spreadsheets in the same workbook.

Each table consists of columns that define what the data represents and rows that represent individual items with values for each column. For example, you might define columns for a student’s ID, name, major, and grade.

Each row contains data for a single student, with values for each of the columns.
A relational database works the same way.
Tables define high-level groupings of data you want to represent, such as students and professors.
Columns define the data that each row in the table contains.
Rows contain the actual data that consist of values for each column in the table.
The structure of a relational database also mirrors what you already know about classes and objects in Kotlin.
Classes, like tables, model the data you want to represent in your app.
Properties, like columns, define the specific pieces of data that every instance of the class should contain.
Objects, like rows, are the actual data. Objects contain values for each property defined in the class, just as rows contain values for each column defined in the data table. .. code:: kotlin
data class Student(
    id: Int,
    name: String,
    major: String,
    gpa: Double
)
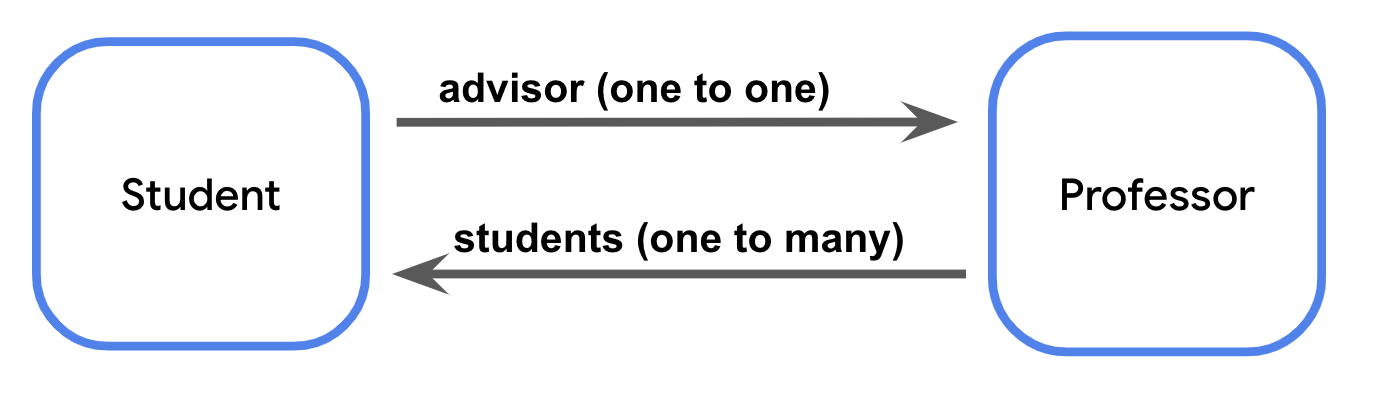
Just as a spreadsheet can contain multiple sheets and an app can contain multiple classes, a database can contain multiple tables. A database is called a relational database when it can model relationships between tables. For example, a graduate student might have a single professor as a doctoral advisor whereas that professor is the doctoral advisor for multiple students.
Every table in a relational database contains a unique identifier for rows, such as a column where the value in each row is an automatically incremented integer. This identifier is known as the primary key.
When a table references the primary key of another table, it is known as a foreign key. The presence of a foreign key means there’s a relationship between the tables.
Note
Like with Kotlin classes, the convention is to use the singular form for the name of database tables. For the example above, that means you name the tables
teacher,student, andcourse, not the plural forms ofteachers,students, andcourses.
What is SQLite?
SQLite is a commonly used relational database. Specifically, SQLite refers to a lightweight C library for relational database management with Structured Query Language, known as SQL and sometimes pronounced as “sequel” for short.
You won’t have to learn C or any entirely new programming language to work with a relational database. SQL is simply a way to add and retrieve data from a relational database with a few lines of code.
Note
Not all databases are organized into tables, columns, and rows. Other kinds of databases, known as NoSQL, are structured similarly to a JSON object with nested pairs of keys and values. Examples of NoSQL databases include Redis or Cloud Firestore.
Representing data with SQLite
In Kotlin, you’re familiar with data types like
IntandBoolean. SQLite databases use data types too! Data table columns must have a specific data type. The following table maps common Kotlin data types to their SQLite equivalents.
Kotlin data type |
SQLite data type |
|---|---|
|
|
|
|
|
|
|
|
The tables in a database and the columns in each table are collectively known as the schema. In the next section, you download the starter data set and learn more about its schema.
Download the starter data set
The database for this codelab is for a hypothetical email app. This codelab uses familiar examples, such as sorting and filtering mail, or searching by subject text or sender, to demonstrate all the powerful things you can do with SQL. This example also ensures you have experience with the types of scenarios you might find in an app before you work with Room in the next pathway.
Starter code: https://github.com/google-developer-training/android-basics-kotlin-sql-basics-app/tree/compose
Branch:
compose
Use the Database Inspector
To use Database Inspector, perform the following steps.
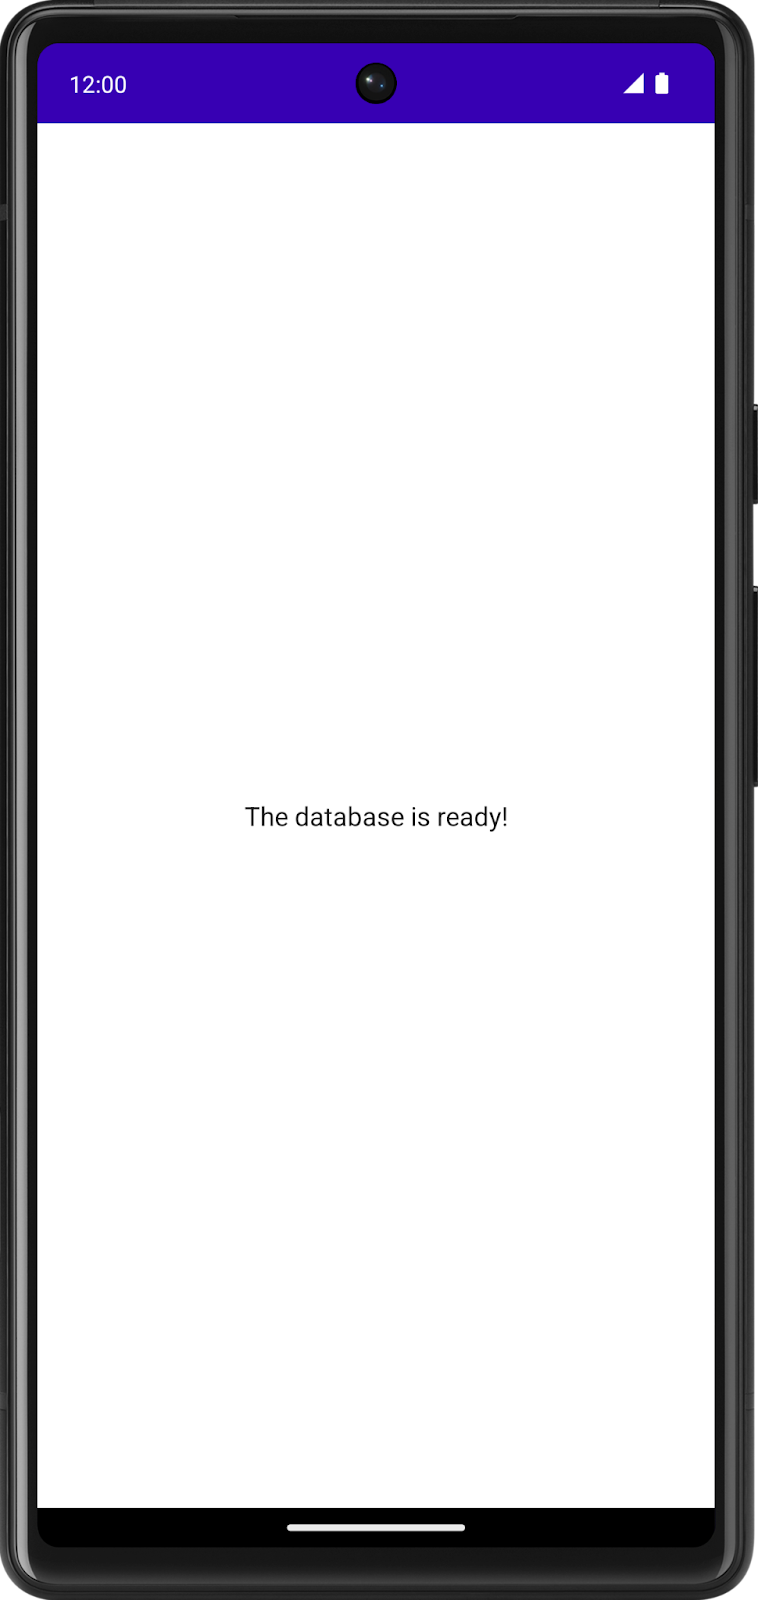
Run the SQL Basics app in Android Studio. When the app launches, you see the following screen.
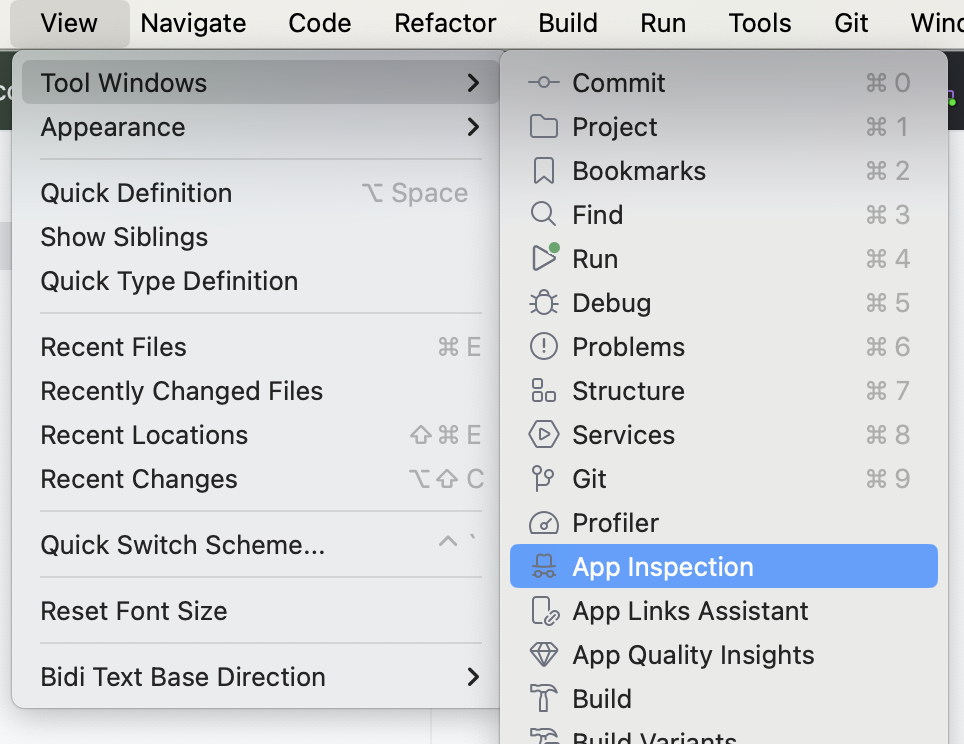
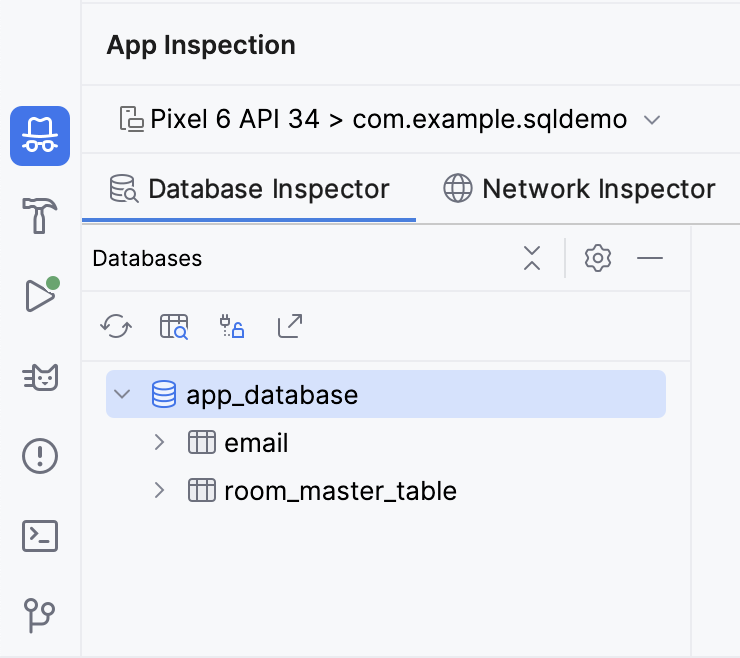
In Android Studio, click View > Tool Windows > App Inspection.
You now see a new tab at the bottom labeled App Inspection with the Database Inspector tab selected. There are two additional tabs, but you don’t need to use those. It might take a few seconds to load, but you then see a list on the left with the data tables, which you can select to run queries against.
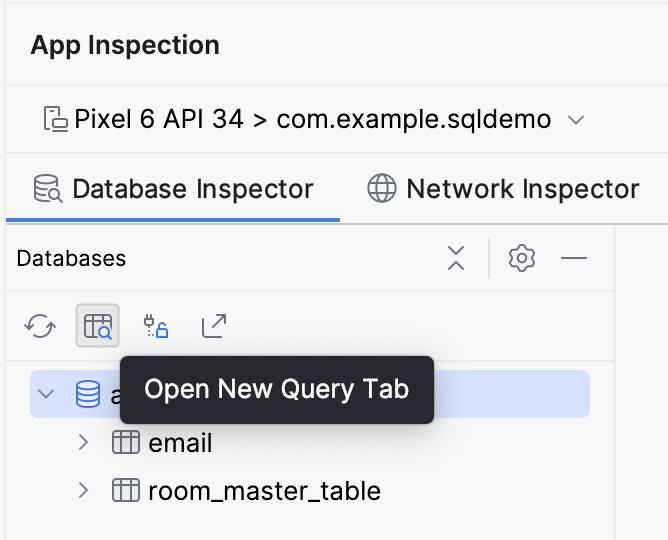
Click the Open New Query Tab button to open a pane to run a query against the database.
The
emailtable has 7 columns:id: The primary key.subject: The subject line of the email.sender: The email address from which the email originated.folder: The folder where the message can be found, such as Inbox or Spam.starred: Whether or not the user starred the email.read: Whether or not the user read the email.received: The timestamp when the email was received.
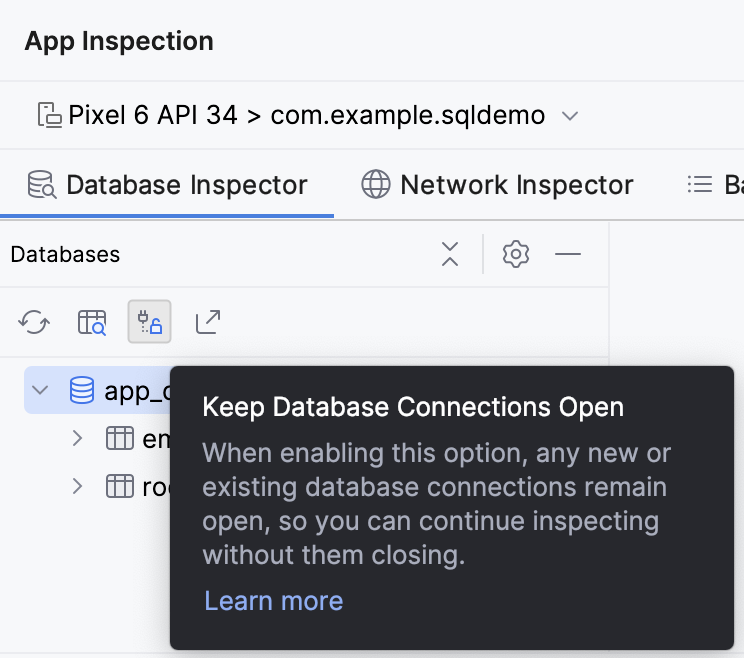
Note
Click Keep Database Connections Open to continue interacting with the database after shutting down the emulator.
Read data with a SELECT statement
SELECT
A SQL statement — sometimes called a query — is used to read or manipulate a database.
You read data from a SQLite database with a
SELECTstatement. A simpleSELECTstatement consists of theSELECTkeyword, followed by the column name, followed by theFROMkeyword, followed by the table name. Every SQL statement ends with a semicolon (;).
A
SELECTstatement can also return data from multiple columns. You must separate column names with a comma.
If you want to select every column from the table, you use the wildcard character (
*) in place of the column names.
In either case, a simple
SELECTstatement like this returns every row in the table. You just need to specify the column names you want it to return.Note
While it is the convention to end every SQL statement with a semicolon (
;), certain editors like the database inspector in Android Studio might let you omit the semicolon. The diagrams in this codelab show a semicolon at the end of each complete SQL query.
Read email data using a SELECT statement
One of the primary things an email app needs to do is display a list of messages. With a SQL database, you can get this information with a
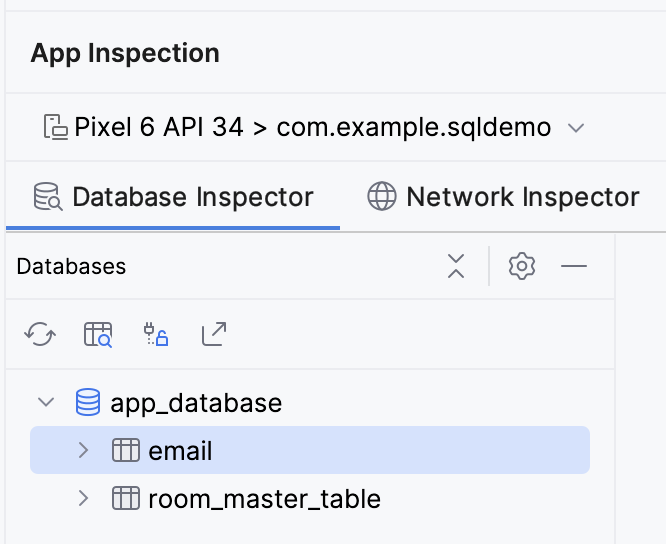
SELECTstatement.Make sure the email table is selected in the Database Inspector.
First, try to select every column from every row in the
emailtable.SELECT * FROM email;
Click the Run button in the bottom right corner of the text box. Observe that the entire
emailtable is returned.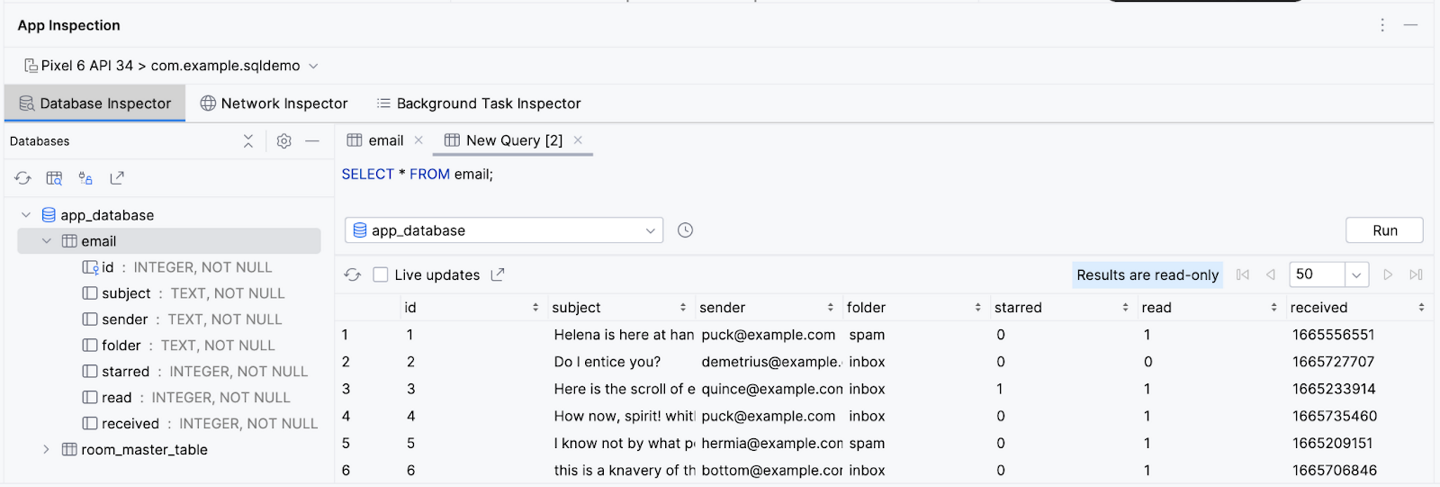
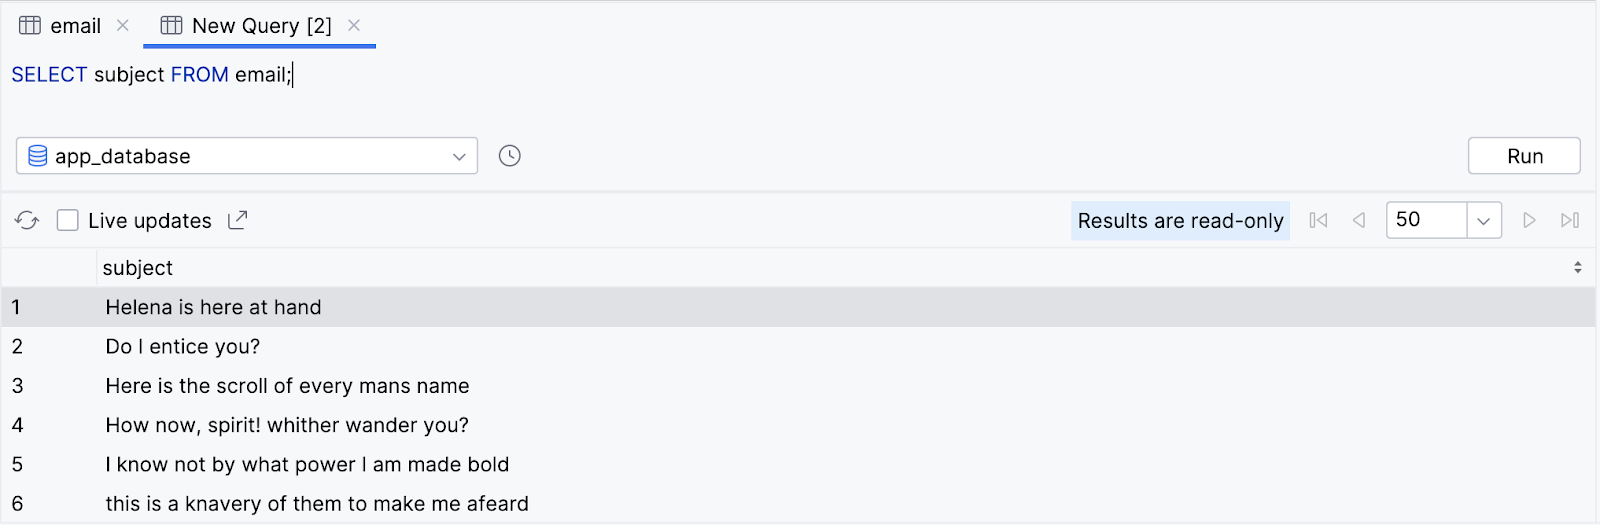
Now, try to select just the subject for every row.
SELECT subject FROM email;
Notice that, once again, the query returns every row but only for that single column.
You can also select multiple columns. Try selecting the subject and the sender.
SELECT subject, sender FROM email;
Observe that the query returns every row in the
emailtable, but only the values of the subject and sender column.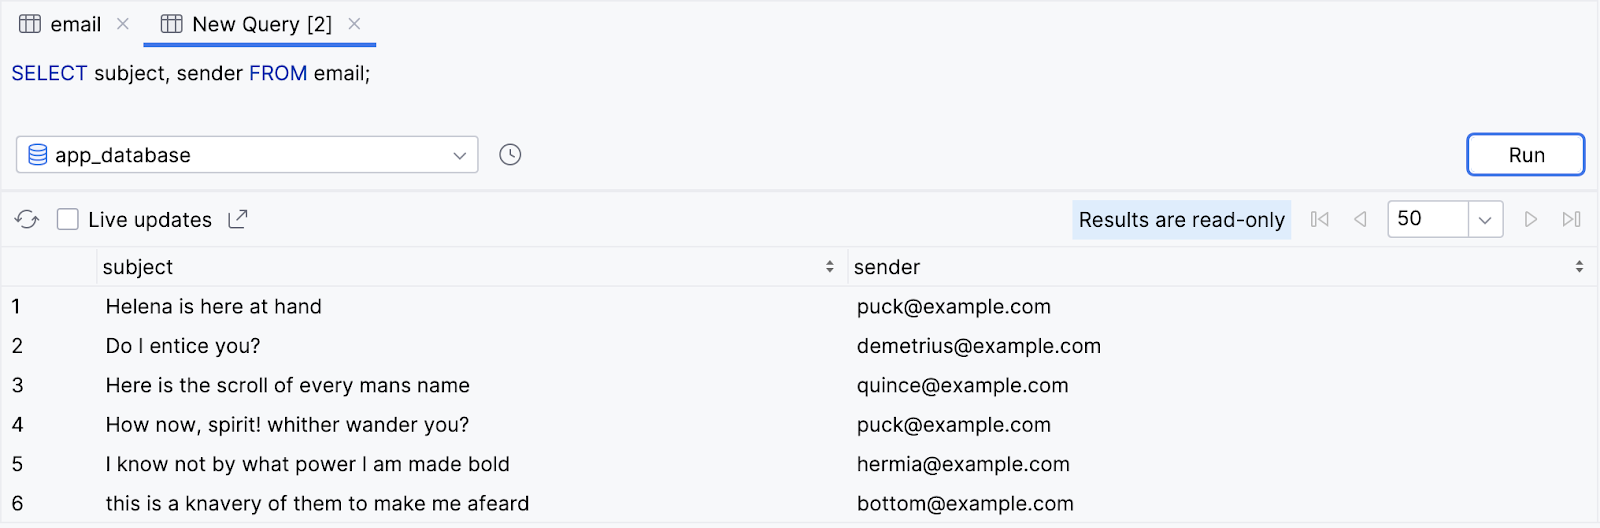
Congratulations! You just executed your first query. Not bad, but consider it just the beginning; the “hello world” of SQL, if you will.
You can be much more specific with
SELECTstatements by adding clauses to specify a subset of the data and even change how the output is formatted. In the following sections, you learn about the commonly used clauses ofSELECTstatements and how to format data.
Use SELECT statements with aggregate functions and distinct values
Reduce columns with aggregate functions
SQL statements aren’t limited to returning rows. SQL offers a variety of functions that can perform an operation or calculation on a specific column, such as finding the maximum value, or counting the number of unique possible values for a particular column. These functions are called aggregate functions. Instead of returning all the data of a specific column, you can return a single value from a specific column.
Examples of SQL aggregate functions include the following:
COUNT(): Returns the total number of rows that match the query.SUM(): Returns the sum of the values for all rows in the selected column.AVG(): Returns the mean value—average—of all the values in the selected column.MIN(): Returns the smallest value in the selected column.MAX(): Returns the largest value in the selected column.
Instead of a column name, you can call an aggregate function and pass in a column name as an argument between the parentheses.

Instead of returning that column’s value for every row in the table, a single value is returned from calling the aggregate function.
Aggregate functions can be an efficient way to perform calculations on a value when you don’t need to read all the data in a database. For example, you might want to find the average of the values in a column without loading your entire database into a List and doing it manually.
Let’s see some of the aggregate functions in action with the
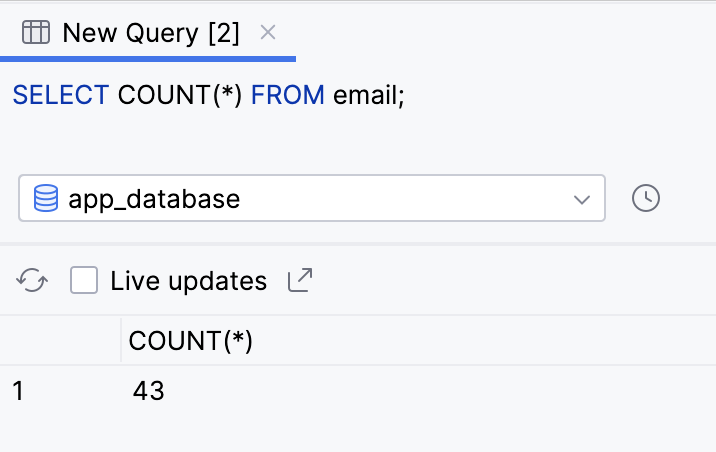
emailtable.An app might want to get the total number of emails received. You can do this by using the
COUNT()function and the wildcard character (*).SELECT COUNT(*) FROM email;
The query returns a single value. You can do this entirely with a SQL query, without any Kotlin code to count the rows manually.
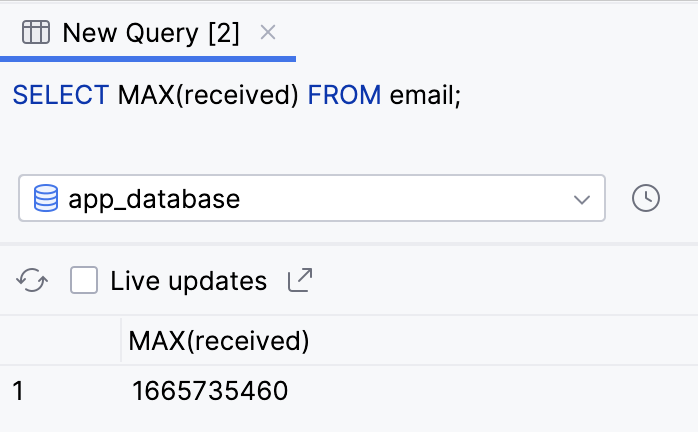
To get the time of the most recent message, you can use the
MAX()function on the received column because the most recent Unix timestamp is the highest number.SELECT MAX(received) FROM email;
The query returns a single result, the highest — most recent — timestamp in the received column.
Filter duplicate results with DISTINCT
When you select a column, you can precede it with the
DISTINCTkeyword. This approach can be useful if you want to remove duplicates from the query result.
As an example, many email apps have an autocomplete feature for addresses. You might want to include all addresses you receive an email from and display them in a list.
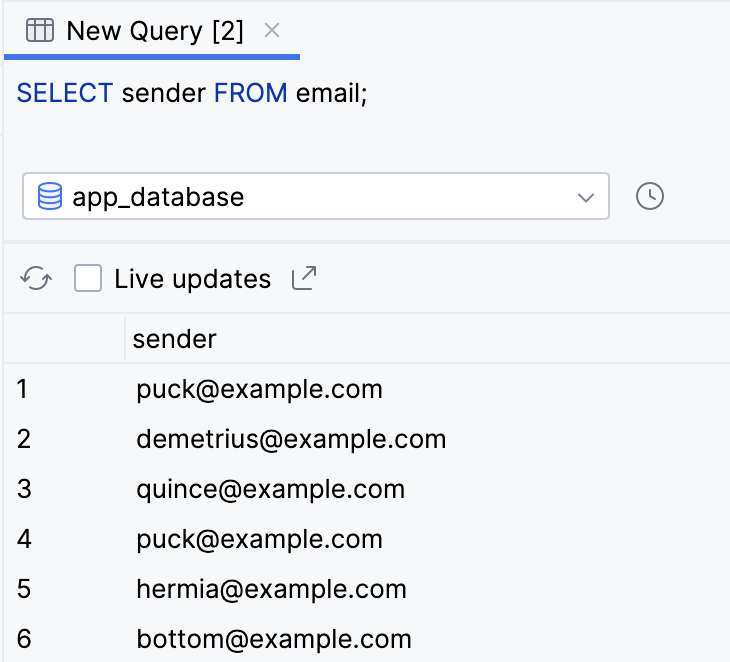
Run the following query to return the sender column for every row.
SELECT sender FROM email;
Observe that the result contains many duplicates. This definitely isn’t an ideal experience!
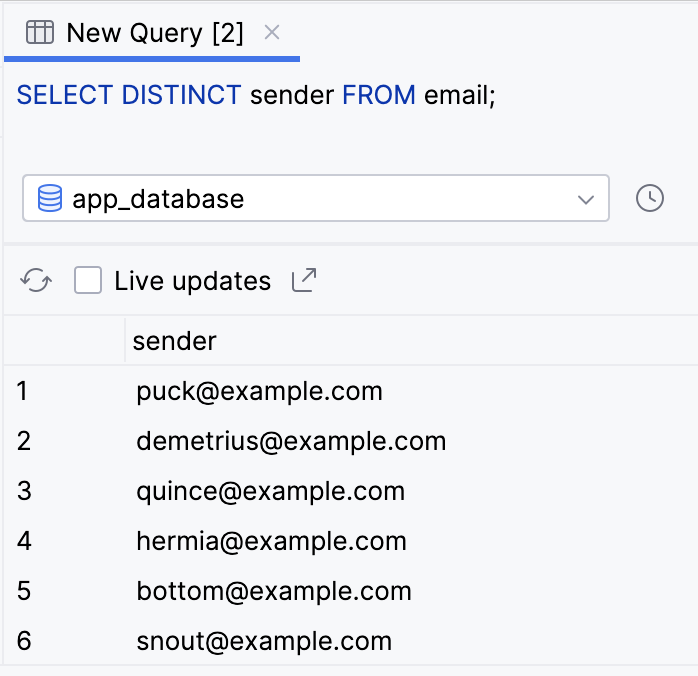
Add the
DISTINCTkeyword before the sender column and rerun the query.SELECT DISTINCT sender FROM email;
Notice that the result is now much smaller and every value is unique.
You can also precede the column name in an aggregate function with the
DISTINCTkeyword.
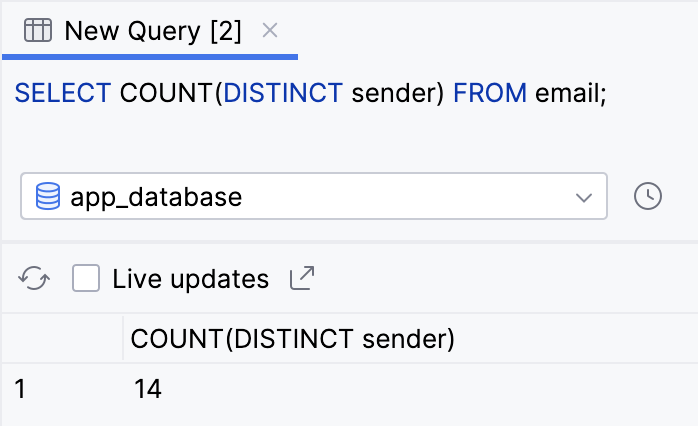
Say you want to know the number of unique senders in the database. You can count the number of unique senders with the
COUNT()aggregate function and with theDISTINCTkeyword on thesendercolumn.Perform a
SELECTstatement, passing inDISTINCT senderto theCOUNT()function.SELECT COUNT(DISTINCT sender) FROM email;
Observe that the query tells us that there are 14 unique senders.
Filter queries with a WHERE clause
Many email apps offer the feature to filter the messages shown based on certain criteria, such as data, search term, folder, sender, etc. For these types of use cases, you can add a
WHEREclause to yourSELECTquery.After the table name, on a new line, you can add the
WHEREkeyword followed by an expression. When writing more complex SQL queries, it’s common to put each clause on a new line for readability.
This query performs a boolean check for each selected row; if the check returns true, it includes the row in the result of the query. Rows for which the query returns false are not included in the result.
For example, an email app might have filters for spam, trash, drafts, or user-created filters. The following instructions do this with a
WHEREclause:Run a
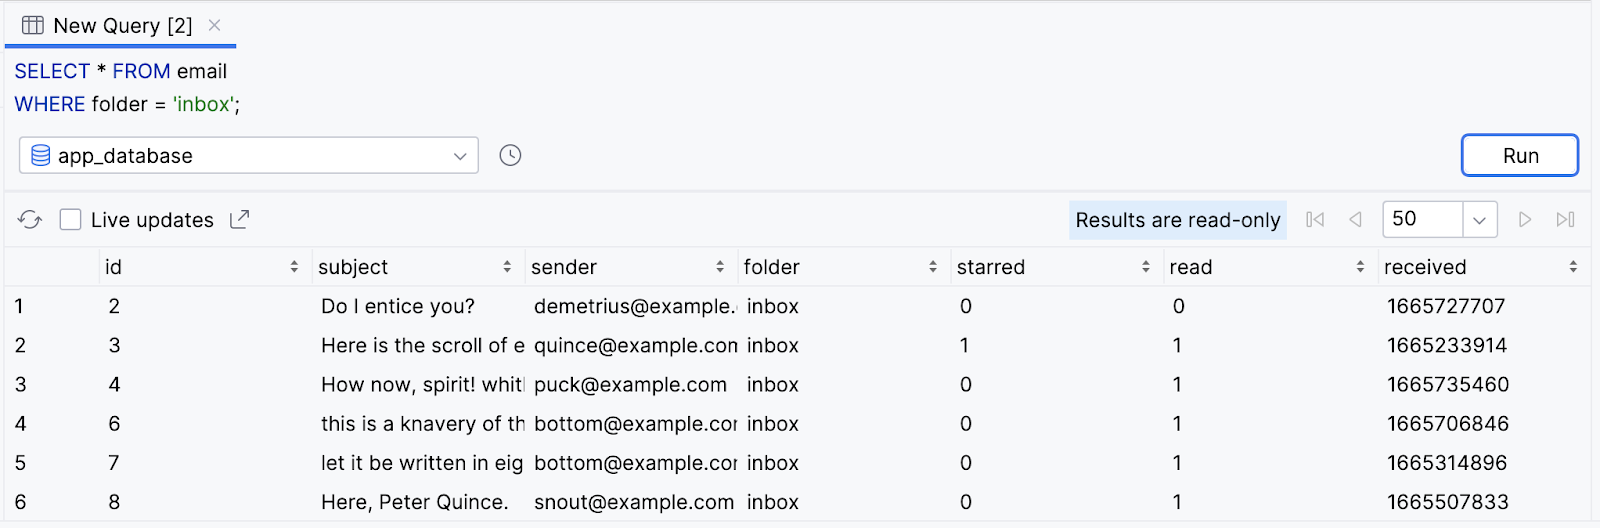
SELECTstatement to return all columns (*) from theemailtable, including aWHEREclause to check the conditionfolder = 'inbox'. No, that’s not a typo: you use a single equals sign to check equality in SQL, and single rather than double quotes to represent a string value.SELECT * FROM email WHERE folder = 'inbox';
The result only returns rows for messages in the user’s inbox.
Note
Pay special attention to the SQL comparison operators!
Unlike in Kotlin, the comparison operator in SQL is a single equal sign (
=), rather than a double equal sign (==).The inequality operator (
!=) is the same as in Kotlin. SQL also provides comparison operators<,<=,>, and>=.
Logical operators with WHERE clauses
SQL
WHEREclauses aren’t limited to a single expression. You can use theANDkeyword, equivalent to the Kotlin and operator (&&), to only include results that satisfy both conditions.
Alternatively, you can use the
ORkeyword, equivalent to the Kotlin or operator (||), to include rows in the results that satisfy either condition.
For readability, you can also negate an expression using the
NOTkeyword.
Many email apps allow multiple filters, for example, only showing unread emails.
Try out the following more complicated
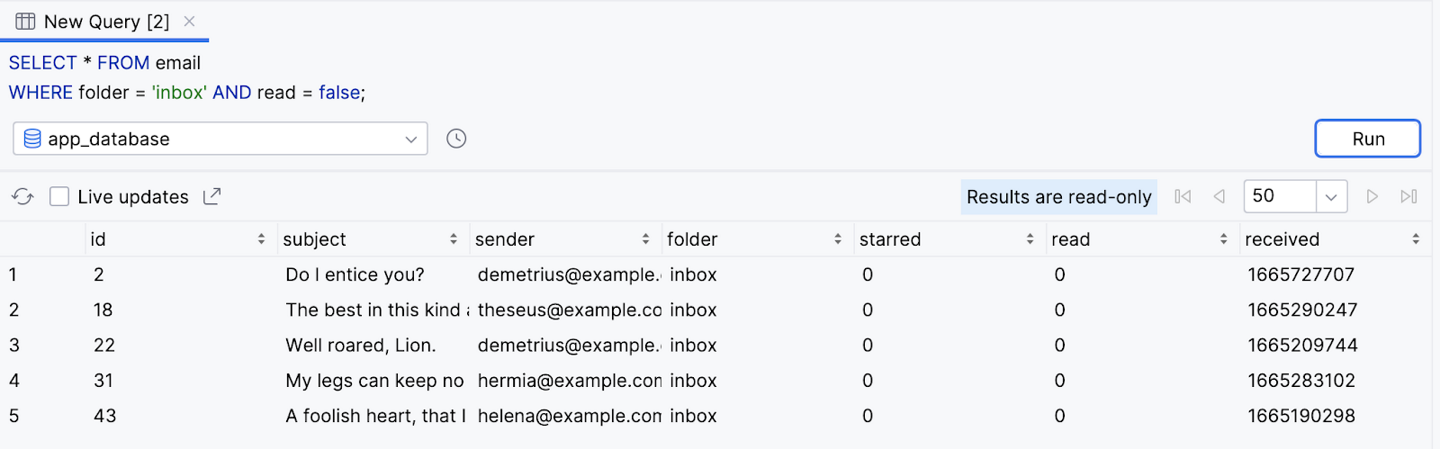
WHEREclauses on theemailtable.In addition to only returning messages in the user’s inbox, try also limiting the results to unread messages — where the value of the read column is false.
SELECT * FROM email
WHERE folder = 'inbox' AND read = false;
Observe that after running the query, the results only contain unread emails in the user’s inbox.
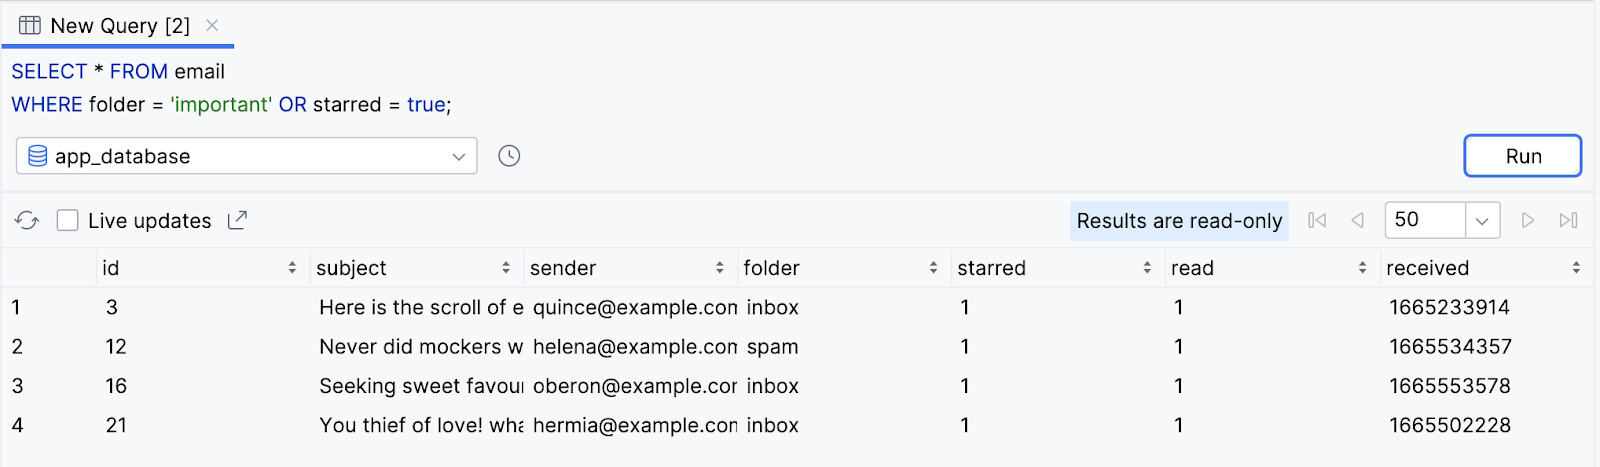
Return all emails that are in the important folder OR are starred (starred = true). This means the result includes emails in different folders as long as they’re starred.
SELECT * FROM email
WHERE folder = 'important' OR starred = true;
Observe the result.
Note
You can also write the SQL condition NOT folder = ‘spam’ as folder != ‘spam’.
Search for text using LIKE
One super useful thing you can do with a
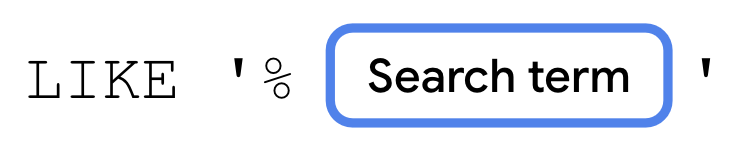
WHEREclause is to search for text in a specific column. You achieve this result when you specify a column name, followed by theLIKEkeyword, followed by a search string.
The search string starts with the percent symbol (
%), followed by the text to search for (Search term), followed by the percent symbol (%) again.
If you’re searching for a prefix — results that begin with the specified text — omit the first percent symbol (
%).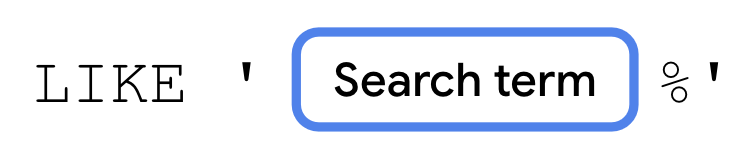
Alternatively, if you’re searching for a suffix, omit the last percent symbol (
%).
There are many use cases where an app can use text search, such as searching for emails that contain particular text in the subject line or updating autocomplete suggestions as the user is typing.
The following instructions let you use text search when querying the
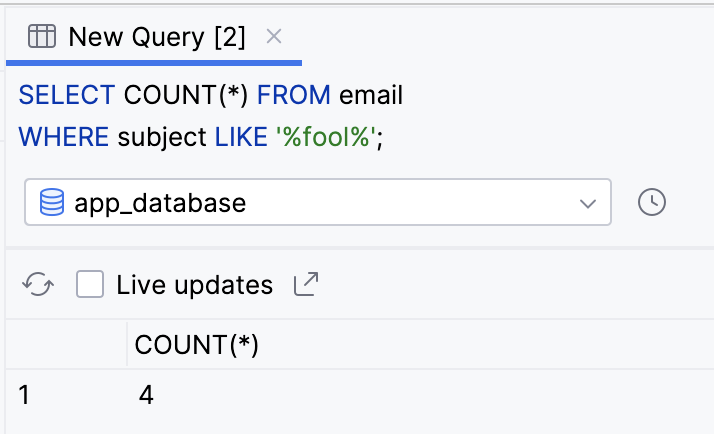
emailtable.Shakespeare characters, like the ones in our database, loved to talk about fools. Run the following query to get the total number of emails with the text “fool” in the subject line.
SELECT COUNT(*) FROM email
WHERE subject LIKE '%fool%';
Observe the result.
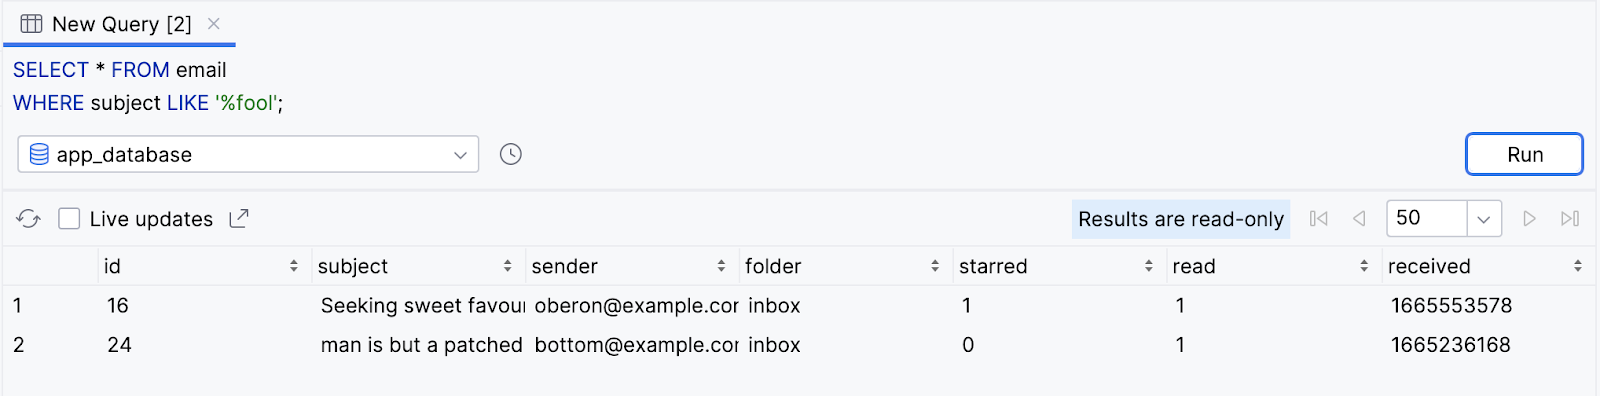
Run the following query to return all columns from all rows where the subject ends with the word fool.
SELECT * FROM email
WHERE subject LIKE '%fool';
Observe that two rows are returned.
Run the following query to return distinct values of the
sendercolumn that begin with the letterh.SELECT DISTINCT sender FROM email WHERE sender LIKE 'h%';
Observe that the query returns three values:
helena@example.com,hyppolytus@example.com, andhermia@example.com.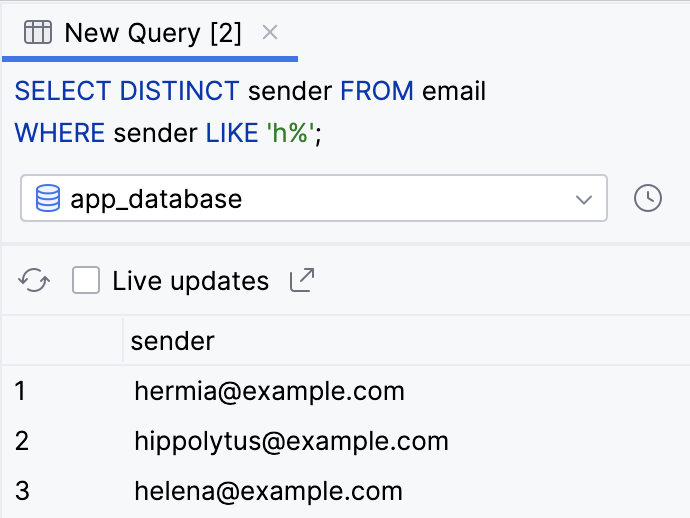
Group, order, and limit results
Group results with GROUP BY
You just saw how to use aggregate functions and the
WHEREclause to filter and reduce results. SQL offers several other clauses that can help you format the results of your query. Among these clauses are grouping, ordering, and limiting results.You can use a
GROUP BYclause to group results so that all rows that have the same value for a given column are grouped next to each other in the results. This clause doesn’t change the results, but only the order in which they’re returned.To add a
GROUP BYclause to aSELECTstatement, add theGROUP BYkeyword followed by the column name you want to group results by.
A common use case is to couple a
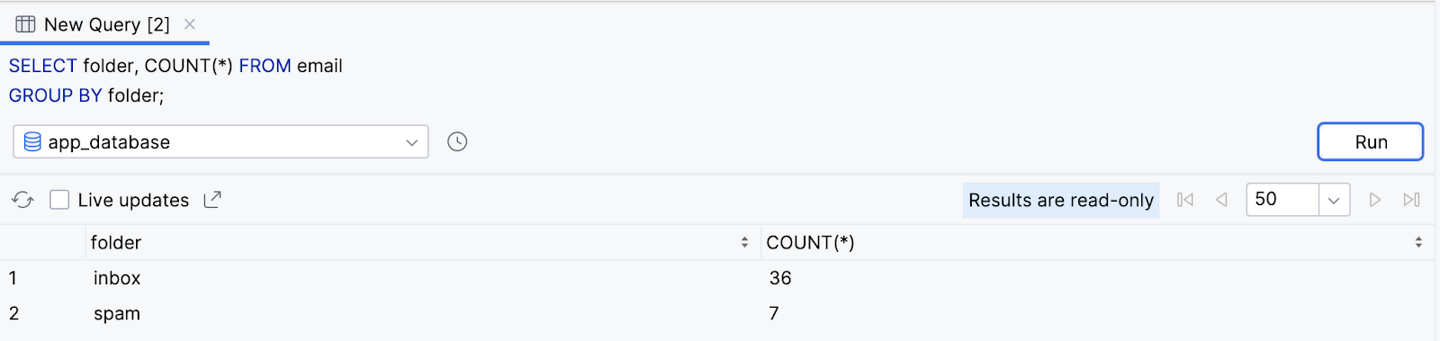
GROUP BYclause with an aggregate function is to partition the result of an aggregate function across different buckets, such as values of a column. Here’s an example. Pretend you want to get the number of emails in each folder:'inbox','spam', etc. You can select both thefoldercolumn and theCOUNT()aggregate function, and specify thefoldercolumn in theGROUP BYclause.Perform the following query to select the folder column, and the result of
COUNT()aggregate function. Use aGROUP BYclause to bucket the results by the value in thefoldercolumn.SELECT folder, COUNT(*) FROM email GROUP BY folder;
Observe the results. The query returns the total number of emails for each folder.
Note
You can specify multiple columns, separated by a comma in the
GROUP BYclause, if you want to further separate each group into additional subgroups based on a different column.
Sort results with ORDER BY
You can also change the order of query results when you sort them with the
ORDER BYclause. Add theORDER BYkeyword, followed by a column name, followed by the sort direction.
By default, the sort direction is ascending order, which you can omit from the
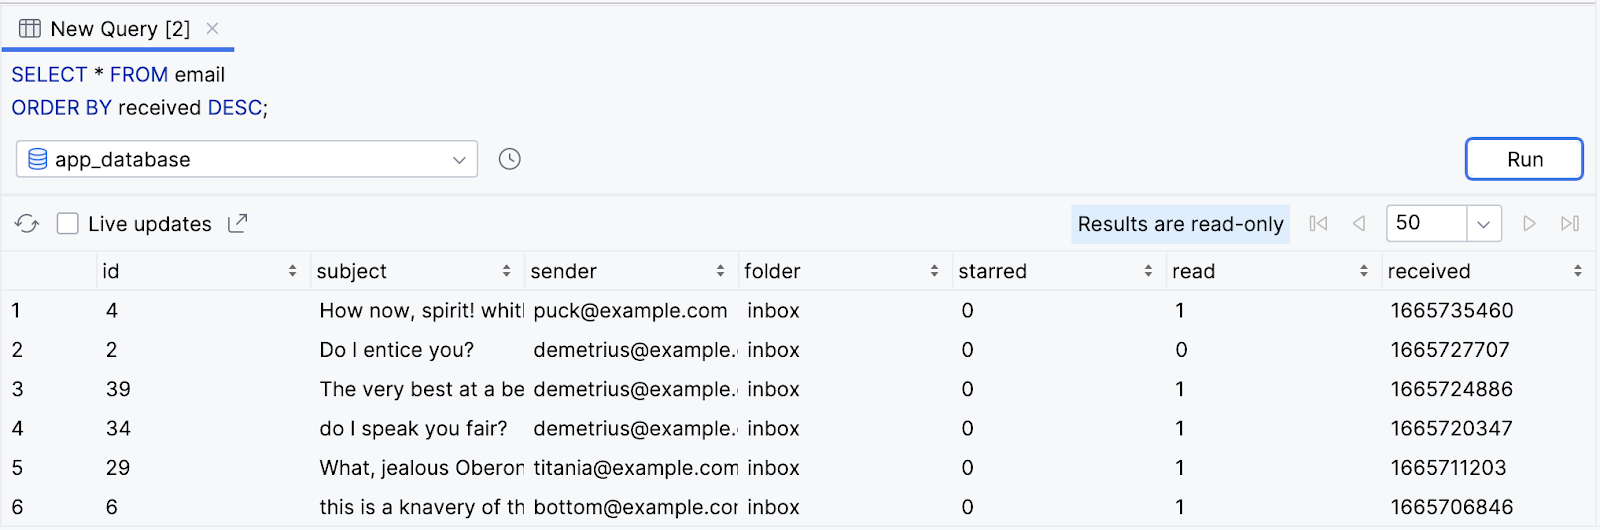
ORDER BYclause. If you want the results sorted in descending order, addDESCafter the column name.Chances are you expect an email app to show the most recent emails first. The following instructions let you do this with an
ORDER BYclause.Add an
ORDER BYclause to sort unread emails, based on thereceivedcolumn. Because ascending order—lowest or the oldest first—is the default, you need to use theDESCkeyword.SELECT * FROM email ORDER BY received DESC;
Observe the result.
You can use an
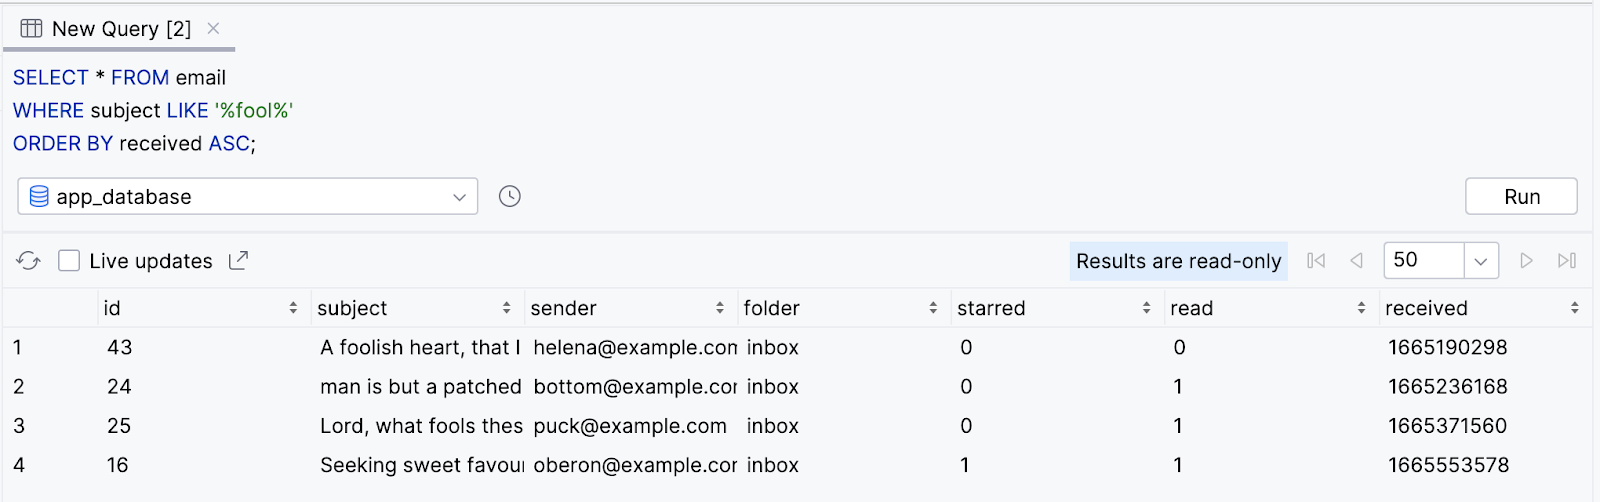
ORDER BYclause with aWHEREclause. Say a user wants to search for old emails containing the text “fool”. They can sort the results to show the oldest emails first, in ascending order.Select all emails where the subject contains the text “fool” and sort the results in ascending order. Because the order is ascending, which is the default order when none is specified, using the
ASCkeyword with theORDER BYclause is optional.SELECT * FROM email WHERE subject LIKE '%fool%' ORDER BY received ASC;
Observe that the filtered results are returned with the oldest shown first.
Note
If both are used in the same query, the
GROUP BYclause comes before theORDER BYclause.
Restrict the number of results with LIMIT
So far, all the examples return every single result from the database that matches the query. In many cases, you only need to display a limited number of rows from your database. You can add a
LIMITclause to your query to only return a specific number of results. Add theLIMITkeyword followed by the maximum number of rows you want to return. If applicable, theLIMITclause comes after theORDER BYclause.
Optionally, you can include the
OFFSETkeyword followed by another number for the number of rows to “skip”. For example, if you want the next ten results, after the first ten, but don’t want to return all twenty results, you can useLIMIT 10 OFFSET 10.
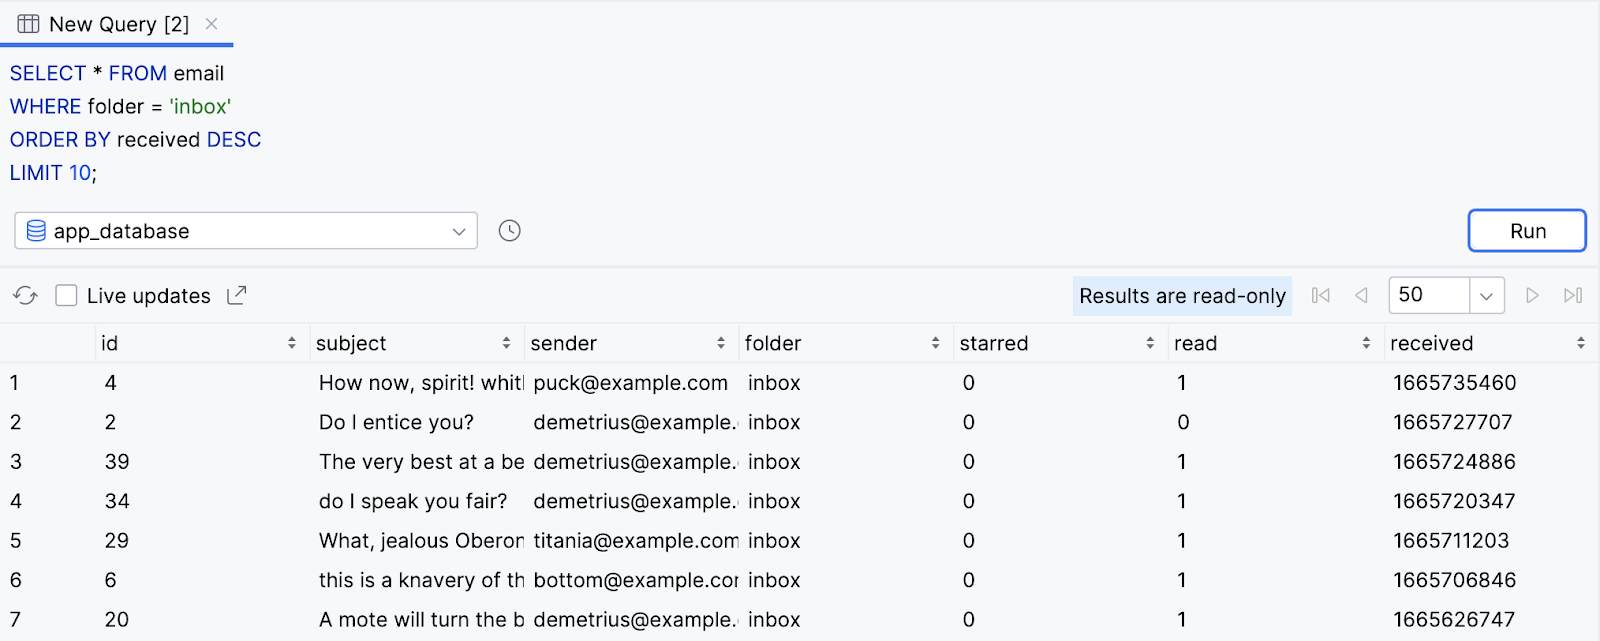
In an app, you might want to load emails more quickly by only returning the first ten emails in the user’s inbox. Users can then scroll to view subsequent pages of emails. The following instructions use a
LIMITclause to achieve this behavior.Perform the following
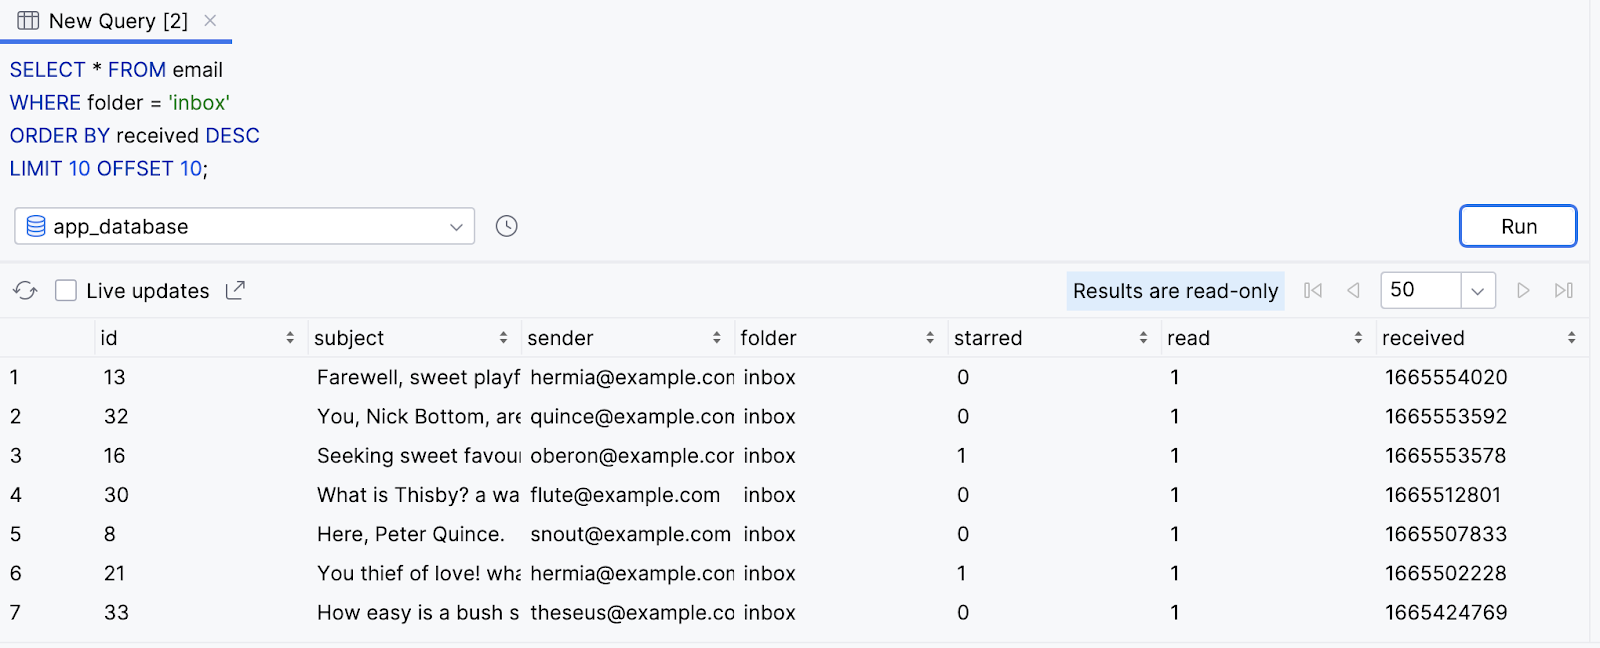
SELECTstatement to get all emails in the user’s inbox in descending order and limited to the first ten results.SELECT * FROM email WHERE folder = 'inbox' ORDER BY received DESC LIMIT 10;
Observe that only ten results are returned.
Modify and re-run the query to include the
OFFSETkeyword with a value of10.SELECT * FROM email WHERE folder = 'inbox' ORDER BY received DESC LIMIT 10 OFFSET 10;
The query returns ten results in decreasing order. However, the query skips the first set of ten results.
Insert, update, and delete data in a database
Insert data into a database
In addition to reading from a database, there are different SQL statements for writing to a database. The data needs a way to get in there in the first place, right?
You can add a new row to a database with an
INSERTstatement. AnINSERTstatement starts withINSERT INTOfollowed by the table name in which you want to insert a new row. TheVALUESkeyword appears on a new line followed by a set of parentheses that contain a comma separated list of values. You need to list the values in the same order of the database columns.
Pretend the user receives a new email, and we need to store it in our app’s database. We can use an
INSERTstatement to add a new row to theemailtable.Perform an
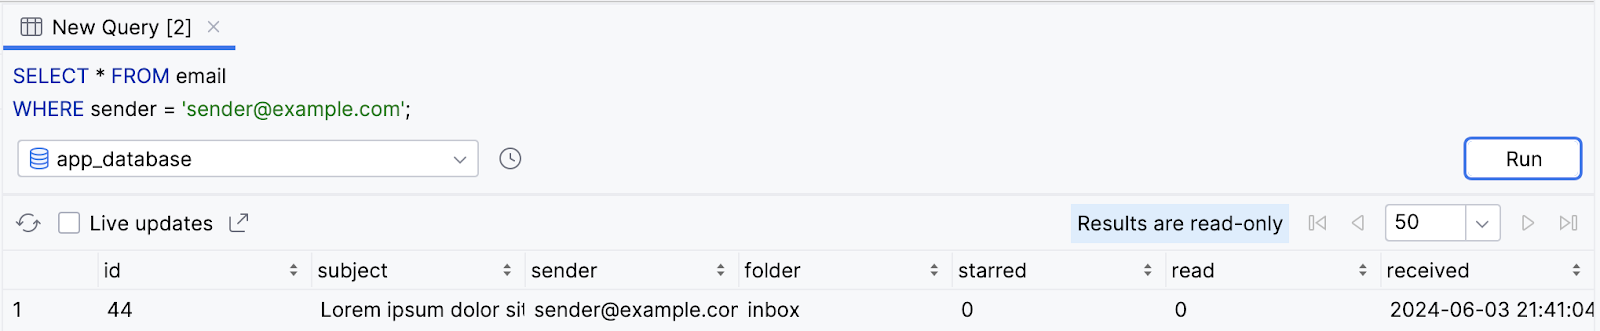
INSERTstatement with the following data for a new email. Because the email is new, it is unread and initially appears in the inboxfolder. A value ofNULLis provided for theidcolumn, which meansidwill be automatically generated with the next available autoincremented integer.INSERT INTO email VALUES ( NULL, 'Lorem ipsum dolor sit amet', 'sender@example.com', 'inbox', false, false, CURRENT_TIMESTAMP );
Note
CURRENT_TIMESTAMPis a special variable that is replaced with the current time in UTC when the query runs, which is convenient for when you insert new rows!Observe that the result is inserted into the database with an
idof44.SELECT * FROM email WHERE sender = 'sender@example.com';
Update existing data in a database
After you’ve inserted data into a table, you can still change it later. You can update the value of one or more columns using an
UPDATEstatement. AnUPDATEstatement starts with theUPDATEkeyword, followed by the table name, followed by aSETclause.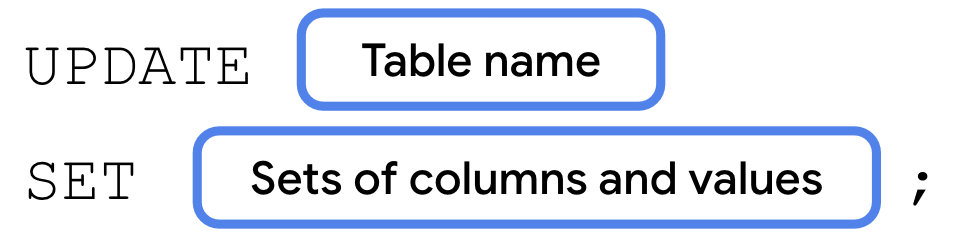
A
SETclause consists of theSETkeyword, followed by the name of the column you want to update.
An
UPDATEstatement often includes aWHEREclause to specify the single row or multiple rows that you want to update with the specified column-value pair.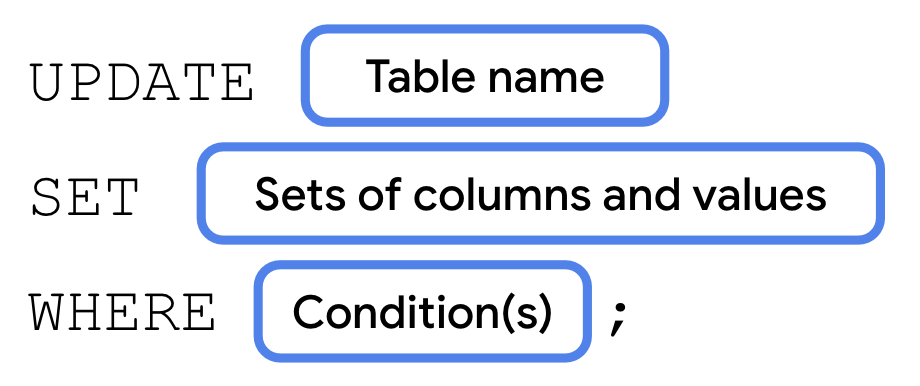
If the user wants to mark an email as read, for example, you use an
UPDATEstatement to update the database. The following instructions let you mark the email inserted in the previous step as read.Perform the following
UPDATEstatement to set the row with anidof44so that the value of the read column istrue.UPDATE email SET read = true WHERE id = 44;
Run a
SELECTstatement for that specific row to validate the result.SELECT read FROM email WHERE id = 44;
Observe that the value of the
readcolumn is now1for atruevalue as opposed to0forfalse.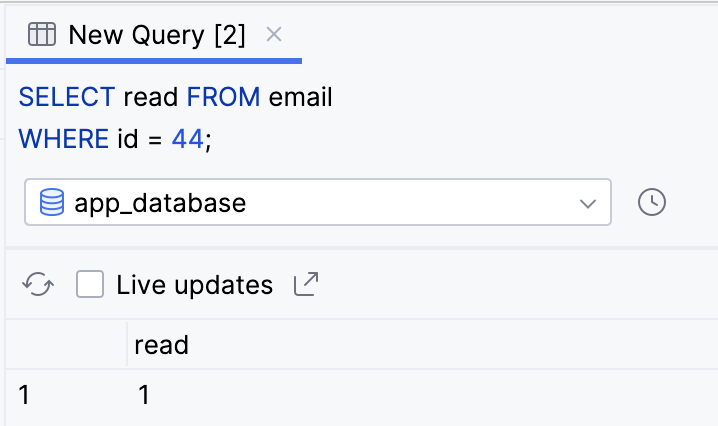
Delete a row from a database
Finally, you can use a
SQL DELETEstatement to delete one or more rows from a table. ADELETEstatement starts with theDELETEkeyword, followed by theFROMkeyword, followed by the table name, followed by aWHEREclause to specify which row or rows you want to delete.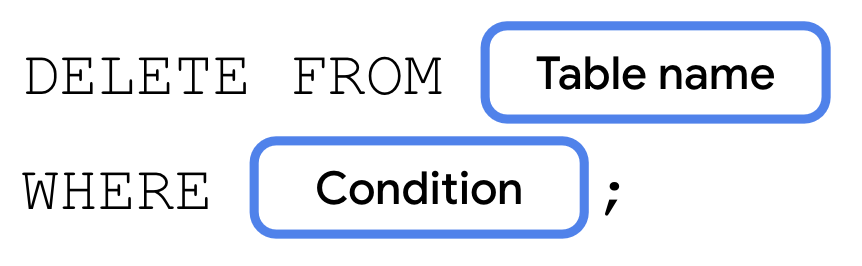
The following instructions use a
DELETEstatement to delete the previously inserted and subsequently updated row from the database.Perform the following
DELETEstatement to delete the row with anidof44from the database.DELETE FROM email WHERE id = 44;
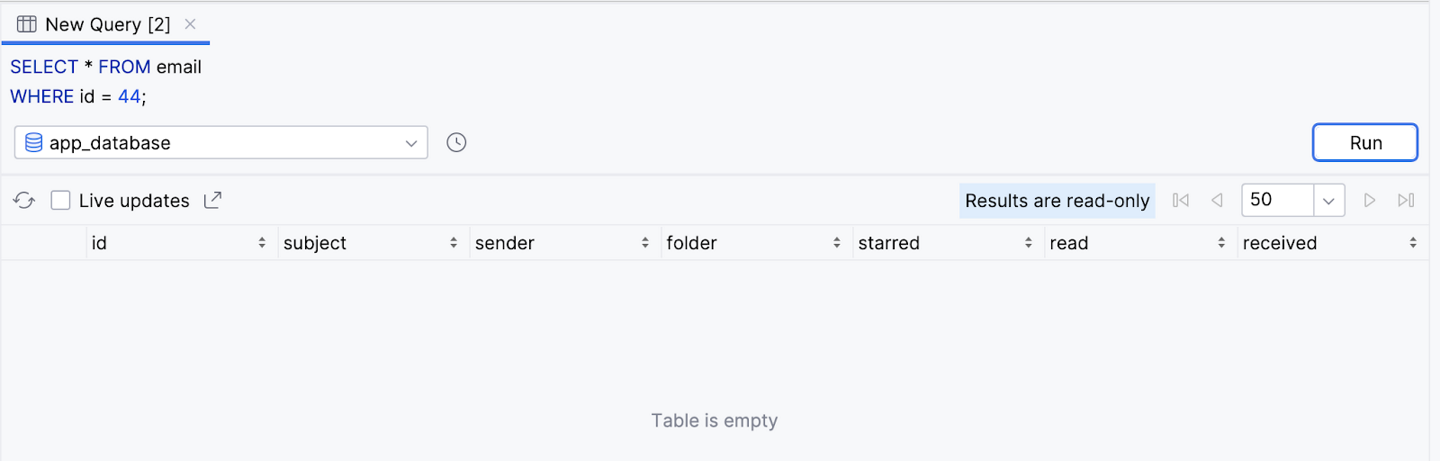
Validate your changes using a
SELECTstatement.SELECT * FROM email WHERE id = 44;
Observe that a row with an id of 44 no longer exists.
Flows
Kotlin flows on Android
In coroutines, a flow is a type that can emit multiple values sequentially, as opposed to suspend functions that return only a single value. For example, you can use a flow to receive live updates from a database.
Flows are built on top of coroutines and can provide multiple values. A flow is conceptually a stream of data that can be computed asynchronously. The emitted values must be of the same type. For example, a
Flow<Int>is a flow that emits integer values.A flow produces a sequence of values, but it uses suspend functions to produce and consume values asynchronously. This means, for example, that the flow can safely make a network request to produce the next value without blocking the main thread.
There are three entities involved in streams of data:
A producer produces data that is added to the stream. Thanks to coroutines, flows can also produce data asynchronously.
(Optional) Intermediaries can modify each value emitted into the stream or the stream itself.
A consumer consumes the values from the stream.
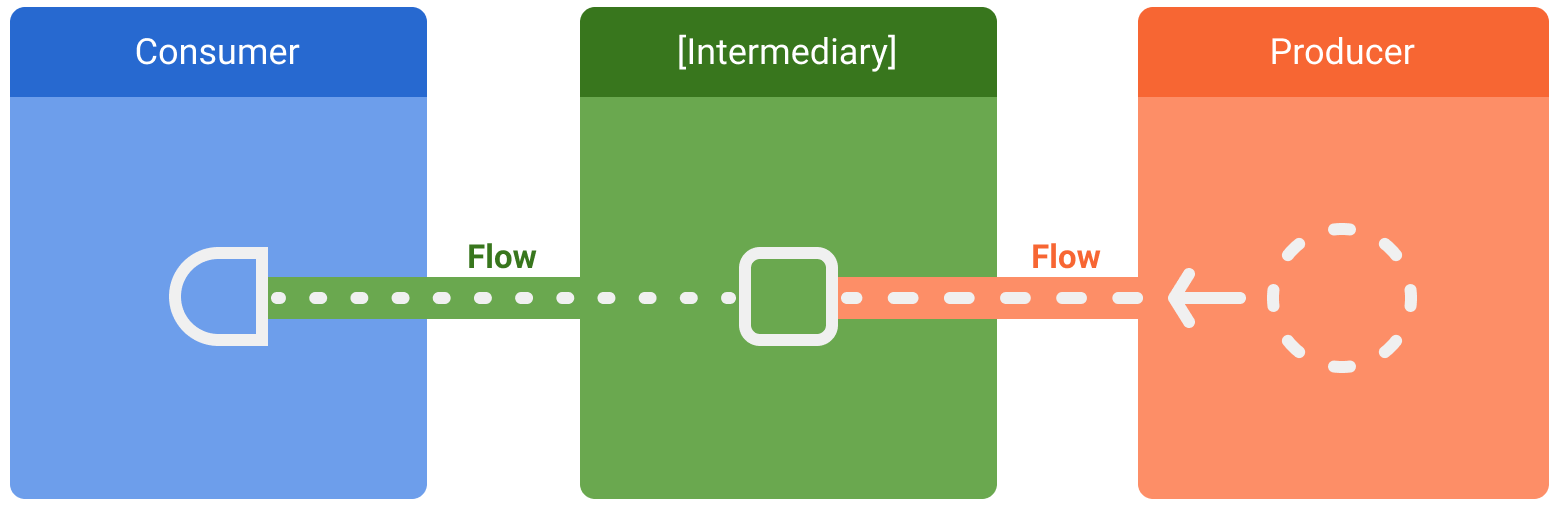
Entities involved in streams of data: consumer, optional intermediaries, and producer
In Android, a repository is typically a producer of UI data that has the user interface (UI) as the consumer that ultimately displays the data. Other times, the UI layer is a producer of user input events and other layers of the hierarchy consume them. Layers in between the producer and consumer usually act as intermediaries that modify the stream of data to adjust it to the requirements of the following layer.
Creating a flow
To create flows, use the flow builder APIs. The flow builder function creates a new flow where you can manually emit new values into the stream of data using the emit function.
In the following example, a data source fetches the latest news automatically at a fixed interval. As a suspend function cannot return multiple consecutive values, the data source creates and returns a flow to fulfill this requirement. In this case, the data source acts as the producer.
class NewsRemoteDataSource(
    private val newsApi: NewsApi,
    private val refreshIntervalMs: Long = 5000
) {
    val latestNews: Flow<List<ArticleHeadline>> = flow {
        while(true) {
            val latestNews = newsApi.fetchLatestNews()
            emit(latestNews) // Emits the result of the request to the flow
            delay(refreshIntervalMs) // Suspends the coroutine for some time
        }
    }
}

// Interface that provides a way to make network requests with suspend functions
interface NewsApi {
    suspend fun fetchLatestNews(): List<ArticleHeadline>
}
The
flowbuilder is executed within a coroutine. Thus, it benefits from the same asynchronous APIs, but some restrictions apply:Flows are sequential. As the producer is in a coroutine, when calling a suspend function, the producer suspends until the suspend function returns. In the example, the producer suspends until the
fetchLatestNewsnetwork request completes. Only then is the result emitted to the stream.With the
flowbuilder, the producer cannotemitvalues from a differentCoroutineContext. Therefore, don’t call emit in a differentCoroutineContextby creating new coroutines or by usingwithContextblocks of code. You can use other flow builders such as callbackFlow in these cases.
Modifying the stream
Intermediaries can use intermediate operators to modify the stream of data without consuming the values. These operators are functions that, when applied to a stream of data, set up a chain of operations that aren’t executed until the values are consumed in the future. Learn more about intermediate operators in the Flow reference documentation.
In the example below, the repository layer uses the intermediate operator
mapto transform the data to be displayed on theView:class NewsRepository( private val newsRemoteDataSource: NewsRemoteDataSource, private val userData: UserData ) { /** * Returns the favorite latest news applying transformations on the flow. * These operations are lazy and don't trigger the flow. They just transform * the current value emitted by the flow at that point in time. */ val favoriteLatestNews: Flow<List<ArticleHeadline>> = newsRemoteDataSource.latestNews // Intermediate operation to filter the list of favorite topics .map { news -> news.filter { userData.isFavoriteTopic(it) } } // Intermediate operation to save the latest news in the cache .onEach { news -> saveInCache(news) } }
Intermediate operators can be applied one after the other, forming a chain of operations that are executed lazily when an item is emitted into the flow. Note that simply applying an intermediate operator to a stream does not start the flow collection.
Collecting from a flow
Use a terminal operator to trigger the flow to start listening for values. To get all the values in the stream as they’re emitted, use
collect.As
collectis a suspend function, it needs to be executed within a coroutine. It takes a lambda as a parameter that is called on every new value. Since it’s a suspend function, the coroutine that calls collect may suspend until the flow is closed.Continuing the previous example, here’s a simple implementation of a
ViewModelconsuming the data from the repository layer:class LatestNewsViewModel( private val newsRepository: NewsRepository ) : ViewModel() { init { viewModelScope.launch { // Trigger the flow and consume its elements using collect newsRepository.favoriteLatestNews.collect { favoriteNews -> // Update View with the latest favorite news } } } }
Collecting the flow triggers the producer that refreshes the latest news and emits the result of the network request on a fixed interval. As the producer remains always active with the
while(true)loop, the stream of data will be closed when the ViewModel is cleared andviewModelScopeis cancelled.Flow collection can stop for the following reasons:
The coroutine that collects is cancelled, as shown in the previous example. This also stops the underlying producer.
The producer finishes emitting items. In this case, the stream of data is closed and the coroutine that called
collectresumes execution.
Flows are cold and lazy unless specified with other intermediate operators. This means that the producer code is executed each time a terminal operator is called on the flow. In the previous example, having multiple flow collectors causes the data source to fetch the latest news multiple times on different fixed intervals. To optimize and share a flow when multiple consumers collect at the same time, use the
shareInoperator.
Unit 6 Pathway 2 Activity 3: Using Room Kotlin APIs
Persist Data with Room
Most production-quality apps have data that the app needs to persist. For example, the app might store a playlist of songs, items on a to-do list, records of expenses and income, a catalog of constellations, or a history of personal data. For such use cases, you use a database to store this persistent data.
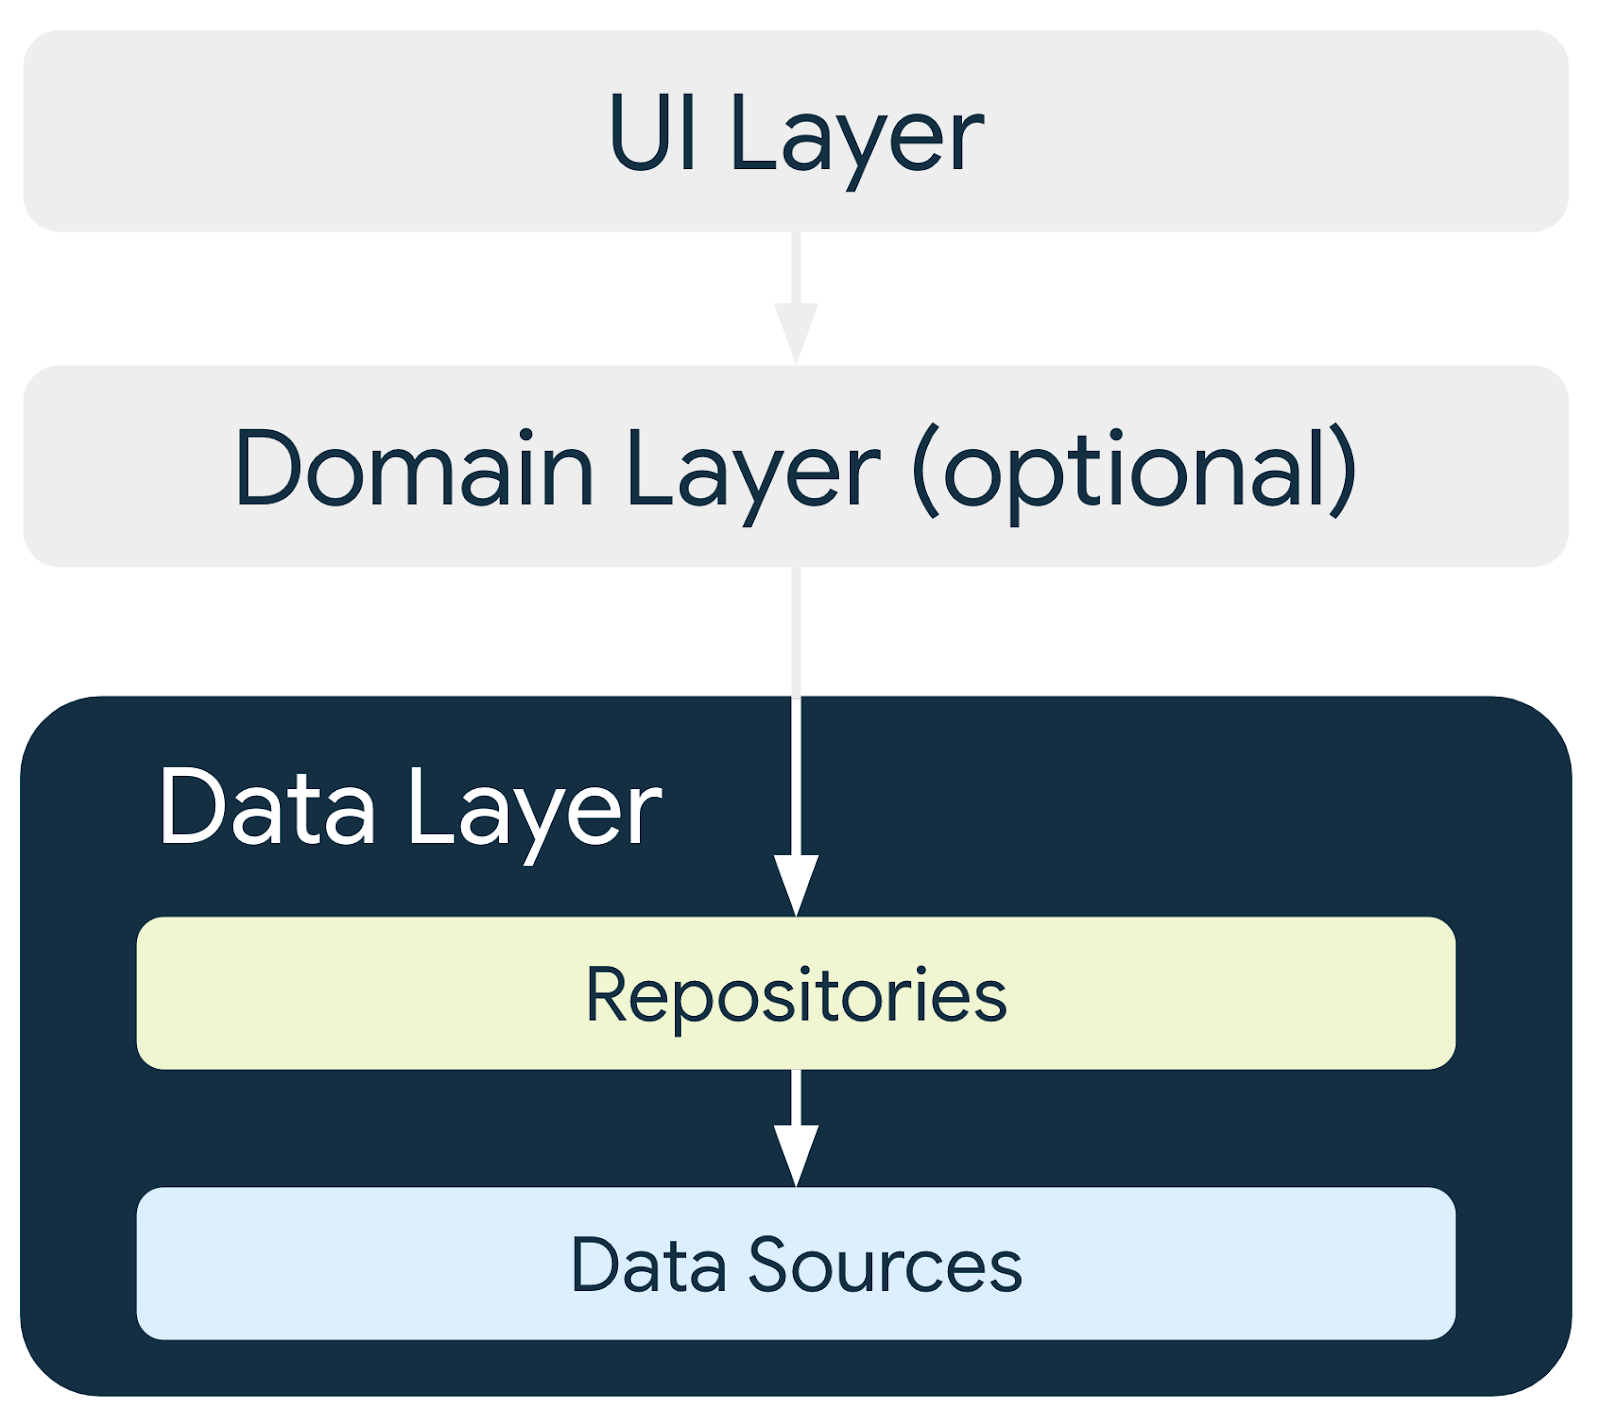
Room is a persistence library that’s part of Android Jetpack. Room is an abstraction layer on top of a SQLite database. SQLite uses a specialized language (SQL) to perform database operations. Instead of using SQLite directly, Room simplifies the chores of database setup, configuration, and interactions with the app. Room also provides compile-time checks of SQLite statements.
An abstraction layer is a set of functions that hide the underlying implementation/complexity. It provides an interface to an existing set of functionality, like SQLite in this case.
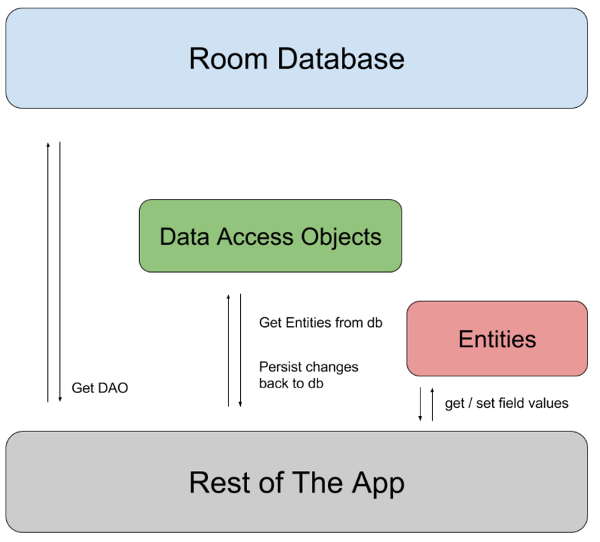
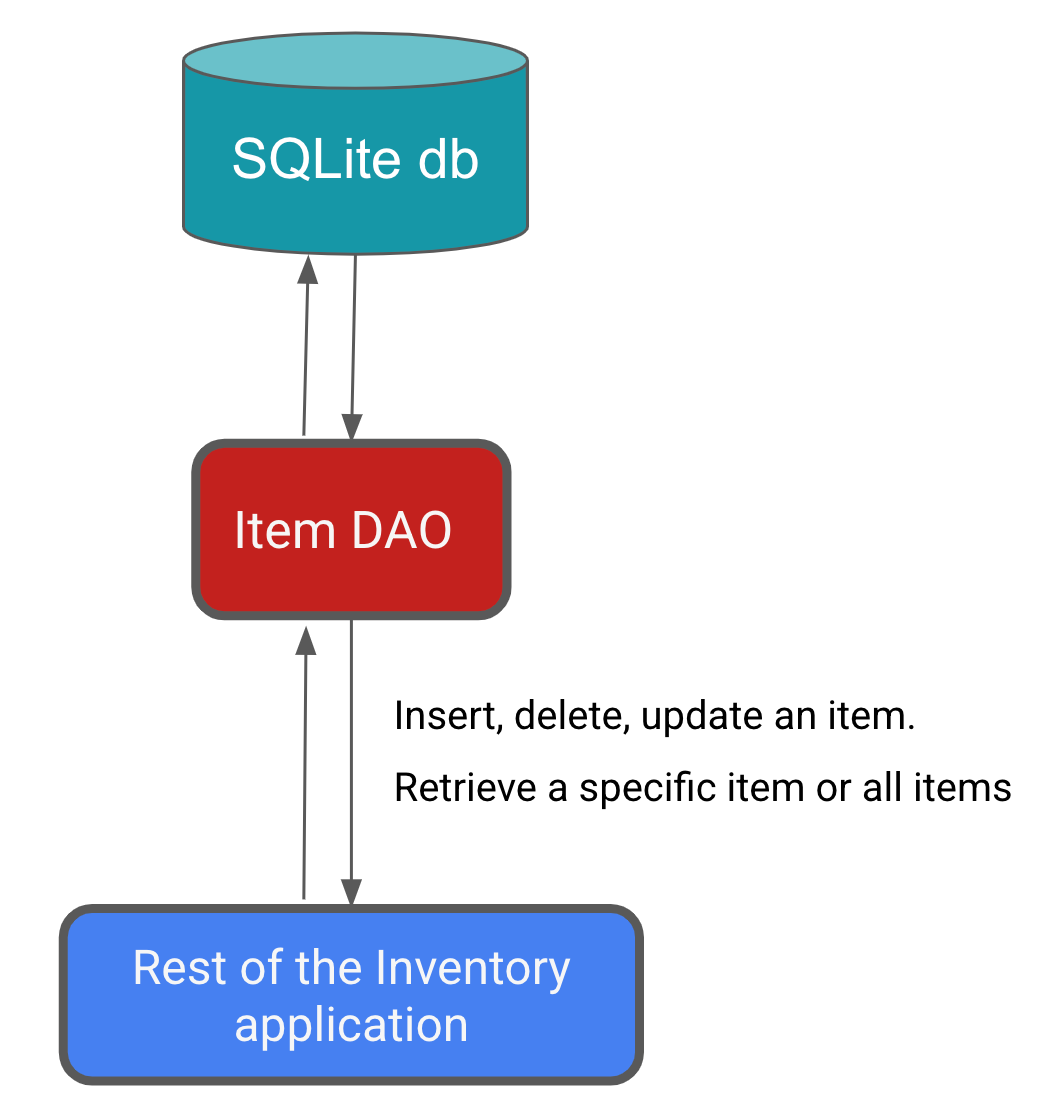
The image below shows how Room, as a data source, fits in with the overall architecture recommended in this course. Room is a Data Source.
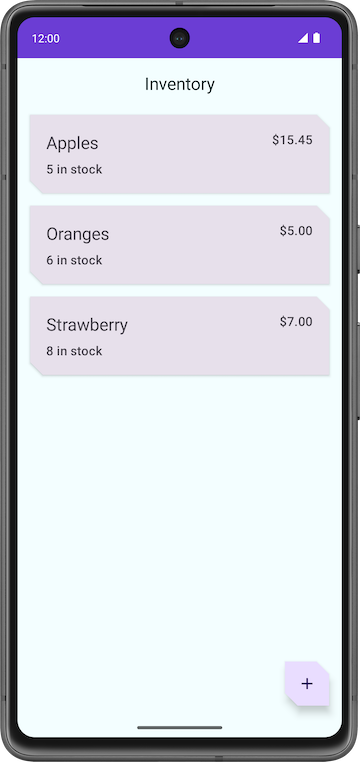
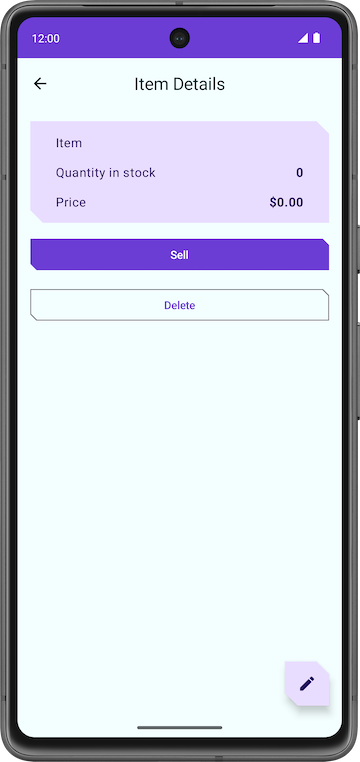
Inventory app overview
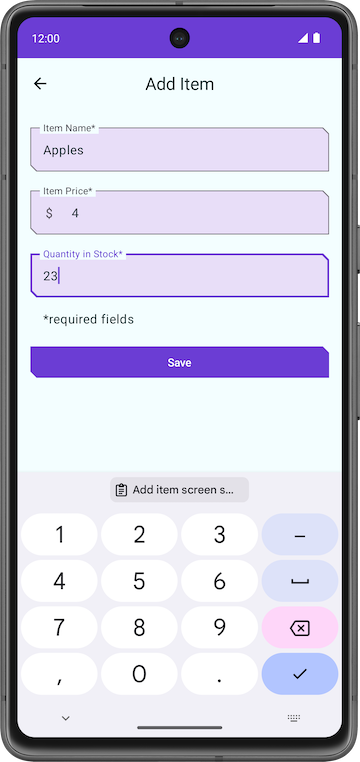
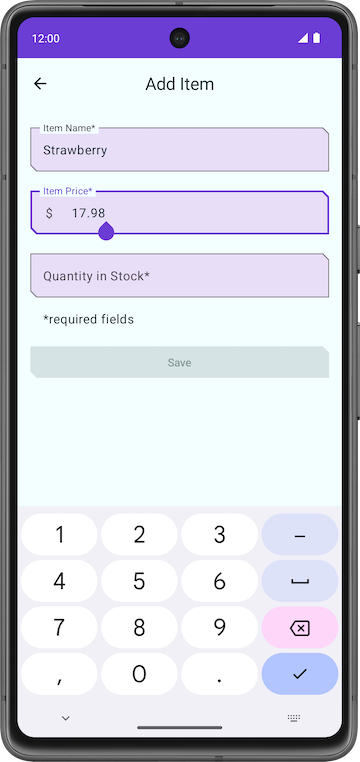
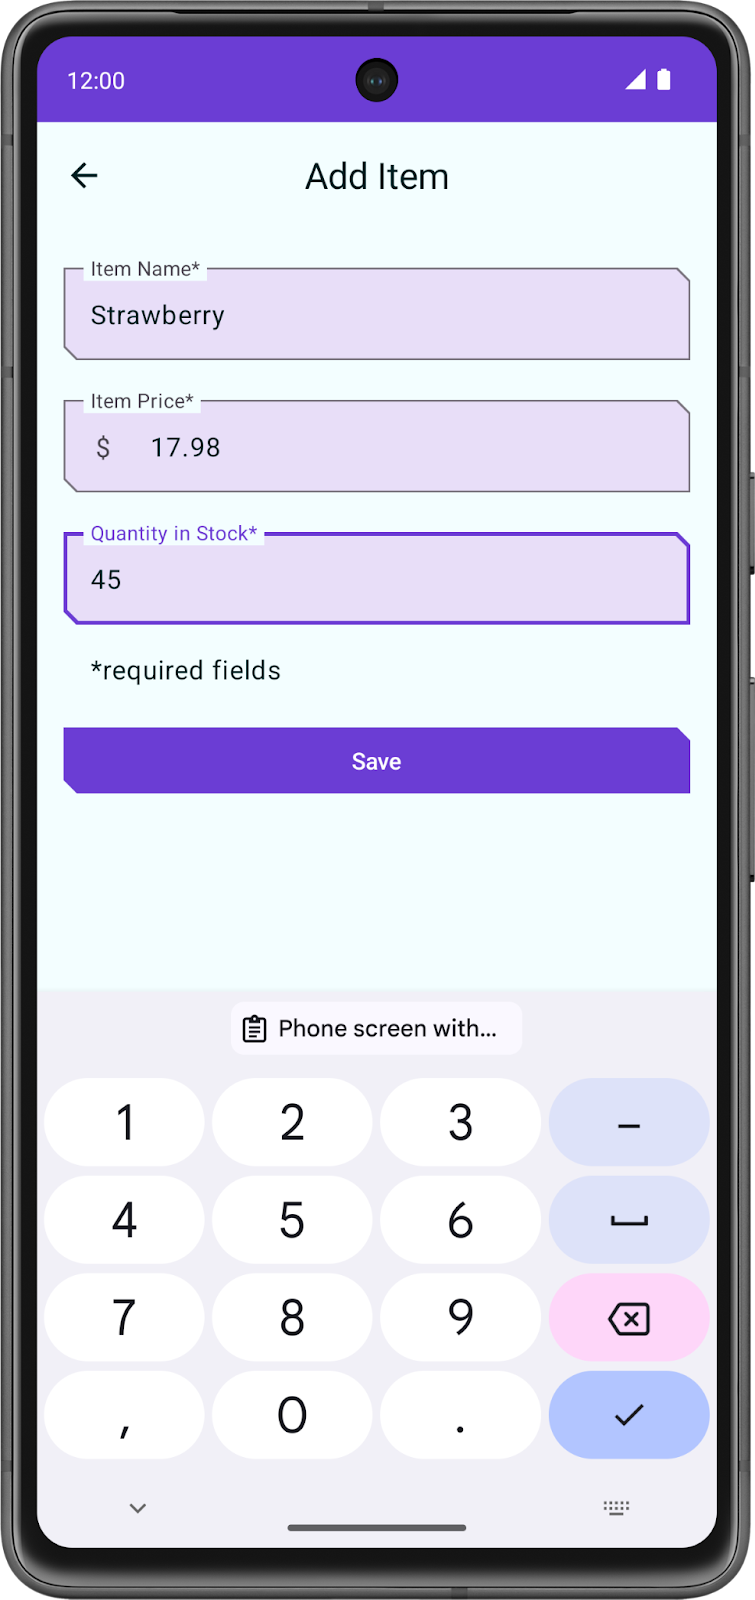
In this codelab, you work with a starter code of the Inventory app and add the database layer to it using the Room library. The final version of the app displays a list of items from the inventory database. The user has options to add a new item, update an existing item, and delete an item from the inventory database. For this codelab, you save the item data to the Room database. You complete the rest of the app’s functionality in the next codelab.

Note
The above screenshots are from the final version of the app at the end of the pathway, not the end of this codelab. These screenshots give you an idea of the final version of the app.
Starter code: Inventory app
Branch: starter
Clone:
$ git clone https://github.com/google-developer-training/basic-android-kotlin-compose-training-inventory-app.git
$ cd basic-android-kotlin-compose-training-inventory-app
$ git checkout starter
Starter code overview
Open the project with the starter code in Android Studio.
Run the app on an Android device or an emulator. Make sure the emulator or connected device runs with an API level 26 or higher. Database Inspector works on emulators/devices that run API level 26 and higher.
Note
The Database Inspector lets you inspect, query, and modify your app’s databases while your app runs. The Database Inspector works with plain SQLite or with libraries built on top of SQLite, such as Room.
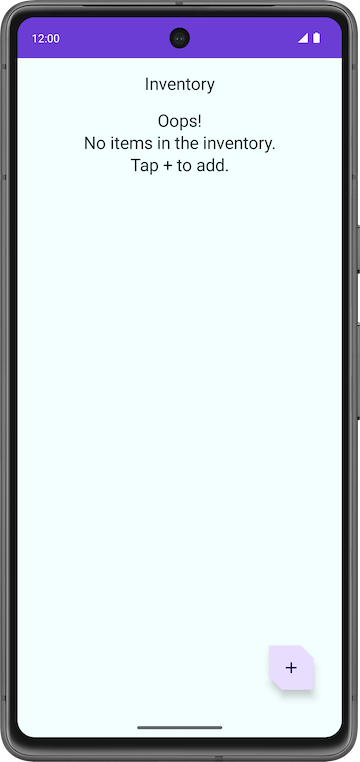
Notice that the app shows no inventory data.
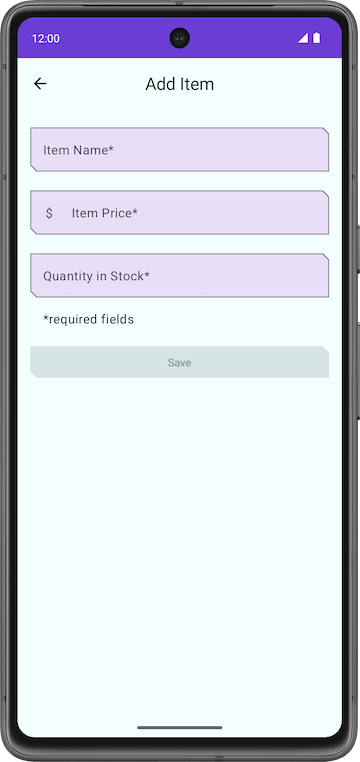
Tap the floating action button (FAB) at the bottom right, which lets you add new items to the database.
The app navigates to a new screen where you can enter details for the new item.

Problems with the starter code
In the Add Item screen, enter an item’s details like name, price, and quantity of the Item.
Tap Save. The Add Item screen is not closed, but you can navigate back using the back key. The save functionality is not implemented, so the item details are not saved.
Notice that the app is incomplete and the Save button functionality is not implemented.
In this codelab, you add the code that uses Room to save the inventory details in the SQLite database. You use the Room persistence library to interact with the SQLite database.
Code walkthrough
The starter code you downloaded has pre-designed screen layouts for you. In this pathway, you focus on implementing the database logic. The following section is a brief walkthrough of some of the files to get you started.
ui/home/HomeScreen.kt: this file is the home screen, or the first screen in the app, which contains the composables to display the inventory list. It has a FAB+to add new items to the list.
ui/item/ItemEntryScreen.kt: this screen is similar toItemEditScreen.kt. They both have text fields for the item details. This screen is displayed when the FAB is tapped in the home screen. TheItemEntryViewModel.ktis the correspondingViewModelfor this screen.
ui/navigation/InventoryNavGraph.kt: this file is the navigation graph for the entire application.
Main components of Room
Kotlin provides an easy way to work with data through data classes. While it is easy to work with in-memory data using data classes, when it comes to persisting data, you need to convert this data into a format compatible with database storage. To do so, you need tables to store the data and queries to access and modify the data.
The following three components of Room make these workflows seamless.
Room entities represent tables in your app’s database. You use them to update the data stored in rows in tables and to create new rows for insertion.
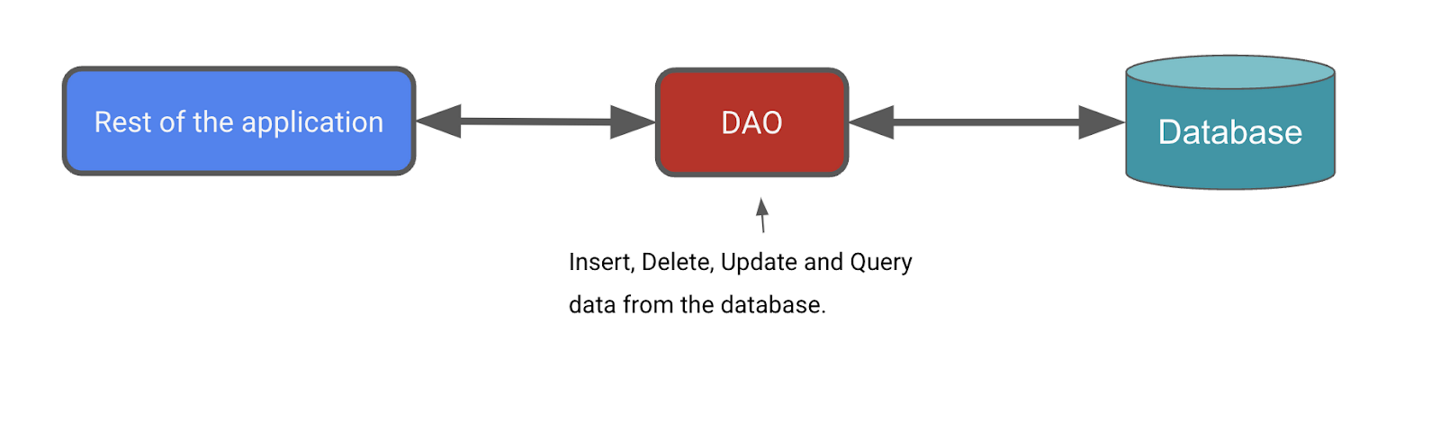
Room Data Access Objects provide methods that your app uses to retrieve, update, insert, and delete data in the database.
Room Database class is the database class that provides your app with instances of the DAOs associated with that database.
You implement and learn more about these components later in the codelab. The following diagram demonstrates how the components of Room work together to interact with the database.
Add Room dependencies
First, we need to add the required Room dependencies.
In
build.gradle.kts (Module :app), in thedependenciesblock://Room implementation("androidx.room:room-runtime:${rootProject.extra["room_version"]}") ksp("androidx.room:room-compiler:${rootProject.extra["room_version"]}") implementation("androidx.room:room-ktx:${rootProject.extra["room_version"]}")
Create an item Entity
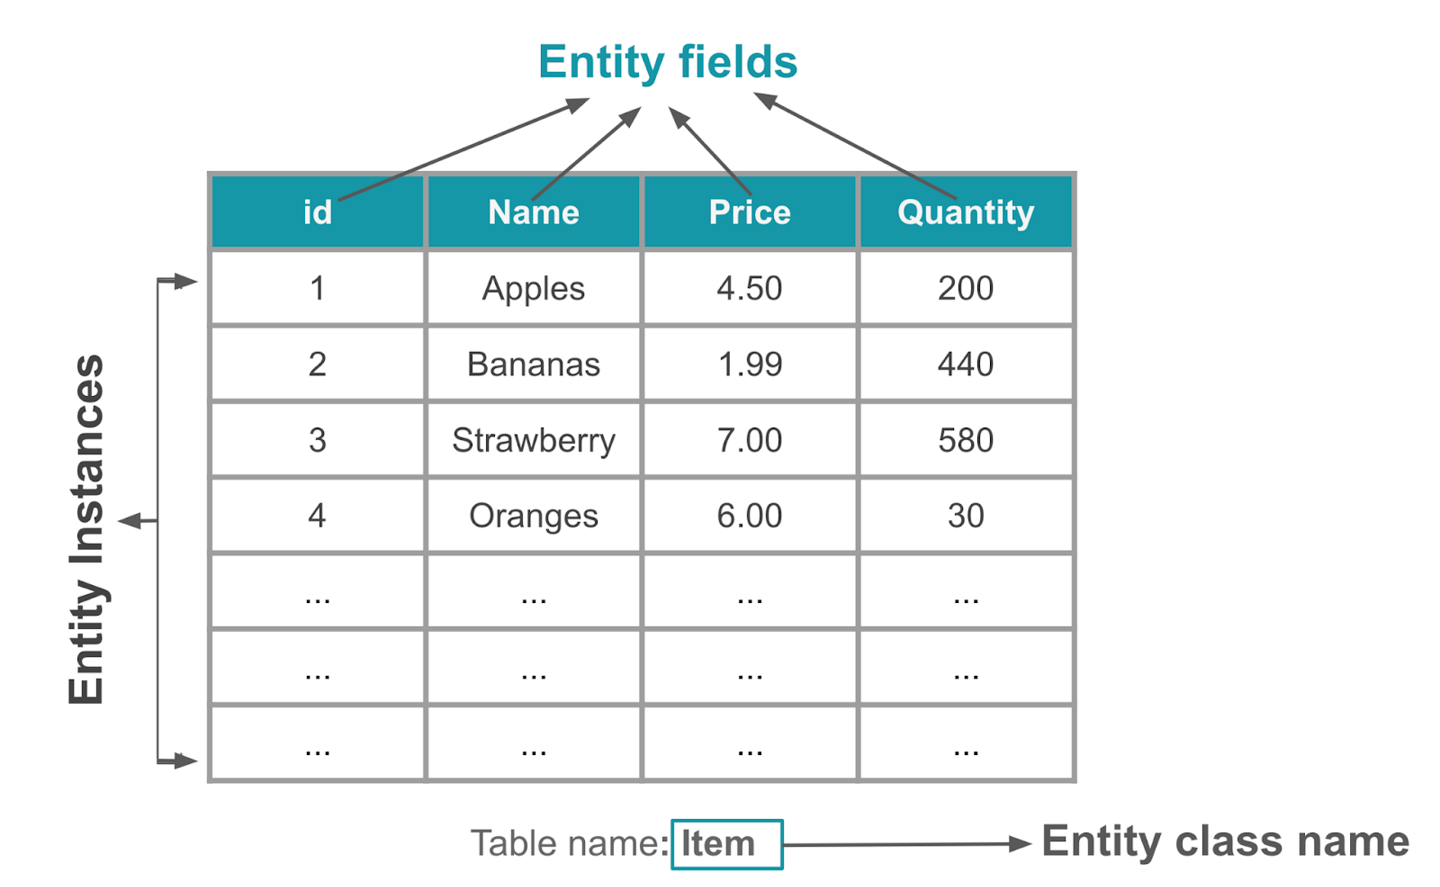
An Entity class defines a table.
Each instance of this class (i.e. an object) represents a row in the table.
The entity class has mappings to tell Room how it intends to present and interact with the information in the database. In your app, the entity holds information about inventory items, such as item name, item price, and quantity of items available.
The
@Entityannotation marks a class as a database Entity class. For each Entity class, the app creates a database table to hold the items. Each field of the Entity is represented as a column in the database, unless denoted otherwise.Every entity instance (i.e. a row) stored in the table must have a primary key. The primary key is used to uniquely identify every record/entry in your database tables. After the app assigns a primary key, it cannot be modified; it represents the entity object as long as it exists in the database.
We’ll create an Entity class to store inventory information. In
data/Item.kt, replace the contents with this code:package com.example.inventory.data import androidx.room.Entity import androidx.room.PrimaryKey /** * Entity data class represents a table (or a single row) in the database. */ @Entity(tableName = "items") data class Item( // Primary key @PrimaryKey(autoGenerate = true) val id: Int = 0, // Item name val name: String, // Item price val price: Double, // Quantity in stock val quantity: Int )
@Entity(tableName = "items")tells Kotlin that this Entity defines an SQLite table nameditemsThe code below tells Kotlin that the
idfield is the primary key, and makes Room automatically generate unique values for the primary key. The default value must be set to0to enable the auto-generation of primary key values.@PrimaryKey(autoGenerate = true) val id: Int = 0,
Great! Now that you have created an Entity class, you can create a Data Access Object (DAO) to access the database.
Create the item DAO
So far, we’ve created:
In
data/Item.kt: adata class Itementity, that represents the Items table. Each instance of this class represents a row inside the Items table.
The Data Access Object (DAO) is a pattern you can use to separate the persistence layer from the rest of the application by providing an abstract interface. This isolation follows the single-responsibility principle.
The DAO hides all the complexities involved in performing database operations in the underlying persistence layer, separate from the rest of the application. This lets you change the data layer independently of the code that uses the data.
Next, we’ll define a DAO for Room. It will be a custom interface that provides convenience methods for querying/retrieving, inserting, deleting, and updating the database. Room generates an implementation of this class at compile time.
The
Roomlibrary provides convenience annotations, such as@Insert,@Delete, and@Update, for defining methods that perform simple inserts, deletes, and updates without requiring you to write a SQL statement.If you need to define more complex operations for insert, delete, update, or if you need to query the data in the database, use a
@Queryannotation instead.For the Inventory app, you need the ability to do the following:
Insert or add a new item.
Update an existing item to update the name, price, and quantity.
Get a specific item based on its primary key,
idGet all items so you can display them.
Delete an entry in the database.
To create the item DAO, create a new file,
data/ItemDao.kt, with this code:package com.example.inventory.data import androidx.room.Dao import androidx.room.Delete import androidx.room.Insert import androidx.room.OnConflictStrategy import androidx.room.Query import androidx.room.Update import kotlinx.coroutines.flow.Flow @Dao interface ItemDao { @Insert(onConflict = OnConflictStrategy.IGNORE) suspend fun insert(item: Item) @Update suspend fun update(item: Item) @Delete suspend fun delete(item: Item) @Query("SELECT * from items WHERE id = :id") fun getItem(id: Int): Flow<Item> @Query("SELECT * from items ORDER BY name ASC") fun getAllItems(): Flow<List<Item>> }
Database operations can take a long time to execute, so they need to run on a separate thread. Room doesn’t allow database access on the main thread. That’s why
insert(),update(), anddelete()are suspend functions.When using
insert()to insert items into the database, conflicts can happen. For example, the code may erroneously add two entities with the same primary key. In the Inventory app, we only insert the entity from one place, that is the Add Item screen, so we are not expecting any conflicts, and can set the conflict strategy to Ignore, meaning Room will not insert a new item if that new item causes a conflict. That’s@Insert(onConflict = OnConflictStrategy.IGNORE).Since this is just an interface, do we still need to write code to implement this interface? No. Room generates all the necessary code to insert the
iteminto the database. When you call any of the DAO functions that are marked with Room annotations, Room executes the corresponding SQL query on the database. For example, when you call the above method,insert()from your Kotlin code, Room executes a SQL query to insert the entity into the database.There is no convenience annotation for the remaining functionality, so
@Queryannotations are used to supply SQLite queries. CallinggetItem(WTV_ID)will cause the SQLite querySELECT * from items WHERE id = WTV_IDto be run.It is recommended to use
Flowin the persistence layer. WithFlowas the return type, you receive notification whenever the data in the database changes. Analogy: when following a content creator, you can turn on and receive notifications whenever they create a new post.Room keeps this
Flowupdated for you, which means you only need to explicitly get the data once, e.g. by callinggetItem()orgetAllItems(), and the data will be updated whenever it changes in the database. Because of theFlowreturn type, Room also runs the query on the background thread. You don’t need to explicitly make it asuspendfunction and call it inside a coroutine scope.Note
Flowin Room database can keep the data up-to-date by emitting a notification whenever the data in the database changes. This allows you to observe the data and update your UI accordingly.
Create a Database instance
So far, we’ve created:
In
data/Item.kt: adata class Itementity, that represents the Items table. Each instance of this class represents a row inside the Items table.In
data/ItemDao.kt: aninterface ItemDao, that contains methods to create, update, delete, and get items from the Items table. This is just an interface, the code for it will be provided by Room automatically.
In this task, we’ll create an
InventoryDatabaseclass, that uses thedata class Itemandinterface DAO. This class is responsible for creating the database, tables, and saving them to a file. This class isabstract, because Room will automatically generate most of the code needed, and we don’t have to code the implementation of this class ourselves.
Create the Database
Create a new file
data/InventoryDatabase.kt.Insert this code:
package com.example.inventory.data

import android.content.Context
import androidx.room.Database
import androidx.room.Room
import androidx.room.RoomDatabase

/**
* Database class with a singleton Instance object.
*/
@Database(entities = [Item::class], version = 1, exportSchema = false)
abstract class InventoryDatabase : RoomDatabase() {

    // This abstract function returns an ItemDao, no need to code the function body, Room will automatically generate the code.
    abstract fun itemDao(): ItemDao

    companion object {
        @Volatile
        private var Instance: InventoryDatabase? = null

        fun getDatabase(context: Context): InventoryDatabase {
            // if the Instance is not null, return it, otherwise create a new database instance.
            return Instance ?: synchronized(this) {
                Room.databaseBuilder(context, InventoryDatabase::class.java, "item_database")
                    .fallbackToDestructiveMigration()
                    .build()
                    .also { Instance = it }
            }
        }
    }
}
In this code:
@Database(entities = [Item::class], version = 1, exportSchema = false)
entities = [Item::class]tells Room that the database contains only 1 entity (table),ItemWhenever the schema of the database table changes,
versionmust be increased.exportSchema = falsedisables schema version history backups. If set totrue, Room will help to backup older versions of the schema into a folder.
The purpose of the companion object is to maintain one single instance of the database opened at a given time. A database object is computationally expensive to create and maintain, that’s why it’s preferred to only have one since instance.
@Volatilemeans that the value of that variable is never cached, and all reads and writes are to and from the main memory. These features help ensure the value ofInstanceis always up to date and is the same for all execution threads. It means that changes made by one thread toInstanceare immediately visible to all other threads.Multiple threads can potentially run
getDatabase()concurrently, which results in two database instances instead of one. This issue is known as a race condition. Usingsynchronized {}ensures that only one thread can enter this block of code at any time, which makes sure the database only gets initialized once. Usesynchronized {}to avoid race conditions.Room.databaseBuilder(context, InventoryDatabase::class.java, "item_database")creates the database inside a file nameditem_database. Thecontextis the “environment” in which the database is created.InventoryDatabase::class.javais the name of the database class,InventoryDatabase, with an additional::class.javaappended.fallbackToDestructiveMigration()causes the database to be destroyed and rebuilt whenever the schema changes, i.e. the entities (tables) changes. In this case, there is only one entity,Item. Example:The first time the app is run, it uses the
Itemdefinition to create a database and a table for the Items. At this point, theItemclass and the Items table are “in sync”, meaning they contain the same fields.Some data is added to the Items table inside the database.
The
Itemclass changes, causing theItemclass and the Items table to now have different fields. All rows in the Items table are deleted.The database is destroyed and rebuilt. The
Itemclass and Items table are now “in sync” again.
fallbackToDestructiveMigration()is suitable for a sample app but in real life, other strategies are more appropriate. See Migration for more.build()creates the database instance, and returns it.also { Instance = it }setsInstanceto the recently created database instance. It also returns the database instance thatbuild()returned.
Tip
You can use this code as a template for your future projects. Replace the entities and DAOs specific to your app.
Implement the Repository
So far, we’ve created:
In
data/Item.kt: adata class Itementity, that represents the Items table. Each instance of this class represents a row inside the Items table.In
data/ItemDao.kt: aninterface ItemDao, that contains methods to create, update, delete, and get items from the Items table. This is just an interface, the code for it will be provided by Room automatically.In
data/InventoryDatabase.kt: aclass InventoryDatabase, that “manages” the actual database. The actual database is stored inside a file. This class provides anItemDaoobject, that can be used to create, update, delete rows inside the Items table.
Now we’ll create a
class OfflineItemsRepositorythat provides an API for the app to call if the app needs to change some data. This class does not interact with the database directly, it needs to use anItemDaoobject to help it do so.Open
data/ItemsRepository.kt, replace the contents with the code below.package com.example.inventory.data import kotlinx.coroutines.flow.Flow /** * Repository that provides insert, update, delete, and retrieve of [Item] from a given data source. */ interface ItemsRepository { /** * Retrieve all the items from the the given data source. */ fun getAllItemsStream(): Flow<List<Item>> /** * Retrieve an item from the given data source that matches with the [id]. */ fun getItemStream(id: Int): Flow<Item?> /** * Insert item in the data source */ suspend fun insertItem(item: Item) /** * Delete item from the data source */ suspend fun deleteItem(item: Item) /** * Update item in the data source */ suspend fun updateItem(item: Item) }
This interface is very similar to
interface ItemDao. What’s the diff?interface ItemDaointeracts directly with the SQLite database. It executes SQL queries.interface ItemsRepositoryis a layer aboveinterface ItemDao. It works at a higher level. It provides an API for the rest of the app to call, so that the app doesn’t need to callinterface ItemDaomethods directly.
To implement the
ItemsRepositoryinterface, opendata/OfflineItemsRepository.kt, and replace the contents with this code:package com.example.inventory.data import kotlinx.coroutines.flow.Flow class OfflineItemsRepository(private val itemDao: ItemDao) : ItemsRepository { override fun getAllItemsStream(): Flow<List<Item>> = itemDao.getAllItems() override fun getItemStream(id: Int): Flow<Item?> = itemDao.getItem(id) override suspend fun insertItem(item: Item) = itemDao.insert(item) override suspend fun deleteItem(item: Item) = itemDao.delete(item) override suspend fun updateItem(item: Item) = itemDao.update(item) }
This code implements the
ItemsRepositoryinterface. It represents a repository that is offline, meaning no Internet connection is needed to use this repository.Why do it like this?
If the app calls the
interface ItemDaomethods directly, then if one day the database is removed and replaced with a cloud data source instead, many parts of the app need to be changed.By using
interface ItemsRepository, if one day the database is removed and replaced with a cloud data source instead, then only theOfflineItemsRepositoryneeds to be changed.
Implement AppContainer class
So far, we’ve created:
In
data/Item.kt: adata class Itementity, that represents the Items table. Each instance of this class represents a row inside the Items table.In
data/ItemDao.kt: aninterface ItemDao, that contains methods to create, update, delete, and get items from the Items table. This is just an interface, the code for it will be provided by Room automatically.In
data/InventoryDatabase.kt: aclass InventoryDatabase, that “manages” the actual database. The actual database is stored inside a file. This class provides anItemDaoobject, that can be used to create, update, delete rows inside the Items table.In
data/ItemsRepository.ktanddata/OfflineItemsRepository.kt: aclass OfflineItemsRepositorythat provides an API for the app to call if the app needs to change some data. This class does not interact with the database directly, it needs to use anItemDaoobject to help it do so.
Now, we’ll instantiate the database, and pass in an
ItemDaoto theOfflineItemsRepositoryclass.In
data/AppContainer.kt, replace the contents with this code:package com.example.inventory.data import android.content.Context /** * App container for Dependency injection. */ interface AppContainer { val itemsRepository: ItemsRepository } /** * [AppContainer] implementation that provides instance of [OfflineItemsRepository] */ class AppDataContainer(private val context: Context) : AppContainer { /** * Implementation for [ItemsRepository] */ override val itemsRepository: ItemsRepository by lazy { OfflineItemsRepository(InventoryDatabase.getDatabase(context).itemDao()) } }
InventoryDatabase.getDatabase(context)instantiates the database instance. Next, theitemDao()creates anItemDao, which is then passed to theOfflineItemsRepository.OfflineItemsRepositoryneeds thisItemDaoobject to help it create, update, delete, and get rows from the Items table.
Add the save functionality
To save the app’s transient data and to also access the database, the ViewModels must be updated. The ViewModels use the DAO to interact with the database, and provide data to the UI. All database operations need to be run outside of the main UI thread, using coroutines and
viewModelScope.
UI state class walkthrough
Open
ui/item/ItemEntryViewModel.kt. TheItemUiStatedata class represents the UI state of an Item. TheItemDetailsdata class represents a single item.The starter code provides three extension functions:
ItemDetails.toItem(): converts the ItemUiState UI state object to the Item entity type.Item.toItemUiState(): converts the Item Room entity object to the ItemUiState UI state type.Item.toItemDetails(): converts the Item Room entity object to the ItemDetails.
// No need to copy, this is part of starter code
/**
* Represents Ui State for an Item.
*/
data class ItemUiState(
    val itemDetails: ItemDetails = ItemDetails(),
    val isEntryValid: Boolean = false
)

data class ItemDetails(
    val id: Int = 0,
    val name: String = "",
    val price: String = "",
    val quantity: String = "",
)

/**
* Extension function to convert [ItemDetails] to [Item]. If the value of [ItemDetails.price] is
* not a valid [Double], then the price will be set to 0.0. Similarly if the value of
* [ItemDetails.quantity] is not a valid [Int], then the quantity will be set to 0
*/
fun ItemDetails.toItem(): Item = Item(
    id = id,
    name = name,
    price = price.toDoubleOrNull() ?: 0.0,
    quantity = quantity.toIntOrNull() ?: 0
)

fun Item.formatedPrice(): String {
    return NumberFormat.getCurrencyInstance().format(price)
}

/**
* Extension function to convert [Item] to [ItemUiState]
*/
fun Item.toItemUiState(isEntryValid: Boolean = false): ItemUiState = ItemUiState(
    itemDetails = this.toItemDetails(),
    isEntryValid = isEntryValid
)

/**
* Extension function to convert [Item] to [ItemDetails]
*/
fun Item.toItemDetails(): ItemDetails = ItemDetails(
    id = id,
    name = name,
    price = price.toString(),
    quantity = quantity.toString()
)
These are used by the ViewModels to read and update the UI.
Update the ItemEntry ViewModel
In this task, you pass in the repository to the
ItemEntryViewModel.ktfile. You also save the item details entered in the Add Item screen into the database.Open
ItemEntryViewModel.kt.Notice the
validateInput()private function:// No need to copy over, this is part of starter code private fun validateInput(uiState: ItemDetails = itemUiState.itemDetails): Boolean { return with(uiState) { name.isNotBlank() && price.isNotBlank() && quantity.isNotBlank() } }
The above function checks if the
name,price, andquantityare empty. It’s used to verify user input before adding or updating the entity in the database.Change the
ItemEntryViewModelclass to the below, but leave the code outside the class untouched./** * ViewModel to validate and insert items in the Room database. */ class ItemEntryViewModel(private val itemsRepository: ItemsRepository) : ViewModel() { /** * Holds current item ui state */ var itemUiState by mutableStateOf(ItemUiState()) private set /** * Updates the [itemUiState] with the value provided in the argument. This method also triggers * a validation for input values. */ fun updateUiState(itemDetails: ItemDetails) { itemUiState = ItemUiState(itemDetails = itemDetails, isEntryValid = validateInput(itemDetails)) } private fun validateInput(uiState: ItemDetails = itemUiState.itemDetails): Boolean { return with(uiState) { name.isNotBlank() && price.isNotBlank() && quantity.isNotBlank() } } suspend fun saveItem() { if (validateInput()) { itemsRepository.insertItem(itemUiState.itemDetails.toItem()) } } }
The constructor now takes in an
ItemsRepository, which the ViewModel uses to save items into the database.
In
ui/AppViewModelProvider.kt, modify theinitializer {}for ItemEntryViewModel to pass in the repository as a parameter:object AppViewModelProvider { val Factory = viewModelFactory { // ... // Initializer for ItemEntryViewModel initializer { ItemEntryViewModel(inventoryApplication().container.itemsRepository) } // ... } }
The
ItemEntryViewModelis now able to add entities to the database. Now, the UI must be updated the UI to useItemEntryViewModel.
ItemEntryBody() composable walkthrough
In
ui/item/ItemEntryScreen.ktfile, theItemEntryBody()composable is partially implemented in the starter code. Look at theItemEntryBody()composable in theItemEntryScreen()function call. Notice that the UI state and theupdateUiStatelambda are being passed as function parameters:// No need to copy over, part of the starter code ItemEntryBody( itemUiState = viewModel.itemUiState, // UI state passed as parameter onItemValueChange = viewModel::updateUiState, // updateUiState passed as parameter onSaveClick = { }, modifier = Modifier .padding( start = innerPadding.calculateStartPadding(LocalLayoutDirection.current), end = innerPadding.calculateEndPadding(LocalLayoutDirection.current), top = innerPadding.calculateTopPadding() ) .verticalScroll(rememberScrollState()) .fillMaxWidth() )
Look at the
ItemEntryBody()definition to see how the UI state is used.ItemEntryBody()displays anItemInputForm, and a Save button. TheItemInputForm()displays the item details. The Save button is only enabled if text is entered in the text fields.itemUiState.isEntryValidis true if the text in all the text fields is valid (not empty)// No need to copy over, part of the starter code @Composable fun ItemEntryBody( itemUiState: ItemUiState, onItemValueChange: (ItemUiState) -> Unit, onSaveClick: () -> Unit, modifier: Modifier = Modifier ) { Column( // ... ) { ItemInputForm( itemDetails = itemUiState.itemDetails, // UI state used to display item details onValueChange = onItemValueChange, modifier = Modifier.fillMaxWidth() ) Button( onClick = onSaveClick, enabled = itemUiState.isEntryValid, // UI state used to determine whether the Save Button is enabled or not shape = MaterialTheme.shapes.small, modifier = Modifier.fillMaxWidth() ) { Text(text = stringResource(R.string.save_action)) } } }
Add a click handler to the Save button
Next, to tie everything together, we’ll add a click handler to the Save button. Inside the click handler, launch a coroutine and call
saveItem()to save the data in the Room database.In
ItemEntryScreen.kt, inside theItemEntryScreencomposable function, add this code:val coroutineScope = rememberCoroutineScope()
imports
import androidx.compose.runtime.rememberCoroutineScope
Note
The
rememberCoroutineScope()is a composable function that returns aCoroutineScopebound to the composition where it’s called. You can use therememberCoroutineScope()composable function when you want to launch a coroutine outside of a composable, and ensure the coroutine is canceled after the scope leaves the composition. You can use this function when you need to control the lifecycle of coroutines manually, for example, to cancel an animation whenever a user event happens.Inside
ItemEntryBody(), add this code to launch a coroutine that saves the item and navigates back to the Inventory screenItemEntryBody( itemUiState = viewModel.itemUiState, onItemValueChange = viewModel::updateUiState, onSaveClick = { coroutineScope.launch { viewModel.saveItem() navigateBack() } }, // ...
Build and run your app.
Tap the + FAB.
In the Add Item screen, add the item details and tap Save. The app navigates back to the Inventory screen.
This action saves the data, but you cannot see the inventory data in the app. In the next task, you use the Database Inspector to view the data you saved.

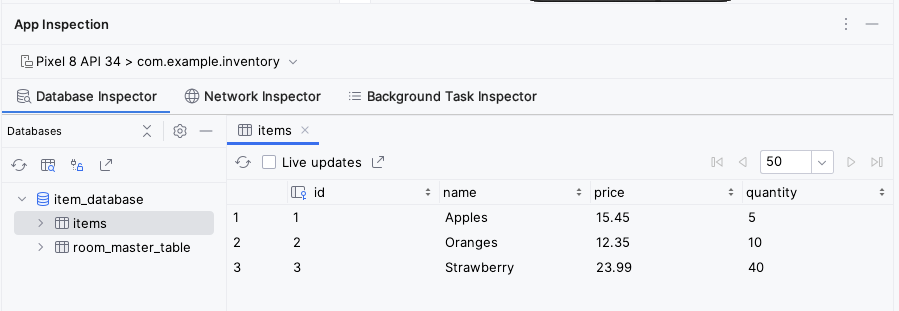
View the database content using Database Inspector
The Database Inspector lets you inspect, query, and modify your app’s databases while your app runs. This feature is especially useful for database debugging. The Database Inspector works with plain SQLite and with libraries built on top of SQLite, such as Room. Database Inspector works best on emulators/devices running API level 26 and higher.
Note
The Database Inspector only works with the SQLite library included in the Android operating system on API level 26 and higher. It doesn’t work with other SQLite libraries that you bundle with your app.
Select View ➜ Tool Windows ➜ App Inspection ➜ Database Inspector.
Just above the words Database Inspector, make sure com.example.inventory appears somewhere. The
item_databaseshould appear in the Databases pane.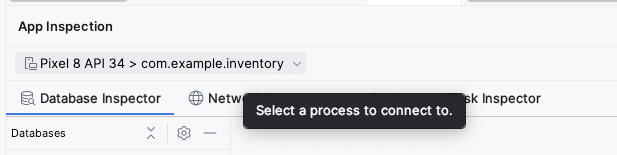
Expand the node for the item_database in the Databases pane and select Item to inspect.
Check the Live updates checkbox in the Database Inspector to automatically update the data it presents as you interact with your running app in the emulator or device.
Congratulations! You created an app that can persist data using Room. In the next codelab, you will add a lazyColumn to your app to display the items on the database, and add new features to the app, like the ability to delete and update the entities. See you there!
Solution code
Branch: room
Clone:
$ git clone https://github.com/google-developer-training/basic-android-kotlin-compose-training-inventory-app.git
$ cd basic-android-kotlin-compose-training-inventory-app
$ git checkout room
Summary
Define your tables as data classes annotated with
@Entity. Define properties annotated with@ColumnInfoas columns in the tables.Define a data access object (DAO) as an interface annotated with
@Dao. The DAO maps Kotlin functions to database queries.Use annotations to define
@Insert,@Delete, and@Updatefunctions.Use the
@Queryannotation with an SQLite query string as a parameter for any other queries.Use Database Inspector to view the data saved in the Android SQLite database.
Unit 6 Pathway 2 Activity 5: Read and update data with Room
Before you begin
In this codelab, you’ll add more features to the Inventory app and learn how to read, display, update, and delete data from the SQLite database using Room. You will use a
LazyColumnto display the data from the database and automatically update the data when the underlying data in the database changes.
Prerequisites
Ability to create and interact with the SQLite database using the Room library.
Ability to create an entity, DAO, and database classes.
Ability to use a data access object (DAO) to map Kotlin functions to SQL queries.
Ability to display list items in a
LazyColumn.Completion of the previous codelab in this unit, Persist data with Room.
What you’ll learn
How to read and display entities from a SQLite database.
How to update and delete entities from a SQLite database using the Room library.
What you’ll build
An Inventory app that displays a list of inventory items and can update, edit, and delete items from the app database using Room.
What you’ll need * A computer with Android Studio
Starter app overview
This codelab uses the Inventory app solution code from the previous codelab, Persist data with Room as the starter code. The starter app already saves data with the Room persistence library. The user can use the Add Item screen to add data to the app database.
Note
The current version of the starter app doesn’t display the data stored in the database.


In this codelab, you extend the app to read and display the data, and update and delete entities on the database using a Room library.
Starter code
Branch: room
Clone:
$ git clone https://github.com/google-developer-training/basic-android-kotlin-compose-training-inventory-app.git
$ cd basic-android-kotlin-compose-training-inventory-app
$ git checkout room
Update UI state
In this task, you add a
LazyColumnto the app to display the data stored in the database.
HomeScreen composable function walkthrough
Open the
ui/home/HomeScreen.ktfile and look at theHomeScreen()composable.@Composable fun HomeScreen( navigateToItemEntry: () -> Unit, navigateToItemUpdate: (Int) -> Unit, modifier: Modifier = Modifier, ) { val scrollBehavior = TopAppBarDefaults.enterAlwaysScrollBehavior() Scaffold( topBar = { // Top app with app title }, floatingActionButton = { FloatingActionButton( // onClick details ) { Icon( // Icon details ) } }, ) { innerPadding -> // Display List header and List of Items HomeBody( itemList = listOf(), // For now, empty list is being passed in for itemList onItemClick = navigateToItemUpdate, modifier = modifier.padding(innerPadding) .fillMaxSize() ) }
This composable function displays:
The top app bar with the app title
The floating action button (FAB) for the addition of new items to inventory
The
HomeBody()composable function
The
HomeBody()composable function displays inventory items based on theitemListparameter. For now, it’s just hard-coded to an empty list,listOf()
Emit UI state in HomeViewModel
We need to pass the
ItemsRepositoryobject toHomeViewModel. Inui/AppViewModelProvider.kt, change theHomeViewModelinitializer:initializer { HomeViewModel(inventoryApplication().container.itemsRepository) }
In
ui/home/HomeViewModel.kt, replace the content with this code:package com.example.inventory.ui.home import androidx.lifecycle.ViewModel import androidx.lifecycle.viewModelScope import com.example.inventory.data.Item import com.example.inventory.data.ItemsRepository import kotlinx.coroutines.flow.SharingStarted import kotlinx.coroutines.flow.StateFlow import kotlinx.coroutines.flow.map import kotlinx.coroutines.flow.stateIn /** * ViewModel to retrieve all items in the Room database. */ class HomeViewModel(itemsRepository: ItemsRepository): ViewModel() { val homeUiState: StateFlow<HomeUiState> = itemsRepository.getAllItemsStream().map { HomeUiState(it) } .stateIn( scope = viewModelScope, started = SharingStarted.WhileSubscribed(TIMEOUT_MILLIS), initialValue = HomeUiState() ) companion object { private const val TIMEOUT_MILLIS = 5_000L } } /** * Ui State for HomeScreen */ data class HomeUiState(val itemList: List<Item> = listOf())
itemsRepository.getAllItemsStream()returns aFlow<List<Item>>map { HomeUiState(it) }transforms theFlow<List<Item>>into aFlow<HomeUiState>stateIn( ... )transforms theFlow<HomeUiState>into aStateFlow<HomeUiState>
Now, focus on this part of the code. The deep dive into this code comes next.
val homeUiState: StateFlow<HomeUiState> =
    itemsRepository.getAllItemsStream().map { HomeUiState(it) }
        .stateIn(
            scope = viewModelScope,
            started = SharingStarted.WhileSubscribed(TIMEOUT_MILLIS),
            initialValue = HomeUiState()
        )
The
getmethods inItemDao, likegetItem()andgetAllItems(), return aFlow. AFlowrepresents a generic stream of data. By returning aFlow, you only need to explicitly call the methods from the DAO once for a given lifecycle. Room handles updates to the underlying data in an asynchronous manner. Analogy: when following someone on social media, you just have to click “Follow” once, and then that person’s content will be updated in your social media feed.Getting data from a flow is called collecting from a flow. When collecting from a flow, there are a few things to consider:
Lifecycle events like configuration changes, for example rotating the device, causes the activity to be recreated. This causes recomposition and collecting from your
Flowall over again.The values should be cached as state, so that existing data isn’t lost between lifecycle events.
Flows should be canceled if there are no observers left, such as after a composable’s lifecycle ends.
The recommended way to expose a
Flowfrom aViewModelis with aStateFlow. Using aStateFlowallows the data to be saved and observed, regardless of the UI lifecycle. To convert aFlowto aStateFlow, use thestateInoperator.The
stateInoperator has three parameters:scope- TheviewModelScopedefines the lifecycle of theStateFlow. When theviewModelScopeis canceled, theStateFlowis also canceled.started- The pipeline should only be active when the UI is visible. TheSharingStarted.WhileSubscribed()is used to accomplish this. To configure a delay (in milliseconds) between the disappearance of the last subscriber and the stopping of the sharing coroutine, pass in theTIMEOUT_MILLISto theSharingStarted.WhileSubscribed()method.initialValue- Set the initial value of the state flow toHomeUiState().
Once the
Flowhas been converted into aStateFlow, collect it using thecollectAsState()method, converting its data intoStateof the same type.In the above code, we retrieve all items in the database as a
StateFlowobservable API for UI state. When the data in the database changes, the UI updates automatically.Build the app to make sure there are no errors in the code. There will not be any visible changes.
Display the Inventory data
In this task, you collect and update the UI state in the
HomeScreen.Open
ui/home/HomeScreen.kt.In the
HomeScreencomposable, add a newviewModelparameter:@Composable fun HomeScreen( navigateToItemEntry: () -> Unit, navigateToItemUpdate: (Int) -> Unit, modifier: Modifier = Modifier, viewModel: HomeViewModel = viewModel(factory = AppViewModelProvider.Factory) )
imports
import androidx.lifecycle.viewmodel.compose.viewModel
import com.example.inventory.ui.AppViewModelProvider
In the
HomeScreencomposable, add the code below. This code collects the UI state from theHomeViewModel. It usescollectAsState(), which collects values fromviewModel.homeUiState, which is aStateFlow, and represents its latest value viaState.val homeUiState by viewModel.homeUiState.collectAsState()
imports
import androidx.compose.runtime.collectAsState
import androidx.compose.runtime.getValue
Update the
HomeBody()function call and pass inhomeUiState.itemListto theitemListparameter.HomeBody( itemList = homeUiState.itemList, onItemClick = navigateToItemUpdate, modifier = modifier.padding(innerPadding) )
Run the app. Notice that the inventory list displays if you saved items in your app database. If the list is empty, add some inventory items to the app database.

Display item details
We’ll now use the item UI state, such as name, price, and quantity from the inventory app database and display them on the Item Details screen with the
ItemDetailsScreencomposable. TheItemDetailsScreencomposable contains three Text composables that display the item details.ui/item/ItemDetailsScreen.kt: this screen is part of the starter code and displays the details of the items. TheItemDetailsViewModel.ktis the correspondingViewModelfor this screen.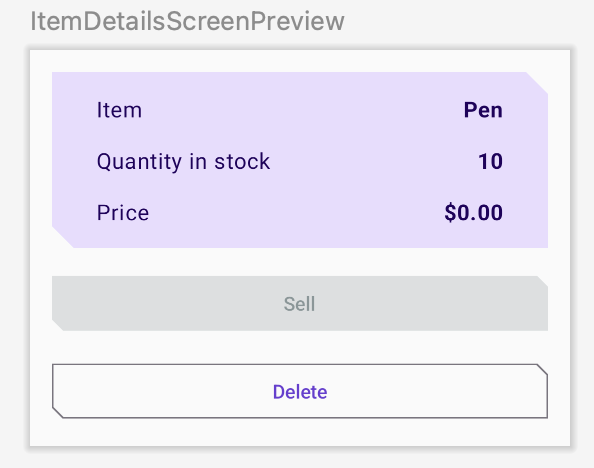
ui/home/HomeScreen.kt: in theHomeScreencomposable, notice theHomeBody()function call usesonItemClick = navigateToItemUpdateto navigate when an item is clicked.// No need to copy over HomeBody( itemList = homeUiState.itemList, onItemClick = navigateToItemUpdate, modifier = modifier .padding(innerPadding) .fillMaxSize() )
In
ui/navigation/InventoryNavGraph.kt, notice thenavigateToItemUpdate. This parameter specifies that the destination for navigation is the item details screen.// No need to copy over HomeScreen( navigateToItemEntry = { navController.navigate(ItemEntryDestination.route) }, navigateToItemUpdate = { navController.navigate("${ItemDetailsDestination.route}/${it}") }
This part of the
onItemClickfunctionality is already implemented for you. When you click the list item, the app navigates to the item details screen.Click any item in the inventory list to see the item details screen with empty fields.
To fill the text fields with item details, you need to collect the UI state in
ItemDetailsScreen().In
UI/Item/ItemDetailsScreen.kt, add a new parameter to theItemDetailsScreencomposable of the typeItemDetailsViewModeland use the factory method to initialize it.@Composable fun ItemDetailsScreen( navigateToEditItem: (Int) -> Unit, navigateBack: () -> Unit, modifier: Modifier = Modifier, viewModel: ItemDetailsViewModel = viewModel(factory = AppViewModelProvider.Factory) )
imports
import androidx.lifecycle.viewmodel.compose.viewModel
import com.example.inventory.ui.AppViewModelProvider
Inside the
ItemDetailsScreen()composable, create avalcalleduiStateto collect the UI state. UsecollectAsState()to collectuiStateStateFlowand represent its latest value viaState.val uiState = viewModel.uiState.collectAsState()
imports
import androidx.compose.runtime.collectAsState
There’s an error, but it’ll be fixed next.
In
ui/item/ItemDetailsViewModel.kt, use this code. This adds auiStatevariable.package com.example.inventory.ui.item import androidx.lifecycle.SavedStateHandle import androidx.lifecycle.ViewModel import com.example.inventory.data.ItemsRepository import androidx.lifecycle.viewModelScope import kotlinx.coroutines.flow.SharingStarted import kotlinx.coroutines.flow.StateFlow import kotlinx.coroutines.flow.filterNotNull import kotlinx.coroutines.flow.map import kotlinx.coroutines.flow.stateIn /** * ViewModel to retrieve, update and delete an item from the [ItemsRepository]'s data source. */ class ItemDetailsViewModel( savedStateHandle: SavedStateHandle, private val itemsRepository: ItemsRepository ) : ViewModel() { private val itemId: Int = checkNotNull(savedStateHandle[ItemDetailsDestination.itemIdArg]) val uiState: StateFlow<ItemDetailsUiState> = itemsRepository.getItemStream(itemId) .filterNotNull() .map { ItemDetailsUiState(outOfStock = it.quantity <= 0, itemDetails = it.toItemDetails()) }.stateIn( scope = viewModelScope, started = SharingStarted.WhileSubscribed(TIMEOUT_MILLIS), initialValue = ItemDetailsUiState() ) companion object { private const val TIMEOUT_MILLIS = 5_000L } } /** * UI state for ItemDetailsScreen */ data class ItemDetailsUiState( val outOfStock: Boolean = true, val itemDetails: ItemDetails = ItemDetails() )
In
ui/AppViewModelProvider.kt, update the initializer forItemDetailsViewModel:initializer { ItemDetailsViewModel( this.createSavedStateHandle(), inventoryApplication().container.itemsRepository ) }
In the
ItemDetailsScreen()composable, update theItemDetailsBody()function call withuiState.value:ItemDetailsBody( itemDetailsUiState = uiState.value, onSellItem = { }, onDelete = { }, modifier = modifier.padding(innerPadding) )
Look at the
ItemDetailsBody()andItemInputForm()functions. The current selecteditemis passed fromItemDetailsBody()toItemDetails().// No need to copy over @Composable private fun ItemDetailsBody( itemDetailsUiState: ItemDetailsUiState, onSellItem: () -> Unit, onDelete: () -> Unit, modifier: Modifier = Modifier ) { Column( //... ) { var deleteConfirmationRequired by rememberSaveable { mutableStateOf(false) } ItemDetails( item = itemDetailsUiState.itemDetails.toItem(), modifier = Modifier.fillMaxWidth() ) //... }
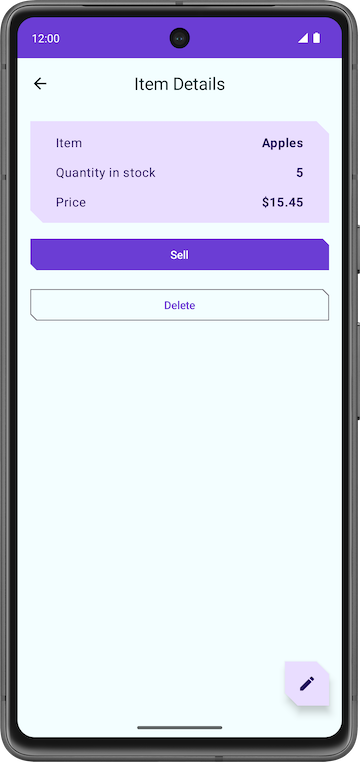
Run the app. When you click any list element on the Inventory screen, the Item Details screen displays.
Notice that the screen is not blank anymore. It displays the entity details retrieved from the inventory database.
Tap the Sell button. Nothing happens!
In the next section, you implement the functionality of the Sell button.
Implement Item details screen
ui/item/ItemEditScreen.kt: the Item edit screen is already provided to you as part of the starter code. This layout contains text field composables to edit the details of any new inventory item.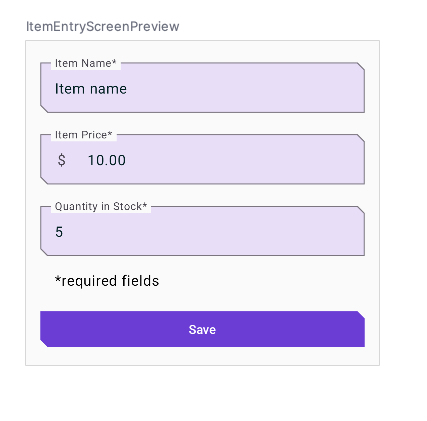
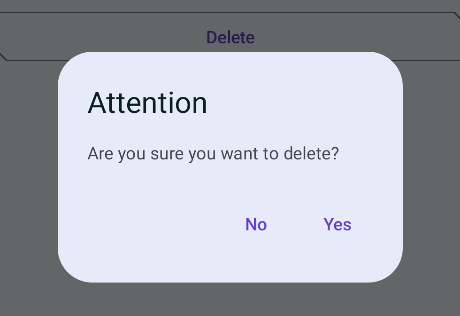
The code for this app still isn’t fully functional. For example, in the Item Details screen, when you tap the Sell button, the Quantity in Stock does not decrease. When you tap the Delete button, the app does prompt you with a confirmation dialog. However, when you select the Yes button, the app does not actually delete the item.
Lastly, the FAB button opens an empty Edit Item screen.

In the next section, you implement the functionalities of Sell, Delete and the FAB buttons.
Implement sell item
In this section, you extend the features of the app to implement the sell functionality by:
Adding a function in
ItemDetailsViewModelto reduce the quantity, and update the entity in the app database.Disabling the Sell button if the quantity is zero.
In
ItemDetailsViewModel.kt, inside theItemDetailsViewModelclass, add this function to reduce the quantity in the database by one.fun reduceQuantityByOne() { viewModelScope.launch { val currentItem = uiState.value.itemDetails.toItem() if (currentItem.quantity > 0) { itemsRepository.updateItem(currentItem.copy(quantity = currentItem.quantity - 1)) } } }
imports
import kotlinx.coroutines.launch
import androidx.lifecycle.viewModelScope
In
ItemDetailsScreen.kt➜ItemDetailsScreen(), go to theItemDetailsBody()function call. In theonSellItemlambda, callviewModel.reduceQuantityByOne().ItemDetailsBody( itemUiState = uiState.value, onSellItem = { viewModel.reduceQuantityByOne() }, onDelete = { }, modifier = modifier.padding(innerPadding) )
In
ItemDetailsScreen.kt➜ItemDetailsBody(), make sure the Button looks like this. It should be enabled/disabled depending on the value ofenabled = itemDetailsUiState.outOfStock.not().Button( onClick = onSellItem, modifier = Modifier.fillMaxWidth(), shape = MaterialTheme.shapes.small, enabled = itemDetailsUiState.outOfStock.not() ) { Text(stringResource(R.string.sell)) }
Run the app.
On the Inventory screen, click a list element. When the Item Details screen displays, tap the Sell and notice that the quantity value decreases by one.

In the Item Details screen, continuously tap the Sell button until the quantity is zero.
Notice that the app disables the Sell button when the quantity in stock is zero.
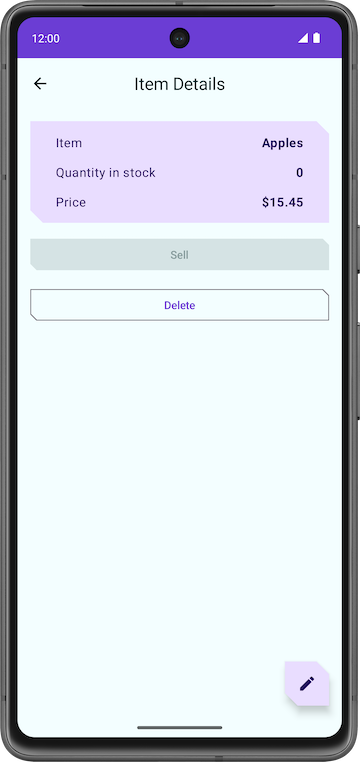
Congratulations on implementing the Sell item feature in your app!
Delete item entity
Now, we’ll add delete functionality. This involves:
Adding a function in the
ItemDetailsViewModelclass to delete an entity from the database.Updating the
ItemDetailsBodycomposable.
In
class ItemDetailsViewModel, add a new functiondeleteItem()with this code:suspend fun deleteItem() { itemsRepository.deleteItem(uiState.value.itemDetails.toItem()) }
In
ui/item/ItemDetailsScreen.kt➜ItemDetailsScreen(), add the code below to get a coroutine scope, bound to theItemDetailsScreencomposable.val coroutineScope = rememberCoroutineScope()
imports
import androidx.compose.runtime.rememberCoroutineScope
In
ui/item/ItemDetailsScreen.kt➜ItemDetailsScreen(), whenItemDetailsBody()is called, add this code to launch the coroutine, that asks the ViewModel to delete the item, then navigates back to the Inventory screen.ItemDetailsBody( itemUiState = uiState.value, onSellItem = { viewModel.reduceQuantityByOne() }, onDelete = { coroutineScope.launch { viewModel.deleteItem() navigateBack() } } modifier = modifier.padding(innerPadding) )
imports
import kotlinx.coroutines.launch
Run the app.
Select a list element on the Inventory screen.
In the Item Details screen, tap Delete.
Tap Yes in the alert dialog, and the app navigates back to the Inventory screen.
Confirm that the entity you deleted is no longer in the app database.
Congratulations on implementing the delete feature!
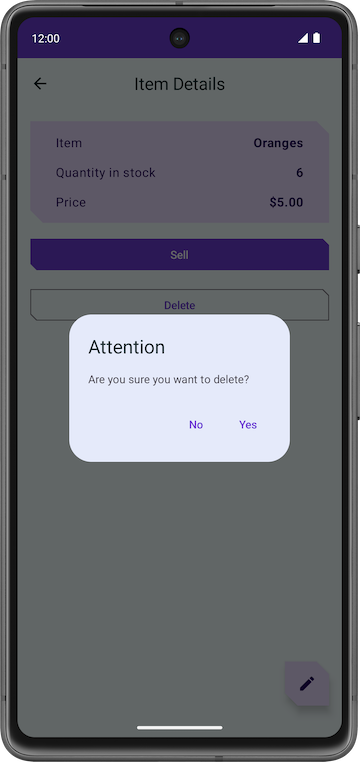
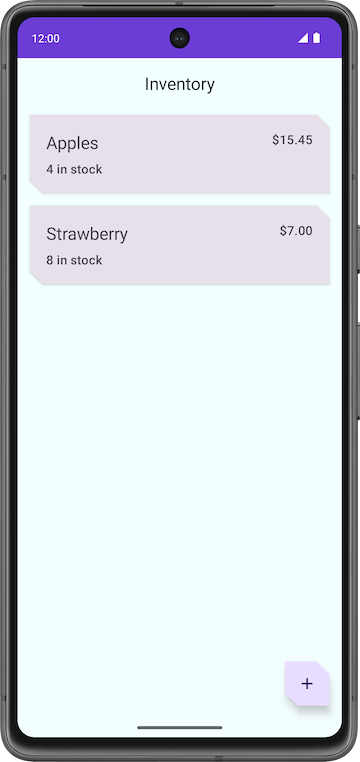
Edit item entity
Now, we’ll add code for editing an item entity. The steps:
Populate the text fields and the Edit Item screen with the entity details.
Update the entity in the database using Room.
If you run the app, go to the Item Details screen, and then click the FAB, you can see that the title of the screen now is Edit Item. However, all the text fields are empty. In this step, you populate the text fields in the Edit Item screen with the entity details.

In
ItemDetailsScreen.kt, scroll to theItemDetailsScreencomposable. In the part whereFloatingActionButton()is called, change theonClickhandler shown below. This makes the screen navigate to the Edit Item screen for that specific item ID.FloatingActionButton( onClick = { navigateToEditItem(uiState.value.itemDetails.id) }, modifier = // ... )
In the
ItemEditViewModelclass, additemsRepositoryas a constructor parameter.class ItemEditViewModel( savedStateHandle: SavedStateHandle, private val itemsRepository: ItemsRepository )
Inside the
ItemEditViewModelclass, add aninit {}afteritemUiStateanditemIdare declared. This gets an item from the database, filters (removes) null values, thentoItemUiState()converts the result to anItemUiState.After this code
var itemUiState by mutableStateOf(ItemUiState())
    private set

private val itemId: Int = checkNotNull(savedStateHandle[ItemEditDestination.itemIdArg])
Add this
init {
    viewModelScope.launch {
        itemUiState = itemsRepository.getItemStream(itemId)
            .filterNotNull()
            .first()
            .toItemUiState(isEntryValid = true)
    }
}
imports
import kotlinx.coroutines.launch
import androidx.lifecycle.viewModelScope
import kotlinx.coroutines.flow.filterNotNull
import kotlinx.coroutines.flow.first
In
AppViewModelProvider.kt, in theItemEditViewModelinitializer, add theItemsRepositoryobject as an argument.initializer { ItemEditViewModel( this.createSavedStateHandle(), inventoryApplication().container.itemsRepository ) }
Run the app.
Go to Item Details and tap on the FAB.
Notice that the fields populate with the item details.
Edit any field. Nothing happens. Tap Save. Nothing happens either. This will be fixed next.
Update item entity
The final pieces of the code will be added to implement the update functionality.
In the
ItemEditViewModelclass, add these functions.// Updates itemUiState with new values that the user enters. fun updateUiState(itemDetails: ItemDetails) { itemUiState = ItemUiState(itemDetails = itemDetails, isEntryValid = validateInput(itemDetails)) } // updates the item to the database suspend fun updateItem() { if (validateInput(itemUiState.itemDetails)) { itemsRepository.updateItem(itemUiState.itemDetails.toItem()) } }
In
ItemEditScreen.kt➜ItemEditScreen(), add a coroutineScope:val coroutineScope = rememberCoroutineScope()
imports
import androidx.compose.runtime.rememberCoroutineScope
In
ItemEditScreen.kt➜ItemEditScreen(), scroll down to theItemEntryBody()function call. Change it to:ItemEntryBody( itemUiState = viewModel.itemUiState, onItemValueChange = viewModel::updateUiState, onSaveClick = { coroutineScope.launch { viewModel.updateItem() navigateBack() } },
Run the app.
Go to the Edit Item screen.
Make one of the entity values empty so that it is invalid. Notice how the Save button disables automatically.

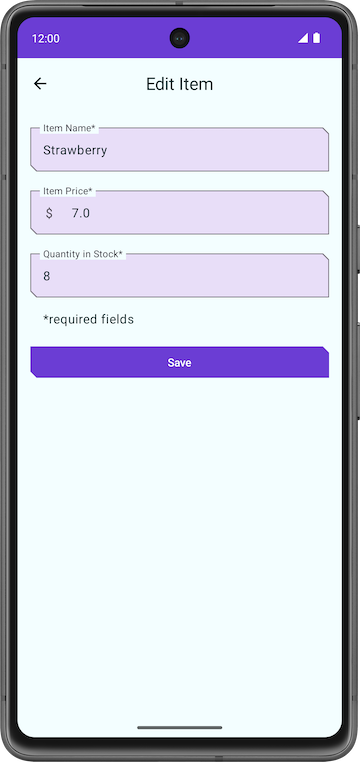
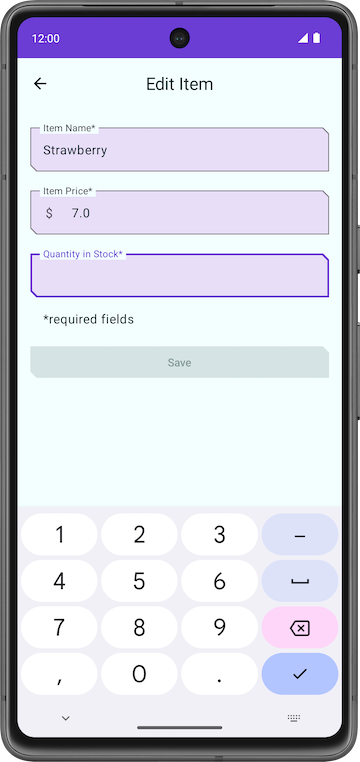
Run the app and try editing inventory items. You are now able to edit any item in the Inventory app database.
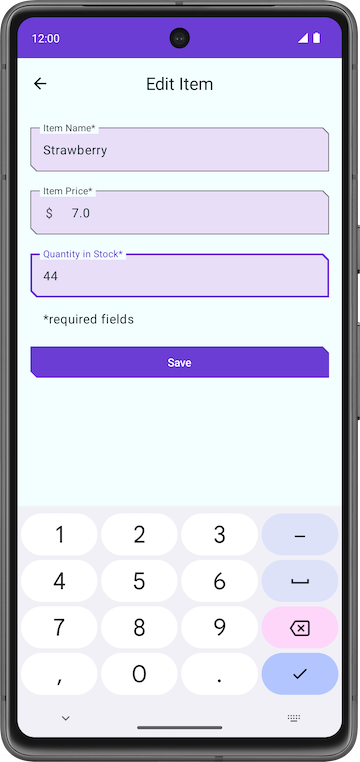
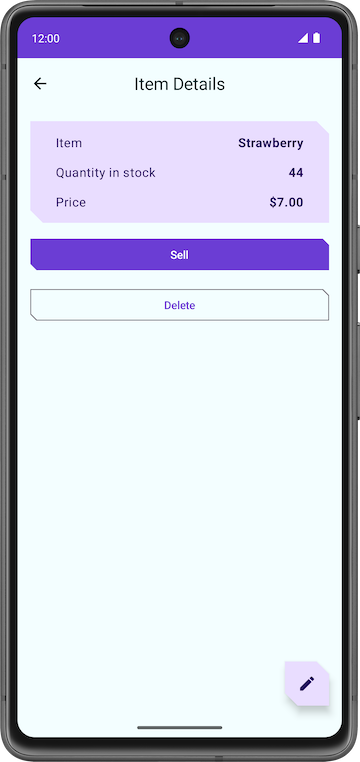
Congratulations on creating your first app that uses Room to manage the database!
Solution code: Inventory app
Branch: main
Clone:
$ git clone https://github.com/google-developer-training/basic-android-kotlin-compose-training-inventory-app.git
$ cd basic-android-kotlin-compose-training-inventory-app
$ git checkout main
In-lesson Practice: Bus Schedule app
You’ve learnt how to implement a Room database in an Android app. This exercise provides the opportunity to gain more familiarity with the implementation of Room databases through an independently driven set of steps.
In this practice set, you take the concepts you learnt to complete the Bus Schedule app. This app presents the user with a list of bus stops and scheduled departures using data provided from a Room database.
You’ll complete the Bus Schedule app by implementing a database and then delivering data to the UI using the database. A database file in the asset directory found in the starter code provides data for the app. You load this data into a database and make it available for read usage by the app.
After you complete the app, it shows a list of bus stops and corresponding arrival times. You can click an item in the list to trigger navigation to a detail screen that provides data for that stop.
The completed app shows this data, loaded from a Room database:
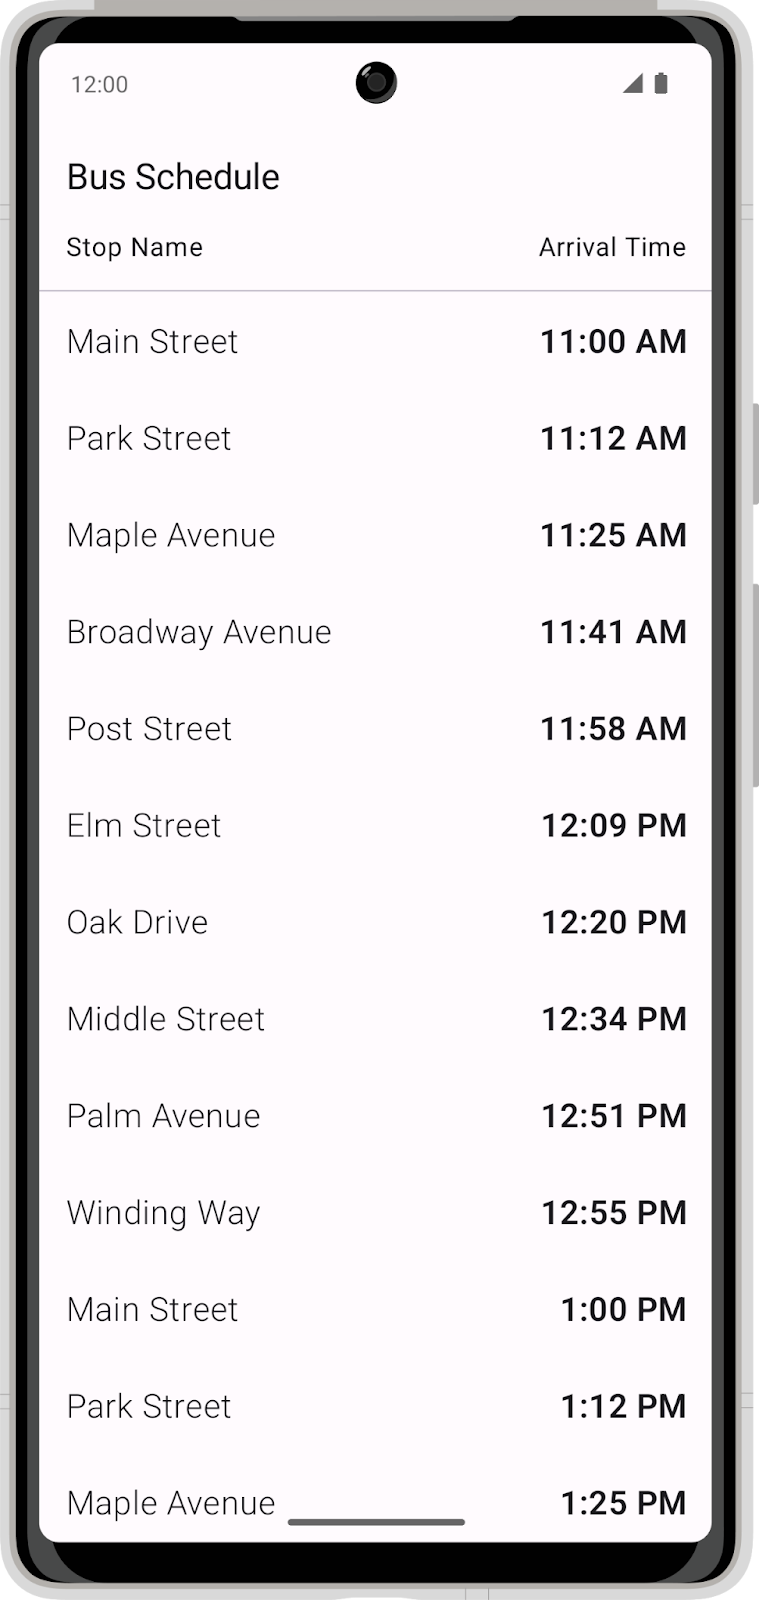
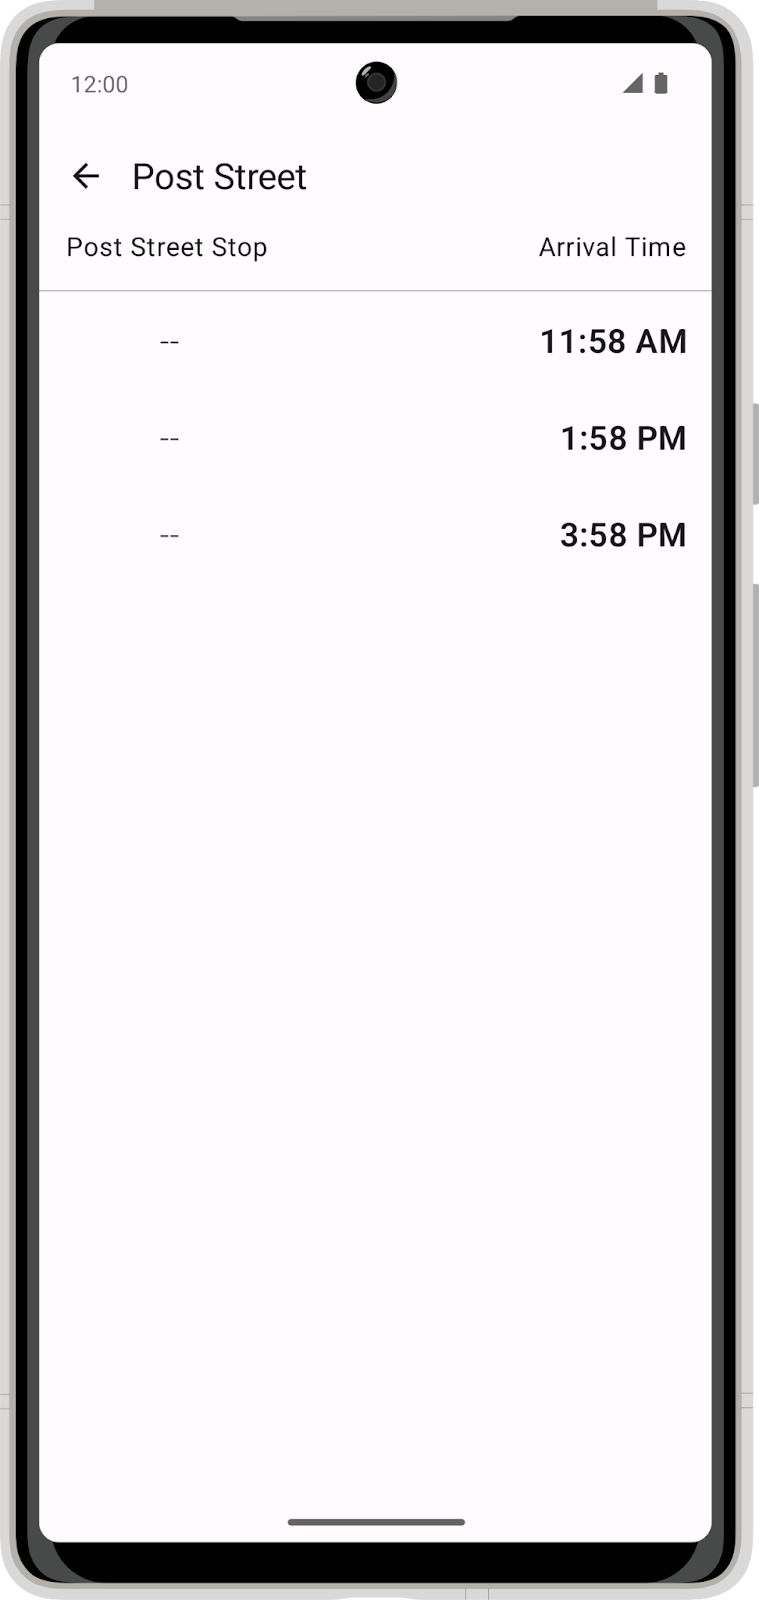
Starter code: Bus Schedule app
Branch: starter
Clone:
$ git clone https://github.com/google-developer-training/basic-android-kotlin-compose-training-bus-schedule-app.git
$ cd basic-android-kotlin-compose-training-bus-schedule-app
$ git checkout starter
Open the Bus Schedule app code in Android Studio.
Click the Run button to build and run the app.
The app is expected to display a schedule showing one stop when built from the
starterbranch code.
Add dependencies
Add the following dependencies to the app:
app/build.gradle.ktsimplementation("androidx.room:room-ktx:2.6.1") implementation("androidx.room:room-runtime:2.6.1") ksp("androidx.room:room-compiler:2.6.1")
You should get the most current stable version of
roomfrom the Room documentation and add the correct version number. As at March 2025, the latest version is 2.6.1.
Create a Room entity
Convert the current Bus Schedule data class into a
Room Entity.The following image shows a sample of what the final data table looks like, including the schema and
Entityproperty.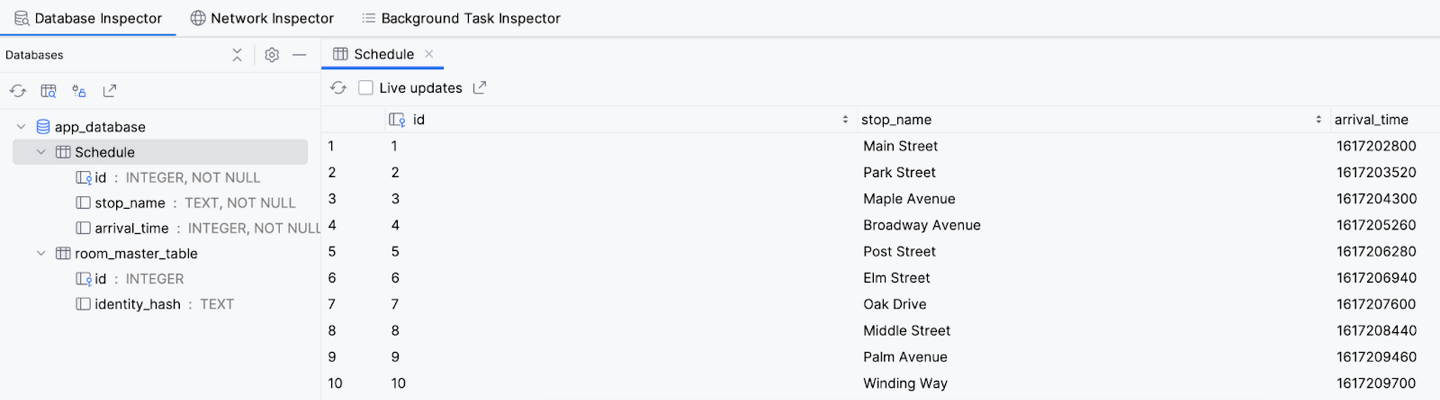
Create a data access object
Create a data access object (DAO) to access the database. The DAO provides a method to retrieve all the items in the database and a method to retrieve a single item with the name of the bus stop. Make sure to order the schedule by arrival time.
Create database instance
Create a Room database that uses the
Entityand your DAO. The database initializes itself with data from theassets/database/bus_schedule.dbfile in the starter code.
Update the ViewModel
Update the ViewModel to retrieve data from the DAO and provide it to the UI instead of supplying sample data. Make sure to leverage both of your DAO methods to supply data for the list and for individual stops.
Solution code: Bus Schedule app
Branch: main
Clone:
$ git clone https://github.com/google-developer-training/basic-android-kotlin-compose-training-bus-schedule-app.git
$ cd basic-android-kotlin-compose-training-bus-schedule-app
$ git checkout main
Project: Create a flight search app
In this project, you’ll build the Flight Search app in which users enter an airport and can view a list of destinations using that airport as a departure. The Flight Search app should to meet the following requirements:
Provide a text field for the user to enter an airport name or International Air Transport Association (IATA) airport identifier.
Query the database to provide autocomplete suggestions as the user types.
When the user chooses a suggestion, generate a list of available flights from that airport, including the IATA identifier and airport name to other airports in the database.
Let the user save favorite individual routes.
When no search query is entered, display all the user-selected favorite routes in a list.
Save the search text with Preferences DataStore. When the user reopens the app, the search text, if any, needs to prepopulate the text field with appropriate results from the database.
We’ve provided a prepopulated database for this project. However, the expectation is for you to build the app from scratch per the requirements—practice for the actual work you do as an Android developer. This project is also a good chance to revisit or further refine your UI building skills with Compose, as you haven’t needed to do much UI work since Unit 4.
Get the flights database
The data for this app comes from the flights database. The flights database contains two tables, airport and favorite.
The airport table contains the following schema.
Column
Data type
Description
idINTEGERUnique identifier (primary key)
iata_codeVARCHAR3 letter IATA code
nameVARCHARFull airport name
passengersINTEGERNumber of passengers per year
The favorite table contains the following schema.
Column
Data type
Description
idINTEGERUnique identifier (primary key)
departure_codeVARCHARIATA code for departure
destination_codeVARCHARIATA code for destination
You can use the airport table to search for airports and build a list of potential flights. You use the favorite table, which is initially empty, to save pairs of departure and arrival destinations selected by the user.
Download the
flight_search.dbfile from theprojectbranch of the SQL Basics GitHub repository.
Plan your app
Plan your UI
You’re welcome to design your app however you like. As a guide, the following descriptions and images is an example of what a user might expect to see in the app.
When the user first opens the app, they see an empty screen with a text field, prompting for an airport.
When the user starts typing, the app displays a list of autocomplete suggestions that match either the airport name or identifier.
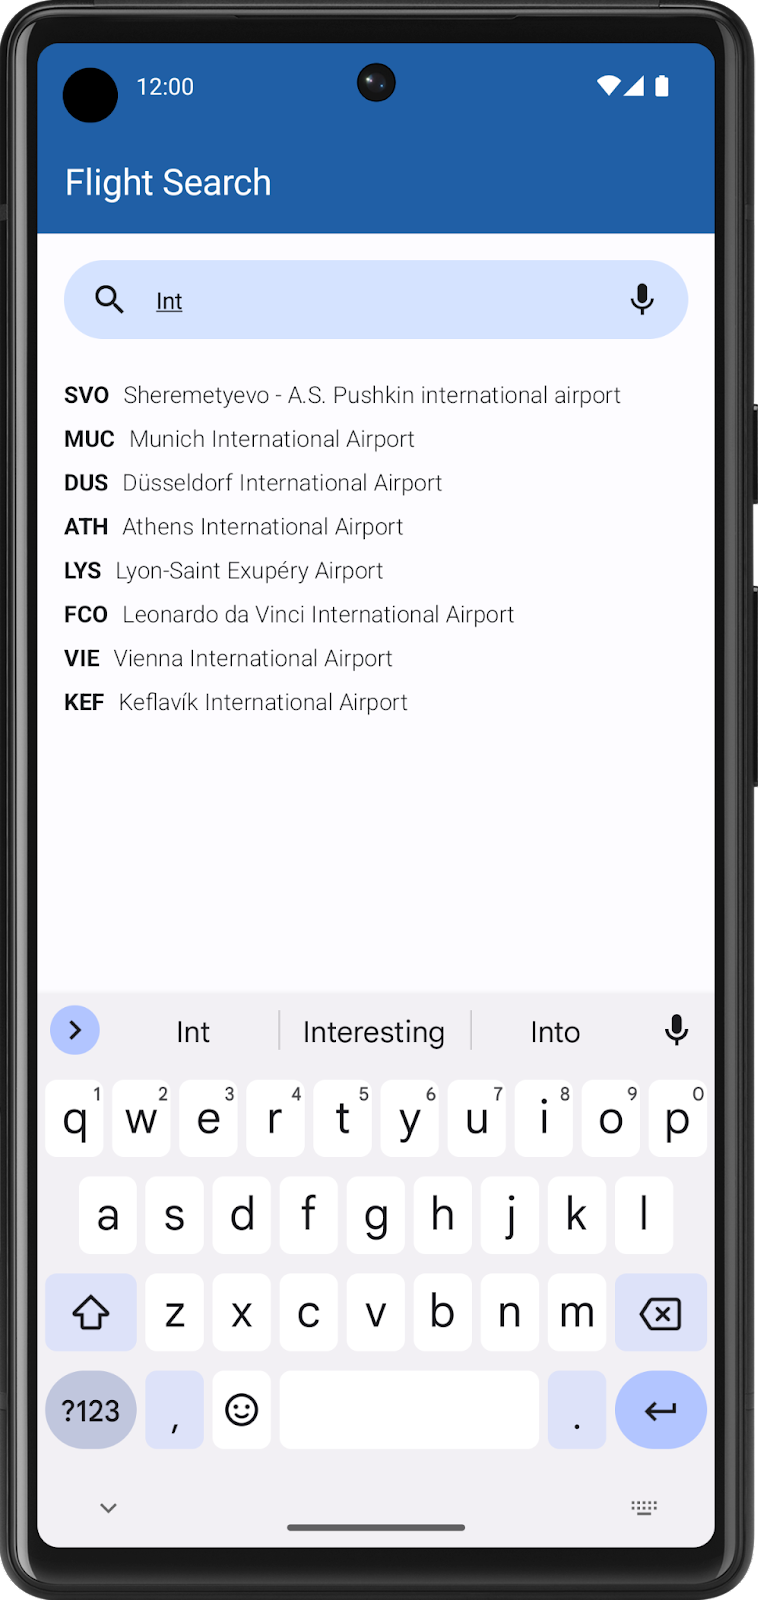
When the user selects a suggestion, the app displays a list of all possible flights from that airport. Each item includes the identifier and names for both airports, and a button to save the destination as a favorite. Feel free to experiment with the layout so long as it conveys all necessary information.
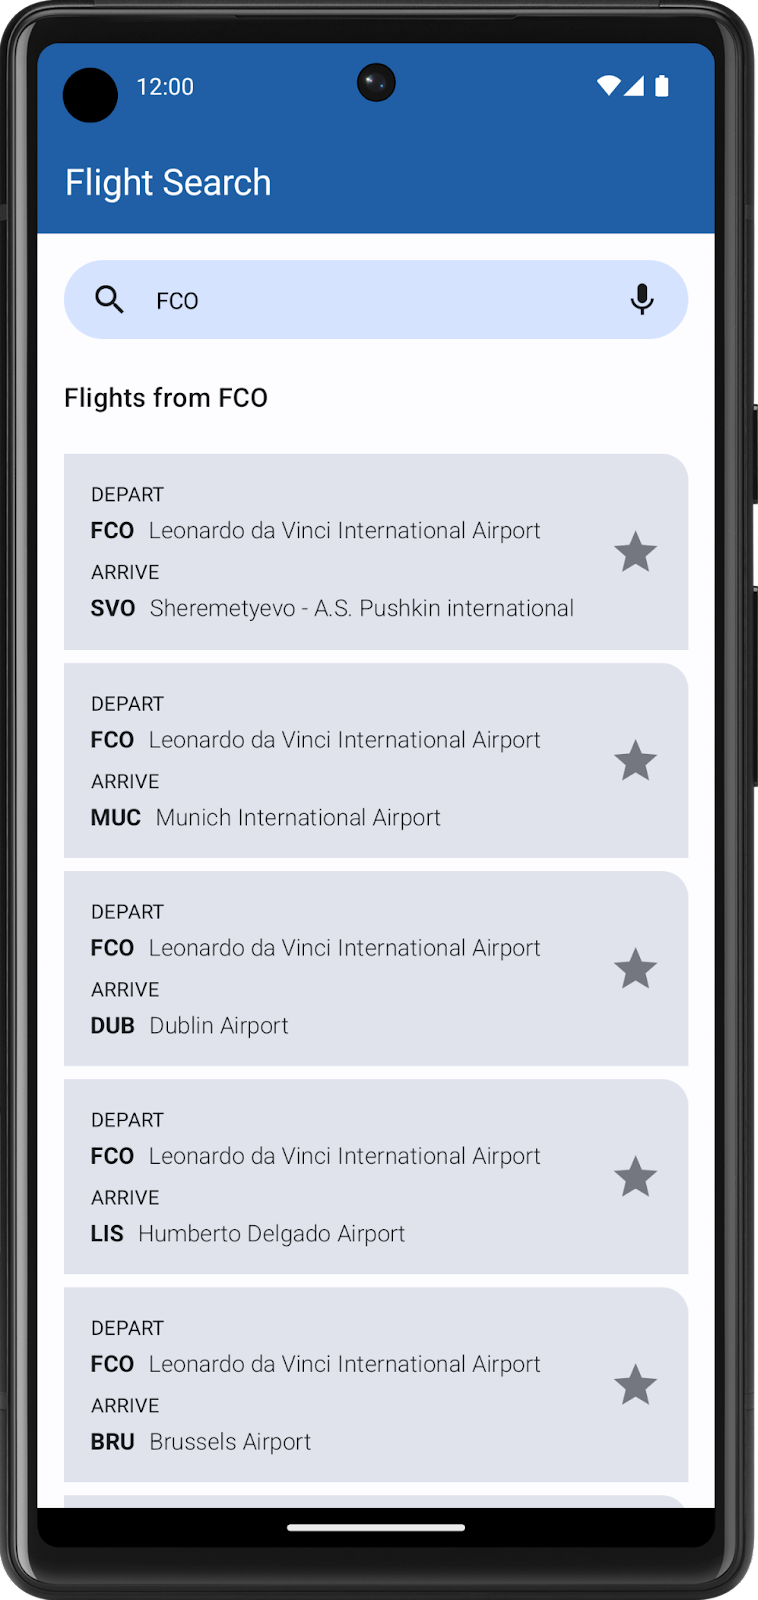
When the user clears the search box or does not enter a search query, the app displays a list of saved favorite destinations, if any exist.
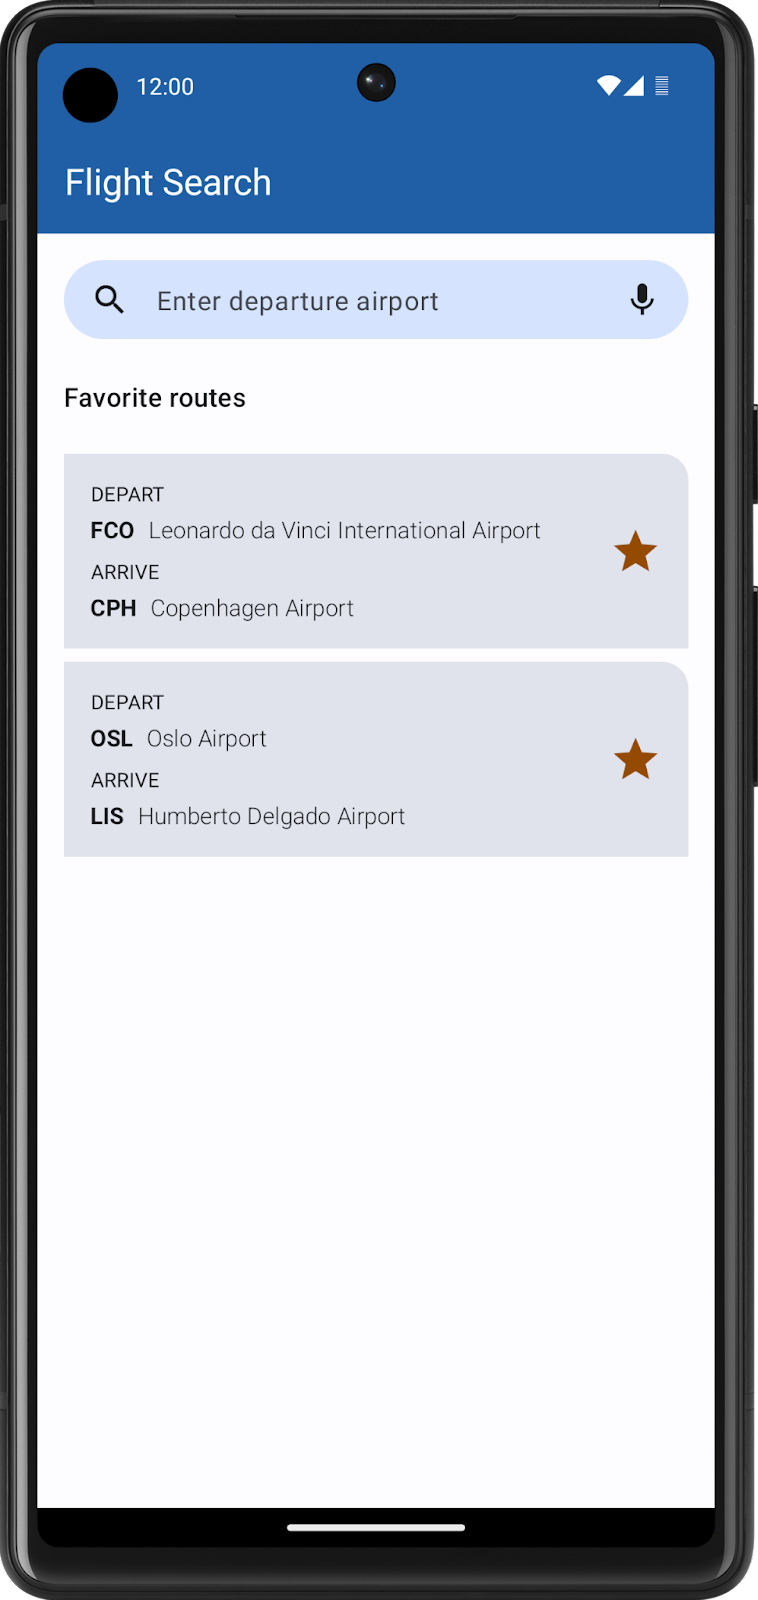
Tip
Use a
LazyColumnto display autocomplete suggestions and search results. You might want to wrap your layout in a Box and use animation APIs to display the autocomplete suggestions in front of the search results list. Your UI then has two lazy columns: the search results, which the app always displays, and the autocomplete suggestions, which the app displays conditionally while the user types.
Use Room to integrate the flights database
In order to implement the features above, you need to leverage your knowledge of SQL and Room. The database already consists of two tables, airport and favorite, and you need entities for each one. Select the appropriate Kotlin data types so that you can access the values in each table.
Additionally, you need to consider the following requirements when querying the flights database and persisting data:
Search for autocomplete suggestions in the airport table. Keep in mind that the user might already know the airport code, so you need to check their input against the
iata_codecolumn, in addition to thenamecolumn, when searching for text. Remember that you can use theLIKEkeyword to perform text searches.Show more frequently visited airports in descending order by sorting on the passengers column.
Assume that every airport has flights to every other airport in the database (except for itself).
When no text is in the search box, display a list of favorite flights, showing the departure and destination. As the favorite table only includes columns for the airport codes, you’re not expected to show the airport names in this list.
Perform all database querying with SQL and Room APIs. The whole point is to NOT load your entire database into memory at once, only to retrieve the required data as needed.
Persist user state with Preferences DataStore
In addition to SQL and Room, you also know how to persist individual values like user settings. For the Flight Search app, you need to store the user’s search string in Preferences DataStore so that it populates when the user relaunches the app. If the text field is empty when the user exits the app, then the list of favorite flights needs to display instead.
Build the Flight Search app
Now that you’ve read through all the requirements, it’s time to build your app. Although this unit focuses exclusively on data persistence, it’s important to continue to get cumulative practice. While you’ve seen example screenshots of the Flight Search app in action, this project is your opportunity to make the app your own and stand out.
Although these exact tasks are unfamiliar, you already know all the core concepts necessary to build this project. If you get stuck or need a refresher, you can refer to the previous codelabs.
Most importantly, enjoy the process! Learning is a journey. Even if you find this project challenging, you’ll probably learn something new and then find the same problems easy to solve the next time. Have fun, and see you in the next unit!
Week 10 Blended Learning Questions
In a hot flow, the producer keeps emitting even if there are no collectors. Share a specific example of a TikTok feature that might be suitable for:
a cold and lazy flow
a hot flow
Explain the roles of Room entities, Data Access Objects, and the Room Database class. Describe how they work together to provide a persistent data storage solution.