Week 2: Building App UI
Kotlin fundamentals
Conditionals
ifstatements:if (condition1) { // code to execute if condition1 is true } else if (condition2) { // code to execute if condition2 is false } else if (condition3) { // code to execute if condition3 is false } else { // code to execute if condition is false }
When there are more than 2 branches, use the
whenstatement.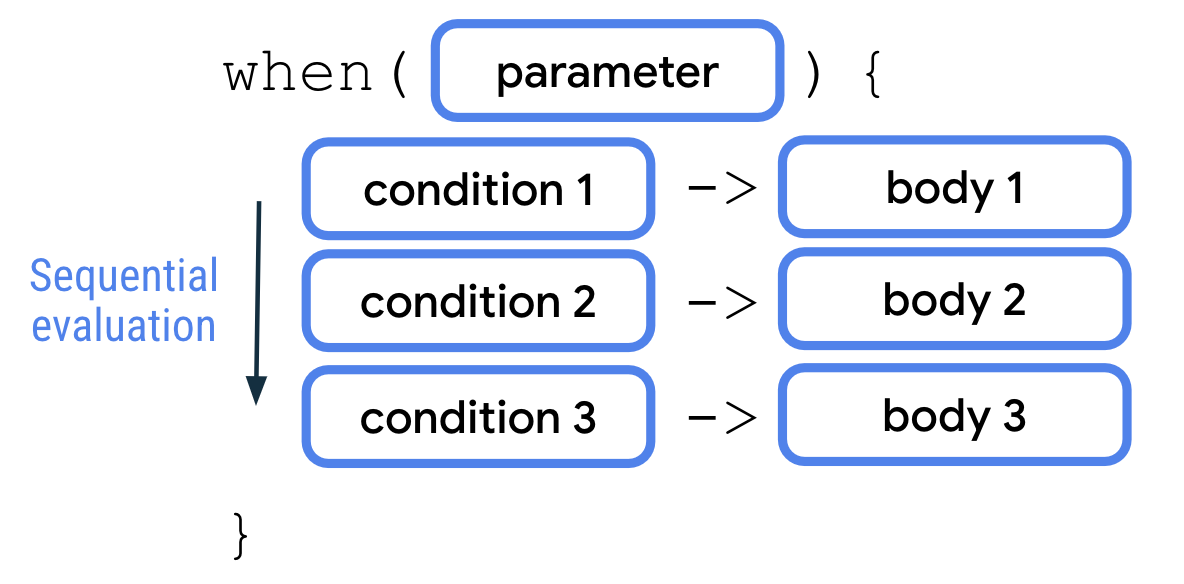
Examples:
fun main() {
    val trafficLightColor = "Black"

    when (trafficLightColor) {
        "Red" -> println("Stop")
        "Yellow" -> println("Slow")
        "Green" -> println("Go")
        else -> println("Invalid traffic-light color")
    }
}
fun main() {
    val x = 3

    when (x) {
        2 -> println("x is a prime number between 1 and 10.")
        3 -> println("x is a prime number between 1 and 10.")
        5 -> println("x is a prime number between 1 and 10.")
        7 -> println("x is a prime number between 1 and 10.")
        else -> println("x isn't a prime number between 1 and 10.")
    }
}
Use
,to denote multiple conditions:
Example:
fun main() {
    val x = 3

    when (x) {
        2, 3, 5, 7 -> println("x is a prime number between 1 and 10.")
        else -> println("x isn't a prime number between 1 and 10.")
    }
}
Use the
inkeyword and a range of values:
fun main() {
    val x = 3

    when (x) {
        2, 3, 5, 7 -> println("x is a prime number between 1 and 10.")
        in 1..10 -> println("x is a number between 1 and 10, but not a prime number.")
        else -> println("x isn't a prime number between 1 and 10.")
    }
}
Use the
iskeyword to check the data type: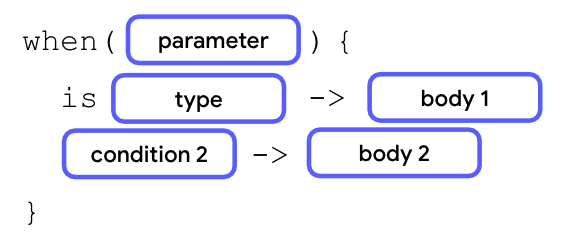
fun main() {
    val x: Any = 20

    when (x) {
        2, 3, 5, 7 -> println("x is a prime number between 1 and 10.")
        in 1..10 -> println("x is a number between 1 and 10, but not a prime number.")
        is Int -> println("x is an integer number, but not between 1 and 10.")
        else -> println("x isn't an integer number.")
    }
}
You can also use conditionals as expressions to return different values for each branch of condition:
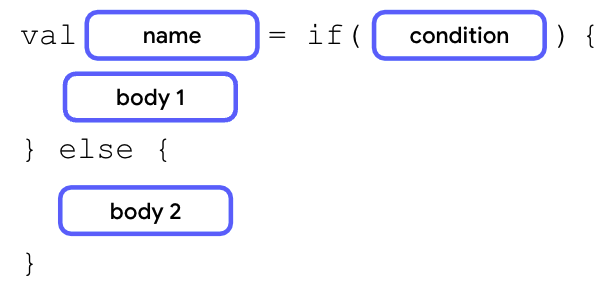
If the bodies only contain a return value or expression, you can remove the curly braces to make the code more concise.
Examples:
fun main() {
    val trafficLightColor = "Black"

    val message =
        if (trafficLightColor == "Red") "Stop"
        else if (trafficLightColor == "Yellow") "Slow"
        else if (trafficLightColor == "Green") "Go"
        else "Invalid traffic-light color"

    println(message)
}
fun main() {
    val trafficLightColor = "Amber"

    val message = when(trafficLightColor) {
        "Red" -> "Stop"
        "Yellow", "Amber" -> "Slow"
        "Green" -> "Go"
        else -> "Invalid traffic-light color"
    }
    println(message)
}
In most cases, a
whenexpression requires theelsebranch because thewhenexpression needs to return a value. The Kotlin compiler checks whether all the branches are exhaustive. Anelsebranch ensures that there won’t be a scenario in which the variable doesn’t get assigned a value.
Nullability
Use
nullto indicate that there’s no value associated with a certain variable. Example:fun main() { val favoriteActor = null }
Nullable vs non-nullable types:
Nullable types are variables that can hold
null.Non-nullable types are variables that cannot hold
null.
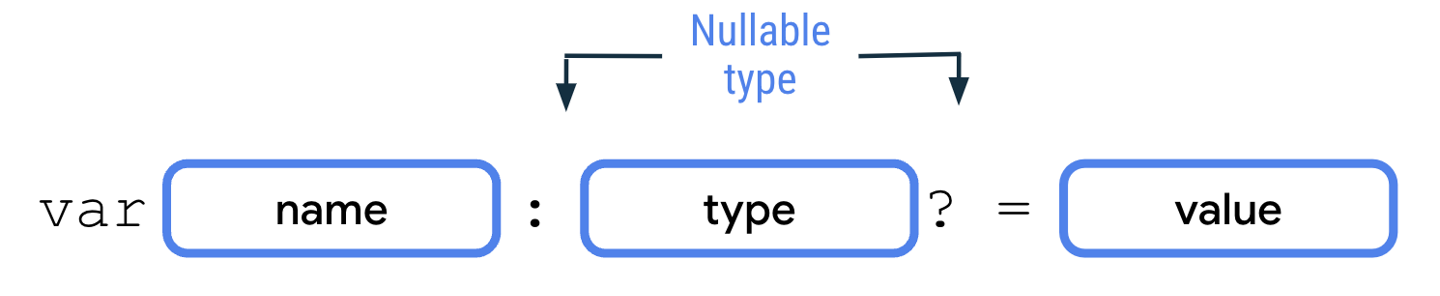
For example, a
String?type can hold either a string ornull, whereas aStringtype can only hold a string. To declare a nullable variable, you need to explicitly add the nullable type. Without the nullable type, the Kotlin compiler infers that it’s a non-nullable type.fun main() { var number: Int? = 10 println(number) number = null println(number) }
Note
While you should use nullable variables for variables that can carry
null, you should use non-nullable variables for variables that can never carrynullbecause the access of nullable variables requires more complex handling.The code below produces an error message:
fun main() {
    var favoriteActor: String? = "Sandra Solulu"
    println(favoriteActor.length)
}

This error is a compile error, or compile-time error. A compile error happens when Kotlin isn’t able to compile the code due to a syntax error in your code.
Kotlin achieves
nullsafety, which refers to a guarantee that no accidental calls are made on potentiallynullvariables. This doesn’t mean that variables can’t benull. It means that if a member of a variable is accessed, the variable itself can’t benull.This is critical because if there’s an attempt to access a member of a variable that’s
null- known as anullreference - the app crashes. This type of crash is known as a runtime error, in which the error happens after the code has been compiled, and runs.Due to
nullsafety, such runtime errors are prevented because the Kotlin compiler forces anullcheck for nullable types. Anullcheck refers to a process of checking whether a variable could benull, before it’s accessed and treated as a non-nullable type.There are various operators used to work with nullable variables.
The
?.safe call operator is used to access methods or properties of nullable variables.
The
?.safe call operator allows safer access to nullable variables because the Kotlin compiler stops any attempt of member access tonullreferences and returnsnullfor the member accessed. Example:println(favoriteActor?.length)
When the below code is run, the output is
null. The program doesn’t crash despite an attempt to access thelengthproperty of anullvariable. The safe call expression simply returnsnull.fun main() { var favoriteActor: String? = null println(favoriteActor?.length) }
Note
You can also use the
?.safe call operators on non-nullable variables to access a method or property. While the Kotlin compiler won’t give any error for this, it’s unnecessary because the access of methods or properties for non-nullable variables is always safe.The
!!not-null assertion operator is used to access methods or properties of nullable variables.
If you use the
!!not-null assertion, it means that you assert that the value of the variable isn’t null, regardless of whether it is or isn’t. You’re telling the compiler, I’m very very very sure that this value isn’t null, don’t complain about it during compile time.Unlike
?.safe-call operators, the use of a!!not-null assertion operator may result in aNullPointerExceptionerror being thrown if the nullable variable is indeednull. Thus, it should be done only when the variable is always non-nullable or proper exception handling is set in place.Example:
fun main() {
    var favoriteActor: String? = "Sandra Solulu"
    println(favoriteActor!!.length)
}
In the above code, if the
!!is removed, the compiler complains:Only safe (?.) or non-null asserted (!!.) calls are allowed on a nullable receiver of type 'kotlin.String?'.
By adding
!!, you’re telling the compiler that the value will never be null, and the compiler won’t complain during compile-time. However, if you were wrong and the value is indeed null, aNullPointerExceptionerror is thrown during run-time.Example of code that will not cause any compile-time error, but will cause a
NullPointerExceptionrun-time error:fun main() { var favoriteActor: String? = null println(favoriteActor!!.length) }
To perform
nullchecks, you can check that the nullable variable isn’t equal tonullwith the!=comparison operator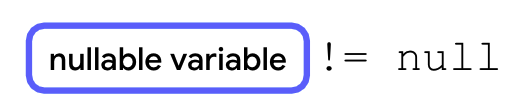
You can also check if a variable is null using
==To use
if/elsetogether with anullcheck: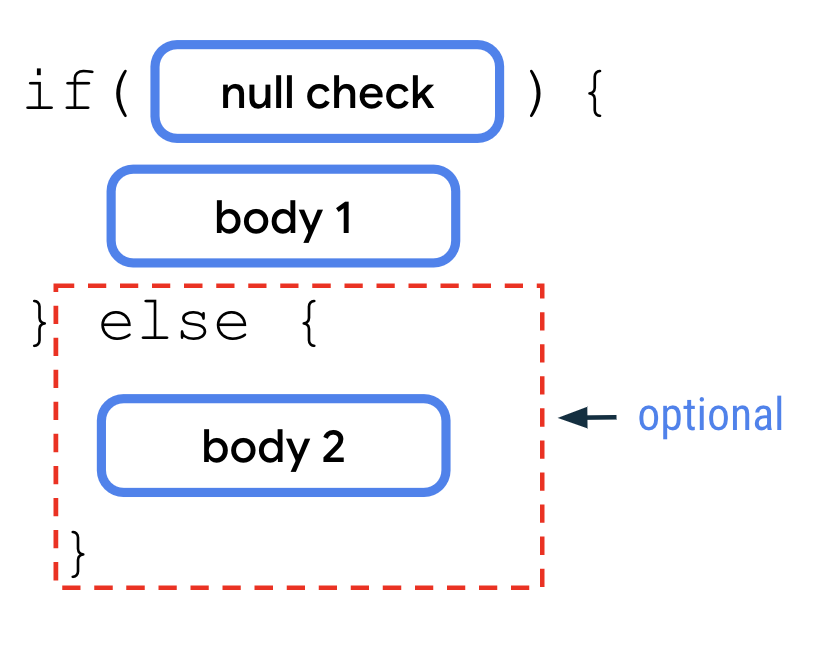
The
nullcheck andifcondition are suitable when there are multiple lines of code that use the nullable variable. Example:fun main() { var favoriteActor: String? = "Sandra Solulu" if (favoriteActor != null) { println("Your favorite actor's name is ${favoriteActor}.") println("The number of characters in your favorite actor's name is ${favoriteActor.length}.") } else { println("You didn't input a name.") } }
The
nullcheck andif/elseare suitable to convert a nullable variable to a non-nullable variable.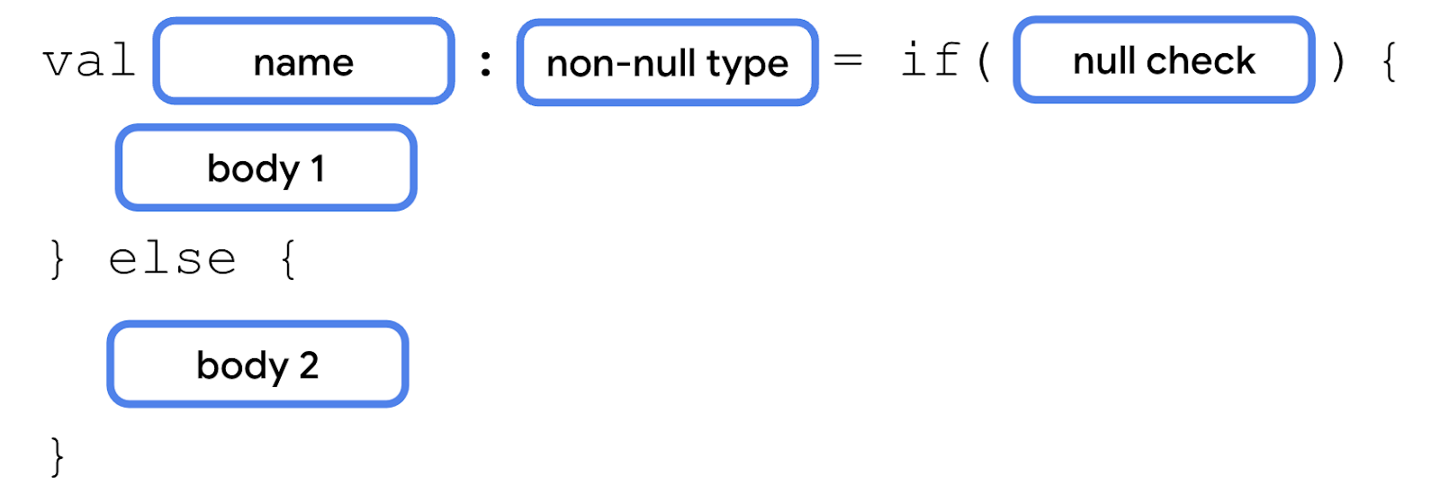
Example:
fun main() {
    var favoriteActor: String? = "Sandra Solulu"

    val lengthOfName = if (favoriteActor != null) {
        favoriteActor.length
    } else {
        0
    }

    println("The number of characters in your favorite actor's name is $lengthOfName.")
}
The
?:Elvis operator can be used together with the?.safe-call operator. It adds a default value when the?.safe-call operator returnsnull.
If the variable isn’t
null, the expression before the?:Elvis operator executes. If the variable isnull, the expression after the?:Elvis operator executes.Example:
fun main() {
    var favoriteActor: String? = "Sandra Solulu"

    val lengthOfName = favoriteActor?.length ?: 0

    println("The number of characters in your favorite actor's name is $lengthOfName.")
}
Classes and Objects
Classes provide blueprints from which objects can be constructed. An object is an instance of a class that consists of data specific to that object. The terms object and class instance are interchangable.
As an analogy, imagine that you build a house. A class is similar to an architect’s design plan, also known as a blueprint. The blueprint isn’t the house; it’s the instruction for how to build the house. The house is the actual thing, or object, which is built based on the blueprint.
Just like the house blueprint specifies multiple rooms and each room has its own design and purpose, each class has its own design and purpose. To know how to design your classes, you need to get familiar with object-oriented programming (OOP), a framework that teaches you to enclose data, logic, and behavior in objects.
OOP helps you simplify complex, real-world problems into smaller objects. There are four basic concepts of OOP:
Encapsulation. Wraps related properties, and methods that perform actions on those properties, in a class. For example, a phone encapsulates a camera, display, memory cards, and several other hardware and software components. You don’t have to worry about how components are wired internally.
Abstraction. An extension to encapsulation. The idea is to hide the internal implementation logic as much as possible. For example, to take a photo with your mobile phone, all you need to do is open the camera app, point your phone to the scene that you want to capture, and click a button to capture the photo. You don’t need to know how the camera app is built or how the camera hardware on your mobile phone actually works. In short, the internal mechanics of the camera app and how a mobile camera captures the photos are abstracted to let you perform the tasks that matter.
Inheritance. Enables you to build a class upon the characteristics and behavior of other classes by establishing a parent-child relationship. For example, there are different manufacturers who produce a variety of mobile devices that run Android OS, but the UI for each of the devices is different. In other words, the manufacturers inherit the Android OS feature and build their customizations on top of it.
Polymorphism. The word is an adaptation of the Greek root poly-, which means many, and -morphism, which means forms. Polymorphism is the ability to use different objects in a single, common way. For example, when you connect a Bluetooth speaker to your mobile phone, the phone only needs to know that there’s a device that can play audio over Bluetooth. However, there are a variety of Bluetooth speakers that you can choose from and your phone doesn’t need to know how to work with each of them specifically.
Smart Home App
To learn about classes and objects, we’ll build a smart home app that simulates the behavior of smart devices. The app consists of a class structure that represents smart devices, such as a smart TV and a smart light.
The code that we write won’t interact with real hardware devices. Instead, we’ll print actions in the console using
println()to simulate the interactions.
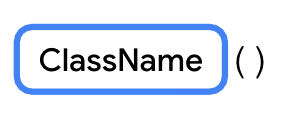
Define a class
When you define a class, you specify the properties and methods that all objects of that class should have.
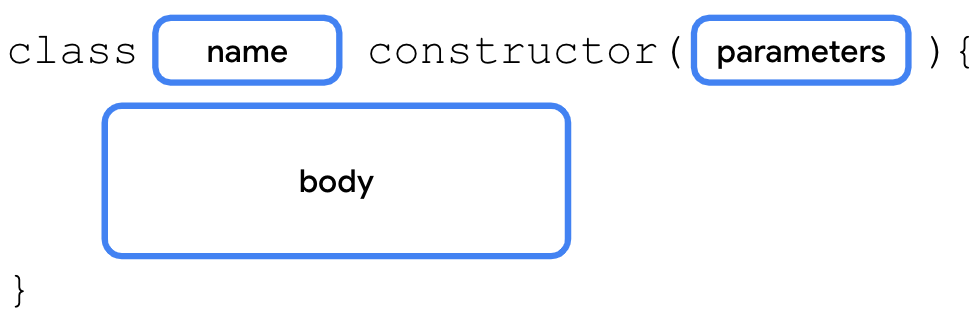
To define a class:
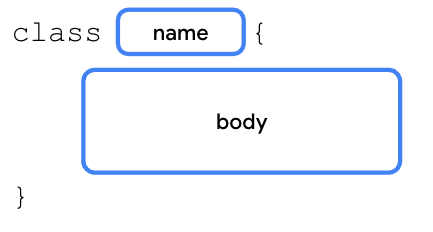
The part before the opening curly brace is known as the class header.
Class naming conventions:
Don’t use Kotlin keywords (like
fun, etc) as a class nameUse PascalCase: each word begins with a capital letter, no spaces.
A class consists of three major parts:
Properties: variables that specify the attributes of the class’s objects.
Methods: functions that contain the class’s behaviors and actions.
Constructors: a special function that creates instances of the class throughout the program in which it’s defined.
Data types like
Int,Float,String, andDoubleare classes. For example, this code creates an object of theIntclass:val number: Int = 1
Example of a bare basic class:
class SmartDevice {
    // empty body
}

fun main() {
}
Create a class instance
A class is a blueprint for an object. The Kotlin runtime uses the class to create an object of that particular type. The
SmartDeviceclass is a blueprint of what a smart device is. To have an actual smart device in your program, you need to create aSmartDeviceobject instance. Creating an object instance is known as instantiation.The instantiation syntax:
To create the object and assign it to a variable:

When using the
valkeyword, the variable is immutable, but the object itself is mutable. This means that you can’t reassign another object to the variable, but you can change the object itself.Example:
val smartTvDevice = SmartDevice()

// Cannot
smartTvDevice = AnotherSmartDevice()

// Can
smartTvDevice.someProperty = "some value"
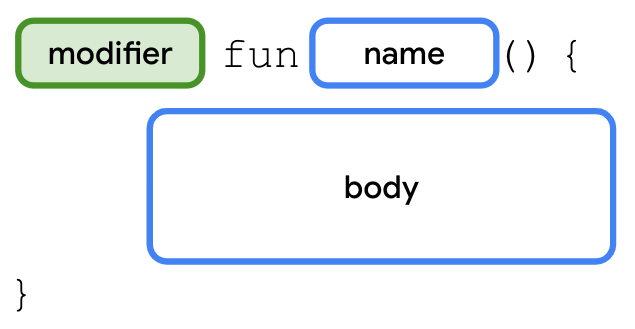
Define class methods
Class methods are actions that the class can perform. They are defined as functions in the class. For example, imagine that you own a smart device, a smart TV, or a smart light, which you can switch on and off with your mobile phone. The smart device is translated to the
SmartDeviceclass in programming, and the action to switch it on and off is represented by theturnOn()andturnOff()functions, which enable the on and off behavior.To define a function in a class, place the function in the class body. A function inside a class body is known as a member function or a method.
Example:
class SmartDevice {
    fun turnOn() {
        println("Smart device is turned on.")
    }

    fun turnOff() {
        println("Smart device is turned off.")
    }
}
So far, you defined a class that serves as a blueprint for a smart device, created an instance of the class, and assigned the instance to a variable. Now you use the
SmartDeviceclass’s methods to turn the device on and off.To call a class method from outside of the class:

Example:
fun main() {
    val smartTvDevice = SmartDevice()
    smartTvDevice.turnOn()
    smartTvDevice.turnOff()
}
Define class properties
Class methods define the actions that a class can perform. Class properties define the class’s characteristics or data attributes. For example, a smart device has these properties:
Name: name of the device.
Category: type of the device, such as entertainment, utility, or cooking.
Device status: whether is is on, off, online, or offline. The device is considered online when it’s connected to the internet. Otherwise, it’s considered offline.
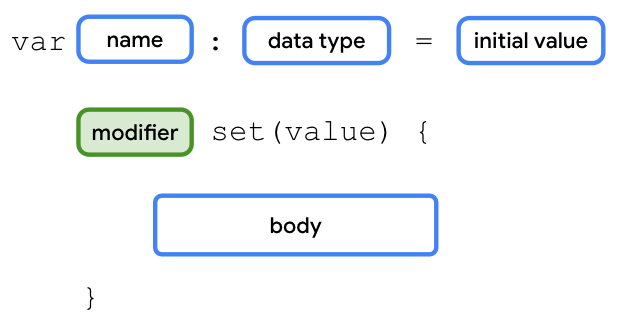
Class properties are defined in the class body. Example:
class SmartDevice {
    val name = "Android TV"
    val category = "Entertainment"
    var deviceStatus = "online"

    fun turnOn() {
        println("Smart device is turned on.")
    }

    fun turnOff() {
        println("Smart device is turned off.")
    }
}

fun main() {
    val smartTvDevice = SmartDevice()
    println("Device name is: ${smartTvDevice.name}")
    smartTvDevice.turnOn()
    smartTvDevice.turnOff()
}
Properties can do more than a variable can. For example, imagine that you create a class structure to represent a smart TV. One of the common actions that you perform is increase and decrease the volume. To represent this action in programming, you can create a property named
speakerVolume, which holds the current volume level set on the TV speaker, but there’s a range in which the value for volume resides. The minimum volume one can set is 0, while the maximum is 100.To ensure that the
speakerVolumeproperty never exceeds 100 or falls below 0, you can write a setter function. When you update the value of the property, you need to check whether the value is in the range of 0 to 100.As another example, imagine that there’s a requirement to ensure that the name is always in uppercase. You can implement a getter function to convert the
nameproperty to uppercase.Full syntax to define a mutable property:
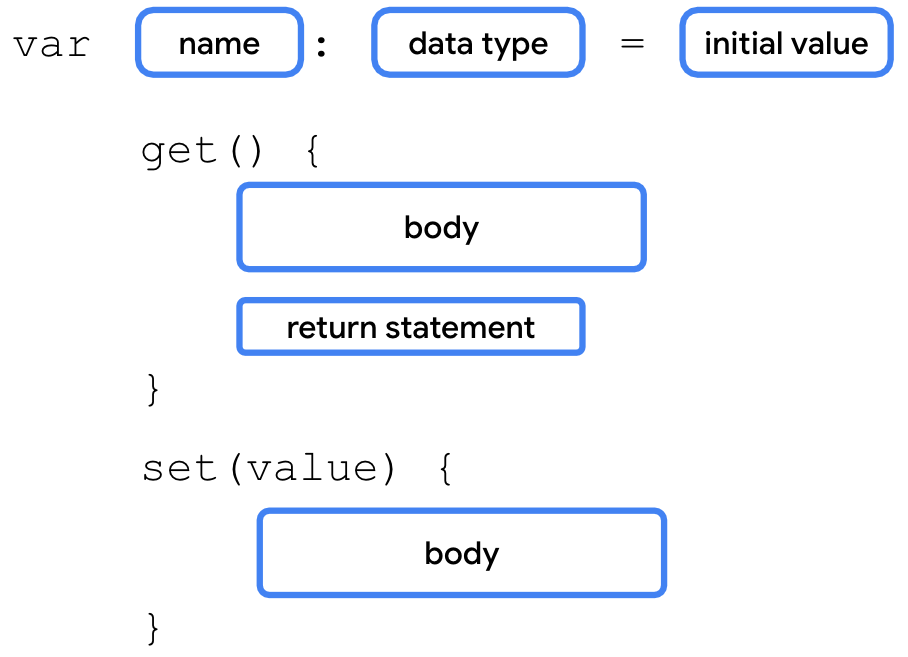
When you don’t define the getter and setter function for a property, the Kotlin compiler internally creates the functions. For example, if you use the
varkeyword to define aspeakerVolumeproperty and assign it a2value, the compiler autogenerates the getter and setter functions as you can see in this code snippet:
var speakerVolume = 2
    get() = field
    set(value) {
        field = value
    }
You won’t see these lines in your code because they’re added by the compiler in the background.
The full syntax for an immutable property has two differences:
It starts with the
valkeyword.The variables of
valtype are read-only variables, so they don’t haveset()functions.
Properties use a backing field to hold a value in memory. A backing field is basically a class variable defined internally. A backing field is scoped to a property, which means that you can only access it through the
get()orset()property functions.To read the property value in the
get()function or update the value in theset()function, you need to use the property’s backing field. It’s autogenerated by the Kotlin compiler and referenced with afieldidentifier.Example: to update the property’s value in the
set()function:var speakerVolume = 2 set(value) { field = value }
Warning
Don’t use the property name to get or set a value. For example, in the
set()function, if you try to assign the value parameter to thespeakerVolumeproperty itself, the code enters an endless loop because the Kotlin runtime tries to update the value for thespeakerVolumeproperty, which triggers a call to the setter function repeatedly.Example: to ensure that the value assigned to the
speakerVolumeproperty is in the range of 0 to 100:var speakerVolume = 2 set(value) { if (value in 0..100) { field = value } }
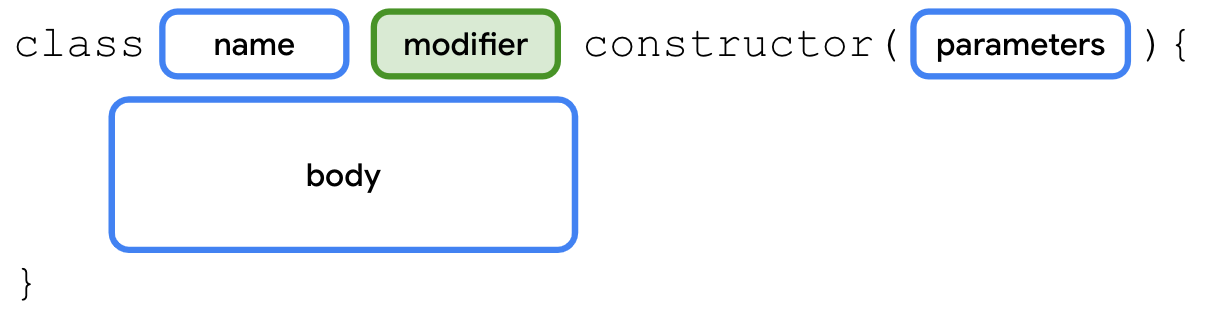
Define a constructor
A constructor specifies how the objects of the class are created. Constructors initialize an object, and make the object ready for use. The code inside the constructor executes when the object of the class is instantiated. You can define a constructor with or without parameters.
A default constructor is a constructor without parameters:
class SmartDevice constructor() {
    ...
}
Kotlin aims to be concise, so you can remove the
constructorkeyword if there are no annotations or visibility modifiers (more on this later), on the constructor.class SmartDevice() { ... }
You can also remove the parentheses if the constructor has no parameters:
class SmartDevice {
    ...
}
The Kotlin compiler autogenerates the default constructor. You won’t see the autogenerated default constructor in your code because it’s added by the compiler in the background.
A parameterized constructor is a constructor that accepts parameters.
In the
SmartDeviceclass, thenameandcategoryproperties are immutable. To maintain immutability but avoid hardcoded values, use a parameterized constructor to initialize them:class SmartDevice(val name: String, val category: String) { var deviceStatus = "online" fun turnOn() { println("Smart device is turned on.") } fun turnOff() { println("Smart device is turned off.") } }
The constructor now accepts parameters to set up its properties. The full syntax to instantiate an object using a parameterized constructor:

Note
If the class doesn’t have a default constructor and you attempt to instantiate the object without arguments, the compiler reports an error.
Example:
SmartDevice("Android TV", "Entertainment")
Both arguments to the constructor are strings. It’s a bit unclear as to which parameter the value should be assigned. To fix this, you can create a constructor with named arguments:
SmartDevice(name = "Android TV", category = "Entertainment")
There are two main types of constructors in Kotlin:
Primary constructor. A class can have only one primary constructor, which is defined as part of the class header. A primary constructor can be a default or parameterized constructor. The primary constructor doesn’t have a body. That means that it can’t contain any code.
Secondary constructor. A class can have multiple secondary constructors. You can define the secondary constructor with or without parameters. The secondary constructor can initialize the class and has a body, which can contain initialization code. If the class has a primary constructor, each secondary constructor needs to initialize the primary constructor.
You can use the primary constructor to initialize properties in the class header. The arguments passed to the constructor are assigned to the properties. The syntax:
The secondary constructor is enclosed in the body of the class. Its syntax:
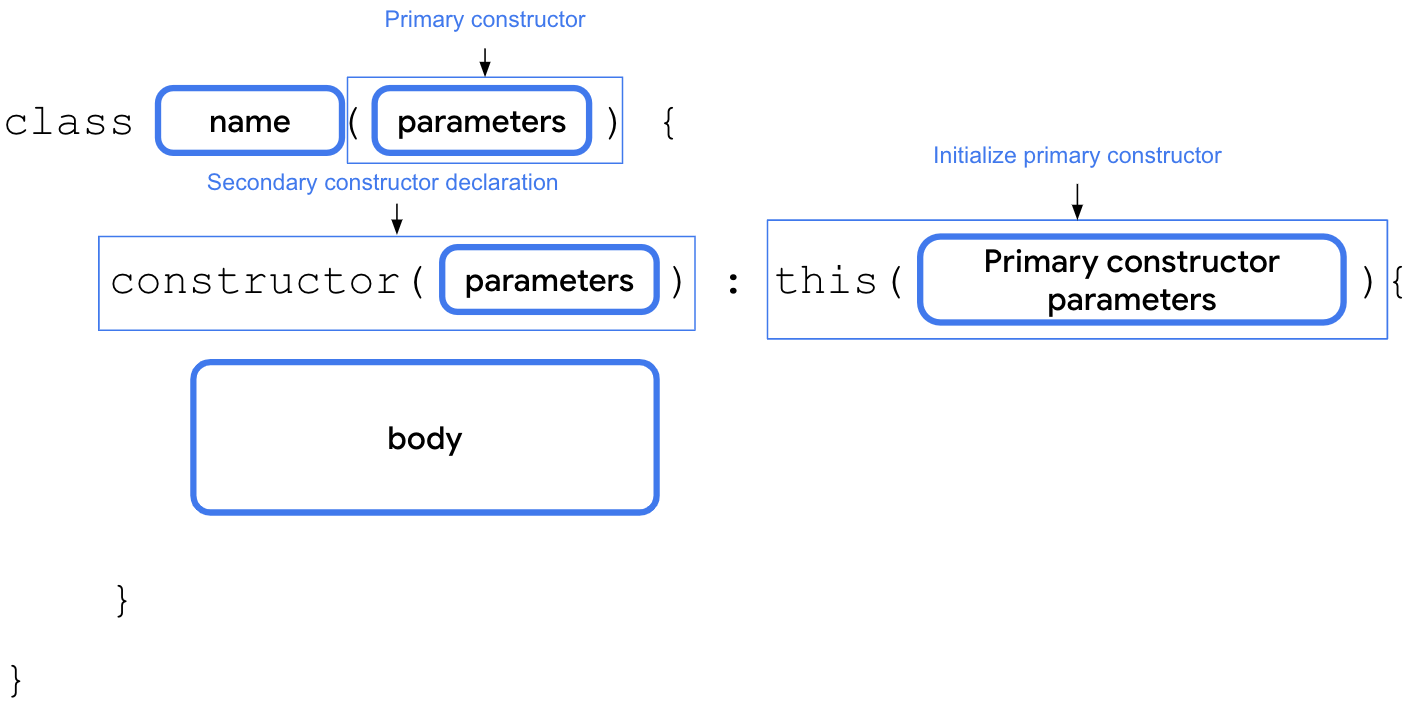
For example, imagine that you want to integrate an API developed by a smart device provider. The API returns a status code of
Inttype to indicate initial device status. The API returns a0if the device is offline and a1if the device is online. For any other integer value, the status is considered unknown. You can create a secondary constructor in theSmartDeviceclass to convert thisstatusCodeparameter to string representation:class SmartDevice(val name: String, val category: String) { var deviceStatus = "online" constructor(name: String, category: String, statusCode: Int) : this(name, category) { deviceStatus = when (statusCode) { 0 -> "offline" 1 -> "online" else -> "unknown" } } ... }
Implement a relationship between classes
Inheritance lets you build a class upon the characteristics and behavior of another class. It helps you write reusable code and establish relationships between classes.
For example, there are many smart device types, such as smart TVs, smart lights, and smart switches. When you represent smart devices in programming, they share some common properties, such as a name, category, and status. They also have common behaviors, such as the ability to turn them on and off.
However, the way to turn on or turn off each smart device is different. For example, to turn on a TV, you might need to turn on the display, and then set up the last known volume level and channel. On the other hand, to turn on a light, you might only need to increase or decrease the brightness.
Also, each of the smart devices has more functions and actions that they can perform. For example, with a TV, you can adjust the volume and change the channel. With a light, you can adjust the brightness or color.
In short, all smart devices have different features, yet share some common characteristics. Duplicating these common characteristics to each of the smart device classes makes the difficult to maintain, hence we make the code reusable with inheritance.
To do so, create a
SmartDeviceparent class, and define these common properties and behaviors. Then, create child classes, such as theSmartTvDeviceandSmartLightDeviceclasses, which inherit the properties of the parent class.In programming terms, we say that the
SmartTvDeviceandSmartLightDeviceclasses extend theSmartDeviceparent class. The parent class is also referred to as a superclass, and the child class as a subclass.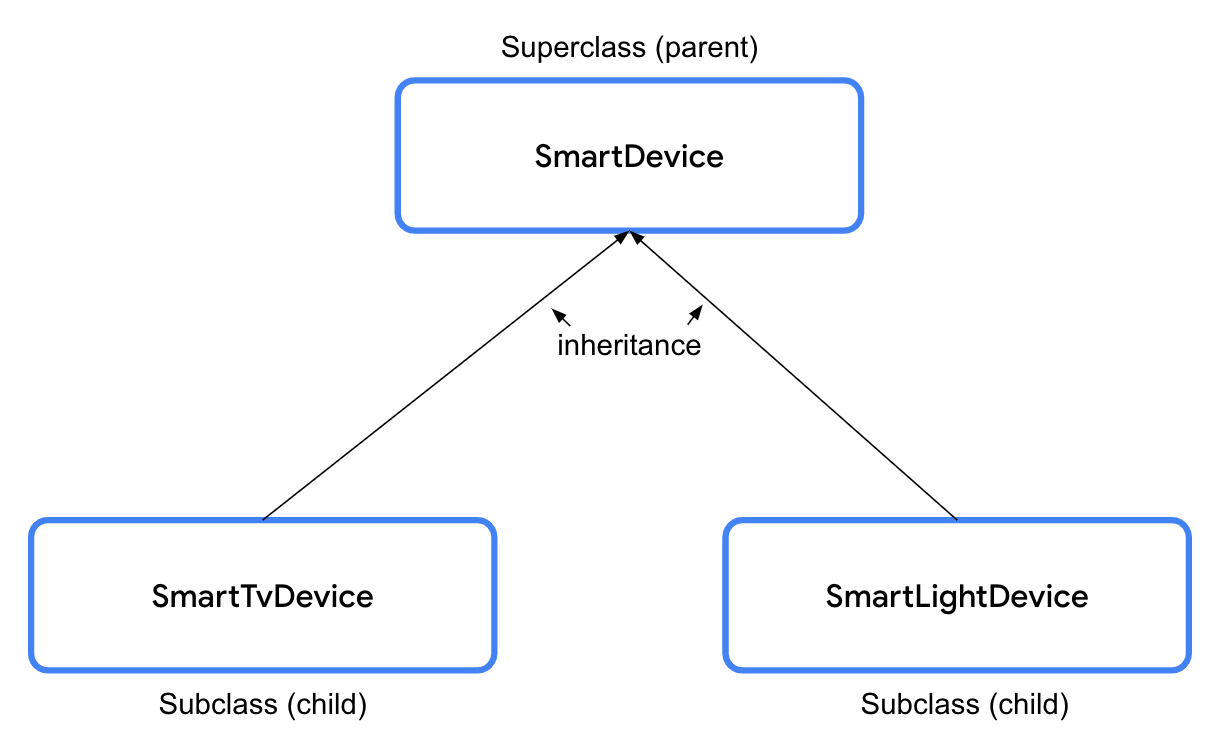
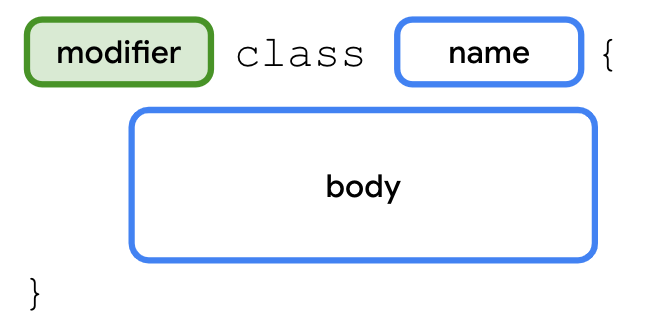
In Kotlin, all classes are final by default. Final means that you can’t extend them. To make a class extendable, it is necessary to use the
openkeyword.The
openkeyword informs the compiler that a class is extendable, so that other subclasses can extend it.open class SmartDevice(val name: String, val category: String) { ... }
Syntax to extend a subclass from a superclass:

Example:
class SmartTvDevice(deviceName: String, deviceCategory: String) :
    SmartDevice(name = deviceName, category = deviceCategory) {
}
The constructor for
SmartTvDevicetakes in 2 parameters:deviceNameanddeviceCategory. These are simply passed on to the superclass constructorSmartDevice().The full
SmartTvDeviceclass might look like this:class SmartTvDevice(deviceName: String, deviceCategory: String) : SmartDevice(name = deviceName, category = deviceCategory) { var speakerVolume = 2 set(value) { if (value in 0..100) { field = value } } var channelNumber = 1 set(value) { if (value in 0..200) { field = value } } fun increaseSpeakerVolume() { speakerVolume++ println("Speaker volume increased to $speakerVolume.") } fun nextChannel() { channelNumber++ println("Channel number increased to $channelNumber.") } }
Sample code for the
SmartLightDeviceclass:class SmartLightDevice(deviceName: String, deviceCategory: String) : SmartDevice(name = deviceName, category = deviceCategory) { var brightnessLevel = 0 set(value) { if (value in 0..100) { field = value } } fun increaseBrightness() { brightnessLevel++ println("Brightness increased to $brightnessLevel.") } }
Inheritance establishes a relationship between two classes in something called an IS-A relationship. An object is also an instance of the class from which it inherits. In a HAS-A relationship, an object can own an instance of another class without actually being an instance of that class itself.
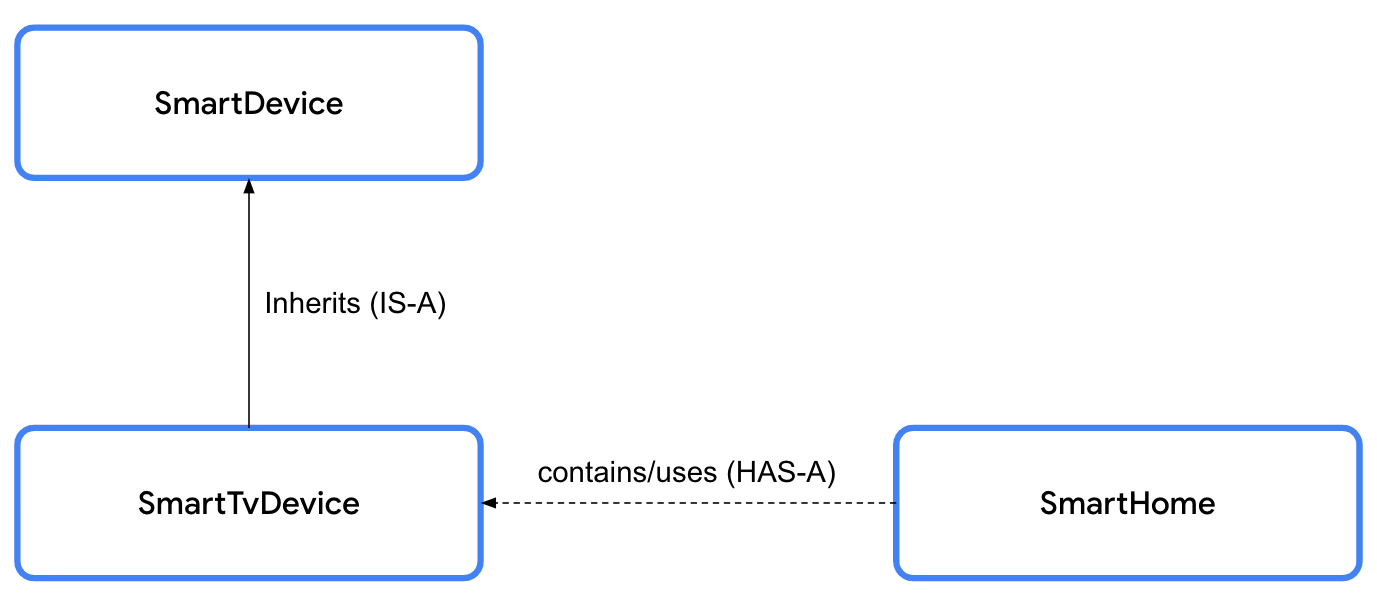
IS-A relationships: the
SmartDevicesuperclass andSmartTvDevicesubclass have an IS-A relationship. Whatever theSmartDevicesuperclass can do, theSmartTvDevicesubclass can do too. The relationship is unidirectional: every smart TV is a smart device, but not every smart device is a smart TV.Example of an IS-A relationship:
// Smart TV IS-A smart device.
class SmartTvDevice : SmartDevice() {
}
Don’t use inheritance only to achieve code reusability. Before you decide, check whether the two classes are related to each other. If they exhibit some relationship, check whether they really qualify for the IS-A relationship. Ask yourself, “Can I say a subclass is a superclass?”. For example, Android is an operating system.
HAS-A relationships: one class contains or uses another class. Example: a home has a smart TV. The HAS-A relationship is also known as composition.
The example below shows the
SmartHomeclass, which contains smart devices. TheSmartHomeclass lets us interact with the smart devices. The smart devices are theSmartTvDeviceandSmartLightDevice.class SmartHome( val smartTvDevice: SmartTvDevice, val smartLightDevice: SmartLightDevice ) { fun turnOnTv() { smartTvDevice.turnOn() } fun turnOffTv() { smartTvDevice.turnOff() } fun increaseTvVolume() { smartTvDevice.increaseSpeakerVolume() } fun changeTvChannelToNext() { smartTvDevice.nextChannel() } fun turnOnLight() { smartLightDevice.turnOn() } fun turnOffLight() { smartLightDevice.turnOff() } fun increaseLightBrightness() { smartLightDevice.increaseBrightness() } fun turnOffAllDevices() { turnOffTv() turnOffLight() } }
Override superclass methods from subclasses
Even though the turn-on and turn-off functionality is supported by all smart devices, the way in which the smart devices perform the functionality differs. To provide this device-specific behavior, you need to override the
turnOn()andturnOff()methods defined in the superclass. To override means to replace the code in the superclass with other code in the subclass.To make a method extendable, use the
openkeyword.open class SmartDevice(val name: String, val category: String) { var deviceStatus = "online" open fun turnOn() { // function body } open fun turnOff() { // function body } }
The
overridekeyword informs the Kotlin runtime to execute the code enclosed in the method defined in the subclass.Sample code for the
SmartLightDeviceclass:class SmartLightDevice(deviceName: String, deviceCategory: String) : SmartDevice(name = deviceName, category = deviceCategory) { var brightnessLevel = 0 set(value) { if (value in 0..100) { field = value } } fun increaseBrightness() { brightnessLevel++ println("Brightness increased to $brightnessLevel.") } override fun turnOn() { deviceStatus = "on" brightnessLevel = 2 println("$name turned on. The brightness level is $brightnessLevel.") } override fun turnOff() { deviceStatus = "off" brightnessLevel = 0 println("Smart Light turned off") } }
Sample code for the
SmartTvDeviceclass:class SmartTvDevice(deviceName: String, deviceCategory: String) : SmartDevice(name = deviceName, category = deviceCategory) { var speakerVolume = 2 set(value) { if (value in 0..100) { field = value } } var channelNumber = 1 set(value) { if (value in 0..200) { field = value } } fun increaseSpeakerVolume() { speakerVolume++ println("Speaker volume increased to $speakerVolume.") } fun nextChannel() { channelNumber++ println("Channel number increased to $channelNumber.") } override fun turnOn() { deviceStatus = "on" println( "$name is turned on. Speaker volume is set to $speakerVolume and channel number is " + "set to $channelNumber." ) } override fun turnOff() { deviceStatus = "off" println("$name turned off") } }
This is an example of polymorphism. When the
turnOn()method of aSmartDevicevariable is called, depending on what the actual value of the variable is, different implementations of theturnOn()method can be executed.
Reuse superclass code in subclasses
In the
turnOn()andturnOff()methods, there’s similarity in how thedeviceStatusvariable is updated, whenever the methods are called in theSmartTvDeviceandSmartLightDevicesubclasses. The code is duplicated. It would be better to put it in theSmartDeviceclass instead. Then, from the subclass, call the common code using thesuperkeyword.Syntax for a subclass to call a method from the superclass:

Sample code for the
SmartTvDevice:class SmartTvDevice(deviceName: String, deviceCategory: String) : SmartDevice(name = deviceName, category = deviceCategory) { var speakerVolume = 2 set(value) { if (value in 0..100) { field = value } } var channelNumber = 1 set(value) { if (value in 0..200) { field = value } } fun increaseSpeakerVolume() { speakerVolume++ println("Speaker volume increased to $speakerVolume.") } fun nextChannel() { channelNumber++ println("Channel number increased to $channelNumber.") } override fun turnOn() { super.turnOn() println( "$name is turned on. Speaker volume is set to $speakerVolume and channel number is set to $channelNumber." ) } override fun turnOff() { super.turnOff() println("$name turned off") } }
Sample code for the
SmartLightDevice:class SmartLightDevice(deviceName: String, deviceCategory: String) : SmartDevice(name = deviceName, category = deviceCategory) { var brightnessLevel = 0 set(value) { if (value in 0..100) { field = value } } fun increaseBrightness() { brightnessLevel++ println("Brightness increased to $brightnessLevel.") } override fun turnOn() { super.turnOn() brightnessLevel = 2 println("$name turned on. The brightness level is $brightnessLevel.") } override fun turnOff() { super.turnOff() brightnessLevel = 0 println("Smart Light turned off") } }
Override superclass properties from subclasses
Properties can also be overridden in subclasses.
Example:
open class SmartDevice(val name: String, val category: String) {

    var deviceStatus = "online"

    open val deviceType = "unknown"
    ...
}
class SmartTvDevice(deviceName: String, deviceCategory: String) :
    SmartDevice(name = deviceName, category = deviceCategory) {

    override val deviceType = "Smart TV"

    ...
}
class SmartLightDevice(deviceName: String, deviceCategory: String) :
    SmartDevice(name = deviceName, category = deviceCategory) {

    override val deviceType = "Smart Light"

    ...

}
Visibility modifiers
Visibility modifiers play an important role to achieve encapsulation:
In a class, they let you hide your properties and methods from unauthorized access outside the class.
In a package, they let you hide the classes and interfaces from unauthorized access outside the package.
Note
A module is a collection of source files and build settings that let you divide your project into discrete units of functionality. Your project can have one or many modules. You can independently build, test, and debug each module.
A package is like a directory or a folder that groups related classes, whereas a module provides a container for your app’s source code, resource files, and app-level settings. A module can contain multiple packages.
Kotlin provides four visibility modifiers:
public: default visibility modifier. Makes the declaration accessible everywhere. The properties and methods that you want used outside the class are marked as public.private: makes the declaration accessible in the same class or source file. There are likely some properties and methods that are only used inside the class, and that you don’t necessarily want other classes to use. These properties and methods can be marked with the private visibility modifier to ensure that another class can’t accidentally access them.protected: makes the declaration accessible in subclasses. The properties and methods that you want used in the class that defines them and the subclasses are marked with the protected visibility modifier.internal: makes the declaration accessible in the same module. The internal modifier is similar to private, but you can access internal properties and methods from outside the class as long as it’s being accessed in the same module.
By default, a class is publicly visible, and can be accessed by any package that imports it. Similarly, when you define or declare properties and methods in the class, by default they can be accessed outside the class through the class object. It’s essential to define proper visibility for code, primarily to hide properties and methods that other classes don’t need to access.
Analogy: Only some parts of a car are exposed to a driver, not all. The specifics of what parts comprise the car and how the car works internally are hidden by default. The car is intended to be as intuitive to operate as possible. Drivers want to focus on driving, not on the internals of the car. Developers also want to know just enough to be able to use a class, they don’t want too much information.
Visibility modifiers help you expose only the relevant parts of the code to other classes in your project, and ensure that certain code cannot be unintentionally used, which makes for code that’s easy to understand and less prone to bugs.
Visibility modifier for properties
Syntax to specify a visibility modifier for a property:

Example:
open class SmartDevice(val name: String, val category: String) {

    ...

    private var deviceStatus = "online"

    ...
}
Syntax to specify a visibility modifier for a setter function:
For the
SmartDeviceclass, the value of thedeviceStatusproperty should be readable outside of the class through class objects. However, only the class and its children should be able to update or write the value. To implement this requirement, use the protected modifier on theset()function of thedeviceStatusproperty.open class SmartDevice(val name: String, val category: String) { ... var deviceStatus = "online" protected set(value) { field = value } ... }
The
set()function doesn’t performing any actions. It simply assigns thevalueparameter to thefieldvariable. This is similar to the default implementation for property setters, hence the parentheses and body ofset()can be omitted:open class SmartDevice(val name: String, val category: String) { ... var deviceStatus = "online" protected set ... }
Code for the
SmartHomeclass, with a private setter fordeviceTurnOnCount:class SmartHome( val smartTvDevice: SmartTvDevice, val smartLightDevice: SmartLightDevice ) { var deviceTurnOnCount = 0 private set fun turnOnTv() { deviceTurnOnCount++ smartTvDevice.turnOn() } fun turnOffTv() { deviceTurnOnCount-- smartTvDevice.turnOff() } ... fun turnOnLight() { deviceTurnOnCount++ smartLightDevice.turnOn() } fun turnOffLight() { deviceTurnOnCount-- smartLightDevice.turnOff() } ... }
Visibility modifiers for methods
Syntax to specify a visibility modifier for a method:
Example:
class SmartTvDevice(deviceName: String, deviceCategory: String) :
    SmartDevice(name = deviceName, category = deviceCategory) {

    ...

    protected fun nextChannel() {
        channelNumber++
        println("Channel number increased to $channelNumber.")
    }

    ...
}
Visibility modifiers for constructors
Syntax to specify a visibility modifier for a constructor:
If the modifier is specified for the primary constructor, it’s necessary to always keep the
constructorkeyword and parentheses.Example:
open class SmartDevice protected constructor (val name: String, val category: String) {

    ...

}
Visibility modifiers for classes
Syntax to specify a visibility modifier for a class:
Example:
internal open class SmartDevice(val name: String, val category: String) {

    ...

}
Choosing visibility modifiers
Ideally, strive for strict visibility of properties and methods, and declare them with the
privatemodifier as often as possible. If you can’t keep them private, use theprotectedmodifier. If you can’t keep them protected, use theinternalmodifier. If you can’t keep theminternal, use thepublicmodifier.This table helps you determine the appropriate visibility modifiers based on where the property or methods of a class or constructor should be accessible:
Modifier
Accessible in same class
Accessible in subclass
Accessible in same module
Accessible outside module
private
✔
✘
✘
✘
protected
✔
✔
✘
✘
internal
✔
✔
✔
✘
public
✔
✔
✔
✔
In the
SmartTvDevicesubclass, you shouldn’t allow thespeakerVolumeandchannelNumberproperties to be controlled from outside the class. These properties should be controlled only through theincreaseSpeakerVolume()andnextChannel()methods.class SmartTvDevice(deviceName: String, deviceCategory: String) : SmartDevice(name = deviceName, category = deviceCategory) { private var speakerVolume = 2 set(value) { if (value in 0..100) { field = value } } private var channelNumber = 1 set(value) { if (value in 0..200) { field = value } } ... }
Similarly, in the
SmartLightDevicesubclass, thebrightnessLevelproperty should be controlled only through theincreaseLightBrightness()method.class SmartLightDevice(deviceName: String, deviceCategory: String) : SmartDevice(name = deviceName, category = deviceCategory) { ... private var brightnessLevel = 0 set(value) { if (value in 0..100) { field = value } } ... }
Define property delegates
Previously, we saw that properties in Kotlin use a backing field to hold their values in memory. The
fieldidentifier is used to reference it.Currently, there is some range-check code to check whether values are within range for the
speakerVolume,channelNumber, andbrightnessLevelproperties. The code is duplicated in theSmartTvDeviceandSmartLightDeviceclasses. We can reuse the range-check code in a setter function with delegates. Instead of using a field, and a getter and setter function to manage the value, a delegate object handles the getter and setter functions for the property.Syntax to create property delegates:

We’ll pause here and briefly explain interfaces. An interface is a contract. Classes that implement an interface need to adhere to this contract. It focuses on what to do instead of how to do the action. An interface helps to achieve abstraction.
For example, before building a house, you inform the architect about what you want. You want a bedroom, living room, kitchen, etc. In short, you specify what you want and the architect specifies how to achieve it.
Syntax to create an interface:
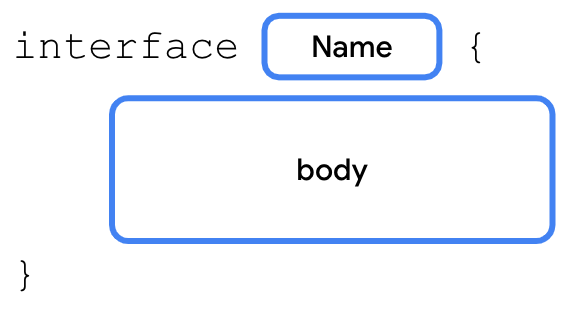
We’ve already learned how to extend a class and override its functionality. With interfaces, the class implements the interface. The class provides implementation details for the methods and properties declared in the interface. We’ll do something similar with the
ReadWritePropertyinterface to create the delegate.It’s ok if we’re still not clear about what interfaces are, we’ll learn more about interfaces later.
A delegate class for the
vartype implements theReadWritePropertyinterface. A delegate class for thevaltype implments theReadOnlyPropertyinterface.We’ll create a delegate class, the
RangeRegulatorclass that implements theReadWriteProperty<Any?, Int>interface. Ignore the<Any?, Int>for now, more on that later.class RangeRegulator( initialValue: Int, private val minValue: Int, private val maxValue: Int ) : ReadWriteProperty<Any?, Int> { var fieldData = initialValue override fun getValue(thisRef: Any?, property: KProperty<*>): Int { return fieldData } override fun setValue(thisRef: Any?, property: KProperty<*>, value: Int) { if (value in minValue..maxValue) { fieldData = value } } }
The
fieldDataproperty is acts as the backing field for the variable. It is initialized withinitialValueparameter.The
getValue()andsetValue()methods act as the property’s getter and setter functions.getValue()simply returns thefieldDataproperty.setValue()checks whether thevalueparameter is withinminValue..maxValue, before assigning it to thefieldDataproperty:
Note
KProperty is an interface that represents a declared property and lets you access the metadata on a delegated property. It’s out of scope of this mod. It’s enough to just have a high-level understanding about what the KProperty is.
Now, this range-check code can be re-used in the
SmartTvDeviceandSmartLightDeviceclasses. TheRangeRegulatorclass acts as a delegate for the properties that need range checking.In
SmartTvDevice:class SmartTvDevice(deviceName: String, deviceCategory: String) : SmartDevice(name = deviceName, category = deviceCategory) { ... private var speakerVolume by RangeRegulator(initialValue = 2, minValue = 0, maxValue = 100) private var channelNumber by RangeRegulator(initialValue = 1, minValue = 0, maxValue = 200) ... }
In
SmartLightDevice:class SmartLightDevice(deviceName: String, deviceCategory: String) : SmartDevice(name = deviceName, category = deviceCategory) { ... private var brightnessLevel by RangeRegulator(initialValue = 0, minValue = 0, maxValue = 100) ... }
Smart Home App code
Here’s the complete code for the Smart Home app.
import kotlin.properties.ReadWriteProperty
import kotlin.reflect.KProperty

open class SmartDevice(val name: String, val category: String) {

    var deviceStatus = "online"
        protected set

    open val deviceType = "unknown"

    open fun turnOn() {
        deviceStatus = "on"
    }

    open fun turnOff() {
        deviceStatus = "off"
    }
}

class SmartTvDevice(deviceName: String, deviceCategory: String) :
    SmartDevice(name = deviceName, category = deviceCategory) {

    override val deviceType = "Smart TV"

    private var speakerVolume by RangeRegulator(initialValue = 2, minValue = 0, maxValue = 100)

    private var channelNumber by RangeRegulator(initialValue = 1, minValue = 0, maxValue = 200)

    fun increaseSpeakerVolume() {
        speakerVolume++
        println("Speaker volume increased to $speakerVolume.")
    }

    fun nextChannel() {
        channelNumber++
        println("Channel number increased to $channelNumber.")
    }

    override fun turnOn() {
        super.turnOn()
        println(
            "$name is turned on. Speaker volume is set to $speakerVolume and channel number is " +
                "set to $channelNumber."
        )
    }

    override fun turnOff() {
        super.turnOff()
        println("$name turned off")
    }
}

class SmartLightDevice(deviceName: String, deviceCategory: String) :
    SmartDevice(name = deviceName, category = deviceCategory) {

    override val deviceType = "Smart Light"

    private var brightnessLevel by RangeRegulator(initialValue = 0, minValue = 0, maxValue = 100)

    fun increaseBrightness() {
        brightnessLevel++
        println("Brightness increased to $brightnessLevel.")
    }

    override fun turnOn() {
        super.turnOn()
        brightnessLevel = 2
        println("$name turned on. The brightness level is $brightnessLevel.")
    }

    override fun turnOff() {
        super.turnOff()
        brightnessLevel = 0
        println("Smart Light turned off")
    }
}

class SmartHome(
    val smartTvDevice: SmartTvDevice,
    val smartLightDevice: SmartLightDevice
) {

    var deviceTurnOnCount = 0
        private set

    fun turnOnTv() {
        deviceTurnOnCount++
        smartTvDevice.turnOn()
    }

    fun turnOffTv() {
        deviceTurnOnCount--
        smartTvDevice.turnOff()
    }

    fun increaseTvVolume() {
        smartTvDevice.increaseSpeakerVolume()
    }

    fun changeTvChannelToNext() {
        smartTvDevice.nextChannel()
    }

    fun turnOnLight() {
        deviceTurnOnCount++
        smartLightDevice.turnOn()
    }

    fun turnOffLight() {
        deviceTurnOnCount--
        smartLightDevice.turnOff()
    }

    fun increaseLightBrightness() {
        smartLightDevice.increaseBrightness()
    }

    fun turnOffAllDevices() {
        turnOffTv()
        turnOffLight()
    }
}

class RangeRegulator(
    initialValue: Int,
    private val minValue: Int,
    private val maxValue: Int
) : ReadWriteProperty<Any?, Int> {

    var fieldData = initialValue

    override fun getValue(thisRef: Any?, property: KProperty<*>): Int {
        return fieldData
    }

    override fun setValue(thisRef: Any?, property: KProperty<*>, value: Int) {
        if (value in minValue..maxValue) {
            fieldData = value
        }
    }
}

fun main() {
    var smartDevice: SmartDevice = SmartTvDevice("Android TV", "Entertainment")
    smartDevice.turnOn()

    smartDevice = SmartLightDevice("Google Light", "Utility")
    smartDevice.turnOn()
}
Practice: Classes and Objects
If you need more practice, do these exercises. If not, feel free to skip them.
In the
SmartDeviceclass, define aprintDeviceInfo()method that prints a"Device name: $name, category: $category, type: $deviceType"string.In the
SmartTvDeviceclass, define adecreaseVolume()method that decreases the volume and apreviousChannel()method that navigates to the previous channel.In the
SmartLightDeviceclass, define adecreaseBrightness()method that decreases the brightness.In the
SmartHomeclass, ensure that all actions can only be performed when each device’sdeviceStatusproperty is set to an"on"string. Also, ensure that thedeviceTurnOnCountproperty is updated correctly.In the
SmartHomeclass, define andecreaseTvVolume(),changeTvChannelToPrevious(),printSmartTvInfo(),printSmartLightInfo(), anddecreaseLightBrightness()method.Call the appropriate methods from the
SmartTvDeviceandSmartLightDeviceclasses in theSmartHomeclass.In the
main()function, call these added methods to test them.
Summary
There are four main principles of OOP: encapsulation, abstraction, inheritance, and polymorphism.
Classes are defined with the
classkeyword, and contain properties and methods.Properties are similar to variables except properties can have custom getters and setters.
A constructor specifies how to instantiate objects of a class.
You can omit the
constructorkeyword when you define a primary constructor.Inheritance makes it easier to reuse code.
The IS-A relationship refers to inheritance.
The HAS-A relationship refers to composition.
Visibility modifiers play an important role in the achievement of encapsulation.
Kotlin provides four visibility modifiers: the
public,private,protected, andinternalmodifiers.A property delegate lets you reuse the getter and setter code in multiple classes.
Use function types and lambda expressions
In Kotlin, functions are considered first-class constructs. This means that functions can be treated as a data type. You can store functions in variables, pass them to other functions as arguments, and return them from other functions.
Data types can store literal values — an
Inttype can store a10literal value, aStringtype can store a"Hello"literal value, etc. We can also declare function literals, which are called lambda expressions or lambdas for short.
Store a function in a variable
So far, we’ve learned how to declare functions with the
funkeyword. A function can be called, which causes the code in the function body to execute.As a first-class construct, functions are also data types, so you can store functions in variables, pass them to functions, and return them from functions. All this is made possible by lambda expressions.
We’ll see this in action with some trick-or-treating code, which refers to a tradition in many countries during which children dressed in costumes go from door to door and ask, “trick or treat?”. It helps if you try the code examples in Kotlin Playground.
Syntax to refer to a function as a value:
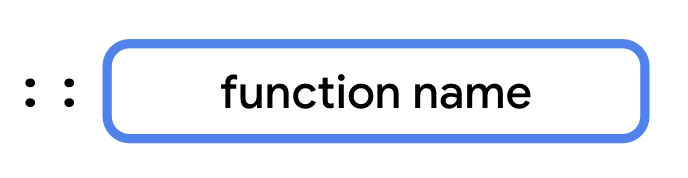
Example:
fun main() {
    val trickFunction = ::trick
}

fun trick() {
    println("No treats!")
}
Lambda expressions provide a concise syntax to define a function without the
funkeyword. You can store a lambda expression directly in a variable.Syntax for lambda expressions:
When defining a function with a lambda expression, a variable is used to refer to the function. Example:
fun main() {
    val trickFunction = trick
    trick()
    trickFunction()
}

val trick = {
    println("No treats!")
}
Using type inference, the Kotlin compiler inferred that the type of
trickis a function. Next up, we’ll learn how to explicitly specify function types.
Use functions as a data type
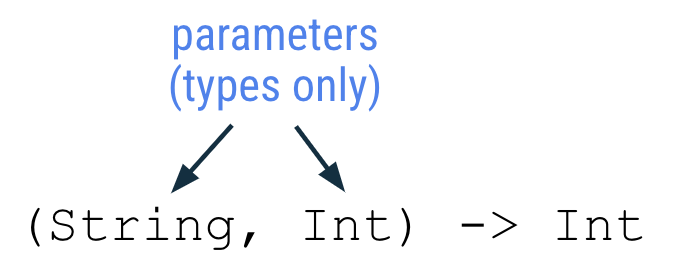
Syntax for function types:

Examples:
() -> Unit: a function that doesn’t take any parameters, and doesn’t return anything(Int, Int) -> String: a function that takes twoIntparameters, and returns aString
In the code below,
treat()behaves liketrick(). Both variables have the same data type, even though only thetreatvariable declares it explicitly. The type oftrickis inferred using type inference.val trick = { println("No treats!") } val treat: () -> Unit = { println("Have a treat!") } fun main() { val trickFunction = trick trick() trickFunction() treat() }
Use a function as a return type
A function is a data type, so you can use it like any other data type. You can even return functions from other functions.
Syntax for using a function type as a return type:

In this example, the
trickOrTreat()function returns another function. The returned function is of type() -> Unit.fun main() { val treatFunction = trickOrTreat(false) val trickFunction = trickOrTreat(true) treatFunction() trickFunction() } fun trickOrTreat(isTrick: Boolean): () -> Unit { if (isTrick) { return trick } else { return treat } } val trick = { println("No treats!") } val treat = { println("Have a treat!") }
Pass a function to another function as an argument
We’ll modify the
trickOrTreat()function to allow an extra treat. The extra treat will be represented by a function. This function will be provided as an argument totrickOrTreat().Syntax for specifying a function type as a parameter to another function:
Syntax for writing a lambda expression for a function that takes a parameter (the function type is omitted):
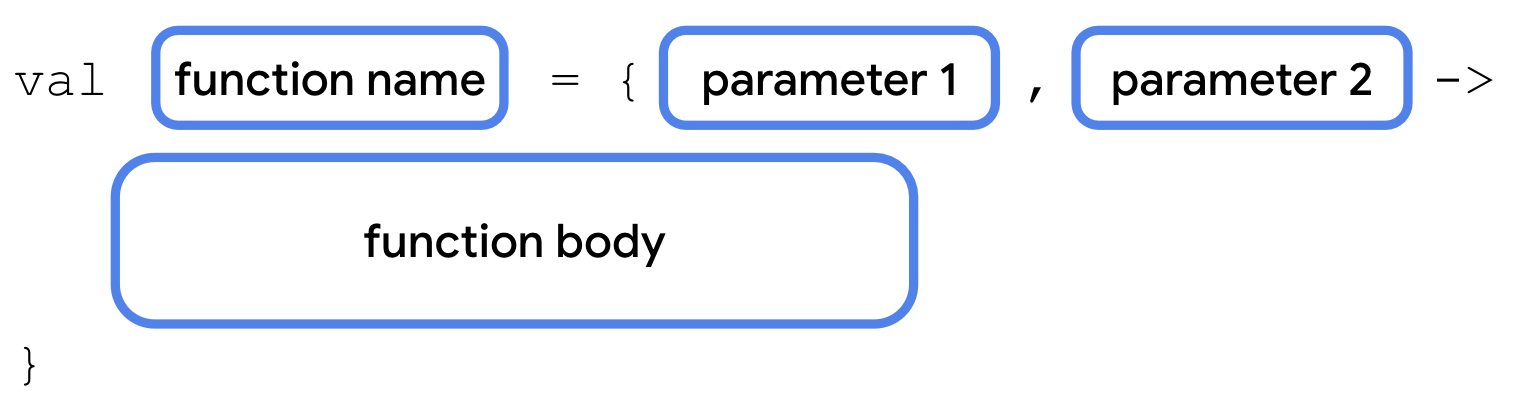
Example:
fun main() {
    val coins: (Int) -> String = { quantity ->
        "$quantity quarters"
    }

    val cupcake: (Int) -> String = {
        "Have a cupcake!"
    }

    val treatFunction = trickOrTreat(false, coins)
    val trickFunction = trickOrTreat(true, cupcake)
    treatFunction()
    trickFunction()
}

fun trickOrTreat(isTrick: Boolean, extraTreat: (Int) -> String): () -> Unit {
    if (isTrick) {
        return trick
    } else {
        println(extraTreat(5))
        return treat
    }
}

val trick = {
    println("No treats!")
}

val treat = {
    println("Have a treat!")
}
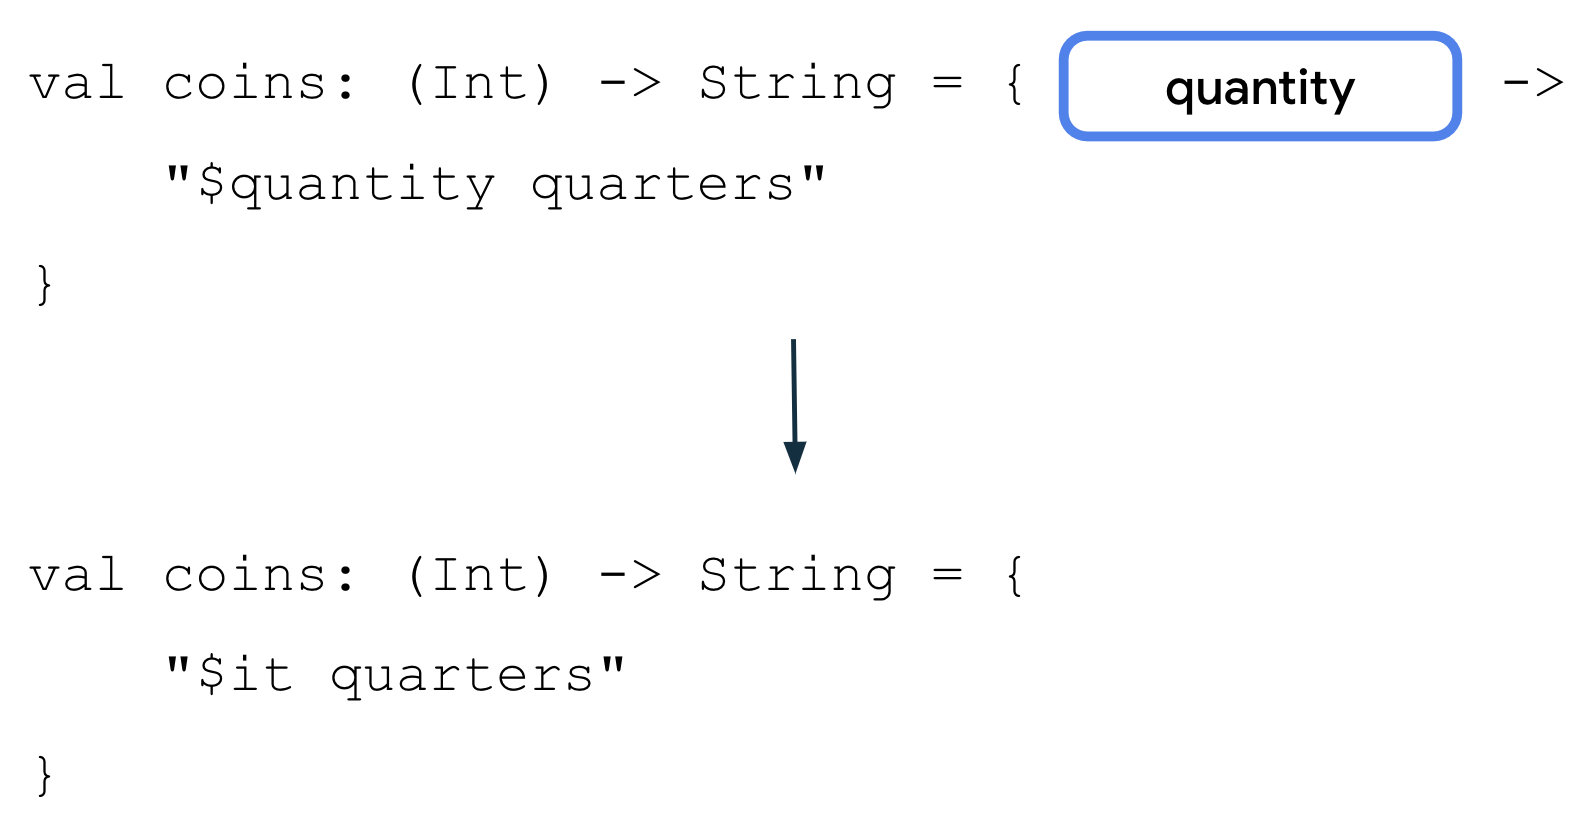
Let’s zoom in on this code:
val coins: (Int) -> String = { quantity ->
    "$quantity quarters"
}
The code creates a
coinsvariable. The variable can contain a function.The
(Int) -> Stringmeans this function takes anIntparameter, and returns aString.The
Intparameter is namedquantity. This could be named anything you like.The return value is a
Stringthat contains thequantityparameter and the wordquarters.
Let’s zoom in on this code:
val cupcake: (Int) -> String = {
    "Have a cupcake!"
}
The code creates a
cupcakevariable. The variable can contain a function.The
(Int) -> Stringmeans this function takes anIntparameter, and returns aString.The
Intparameter is not used in the function, which is fine. That’s why it’s missing thequantity -> ``, unlike the ``coins()function.It always returns the string
Have a cupcake!
Finally, let’s zoom in on this code:
fun trickOrTreat(isTrick: Boolean, extraTreat: (Int) -> String): () -> Unit {
    if (isTrick) {
        return trick
    } else {
        println(extraTreat(5))
        return treat
    }
}
The code declares a function named
trickOrTreat. The function takes 2 parameters.The
isTrickparameter has aBooleantype.The
extraTreatparameter has a(Int) -> Stringtype, meaning it can hold a function that takes anIntparameter, and returns aString.The
trickOrTreatfunction has a return type() -> Unit, which means it returns a function that takes no parameters and returns nothing.
Nullable function types
Like other data types, function types can be declared as nullable. In these cases, a variable could contain a function or it could be
null.Syntax to declare a function as nullable:

For example, to make the
extraTreatparameter nullable so that you don’t have to provide anextraTreat()function every time that you call thetrickOrTreat()function:fun trickOrTreat(isTrick: Boolean, extraTreat: ((Int) -> String)?): () -> Unit { if (isTrick) { return trick } else { if (extraTreat != null) { println(extraTreat(5)) } return treat } } fun main() { val coins: (Int) -> String = { quantity -> "$quantity quarters" } val treatFunction = trickOrTreat(false, coins) val trickFunction = trickOrTreat(true, null) treatFunction() trickFunction() } val trick = { println("No treats!") } val treat = { println("Have a treat!") }
Write lambda expressions with shorthand syntax
Lambda expressions make code more concise. We’ll explore some shorthand syntax to write lambda expressions more concisely.
Omit parameter name
When a function has a single parameter and you don’t provide a name, Kotlin implicitly assigns it the
itname, so you can omit the parameter name and->symbol, which makes your lambda expressions more concise.Syntax for omitting the parameter name:
Example:
val coins: (Int) -> String = {
    "$it quarters"
}
$itcan only be used for a single parameter. If a lambda expression has multiple parameters, they must be explicitly named.
Pass a lambda expression directly into a function
The
coins()function is currently only used in one place:val treatFunction = trickOrTreat(false, coins)
Instead of creating a variable to store it, it’s also possible to pass a lambda expression directly into
trickOrTreat():val treatFunction = trickOrTreat(false, LAMBDA_EXPRESSION)
Lambda expressions are simply function literals, just like
0is an integer literal, and"Slay"is a string literal. You can pass a lambda expression directly into a function call.Syntax to pass a lambda expression into a function call:
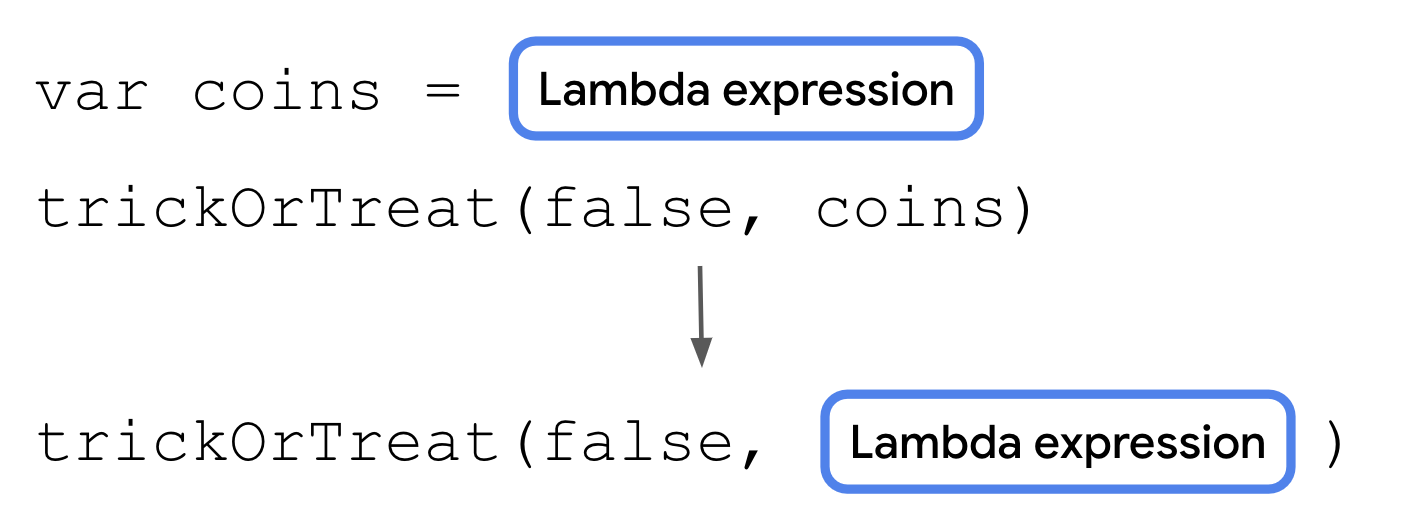
Example:
fun main() {
    val treatFunction = trickOrTreat(false, { "$it quarters" })
    val trickFunction = trickOrTreat(true, null)
    treatFunction()
    trickFunction()
}
Use trailing lambda syntax
When a function type is the last parameter of a function, you can write lambdas using another shorthand option.
Syntax for trailing lambdas:
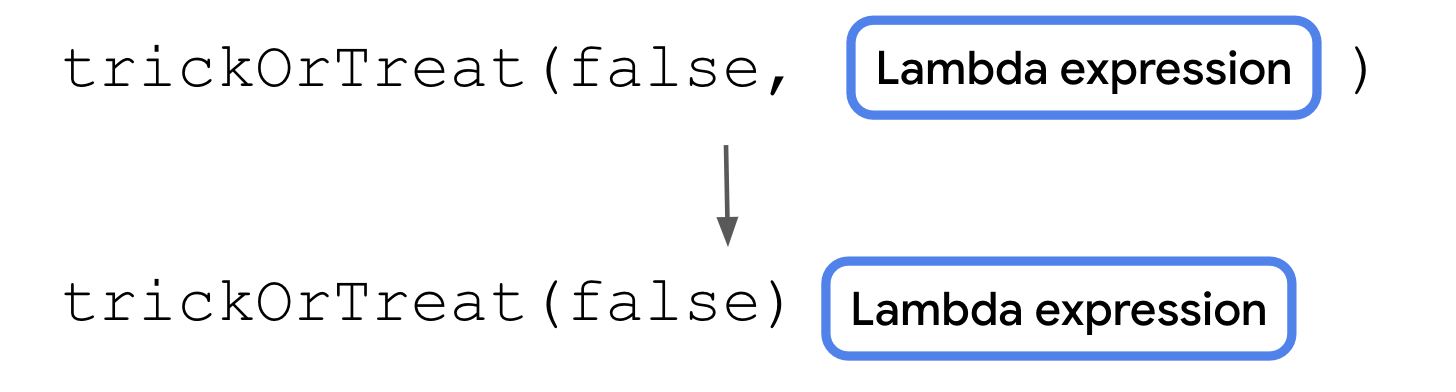
This makes code more readable because it separates the lambda expression from the other parameters, but doesn’t change what the code does.
Example:
val treatFunction = trickOrTreat(false) { "$it quarters" }
Note
Composable functions are typically called using trailing lambda syntax.
Use the repeat() function
A higher-order function either returns a function, and/or takes a function as an argument. The
trickOrTreat()function is an example of a higher-order function, because it takes a function of type((Int) -> String)?as a parameter and returns a function of type() -> Unit.Kotlin provides several useful higher-order functions. The
repeat()function is one such higher-order function. It’s basically a for loop. The function signature:repeat(times: Int, action: (Int) -> Unit)
The
timesparameter is the number of times that the action should happen. Theactionparameter is a function that takes a singleIntparameter and returns aUnittype.The
repeat()function is used to repeat code a specified number of times, similar to aforloop:
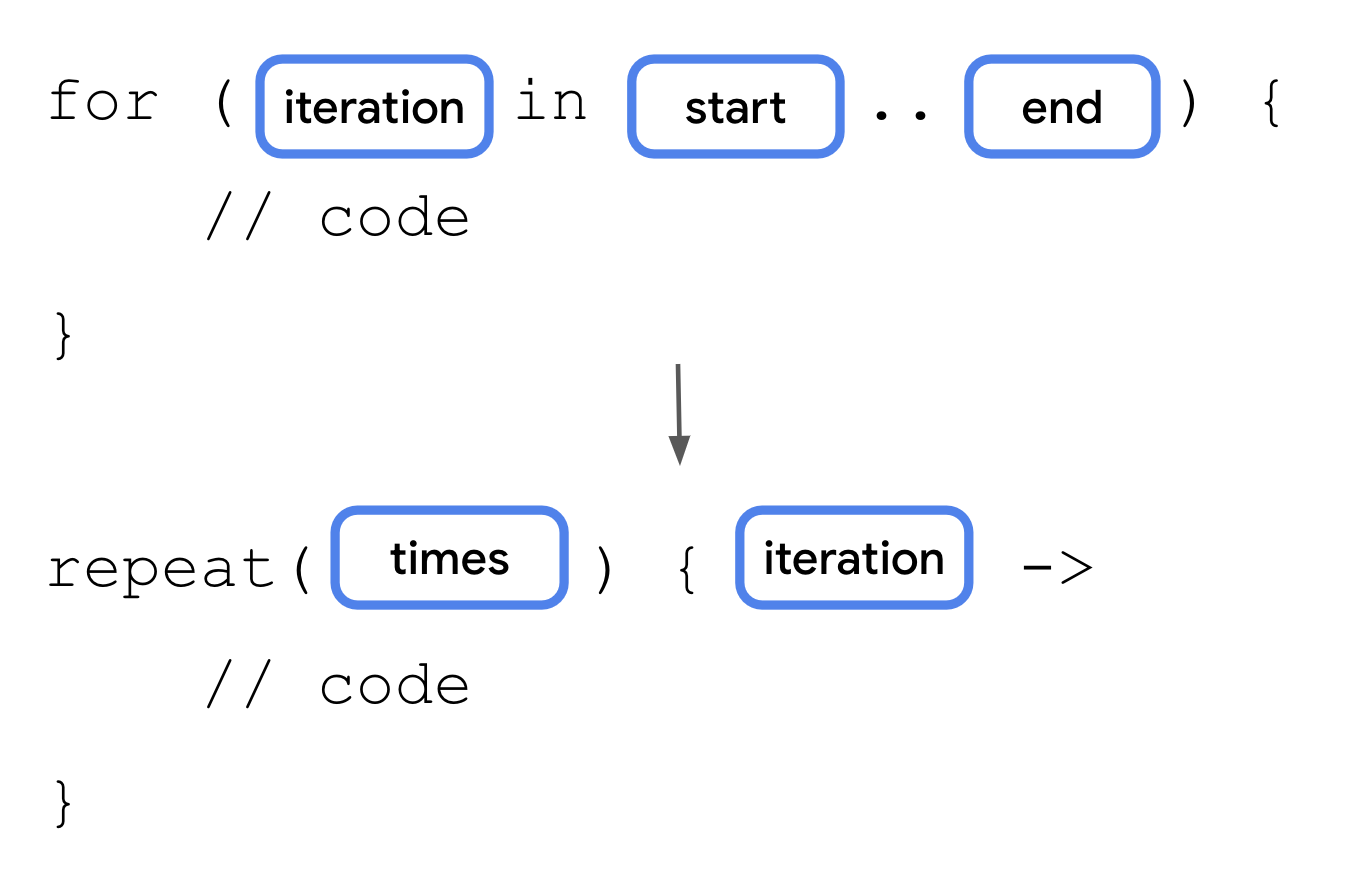
Instead of calling the
trickFunction()function only once, you can call it multiple times with therepeat()function.Example:
fun main() {
    val treatFunction = trickOrTreat(false) { "$it quarters" }
    val trickFunction = trickOrTreat(true, null)
    repeat(4) {
        treatFunction()
    }
    trickFunction()
}
Practice: Kotlin Fundamentals
Need some extra practice? These exercises test your understanding of the concepts that you studied. They’re based on real-world use cases, some of which you probably encountered before as a user.
If you don’t need any extra practice, feel free to skip these exercises.
Sample solutions are provided. The solutions are only one way to solve the exercises, so feel free to experiment however you feel comfortable.
Mobile notifications
Typically, your phone provides you with a summary of notifications.
Using the starter code below, write a program that prints the summary message based on the number of notifications received. The message should include:
The exact number of notifications when there are less than 100 notifications.
99+as the number of notifications when there are 100 notifications or more.
fun main() {
    val morningNotification = 51
    val eveningNotification = 135

    printNotificationSummary(morningNotification)
    printNotificationSummary(eveningNotification)
}

fun printNotificationSummary(numberOfMessages: Int) {
    // Fill in the code.
}
Complete the printNotificationSummary() function so that the program prints these lines:
You have 51 notifications.
Your phone is blowing up! You have 99+ notifications.
Movie ticket price
Movie tickets are typically priced differently based on the age of moviegoers.
Using the starter code below, write a program that calculates these age-based ticket prices:
A children’s ticket price of $15 for people 12 years old or younger.
A standard ticket price of $30 for people between 13 and 60 years old. On Mondays, discount the standard ticket price to $25 for this same age group.
A senior ticket price of $20 for people 61 years old and older. Assume that the maximum age of a moviegoer is 100 years old.
A
-1to indicate that the price is invalid when a user inputs an age outside of the age specifications.
fun main() {
    val child = 5
    val adult = 28
    val senior = 87

    val isMonday = true

    println("The movie ticket price for a person aged $child is $${ticketPrice(child, isMonday)}.")
    println("The movie ticket price for a person aged $adult is $${ticketPrice(adult, isMonday)}.")
    println("The movie ticket price for a person aged $senior is $${ticketPrice(senior, isMonday)}.")
}

fun ticketPrice(age: Int, isMonday: Boolean): Int {
    // Fill in the code.
}
Complete the ticketPrice() function so that the program prints these lines:
The movie ticket price for a person aged 5 is $15.
The movie ticket price for a person aged 28 is $25.
The movie ticket price for a person aged 87 is $20.
Temperature converter
There are three main temperature scales used in the world: Celsius, Fahrenheit, and Kelvin.
Using the starter code below, write a program that converts a temperature from one scale to another with these formulas:
Celsius to Fahrenheit: ° F = 9/5 (° C) + 32
Kelvin to Celsius: ° C = K - 273.15
Fahrenheit to Kelvin: K = 5/9 (° F - 32) + 273.15
Note that the
String.format("%.2f", /* measurement */ )method is used to convert a number into aStringtype with 2 decimal places.fun main() { // Fill in the code. } fun printFinalTemperature( initialMeasurement: Double, initialUnit: String, finalUnit: String, conversionFormula: (Double) -> Double ) { val finalMeasurement = String.format("%.2f", conversionFormula(initialMeasurement)) // two decimal places println("$initialMeasurement degrees $initialUnit is $finalMeasurement degrees $finalUnit.") }
Complete the
main()function so that it calls theprintFinalTemperature()function and prints the following lines. You need to pass arguments for the temperature and conversion formula. Hint: you may want to useDoublevalues to avoidIntegertruncation during division operations.27.0 degrees Celsius is 80.60 degrees Fahrenheit. 350.0 degrees Kelvin is 76.85 degrees Celsius. 10.0 degrees Fahrenheit is 260.93 degrees Kelvin.
Song catalog
Imagine that you need to create a music-player app.
Create a class that can represent the structure of a song. The
Songclass must include these code elements:Properties for the title, artist, year published, and play count
A property that indicates whether the song is popular. If the play count is less than 1,000, consider it unpopular.
A method that prints a song description in this format:
“[Title], performed by [artist], was released in [year published].”
Internet profile
Oftentimes, you’re required to complete profiles for online websites that contain mandatory and non-mandatory fields. For example, you can add your personal information and link to other people who referred you to sign up for the profile.
Using the starter code below, write a program which prints out a person’s profile details.
fun main() {
    val amanda = Person("Amanda", 33, "play tennis", null)
    val atiqah = Person("Atiqah", 28, "climb", amanda)

    amanda.showProfile()
    atiqah.showProfile()
}

class Person(val name: String, val age: Int, val hobby: String?, val referrer: Person?) {
    fun showProfile() {
      // Fill in code
    }
}
Sample output:
Name: Amanda
Age: 33
Likes to play tennis. Doesn't have a referrer.

Name: Atiqah
Age: 28
Likes to climb. Has a referrer named Amanda, who likes to play tennis.
Foldable phones
Typically, a phone screen turns on and off when the power button is pressed. In contrast, if a foldable phone is folded, the main inner screen on a foldable phone doesn’t turn on when the power button is pressed.
Using the starter code below, write a
FoldablePhoneclass that inherits from thePhoneclass. It should contain the following:A property that indicates whether the phone is folded.
A different
switchOn()function behavior than thePhoneclass so that it only turns the screen on when the phone isn’t folded.Methods to change the folding state.
class Phone(var isScreenLightOn: Boolean = false){
    fun switchOn() {
        isScreenLightOn = true
    }

    fun switchOff() {
        isScreenLightOn = false
    }

    fun checkPhoneScreenLight() {
        val phoneScreenLight = if (isScreenLightOn) "on" else "off"
        println("The phone screen's light is $phoneScreenLight.")
    }
}
Special auction
Typically in an auction, the highest bidder determines the price of an item. In this special auction, if there’s no bidder for an item, the item is automatically sold to the auction house at the minimum price.
In the starter code below, you’re given an
auctionPrice()function that accepts a nullableBid?type as an argument:fun main() { val winningBid = Bid(5000, "Private Collector") println("Item A is sold at ${auctionPrice(winningBid, 2000)}.") println("Item B is sold at ${auctionPrice(null, 3000)}.") } class Bid(val amount: Int, val bidder: String) fun auctionPrice(bid: Bid?, minimumPrice: Int): Int { // Fill in the code. }
Complete the
auctionPrice()function so that the program prints these lines:Item A is sold at 5000. Item B is sold at 3000.
Solution code
Solution: Mobile notifications
The solution uses an
if/elsestatement to print the appropriate notification summary message based on the number of notification messages received:fun main() { val morningNotification = 51 val eveningNotification = 135 printNotificationSummary(morningNotification) printNotificationSummary(eveningNotification) } fun printNotificationSummary(numberOfMessages: Int) { if (numberOfMessages < 100) { println("You have ${numberOfMessages} notifications.") } else { println("Your phone is blowing up! You have 99+ notifications.") } }
Solution: Movie ticket price
The solution uses a
whenexpression to return the appropriate ticket price based on the moviegoer’s age. It also uses a simpleif/elseexpression for one of thewhenexpression’s branches to add the additional condition for the standard ticket pricing.The ticket price in the
elsebranch returns a-1value, which indicates that the price set is invalid for theelsebranch. A better implementation is for theelsebranch to throw an exception. You learn about exception handling in future units.fun main() { val child = 5 val adult = 28 val senior = 87 val isMonday = true println("The movie ticket price for a person aged $child is \$${ticketPrice(child, isMonday)}.") println("The movie ticket price for a person aged $adult is \$${ticketPrice(adult, isMonday)}.") println("The movie ticket price for a person aged $senior is \$${ticketPrice(senior, isMonday)}.") } fun ticketPrice(age: Int, isMonday: Boolean): Int { return when(age) { in 0..12 -> 15 in 13..60 -> if (isMonday) 25 else 30 in 61..100 -> 20 else -> -1 } }
Solution: Temperature converter
The solution requires you to pass a function as a parameter to the
printFinalTemperature()function. The most succinct solution passes lambda expressions as the arguments, uses theitparameter reference in place of the parameter names, and makes use of trailing lambda syntax.fun main() { printFinalTemperature(27.0, "Celsius", "Fahrenheit") { 9.0 / 5.0 * it + 32 } printFinalTemperature(350.0, "Kelvin", "Celsius") { it - 273.15 } printFinalTemperature(10.0, "Fahrenheit", "Kelvin") { 5.0 / 9.0 * (it - 32) + 273.15 } } fun printFinalTemperature( initialMeasurement: Double, initialUnit: String, finalUnit: String, conversionFormula: (Double) -> Double ) { val finalMeasurement = String.format("%.2f", conversionFormula(initialMeasurement)) // two decimal places println("$initialMeasurement degrees $initialUnit is $finalMeasurement degrees $finalUnit.") }
Solution: Song catalog
The solution contains a
Songclass with a default constructor that accepts all required parameters. TheSongclass also has anisPopularproperty that uses a custom getter function, and a method that prints the description of itself. You can create an instance of the class in themain()function and call its methods to test whether the implementation is correct. You can use underscores when writing large numbers such as the1_000_000value to make it more readable.fun main() { val brunoSong = Song("We Don't Talk About Bruno", "Encanto Cast", 2022, 1_000_000) brunoSong.printDescription() println(brunoSong.isPopular) } class Song( val title: String, val artist: String, val yearPublished: Int, val playCount: Int ){ val isPopular: Boolean get() = playCount >= 1000 fun printDescription() { println("$title, performed by $artist, was released in $yearPublished.") } }
When you call the
println()function on the instance’s methods, the program may print this output:We Don't Talk About Bruno, performed by Encanto Cast, was released in 2022. true
Solution: Internet profile
The solution contains
nullchecks in variousif/elsestatements to print different text based on whether various class properties arenull:fun main() { val amanda = Person("Amanda", 33, "play tennis", null) val atiqah = Person("Atiqah", 28, "climb", amanda) amanda.showProfile() atiqah.showProfile() } class Person(val name: String, val age: Int, val hobby: String?, val referrer: Person?) { fun showProfile() { println("Name: $name") println("Age: $age") if(hobby != null) { print("Likes to $hobby. ") } if(referrer != null) { print("Has a referrer named ${referrer.name}") if(referrer.hobby != null) { print(", who likes to ${referrer.hobby}.") } else { print(".") } } else { print("Doesn't have a referrer.") } print("\n\n") } }
Solution: Foldable phones
For the
Phoneclass to be a parent class, you need to make the class open by adding theopenkeyword before the class name. To override theswitchOn()method in the FoldablePhone class, you need to make the method in thePhoneclass open by adding theopenkeyword before the method.The solution contains a
FoldablePhoneclass with a default constructor that contains a default argument for theisFoldedparameter. TheFoldablePhoneclass also has two methods to change theisFoldedproperty to either atrueorfalsevalue. It also overrides theswitchOn()method inherited from thePhoneclass.You can create an instance of the class in the
main()function and call its methods to test if the implementation is correct.open class Phone(var isScreenLightOn: Boolean = false){ open fun switchOn() { isScreenLightOn = true } fun switchOff() { isScreenLightOn = false } fun checkPhoneScreenLight() { val phoneScreenLight = if (isScreenLightOn) "on" else "off" println("The phone screen's light is $phoneScreenLight.") } } class FoldablePhone(var isFolded: Boolean = true): Phone() { override fun switchOn() { if (!isFolded) { isScreenLightOn = true } } fun fold() { isFolded = true } fun unfold() { isFolded = false } } fun main() { val newFoldablePhone = FoldablePhone() newFoldablePhone.switchOn() newFoldablePhone.checkPhoneScreenLight() newFoldablePhone.unfold() newFoldablePhone.switchOn() newFoldablePhone.checkPhoneScreenLight() }
The output is the following:
The phone screen's light is off.
The phone screen's light is on.
Solution: Special auction
The solution uses the
?.safe call operator and the?:Elvis operator to return the correct price:fun main() { val winningBid = Bid(5000, "Private Collector") println("Item A is sold at ${auctionPrice(winningBid, 2000)}.") println("Item B is sold at ${auctionPrice(null, 3000)}.") } class Bid(val amount: Int, val bidder: String) fun auctionPrice(bid: Bid?, minimumPrice: Int): Int { return bid?.amount ?: minimumPrice }
Dice Roller app
The Dice Roller app lets users tap a
Buttoncomposable to roll a dice. The outcome of the roll is shown with anImagecomposable on the screen.The app:
Solution code: Dice Roller
We’ll start with the solution code, and walk through it to learn how it works.
Branch: main
Clone:
$ git clone https://github.com/google-developer-training/basic-android-kotlin-compose-training-dice-roller.git
In
MainActivity.kt:class MainActivity : ComponentActivity() { override fun onCreate(savedInstanceState: Bundle?) { super.onCreate(savedInstanceState) setContent { DiceRollerTheme { Surface( modifier = Modifier.fillMaxSize(), color = MaterialTheme.colorScheme.background ) { DiceRollerApp() } } } } } @Preview @Composable fun DiceRollerApp() { DiceWithButtonAndImage(modifier = Modifier .fillMaxSize() .wrapContentSize(Alignment.Center) ) } @Composable fun DiceWithButtonAndImage(modifier: Modifier = Modifier) { // Result of the dice roll is a mutable state variable, with a default value of 1. // It's delegated to remember so that it retains its value across recompositions. var result by remember { mutableStateOf(1) } // Select the image resource based on the result of the dice roll. val imageResource = when(result) { 1 -> R.drawable.dice_1 2 -> R.drawable.dice_2 3 -> R.drawable.dice_3 4 -> R.drawable.dice_4 5 -> R.drawable.dice_5 else -> R.drawable.dice_6 } // The DiceWithButtonAndImage composable comprises a column that contains an image to show the dice roll, and a button for the user to roll the dice. Column(modifier = modifier, horizontalAlignment = Alignment.CenterHorizontally) { Image(painter = painterResource(imageResource), contentDescription = result.toString()) Button( onClick = { result = (1..6).random() }, // Generate a random number between 1 and 6 when the button is clicked ) { // Text composable to display the button label Text(text = stringResource(R.string.roll), fontSize = 24.sp) } } }
Add a modifier
Compose uses a
Modifierobject to decorate or modify the behavior of Compose UI elements. This is used to style the the Dice Roller app’s UI components.The
DiceWithButtonAndImage()composable accepts amodifierparameter, which is of typeModifier. This allows the caller to pass in aModifierobject that can be used to modify the behavior and decoration of the UI components inside theDiceWithButtonAndImage()composable.@Composable fun DiceWithButtonAndImage(modifier: Modifier = Modifier) { // ... Column(modifier = modifier, horizontalAlignment = Alignment.CenterHorizontally) { // ... } }
The
modifierparameter has a default value ofModifier. This means that when a caller callsDiceWithButtonAndImage(), the caller can either omit themodifierparameter and use the default value, or the caller can specify anotherModifierobject to decorate or modify the behavior of theDiceWithButtonAndImage()composable.As a best practice, the
modifierparameter is passed on a composable’s first child. In this case, theDiceWithButtonAndImage()'s first child is theColumn()composable. This allows the caller to decorate or modify the behavior of theColumn()composable.Now let’s look at how the
DiceWithButtonAndImage()composable is called from theDiceRollerApp()function:@Preview @Composable fun DiceRollerApp() { DiceWithButtonAndImage(modifier = Modifier .fillMaxSize() .wrapContentSize(Alignment.Center) ) }
Basically,
DiceRollerApp()tellsDiceWithButtonAndImage()to fill the maximum size of the parent container, to wrap the content, and to centering it within the available space.How does this work?
Modifieris the “plain” modifier object.Modifier.fillMaxSize()returns aModifierobject that fills the maximum size of the parent container.Modifier.fillMaxSize().wrapContentSize(Alignment.Center)returns aModifierobject that fills the maximum size of the parent container, and wraps the content, centering it within the available space.
The
wrapContentSize()method specifies that the available space should at least be as large as the components inside of it. However, becausefillMaxSize()is used, if the components inside of the layout are smaller than the available space, anAlignmentobject can be passed towrapContentSize()that specifies how the components should align within the available space.Alignment.Centerspecifies that a component centers both vertically and horizontally.
Create a vertical layout
Vertical layouts are created with the
Column()function.The
Column()function is a composable layout that places its children in a vertical sequence. In the expected app design, you can see that the dice image displays vertically above the roll button:
Example code with a vertical layout:
// The DiceWithButtonAndImage composable comprises a column that contains an image to show the dice roll, and a button for the user to roll the dice.
Column(modifier = modifier, horizontalAlignment = Alignment.CenterHorizontally) {
    Image(painter = painterResource(imageResource), contentDescription = result.toString())

    Button(
        onClick = { result = (1..6).random() }, // Generate a random number between 1 and 6 when the button is clicked
    ) {
        // Text composable to display the button label
        Text(text = stringResource(R.string.roll), fontSize = 24.sp)
    }
}
imports
import import androidx.compose.foundation.layout.Column
The
modifierargument fromDiceWithButtonAndImage()is passed on to theColumn(). This ensures that the composables inColumn()adhere to any modifier constraints imposed.horizontalAlignment = Alignment.CenterHorizontallyensures that the children within the column are centered horizontally on the device screen.
Add an image
The dice image displays the result when the user taps the Roll button. An image is added using the
Imagecomposable, and an image resource.
Import Drawables
For this app, the dice images are downloaded from dice_images.zip and stored in a dice_images folder. This folder contains six dice image files with dice values from 1 to 6.
Here are the steps to import the dice images. You don’t have to do these, it’s already done, but you can follow the steps in future if you need to import your own images.
Click View ➜ Tool Windows ➜ Resource Manager ➜ + ➜ Import Drawables.
Find and select the dice_images folder, and upload them. The uploaded images will appear like this:
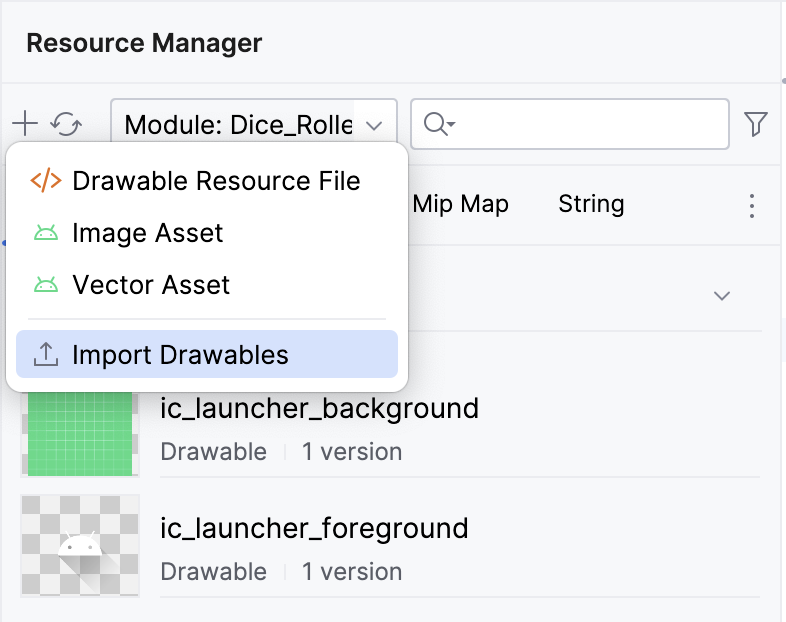
Click Next ➜ Import. The images should appear in the Resource Manager pane.
The images can then be referred using their resource IDs:
R.drawable.dice_1R.drawable.dice_2R.drawable.dice_3R.drawable.dice_4R.drawable.dice_5R.drawable.dice_6
Add an Image composable
The
Image()composable is used to display the dice image:// Select the image resource based on the result of the dice roll. val imageResource = when(result) { 1 -> R.drawable.dice_1 2 -> R.drawable.dice_2 3 -> R.drawable.dice_3 4 -> R.drawable.dice_4 5 -> R.drawable.dice_5 else -> R.drawable.dice_6 } // The DiceWithButtonAndImage composable comprises a column that contains an image to show the dice roll, and a button for the user to roll the dice. Column(modifier = modifier, horizontalAlignment = Alignment.CenterHorizontally) { Image(painter = painterResource(imageResource), contentDescription = result.toString()) Button( onClick = { result = (1..6).random() }, // Generate a random number between 1 and 6 when the button is clicked ) { // Text composable to display the button label Text(text = stringResource(R.string.roll), fontSize = 24.sp) } }
imports
import androidx.compose.foundation.Image import androidx.compose.ui.res.painterResource
The
painterResource()function is used to load the image resource. Note the use ofpainterResource(imageResource)to access the drawable resource id:R.drawable.dice_1,R.drawable.dice_2, etc.Composables inside of a
Columncomposable will be stacked vertically. In this case, the Image is stacked on top of th button.Any time you create an Image in your app, you should provide what is called a “content description.” Content descriptions attach descriptions to their respective UI components to increase accessibility. For more information about content descriptions, see Describe each UI element. The
Imagecomposable has acontentDescriptionparameter that accepts a string. This string is used to describe the image to users with visual impairments, and it is read by screen readers.
Add a Spacer
A
Spacercomposable is used to add space between 2 other composables. Example:Spacer(modifier = Modifier.height(16.dp))
imports
import androidx.compose.foundation.layout.height import androidx.compose.foundation.layout.Spacer import androidx.compose.ui.unit.dp
Typically, dp dimensions are changed in increments of
4.dp.
Build the dice roll logic
When the button is clicked, the app should perform some action. The
onClickparameter of theButton()composable is used to specify the action.In this case, the action is to generate a random number between 1 and 6:
Button(
    onClick = { result = (1..6).random() }, // Generate a random number between 1 and 6 when the button is clicked
) {
    // Text composable to display the button label
    Text(text = stringResource(R.string.roll), fontSize = 24.sp)
}
Use remember
Composables are stateless by default, which means that they don’t hold a value and can be recomposed any time by the system, which results in the value being reset. To store an object in memory, use the
remembercomposable. Example:var result by remember { mutableStateOf(1) }
imports
import androidx.compose.runtime.mutableStateOf
import androidx.compose.runtime.remember
import androidx.compose.runtime.getValue
import androidx.compose.runtime.setValue
The
mutableStateOf()function returns an observable. You learn more about observables later, but for now this basically means that when the value of theresultvariable changes, a recomposition is triggered, and the UI refreshes, displaying the new value.If the code is changed to the following, the UI will not refresh when the button is clicked:
var result
Use the debugger (optional)
The debugger is an essential tool that lets you inspect the execution of the code that powers your Android app so that you can fix any bugs in it. It lets you specify points at which to suspend the execution of the code and manually interact with variables, methods, and other aspects of the code.
Starter code
https://github.com/google-developer-training/basic-android-kotlin-compose-training-dice-roller
Branch: main
Clone:
$ git clone https://github.com/google-developer-training/basic-android-kotlin-compose-training-dice-roller.git
Run the debugger
There are two ways to run the debugger alongside your app:
Attach the debugger to an existing app process that runs on a device or emulator.
Run the app with the debugger.
Both ways accomplish the same thing to a certain extent. Once you’re familiar with both ways, you can pick the one that you prefer or whichever one is required.
Attach the debugger to an app process
First, run your app.
Click Attach Debugger to Android Process.
A Choose Process dialog opens in which you can choose the process to which you want to attach the debugger.
Select com.example.diceroller, click OK.
A Debug pane appears at the bottom of Android Studio with a message that indicates that the debugger is attached to the target device or emulator.

You attached the debugger to your app! Deets to be covered later. Next, you learn how to launch an app with the debugger already attached.
Run the app with the debugger
If you know that you want to use the debugger from the start, you can save time when you run the app with the debugger. Furthermore, if you want to debug code that only runs when the app launches, you need to launch the app with the debugger already attached.
To run the app with the debugger, in the Debug pane, click Stop, which should close the app on the emulator.
Click Debug ‘app’.
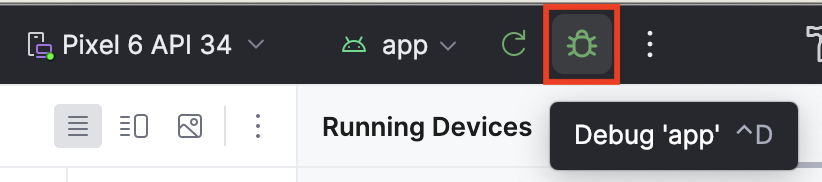
The same Debug pane appears at the bottom of Android Studio with some console output.
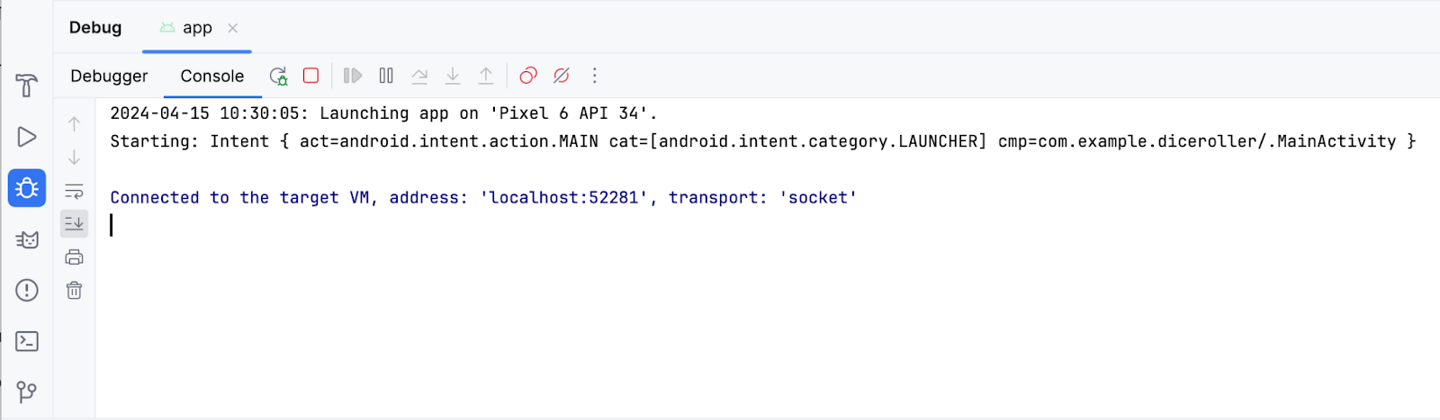
Use the debugger
The Debug pane
There are quite a few buttons across the top of the Debug pane, but these buttons don’t mean much right now, and most are grayed out and unclickable. This section covers the more-commonly used features found in the debugger. This codelab explains the other buttons as they become relevant.
When you first launch the debugger, you see a number of buttons in the Debug pane. At the top of the Debug pane, you see the Debugger and Console buttons. On some versions of Android Studio, instead of Debugger, you see Threads & Variables. They are the same.

The Console button displays the logcat output of the app. If you have any log statements in your code, the output displays as that piece of code executes.
The Debugger (or Threads & Variables) button displays three separate panes, which are empty right now because you aren’t using the debugger:
Frames display
Evaluation and watch expression entry
Variables pane
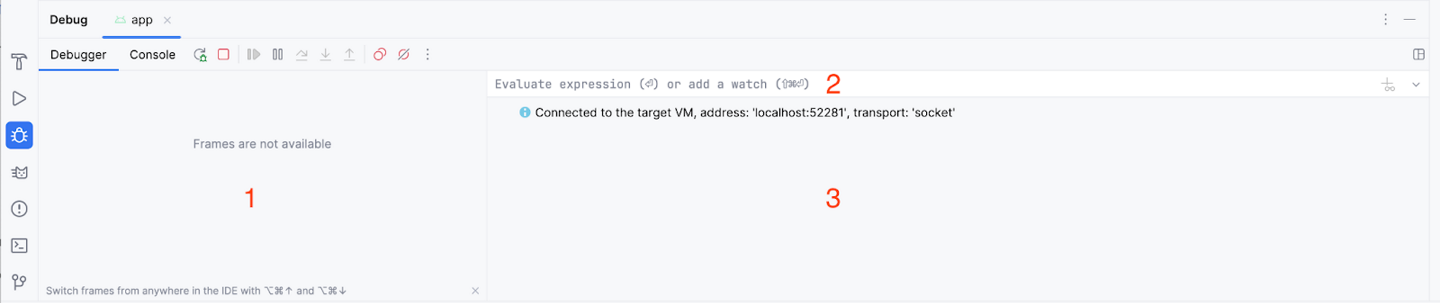
Use common debugger features
Set a breakpoint
One of the main features of the debugger is that it lets you stop execution on a specific line of code with a breakpoint.
To set a breakpoint in Android Studio, you need to navigate to a specific line of code and then click in the gutter next to the line number. To unset a breakpoint, you need to click an existing breakpoint in the gutter to make it disappear.
Example: here a breakpoint is set at where
DiceRollerApp()is called.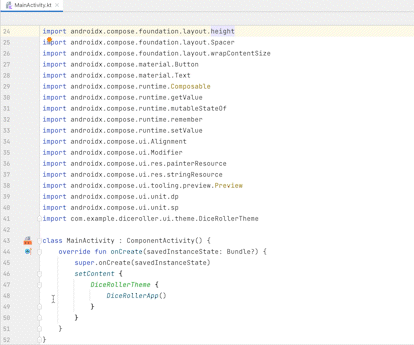
Try it yourself. Set a breakpoint where the
imageResourcevariable is set, i.e. this line of code:val imageResource = when(result) {
Use the Resume Program button
In the last section, you set a breakpoint where the
imageResourcevariable is set. This breakpoint causes the execution to suspend upon this instruction. When code execution is suspended with the debugger, you likely need to continue execution to continue running the app. The most direct way to do this is to use the Resume Program button.To resume the program, follow these steps.
Click Debug ‘app’. You should see something like this image after the app launches:
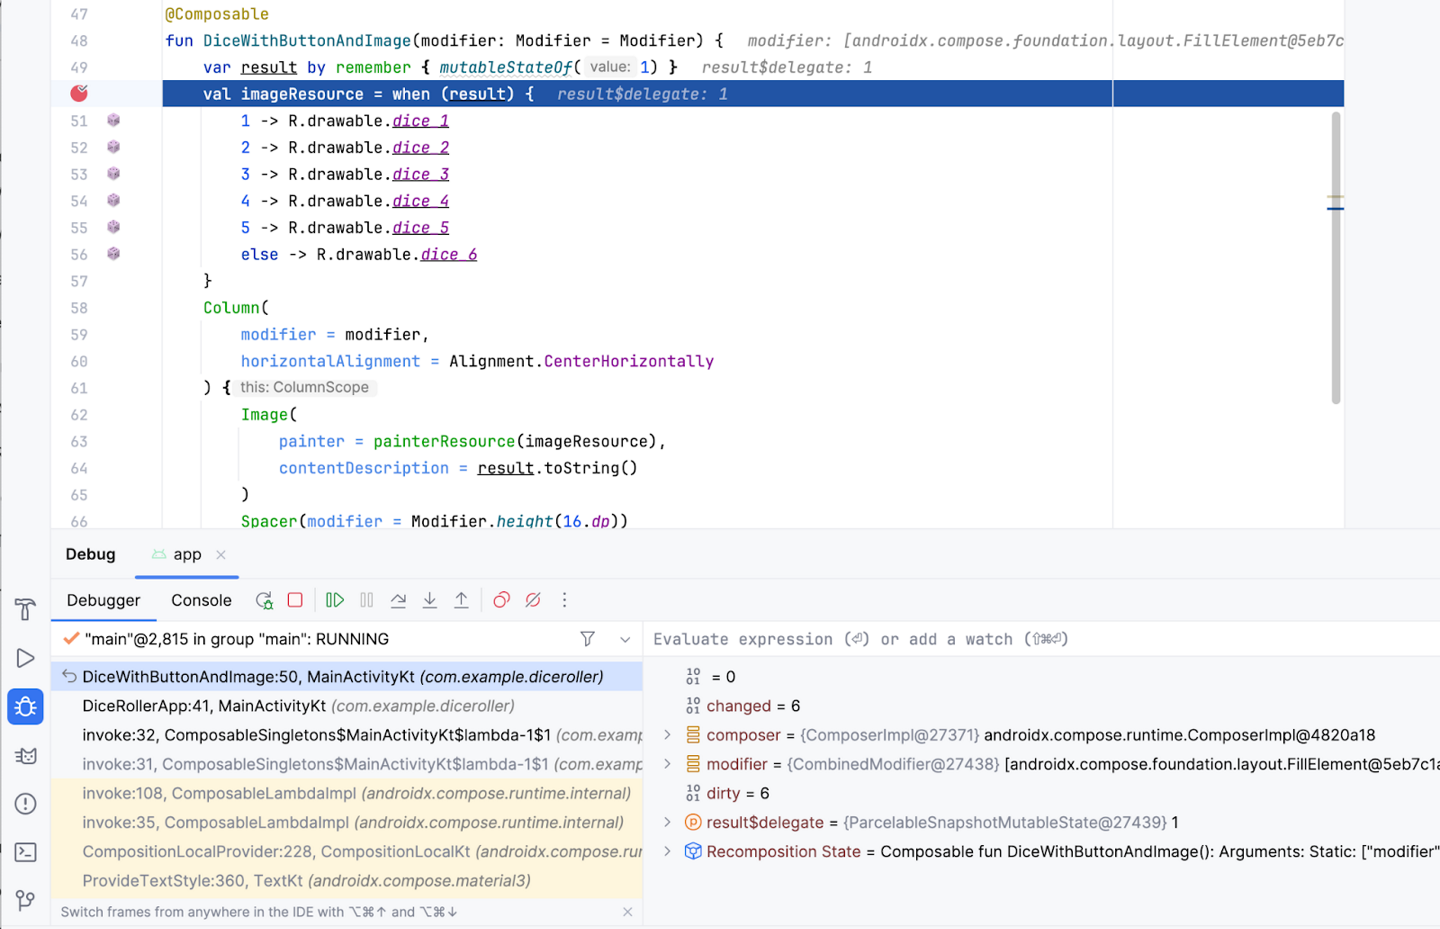
Before you resume the program, it’s important to explain some of what you see on the screen when the debugger suspends execution:
Many of the buttons in the Debugger (or Threads & Variables) pane are now clickable.
The Frames pane displays a lot of information, which includes a highlighted reference to the line where the breakpoint was set.
The Variables pane displays a number of items, but this app doesn’t have many variables so there isn’t a lot of information that is relevant in the scope of this codelab at the moment. However, the ability to inspect variables is an essential feature of the debugger because it yields insight into what happens in the code at runtime. This codelab goes into more detail about how to inspect variables later.
If you look at the app on your device or emulator, you notice that the screen is blank because the app is suspended on a line of code. More specifically, execution stopped at the breakpoint and the UI hasn’t yet rendered.
Bear in mind that the app won’t always stop immediately only because a breakpoint was set. It depends on where you place a breakpoint in the code. In this case, you placed it on a line that executes when the app starts.
The key thing to remember is that the app only suspends at a breakpoint when an attempt to execute the line at which the breakpoint was set occurs. There are multiple ways to move the debugger forward, but for now you use the Resume Program button.
Click Resume Program.
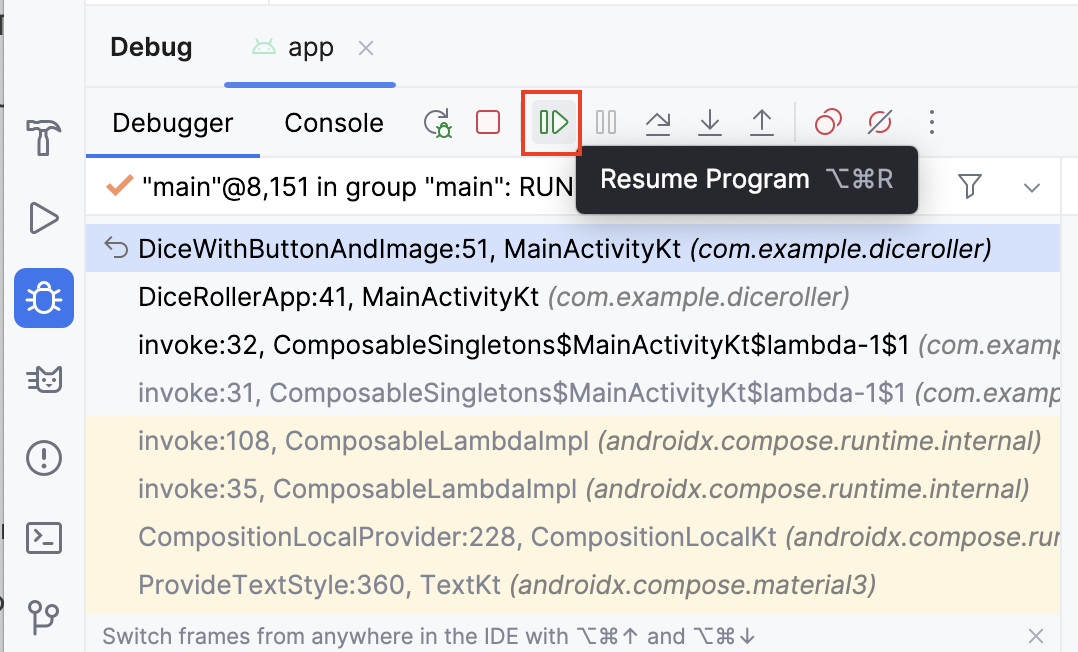
You should now see something that looks like this image:
The majority of the information disappears and the buttons are once again unclickable. The app also appears as normal on your device or emulator. The reason for this is that the code is no longer suspended at the breakpoint and the app is in a normal running state. The debugger is attached, but it doesn’t do much until there’s an attempt to execute a line of code that has a breakpoint set. Leave this breakpoint in place because it’s useful in the following examples.
Use the Step Into button
The Step Into button of the debugger is a handy way to drill deeper into the code at runtime. If an instruction makes a call to a method or another piece of code, the Step Into button lets you enter the code without the need to navigate there manually before you launch the debugger to set a breakpoint.
Create a breakpoint in where the
DiceRollerApp()function is called.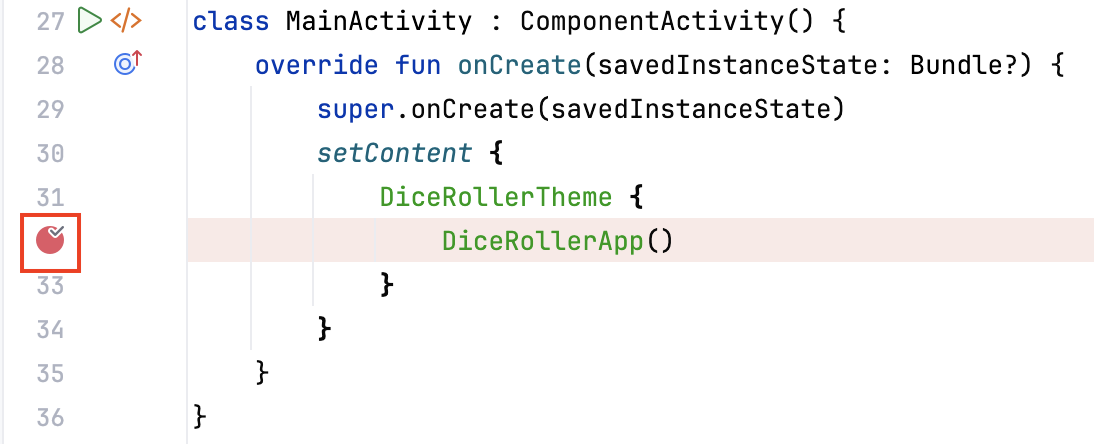
Click Debug ‘app’ to rerun the app with the debugger. The execution suspends at the line where the
DiceRollerApp()function is called.Note
If the execution doesn’t suspend, most likely your Android Studio version is 2024.1.1 or later. In that case, create a breakpoint inside
fun DiceRollerApp(), atDiceWithButtonAndImage(modifier = Modifier
Click Debug ‘app’ to rerun the app with the debugger.
The next steps will be different for you, try to understand what the steps are doing, and repeat them in your own Android Studio as far as possible.
Click Step Into.
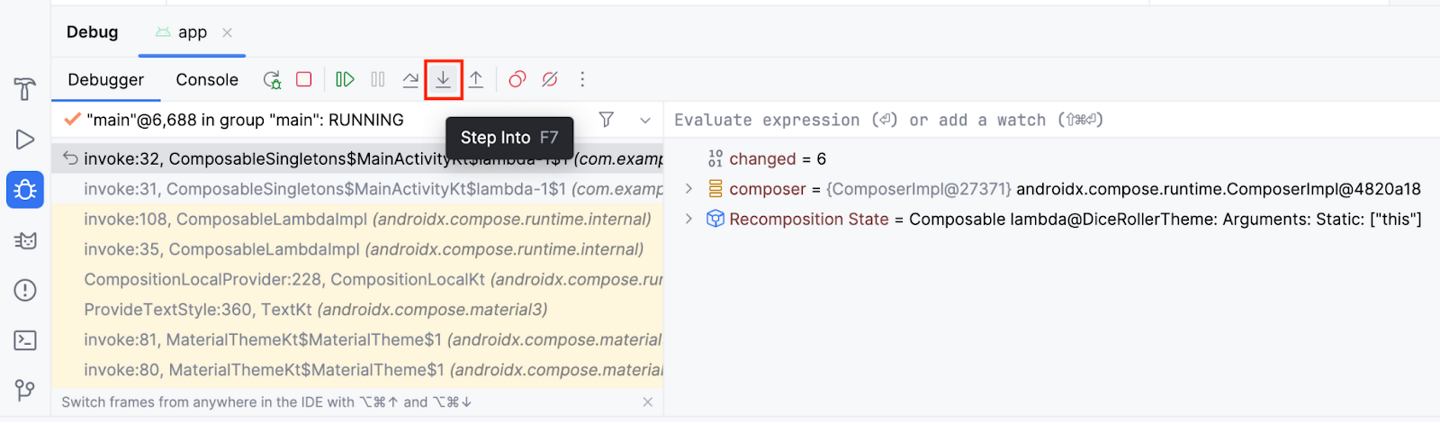
Now line 40 is highlighted and the Frames pane in the Debug pane indicates that the code is suspended on line 40.
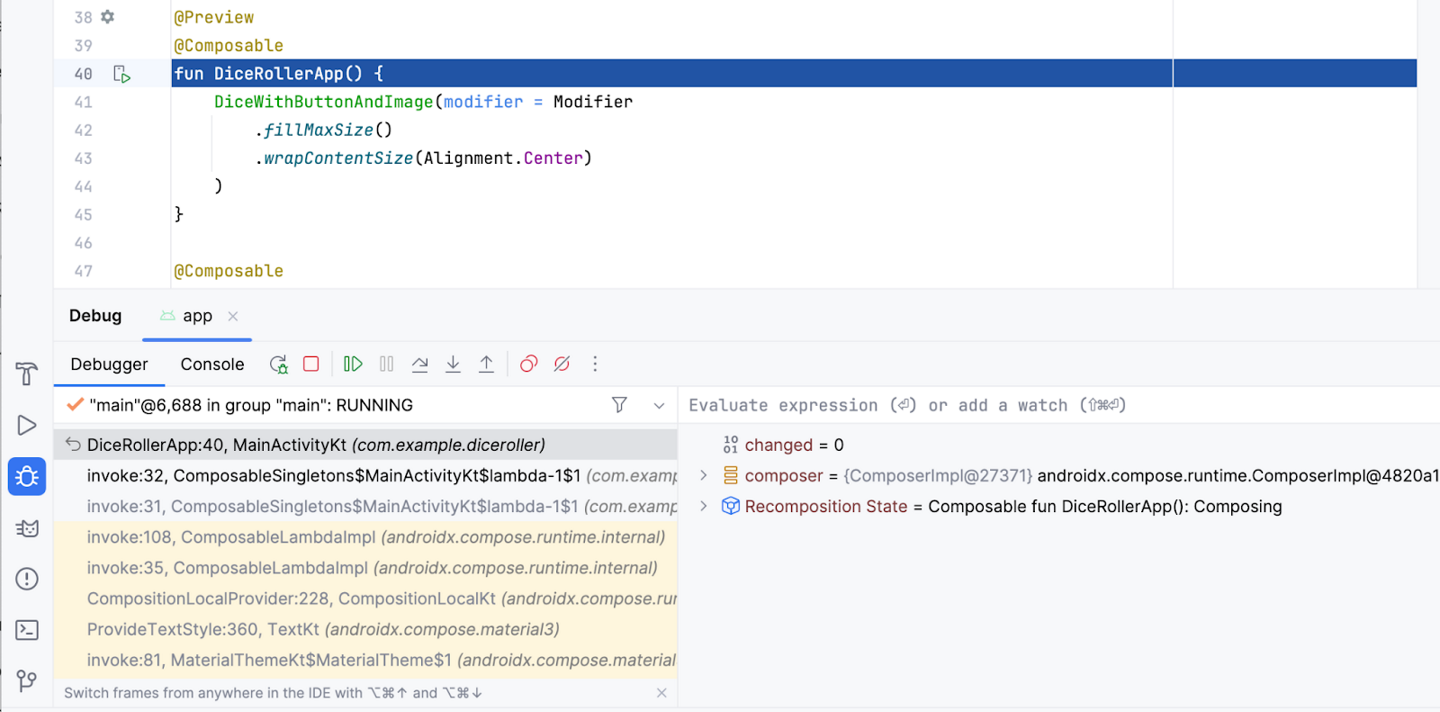
If you expand the Frames pane, you can see that the line after the highlighted line starts with invoke: followed by a line number, which is 32 in the previous image. This is what is referred to as the call stack. Essentially, it shows the chain of calls that lead the code execution to the current line. In this case, line 32 holds an instruction that calls the
DiceRollerApp()function.When you clicked the Step Into button when the debugger stopped at the breakpoint set on that function call, the debugger stepped into that function, which leads the execution to line 40 where the function is declared. The highlighted line indicates where the execution is suspended. If the lines after the highlighted line have line numbers associated with them, it’s an indication of the path of execution. In this particular case, the debugger indicates that an instruction on line 32 brought you to line 40.
Click Resume Program.
This should lead you to the original breakpoint that you set. You might understand a bit more about what you saw when you stopped execution in the first example. This is the same picture from the sixth step of the Resume program section:
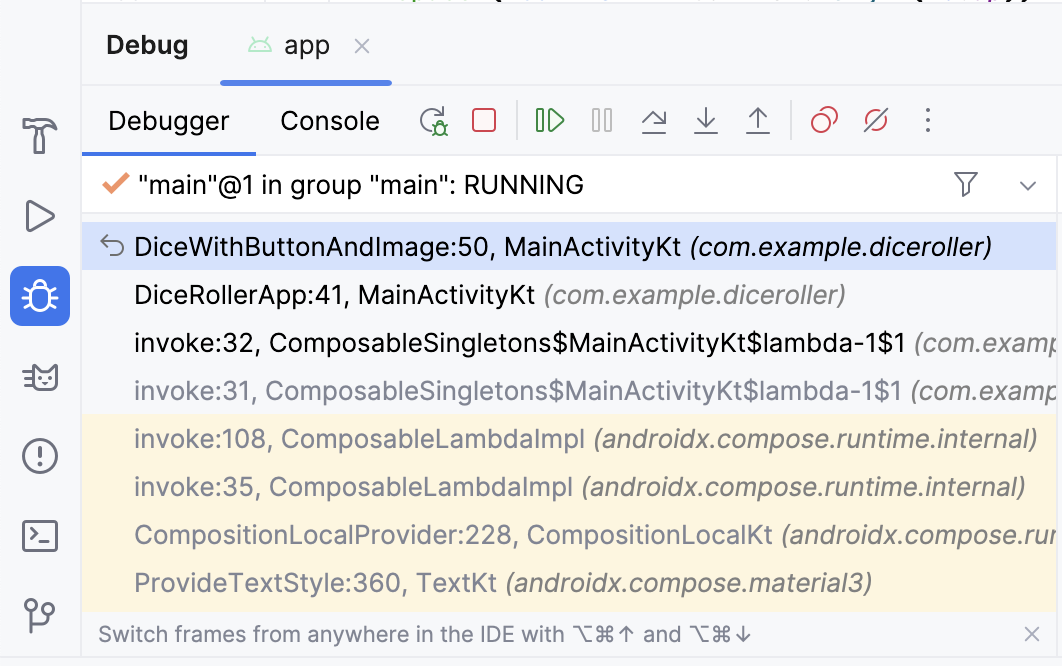
In the call stack, you can see that the
DiceWithButtonAndImage()function suspended on line 50 and the function was called from line 41 in theDiceRollerApp()function, which was called on line 32. The call-stack feature can help you understand the path of execution. This is very helpful when a function is called from many different places in the app.The Step Into button provides a way to enter a function and suspend the execution without setting a breakpoint in the function itself. In this case, you set a breakpoint on the call to the
DiceRollerApp()function. When you click the Step Into button, the execution suspends in theDiceRollerApp()function.Dice Roller is a fairly small app because there aren’t many files, classes, or functions. When you work with bigger apps, the Step Into feature of the debugger becomes more useful because it gives you the option to drill down into the code without the need to navigate the code on your own.
Use the Step Over button
The Step Over button provides another means by which you can step through your app code at runtime. It moves the execution to the next line of code and advances the debugger.
Click Step Over.
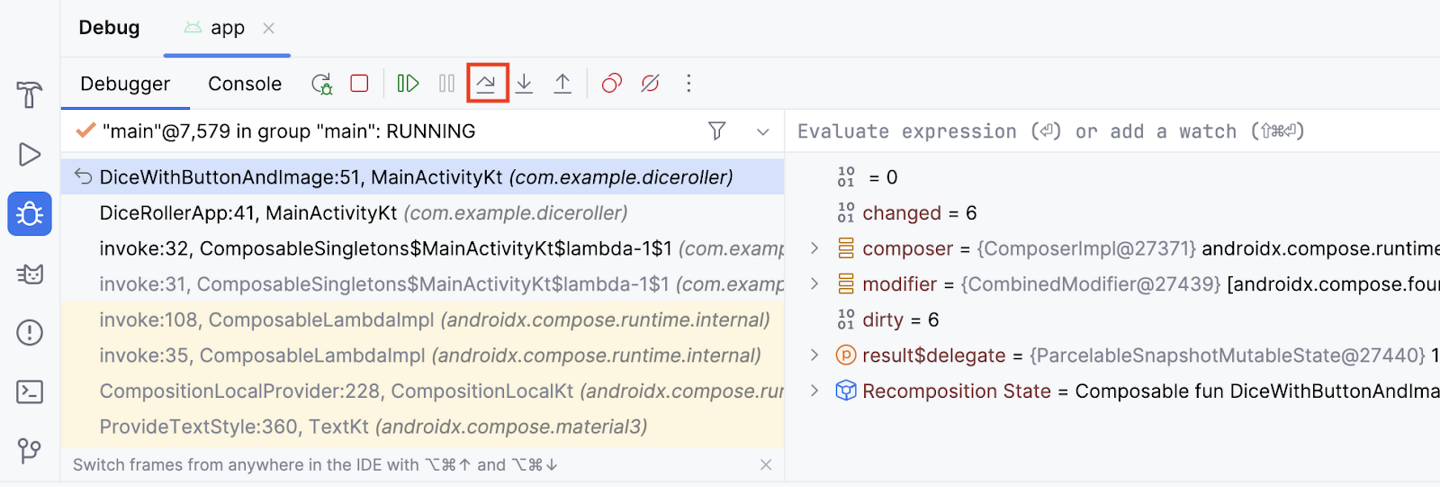
You now see that the debugger suspended the code on the next line of execution, which is line 51. You can proceed to step through each line, consecutively.
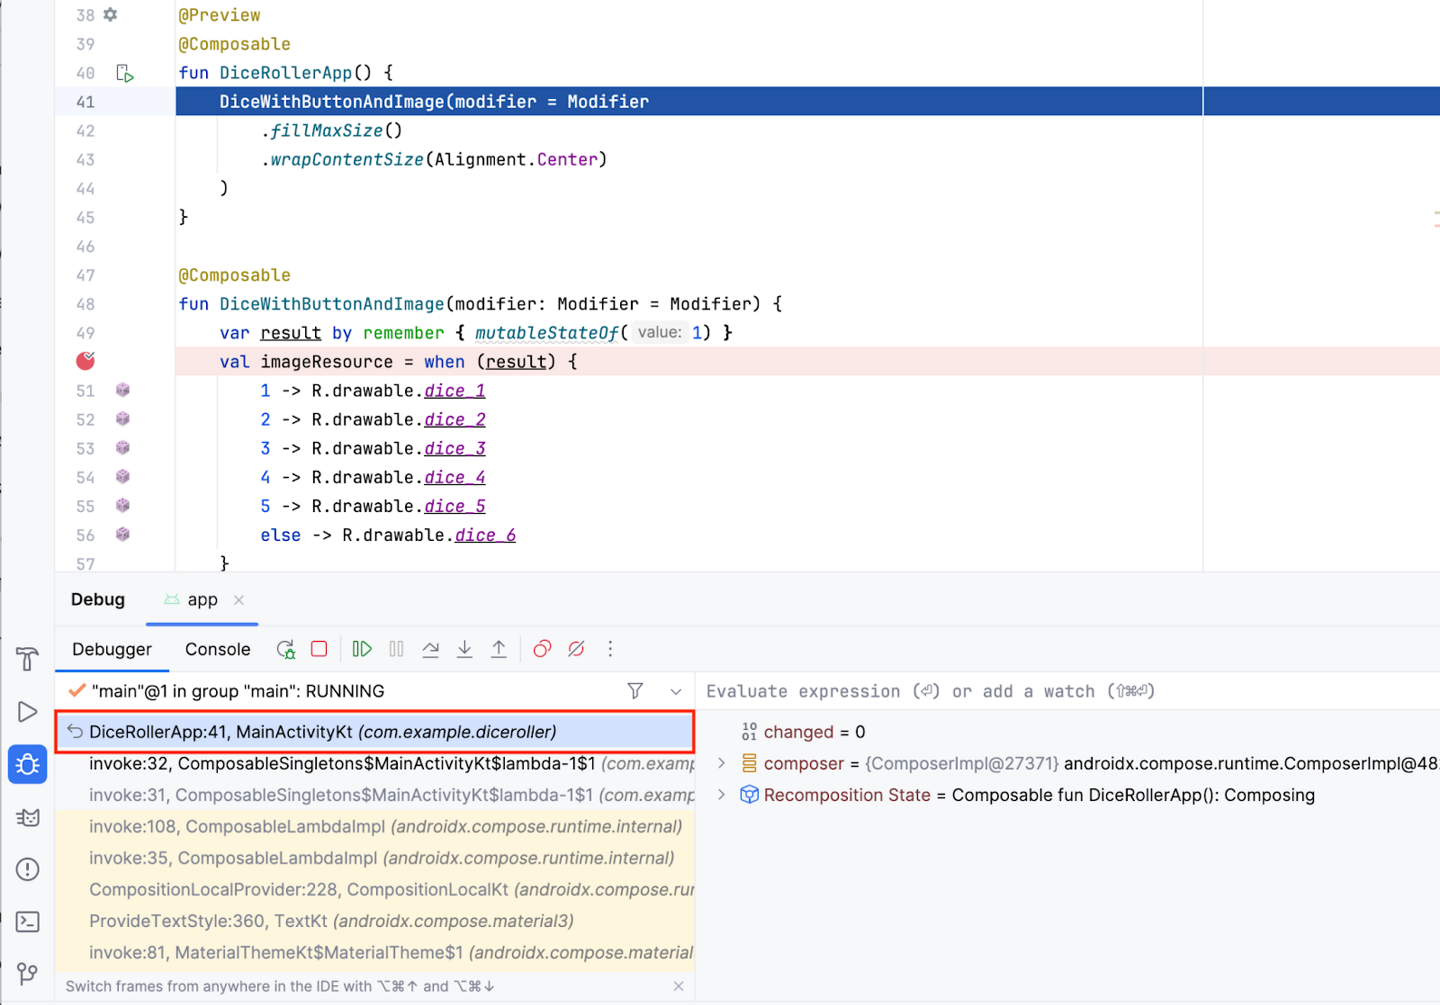
Use the Step Out button
The Step Out button does the opposite of the Step Into button. Rather than drill down into the call stack, the Step Out button navigates up the call stack.
Click Step Out. Can you guess what line the program suspends on?
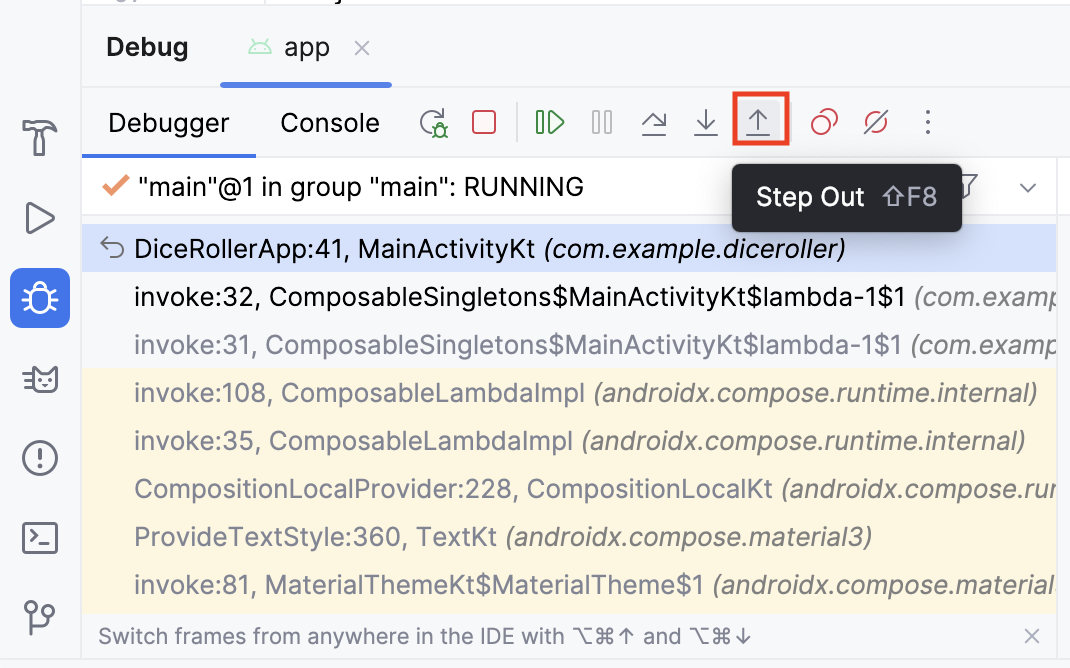
Notice that the debugger stepped out of the
DiceRollerApp()function and back to the line that called it.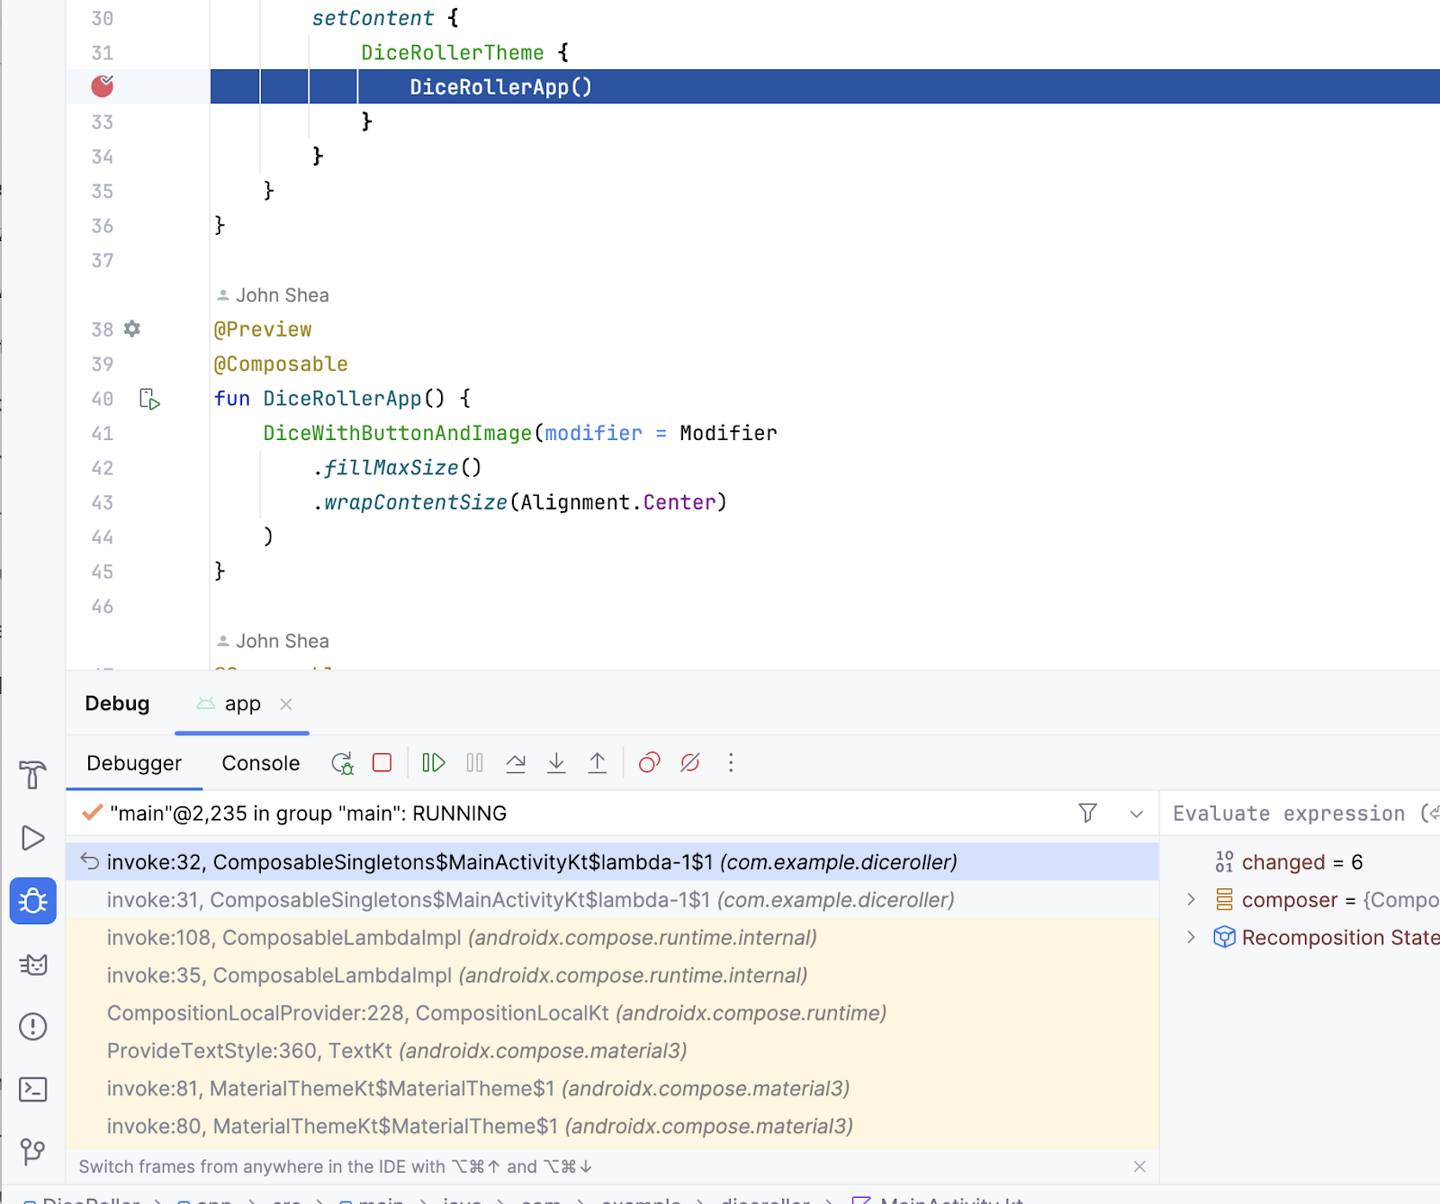
The Step Out button is a useful tool when you find yourself too deep in a method call stack. It lets you work your way up the call stack without the need to step through all the code for each method that you stepped into.
Inspect variables
Earlier in the codelab, there was a brief description of the Variables pane, which provides a more in-depth explanation of how to inspect the variables shown in the pane to help you debug issues in your app.
Click the breakpoint to remove it from where the
DiceRollerApp()function is called, but leave the breakpoint where theimageResourcevariable is set.Click Debug ‘app’. You should see that the
result$delegatevariable is aMutableStatewith a value of 1. That is because when the variable is defined, it is instantiated with amutableStateOf1.MutableStatemeans that the result variable holds a state that can be changed.Note
The
result$delegatevariable in the Variables pane refers to theresultvariable in the code. The$delegatenotation is there because the result variable is arememberdelegate.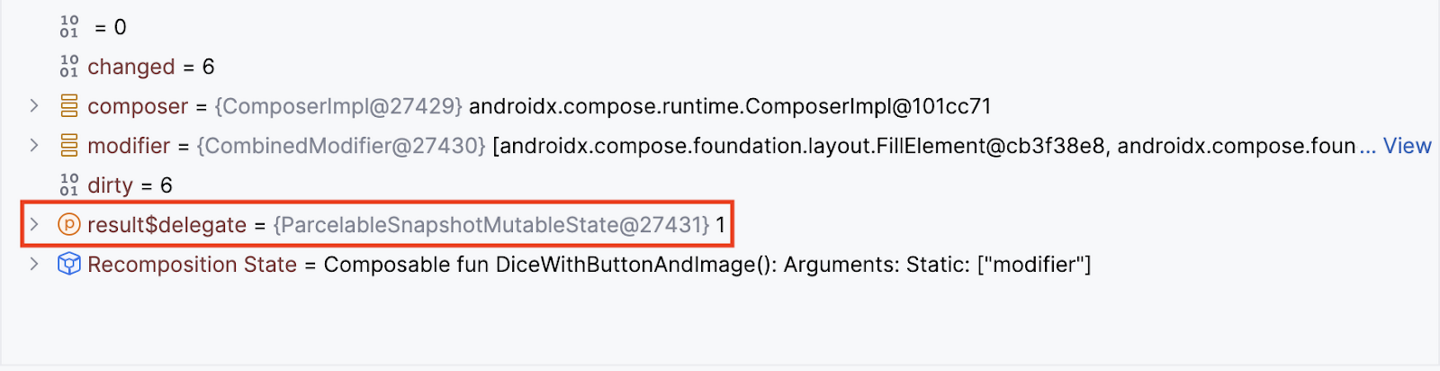
Click Resume Program.
In the app, click Roll. Your code suspends at the breakpoint again and you may see a different value for the
result$delegatevariable.In this image, the mutable state of the
result$delegatevariable holds a value of 2. This demonstrates how you can inspect variables at runtime with the debugger. In a more full-featured app, the value of a variable could potentially cause a crash. When you use the debugger to inspect variables, you can gain more insight into the details of the crash so that you can fix the bug.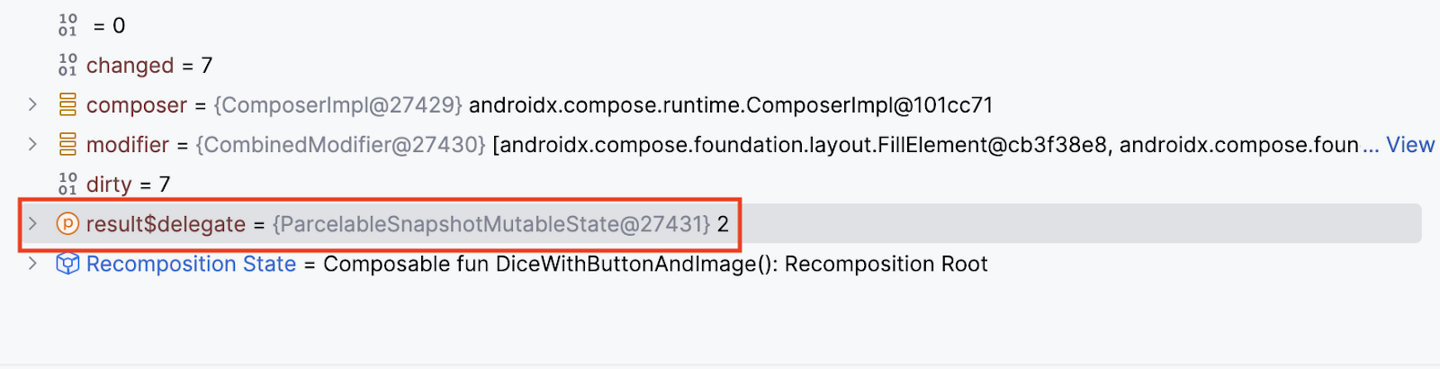
In-lesson practice: Lemonade app
This is meant to be done during the lesson.
App overview
You’re going to help us bring our vision of making digital lemonade to life! The goal is to create a simple, interactive app that lets you juice lemons when you tap the image on screen until you have a glass of lemonade. Consider it a metaphor or maybe just a fun way to pass the time!
Here’s how the app works:
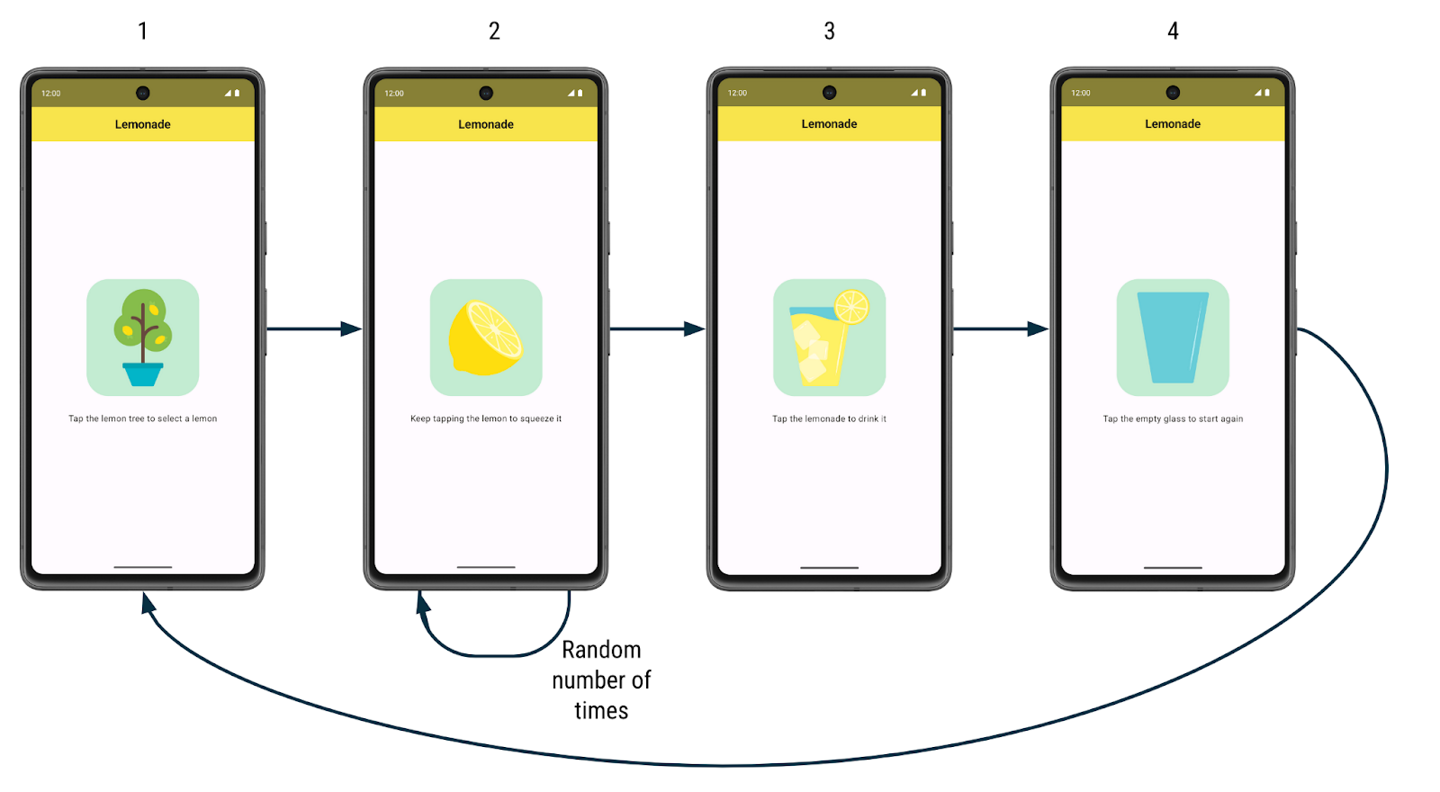
When the user first launches the app, they see a lemon tree. There’s a label that prompts them to tap the lemon tree image to “select” a lemon from the tree.
After they tap the lemon tree, the user sees a lemon. They are prompted to tap the lemon to “squeeze” it to make lemonade. They need to tap the lemon several times to squeeze it. The number of taps required to squeeze the lemon is different each time and is a randomly generated number between 2 to 4 (inclusive).
After they’ve tapped the lemon the required number of times, they see a refreshing glass of lemonade! They are asked to tap the glass to “drink” the lemonade.
After they tap the lemonade glass, they see an empty glass. They are asked to tap the empty glass to start again.
After they tap the empty glass, they see the lemon tree and can begin the process again. More lemonade please!
Here are larger screenshots of how the app looks:
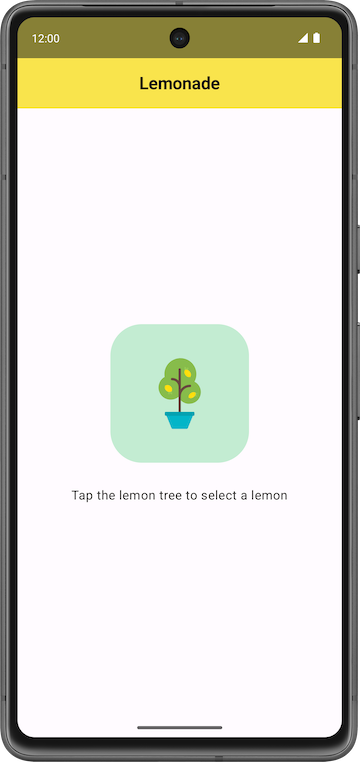
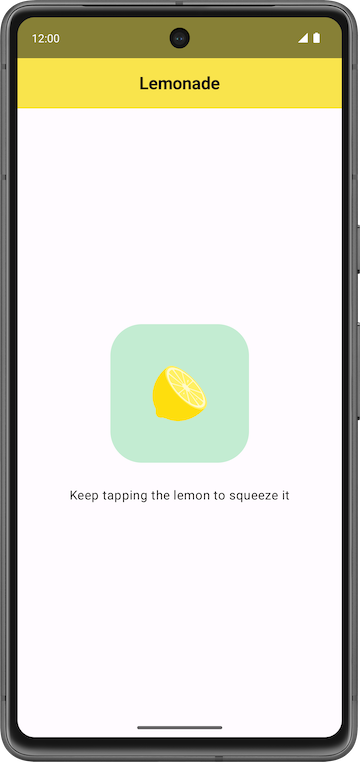
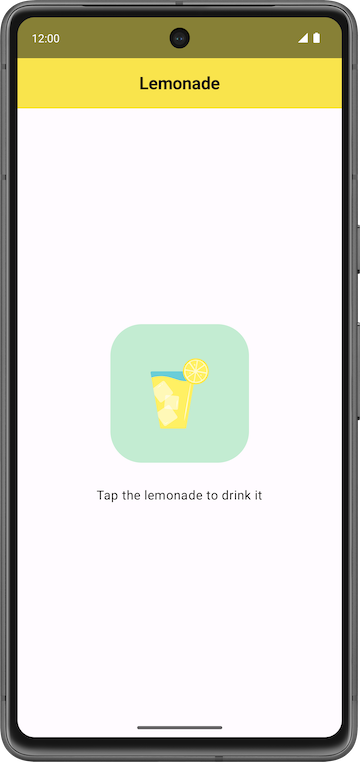
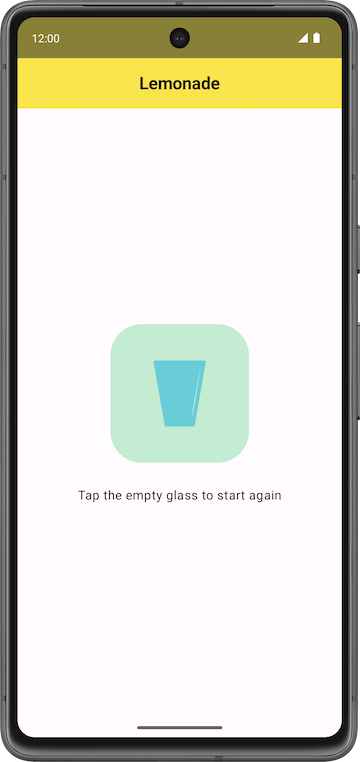
For each step of making lemonade, there’s a different image and text label on the screen, and different behavior for how the app responds to a click. For example, when the user taps the lemon tree, the app shows a lemon.
Your job is to build the app’s UI layout and implement the logic for the user to move through all the steps to make lemonade.
Get started
Create a project
In Android Studio, create a new project with the Empty Activity template with the following details:
Name: Lemonade
Package name:
com.example.lemonadeMinimum SDK: 24
When the app has been successfully created and the project builds, then proceed with the next section.
Add images
You’re provided with four vector drawable files that you use in the Lemonade app.
Get the files:
Download the images for the app: lemonade_images.zip.
Add the images into the
drawablefolder of your app. If you don’t remember how to do this, see the Create an interactive Dice Roller app codelab.
Your project folder should look like the following screenshot in which the
lemon_drink.xml,lemon_restart.xml,lemon_squeeze.xml, andlemon_tree.xmlassets now appear under the res/drawable directory: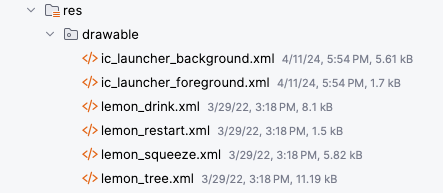
Double click a vector drawable file to see the image preview.
Select the Design pane (not the Code or Split views) to see a full-width view of the image.

After the image files are included in your app, you can refer to them in your code. For example, if the vector drawable file is called
lemon_tree.xml, then in your Kotlin code, you can refer to the drawable using its resource ID in the format ofR.drawable.lemon_tree.
Add string resources
Add the following strings to your project in the
res/values/strings.xmlfile:Tap the lemon tree to select a lemonKeep tapping the lemon to squeeze itTap the lemonade to drink itTap the empty glass to start again
The following strings are also needed in your project. They’re not displayed on the screen in the user interface, but these are used for the content description of the images in your app to describe what the images are. Add these additional strings in your app’s
strings.xmlfile:Lemon treeLemonGlass of lemonadeEmpty glass
Give each string resource an appropriate identifier name that describes the value it contains. For example, for the string “
Lemon", you can declare it in thestrings.xmlfile with the identifier namelemon_content_description, and then refer to it in your code using the resource ID:R.string.lemon_content_description.
Steps of making lemonade
Now you have the string resources and image assets that are needed to implement the app. Here’s a summary of each step of the app and what is shown on the screen:
Step 1:
Text:
Tap the lemon tree to select a lemonImage: Lemon tree (
lemon_tree.xml)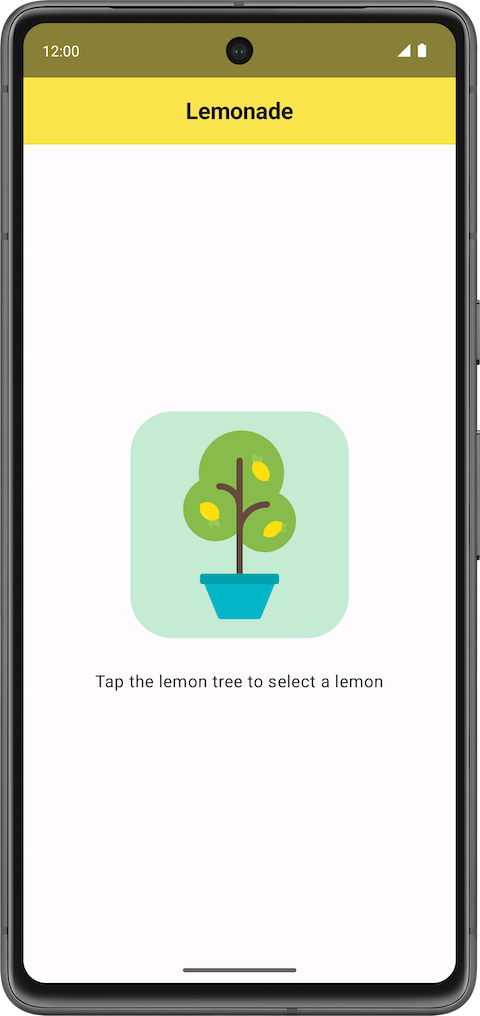
Step 2:
Text:
Keep tapping the lemon to squeeze itImage: Lemon (
lemon_squeeze.xml)
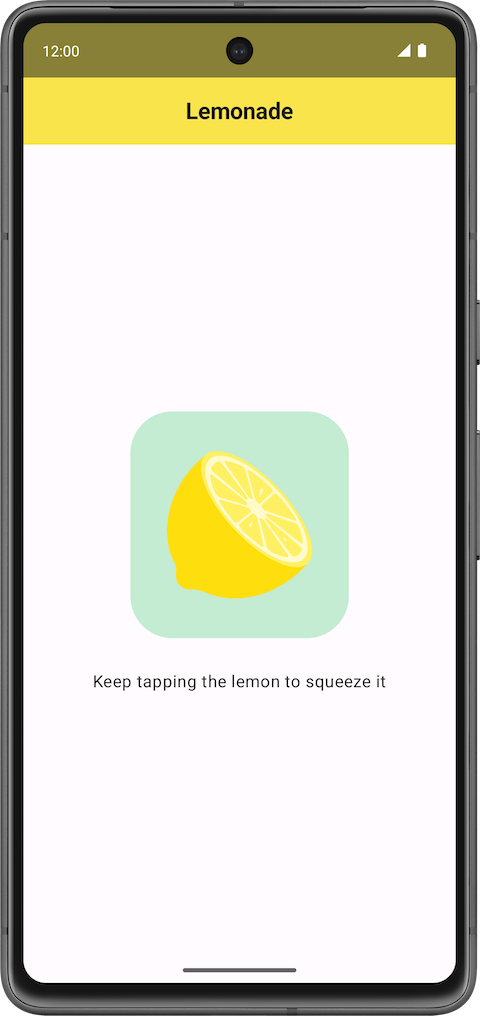
Step 3:
Text:
Tap the lemonade to drink itImage: Full glass of lemonade (
lemon_drink.xml)

Step 4:
Text:
Tap the empty glass to start againImage: Empty glass (
lemon_restart.xml)

Add visual polish
To make your version of the app look like these final screenshots, there are a couple more visual adjustments to make in the app:
Increase the font size of the text so that it’s larger than the default font size (such as
18sp).Add additional space in between the text label and the image below it, so they’re not too close to each other (such as
16dp).Give the button an accent color and slightly rounded corners to let the users know that they can tap the image.
Plan out how to build the app
When building an app, it’s a good idea to get a minimal working version of the app done first. Then gradually add more functionality until you complete all desired functionality. Identify a small piece of end-to-end functionality that you can build first.
In the Lemonade app, notice that the key part of the app is transitioning from one step to another with a different image and text label shown each time. Initially, you can ignore the special behavior of the squeeze state because you can add this functionality later after you build the foundation of the app.
Below is a proposal of the high-level overview of the steps that you can take to build the app:
Build the UI layout for the first step of making lemonade, which prompts the user to select a lemon from the tree. You can skip the border around the image for now because that’s a visual detail that you can add later.

Implement the behavior in the app so that when the user taps the lemon tree, the app shows a lemon image and its corresponding text label. This covers the first two steps of making lemonade.

Add code so that the app displays the rest of the steps to make lemonade, when the image is tapped each time. At this point, a single tap on the lemon can transition to displaying the glass of lemonade.
Add custom behavior for the lemon squeeze step, so that the user needs to “squeeze”, or tap, the lemon a specific number of times that’s randomly generated from 2 to 4.
Finalize the app with any other necessary visual polish details. For example, change the font size and add a border around the image to make the app look more polished. Verify that the app follows good coding practices, such as adhering to the Kotlin coding style guidelines and adding comments to your code.
If you can use these high-level steps to guide you in the implementation of the Lemonade app, go ahead and build the app on your own. If you find that you need additional guidance on each of these five steps, proceed to the next section.
Implement the app
Build the UI layout
First modify the app so that it displays the image of the lemon tree and its corresponding text label, which says
Tap the lemon tree to select a lemon, in the center of the screen. There should also be16dpof space in between the text and the image below it.
If it helps, you can use the following starter code in the MainActivity.kt file:
package com.example.lemonade

import android.os.Bundle
import androidx.activity.ComponentActivity
import androidx.activity.compose.setContent
import androidx.compose.foundation.layout.fillMaxSize
import androidx.compose.material3.MaterialTheme
import androidx.compose.material3.Surface
import androidx.compose.material3.Text
import androidx.compose.runtime.Composable
import androidx.compose.ui.Modifier
import androidx.compose.ui.tooling.preview.Preview
import com.example.lemonade.ui.theme.LemonadeTheme

class MainActivity : ComponentActivity() {
    override fun onCreate(savedInstanceState: Bundle?) {
        super.onCreate(savedInstanceState)
        setContent {
            LemonadeTheme {
                LemonApp()
            }
        }
    }
}

@Composable
fun LemonApp() {
    // A surface container using the 'background' color from the theme
    Surface(
        modifier = Modifier.fillMaxSize(),
        color = MaterialTheme.colorScheme.background
    ) {
        Text(text = "Hello there!")
    }
}

@Preview(showBackground = true)
@Composable
fun DefaultPreview() {
    LemonadeTheme {
        LemonApp()
    }
}
This code is similar to the code that’s autogenerated by Android Studio. However, instead of a
Greeting()composable, there’s aLemonApp()composable defined and it doesn’t expect a parameter. TheDefaultPreview()composable is also updated to use theLemonApp()composable so you can preview your code easily.After you enter this code in Android Studio, modify the
LemonApp()composable, which should contain the contents of the app. Here are some questions to guide your thought process:What composables will you use?
Is there a standard Compose layout component that can help you arrange the composables into the desired positions?
Important
To make your app accessible for more users, remember to set content descriptions on the images to describe what the image contains.
Go and implement this step so that you have the lemon tree and text label displayed in your app, when your app launches. Preview your composable in Android Studio to see how the UI looks as you modify your code. Run the app to ensure that it looks like the screenshot that you saw earlier in this section.
Return to these instructions when you’re done, if you want more guidance on how to add behavior when the image is tapped on.
Add click behavior
Next you will add code so that when the user taps the image of the lemon tree, the image of the lemon appears along with the text label
Keep tapping the lemon to squeeze it. In other words, when you tap the lemon tree, it causes the text and image to change.
Earlier in this pathway, you learned how to make a button clickable. In the case of the Lemonade app, there’s no
Buttoncomposable. However, you can make any composable, not just buttons, clickable when you specify theclickablemodifier on it. For an example, see the clickable documentation page.What should happen when the image is clicked? The code to implement this behavior is non-trivial, so take a step back to revisit a familiar app.
Look at the Dice Roller app
Revisit the code from the Dice Roller app to observe how the app displays different dice images based on the value of the dice roll:
...

@Composable
fun DiceWithButtonAndImage(modifier: Modifier = Modifier) {
    var result by remember { mutableStateOf(1) }
    val imageResource = when(result) {
        1 -> R.drawable.dice_1
        2 -> R.drawable.dice_2
        3 -> R.drawable.dice_3
        4 -> R.drawable.dice_4
        5 -> R.drawable.dice_5
        else -> R.drawable.dice_6
    }
    Column(modifier = modifier, horizontalAlignment = Alignment.CenterHorizontally) {
        Image(painter = painterResource(id = imageResource), contentDescription = result.toString())
        Button(onClick = { result = (1..6).random() }) {
            Text(stringResource(id = R.string.roll))
        }
    }
}

...
Answer these questions about the Dice Roller app code:
Which variable’s value determines the appropriate dice image to display?
What action from the user triggers that variable to change?
The
DiceWithButtonAndImage()composable function stores the most recent dice roll, in theresultvariable, which was defined with theremembercomposable andmutableStateOf()function in this line of code:var result by remember { mutableStateOf(1) }
When the
resultvariable gets updated to a new value, Compose triggers recomposition of theDiceWithButtonAndImage()composable, which means that the composable will execute again. Theresultvalue is remembered across recompositions, so when theDiceWithButtonAndImage()composable runs again, the most recentresultvalue is used. Using awhenstatement on the value of theresultvariable, the composable determines the new drawable resource ID to show and theImagecomposable displays it.
Apply what you learned to the Lemonade app
Now answer similar questions about the Lemonade app:
Is there a variable that you can use to determine what text and image should be shown on the screen? Define that variable in your code.
Can you use conditionals in Kotlin to have the app perform different behavior based on the value of that variable? If so, write that conditional statement in your code.
What action from the user triggers that variable to change? Find the appropriate place in your code where that happens. Add code there to update the variable.
Note
You may want to represent each step of making lemonade with a number. For example, step 1 of the app has the image of the lemon tree and clicking the image goes to step 2 of the app. This can help you organize which text string goes with which image.
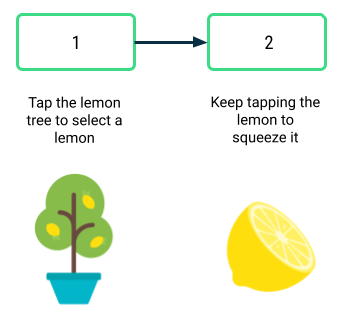
This section can be quite challenging to implement and requires changes in multiple places of your code to work correctly. It’s ok to feel discouraged if the app doesn’t work as you expect right away. Remember that there are multiple correct ways to implement this behavior.
When you’re done, run the app and verify that it works. When you launch the app, it should show the image of the lemon tree and its corresponding text label. A single tap of the image of the lemon tree should update the text label and show the image of the lemon. A tap on the lemon image shouldn’t do anything for now.
Add remaining steps
Now your app can display two of the steps to make lemonade! At this point, your
LemonApp()composable may look something like the following code snippet. It’s okay if your code looks slightly different as long as the behavior in the app is the same.... @Composable fun LemonApp() { // Current step the app is displaying (remember allows the state to be retained // across recompositions). var currentStep by remember { mutableStateOf(1) } // A surface container using the 'background' color from the theme Surface( modifier = Modifier.fillMaxSize(), color = MaterialTheme.colorScheme.background ) { when (currentStep) { 1 -> { Column ( horizontalAlignment = Alignment.CenterHorizontally, verticalArrangement = Arrangement.Center, modifier = Modifier.fillMaxSize() ){ Text(text = stringResource(R.string.lemon_select)) Spacer(modifier = Modifier.height(32.dp)) Image( painter = painterResource(R.drawable.lemon_tree), contentDescription = stringResource(R.string.lemon_tree_content_description), modifier = Modifier .wrapContentSize() .clickable { currentStep = 2 } ) } } 2 -> { Column ( horizontalAlignment = Alignment.CenterHorizontally, verticalArrangement = Arrangement.Center, modifier = Modifier.fillMaxSize() ){ Text(text = stringResource(R.string.lemon_squeeze)) Spacer(modifier = Modifier.height(32 .dp)) Image( painter = painterResource(R.drawable.lemon_squeeze), contentDescription = stringResource(R.string.lemon_content_description), modifier = Modifier.wrapContentSize() ) } } } } } ...
Next you’ll add the rest of the steps to make lemonade. A single tap of the image should move the user to the next step of making lemonade, where the text and image both update. You will need to change your code to make it more flexible to handle all steps of the app, not just the first two steps.

To have different behavior each time that the image is clicked, you need to customize the clickable behavior. More specifically, the lambda that’s executed when the image is clicked needs to know which step we’re moving to.
You may start to notice that there’s repeated code in your app for each step of making lemonade. For the
whenstatement in the previous code snippet, the code for case1is very similar to case2with small differences. If it’s helpful, create a new composable function, calledLemonTextAndImage()for example, that displays text above an image in the UI. By creating a new composable function that takes some input parameters, you have a reusable function that’s useful in multiple scenarios as long as you change the inputs that you pass in. It’s your job to figure out what the input parameters should be. After you create this composable function, update your existing code to call this new function in relevant places.Another advantage to having a separate composable like
LemonTextAndImage()is that your code becomes more organized and robust. When you callLemonTextAndImage(), you can be sure that both the text and image will get updated to the new values. Otherwise, it’s easy to accidentally miss one case where an updated text label is displayed with the wrong image.Here’s one additional hint: You can even pass in a lambda function to a composable. Be sure to use function type notation to specify what type of function should be passed in. In the following example, a
WelcomeScreen()composable is defined and accepts two input parameters: anamestring and anonStartClicked()function of type() -> Unit. That means that the function takes no inputs (the empty parentheses before the arrow) and has no return value ( theUnitfollowing the arrow). Any function that matches that function type() -> Unitcan be used to set theonClickhandler of thisButton. When the button is clicked, theonStartClicked()function is called.@Composable fun WelcomeScreen(name: String, onStartClicked: () -> Unit) { Column { Text(text = "Welcome $name!") Button( onClick = onStartClicked ) { Text("Start") } } }
Passing in a lambda to a composable is a useful pattern because then the
WelcomeScreen()composable can be reused in different scenarios. The user’s name and the button’sonClickbehavior can be different each time because they’re passed in as arguments.With this additional knowledge, go back to your code to add the remaining steps of making lemonade to your app.
Return to these instructions if you want additional guidance on how to add the custom logic around squeezing the lemon a random number of times.
Add squeeze logic
Great job! Now you have the basis of the app. Tapping the image should move you from one step to the next. It’s time to add the behavior of needing to squeeze the lemon multiple times to make lemonade. The number of times that the user needs to squeeze, or tap, the lemon should be a random number between 2 to 4 (inclusive). This random number is different each time that the user picks a new lemon from the tree.
Here are some questions to guide your thought process:
How do you generate random numbers in Kotlin?
At what point in your code should you generate the random number?
How do you ensure that the user tapped the lemon the required number of times before moving to the next step?
Do you need any variables stored with the remember composable so that the data doesn’t get reset every time the screen is redrawn?
When you’re done implementing this change, run the app. Verify that it takes multiple taps of the image of the lemon to move to the next step, and that the number of taps required each time is a random number between 2 and 4. If a single tap of the lemon image displays the lemonade glass, go back to your code to figure out what’s missing and try again.
Return to these instructions if you want additional guidance on how to finalize the app.
Finalize the app
You’re almost done! Add some last details to polish up the app.
As a reminder, here are the final screenshots of how the app looks:

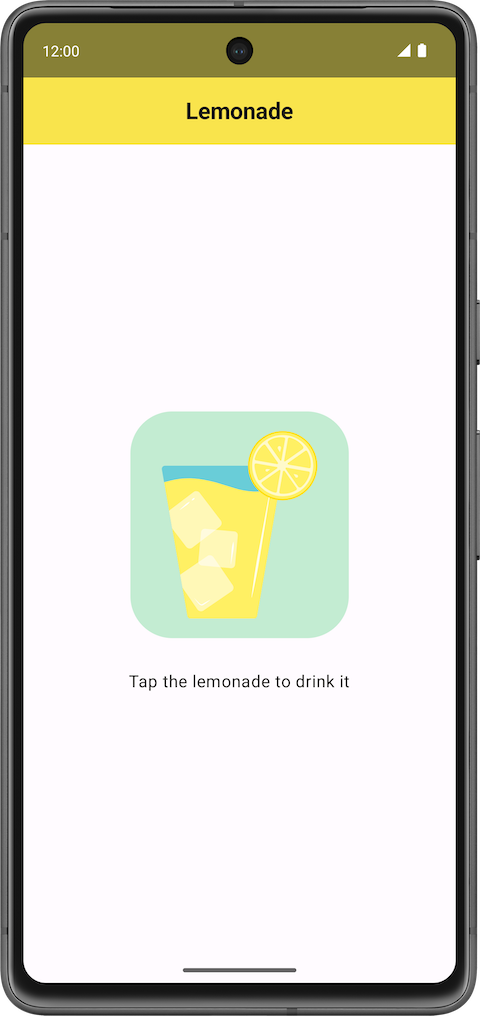
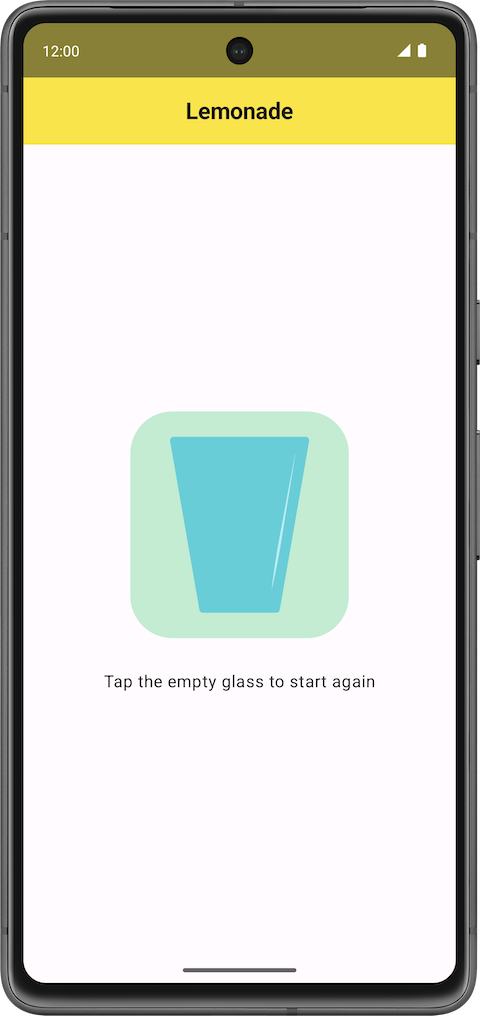
Finishing touches:
Vertically and horizontally center the text and images within the screen.
Set the font size of the text to
18sp.Add
16dpof space between the text and image.Add a thin border of
2dparound the images with slightly rounded corners of4dp. The border has an RGB color value of105for red,205for green, and216for blue. For examples of how to add a border, you can Google search it. Or you can refer to the documentation on Border.
When you’ve completed these changes, run your app and then compare it with the final screenshots to ensure that they match.
As part of good coding practices, go back and add comments to your code, so that anyone who reads your code can understand your thought process more easily. Remove any import statements at the top of your file that aren’t used in your code. Ensure that your code follows the Kotlin style guide. All these efforts will help make your code more readable by other people and easier to maintain!
Well done! You did an amazing job implementing the Lemonade app! That was a challenging app with many parts to figure out. Now treat yourself to a refreshing glass of lemonade. Cheers!
Solution code: Lemonade app
Branch: main
Clone:
$ git clone https://github.com/google-developer-training/basic-android-kotlin-compose-training-lemonade.git
Remember that your code doesn’t need to precisely match the solution code because there are multiple ways to implement the app.
Week 2 Blended Learning Questions
What to do?
Individual work: place your responses to the questions in your Personal RefleXions doc (no need to share with teacher).
Team work: share responses, resolve differences, produce one set of responses as a team, place them in the Team RefleXions doc (share with teacher).
When using lambda expressions with one parameter, what are some considerations when deciding whether to use the implicit
itparameter, or to provide a descriptive parameter name?#solulu
If it’s very obvious what the parameter means, e.g.,
repeat(5) { println("Count: $it") }, it can keep the code concise. However, if the parameter’s meaning is not obvious, naming it something else can improve readability.If the lambda body is longer or more involved body, a descriptive name can improve readability.
If the
itis nested, it can be harder to understand what it refers to. Example:@Composable fun WoofApp() { Scaffold { it -> LazyColumn(contentPadding = it) { items(dogs) { DogItem( dog = it, modifier = Modifier.padding(dimensionResource(R.dimen.padding_small)) ) } } } }
What are some strengths and weaknesses of using trailing lambda syntax?
#solulu
Strengths:
Improves readability by reducing parentheses clutter.
Feels more like HTML.
Weaknesses:
Confuses Kotlin beginners with C/Java background because it looks a lot like a function definition.
May be more difficult to read when functions have multiple lambda parameters. Example:
fun handleEvents(onClick: () -> Unit, onLongClick: () -> Unit) {
    onClick()
    onLongClick()
}

fun main() {
    // Which lambda is for onClick and which for onLongClick can be unclear.
    handleEvents({
        println("Clicked")
    }) {
        println("Long clicked")
    }
}
The codelab places the dice-rolling logic
(1..6).random()inline in the Button’sonClicklambda, not in a separate function. What are some considerations that might influence the choice of placing code inline vs in a separate function?#solulu
Code length. Shorter lambda body ➜ more suitable to be inline.
Reuse. More times used in the code ➜ more suitable to be separate function.
Searchability. Inline lambda ➜ instantly see the code that runs when the button is clicked, no need to scroll to a different part of the code.
Clutter. Inline lambda ➜ reduces total number of function declarations.