Week 9: Connect to the Internet
Coroutines
Concurrency involves performing multiple tasks in your app at the same time. For example, your app can get data from a web server or save user data on the device, while responding to user input events and updating the UI accordingly. Concurrency is a critical skill for Android developers to understand in order to deliver a great user experience.
To do work concurrently in your app, you will be using coroutines. Coroutines allow the execution of a block of code to be suspended and then resumed later, so that other work can be done in the meantime. Coroutines make it easier to write asynchronous code, which means one task doesn’t need to finish completely before starting the next task, enabling multiple tasks to run concurrently.
This codelab walks you through some basic examples in the Kotlin Playground, where you get hands-on practice with coroutines to become more comfortable with asynchronous programming.
Synchronous code
Simple Program
In synchronous code, only one conceptual task is in progress at a time. You can think of it as a sequential linear path. One task must finish completely before the next one is started. Below is an example of synchronous code.
Open Kotlin Playground.
Replace the code with the following code for a program that shows a weather forecast of sunny weather. In the
main()function, first we print out the text:Weather forecast. Then we print out:Sunny.fun main() { println("Weather forecast") println("Sunny") }
The output:
Weather forecast
Sunny
println()is a synchronous call: the task of printing the text to the output is completed before execution can move to the next line of code. Because each function call inmain()is synchronous, the entiremain()function is synchronous. Whether a function is synchronous or asynchronous is determined by the parts that it’s composed of.A synchronous function returns only when its task is fully complete. So after the last print statement in
main()is executed, all work is done. Themain()function returns and the program ends.
Add a delay
Now let’s pretend that getting the weather forecast of sunny weather requires a network request to a remote web server. Simulate the network request by adding a delay in the code before printing that the weather forecast is sunny.
Modify your code to add
delay(1000), which delays execution of the remainder of themain()function by 1000 milliseconds, or 1 second. Don’t run the code yet.// Coroutines library needed for delay() import kotlinx.coroutines.* fun main() { println("Weather forecast") delay(1000) println("Sunny") }
delay()is actually a special suspend function provided by the Kotlin coroutines library. Execution ofmain()suspends (pauses), and resumes once the specified duration of the delay is over (one second in this case).Running the code produces a compile error:
Suspend function 'delay' should be called only from a coroutine or another suspend function
For the purposes of learning coroutines within the Kotlin Playground, you can wrap your existing code with a call to the
runBlocking()function from the coroutines library.runBlocking()runs an event loop, which can handle multiple tasks at once by continuing each task where it left off when it’s ready to be resumed.The body of
runBlocking{}is executed in a new coroutine. Use this code:import kotlinx.coroutines.* fun main() { runBlocking { println("Weather forecast") delay(1000) println("Sunny") } }
runBlocking()is synchronous; it will not return until all work within its lambda block is completed. It will wait for the work indelay()to complete first, then continue withprintln("Sunny"). Once all the work in therunBlocking()function is complete, the function returns, which ends the program.Run the program. The output:
Weather forecast
Sunny
The output is the same as before. The code is still synchronous - it runs in a straight line and only does one thing at a time. However, the difference now is that it runs over a longer period of time due to the delay.
The “co-” in coroutine means cooperative. The code cooperates to share the underlying event loop. When it needs to wait for something, it suspends, which allows other work to be run in the meantime. (The “-routine” part in “coroutine” means “a set of instructions”, like a function.)
In this example, the coroutine suspends when it reaches the
delay()call. Other work can be done in that one second when the coroutine is suspended (even though in this program, there is no other work to do). Once the duration of the delay elapses, then the coroutine resumes execution and can proceed with printing Sunny to the output.Note
In general, only use
runBlocking()within amain()function like this for learning purposes. In your Android app code, you do not needrunBlocking()because Android provides an event loop for your app to process resumed work when it becomes ready.runBlocking()can be useful in your tests, however, and can let your test await specific conditions in your app before invoking the test assertions.
Suspending functions
If the actual logic to perform the network request to get the weather data becomes more complex, you may want to extract that logic out into its own function. Let’s refactor the code to see its effect:
import kotlinx.coroutines.*

fun main() {
    runBlocking {
        println("Weather forecast")
        printForecast()
    }
}

fun printForecast() {
    delay(1000)
    println("Sunny")
}
Running the program produces the same compile error you saw earlier. A suspend function can only be called from a coroutine or another suspend function, so define
printForecast()as a suspend function:import kotlinx.coroutines.* fun main() { runBlocking { println("Weather forecast") printForecast() } } suspend fun printForecast() { delay(1000) println("Sunny") }
delay()is a suspending function. NowprintForecast()is a suspending function too.A suspending function is like a regular function, but it can be suspended and resumed again later. To do this, suspend functions can only be called from other suspend functions.
A suspending function may contain zero or more suspension points. A suspension point is the place within the function where execution of the function can suspend. Once execution resumes, it picks up where it last left off in the code, and proceeds with the rest of the function.
Add another suspending function,
printTemperature():import kotlinx.coroutines.* fun main() { runBlocking { println("Weather forecast") printForecast() } } suspend fun printForecast() { delay(1000) println("Sunny") } suspend fun printTemperature() { delay(1000) println("30\u00b0C") // }
You can pretend that this does a network request to get the temperature data for the weather forecast. The escape sequence
"\u00b0"prints the degree symbol°.Call the new
printTemperature()function fromrunBlocking():import kotlinx.coroutines.* fun main() { runBlocking { println("Weather forecast") printForecast() printTemperature() } } suspend fun printForecast() { delay(1000) println("Sunny") } suspend fun printTemperature() { delay(1000) println("30\u00b0C") }
The output:
Weather forecast
Sunny
30°C
What happens within
runBlocking()?First,
printForecast()gets called. It suspends for 1000ms, resumes, and printsSunny. TheprintForecast()function then returns back to the caller.Next,
printTemperature()gets called. It suspends when it reachesdelay(1000), resumes one second later, and prints the temperature value to the output. SinceprintTemperature()has completed all work, it returns.In the
runBlocking()body, there are no further tasks to execute, so therunBlocking()function returns, and the program ends.
runBlocking()is synchronous and each call in the body will be called sequentially. Note that a well-designed suspending function returns only once all work has been completed. As a result, these suspending functions run one after another.To see how long it takes to execute this program, wrap the code in a call to
measureTimeMillis(), which will return the time it in milliseconds that it takes to run the code. Print out the execution time and divide by 1000.0 to convert milliseconds to seconds.import kotlin.system.* import kotlinx.coroutines.* fun main() { val time = measureTimeMillis { runBlocking { println("Weather forecast") printForecast() printTemperature() } } println("Execution time: ${time / 1000.0} seconds") } suspend fun printForecast() { delay(1000) println("Sunny") } suspend fun printTemperature() { delay(1000) println("30\u00b0C") }
Output:
Weather forecast
Sunny
30°C
Execution time: 2.128 seconds
It takes ≈2 seconds to execute. That seems reasonable because each of the suspending functions has a one-second delay.
So far, you’ve seen that the code in a coroutine is invoked sequentially by default. You have to be explicit if you want things to run concurrently, and you will learn how to do that in the next section. You will make use of the cooperative event loop to perform multiple tasks at the same time, which will speed up the execution time of the program.
Asynchronous code
launch()
The
launch()function launches a new coroutine. To execute tasks concurrently, use multiplelaunch()functions, so that multiple coroutines can execute concurrently, appearing to run at the same time.Coroutines in Kotlin follow a key concept called structured concurrency, where code is sequential by default, and cooperates with an underlying event loop, unless you explicitly ask for concurrent execution (e.g. using
launch()).The assumption is that if you call a function, it should finish its work completely by the time it returns, regardless of how many coroutines it may have used in its implementation details. Even if it fails with an exception, once the exception is thrown, there are no more pending tasks from the function. Hence, all work is finished once control flow returns from the function, whether it threw an exception or completed its work successfully.
Run this code, notice the use of
launch:import kotlinx.coroutines.* fun main() { runBlocking { println("Weather forecast") launch { printForecast() } launch { printTemperature() } } } suspend fun printForecast() { delay(1000) println("Sunny") } suspend fun printTemperature() { delay(1000) println("30\u00b0C") }
Run the program. Here’s the output:
Weather forecast
Sunny
30°C
The output is the same, but the program completes faster. Previously, you had to wait for
printForecast()to finish completely before moving on toprintTemperature(). NowprintForecast()andprintTemperature()can run concurrently because they are in separate coroutines.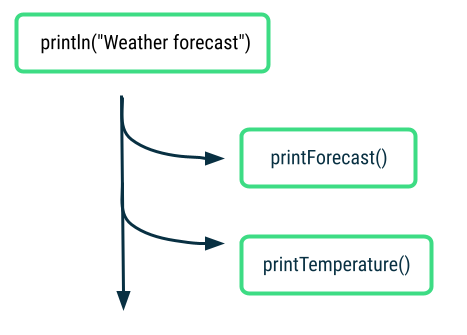
The call to
launch { printForecast() }can return before all the work inprintForecast()is completed. That is the beauty of coroutines. You can move onto the nextlaunch()call to start the next coroutine. Similarly, thelaunch { printTemperature() }also returns even before all work is completed.To see how much faster the program is now, add
measureTimeMillis():import kotlin.system.* import kotlinx.coroutines.* fun main() { val time = measureTimeMillis { runBlocking { println("Weather forecast") launch { printForecast() } launch { printTemperature() } } } println("Execution time: ${time / 1000.0} seconds") } suspend fun printForecast() { delay(1000) println("Sunny") } suspend fun printTemperature() { delay(1000) println("30\u00b0C") }
Output:
Weather forecast
Sunny
30°C
Execution time: 1.122 seconds
The execution time has gone down from ≈2 s to ≈1 s, so it’s faster to execute the program once you add concurrent operations! You can remove this time measurement code before moving on.
Modify the
runBlocking()code to add an additionalprintln():... fun main() { runBlocking { println("Weather forecast") launch { printForecast() } launch { printTemperature() } println("kthxbye") } } ...
The output:
Weather forecast
kthxbye
Sunny
30°C
After the two coroutines for
printForecast()andprintTemperature()are launched, the next instruction printskthxbyeimmediately. This demonstrates the “fire and forget” nature oflaunch(). You fire off a new coroutine withlaunch(), and don’t have to worry about when its work is finished.Later the coroutines will complete their work, and print the remaining output statements. Once all the work (including all coroutines) in the body of the
runBlocking()call have been completed, thenrunBlocking()returns and the program ends.Now you’ve changed your synchronous code into asynchronous code. When an asynchronous function returns, the task may not be finished yet. This is what you saw in the case of
launch(). The function returned, but its work was not completed yet. By usinglaunch(), multiple tasks can run concurrently in your code, which is a powerful capability to use in the Android apps you develop.
async()
In the real world, you won’t know how long the network requests for forecast and temperature will take. If you want to display a unified weather report when both tasks are done, then the current approach with
launch()isn’t sufficient. That’s whereasync()comes in.Use
async()if you care about when the coroutine finishes, and need a return value from it.async()returns aDeferredobject, which is like a promise that the result will be in there when it’s ready. You can access the result on theDeferredobject usingawait().Use this code, notice the
async()calls:import kotlinx.coroutines.* fun main() { runBlocking { println("Weather forecast") val forecast: Deferred<String> = async { getForecast() } val temperature: Deferred<String> = async { getTemperature() } // Using await() here makes the code wait until the values of forecast and temperature are available println("${forecast.await()} ${temperature.await()}") println("kthxbye") } } suspend fun getForecast(): String { delay(1000) return "Sunny" } suspend fun getTemperature(): String { delay(1000) return "30\u00b0C" }
After the two
async()calls, you can access the result of those coroutines by callingawait()on theDeferredobjects.Run the program. The output:
Weather forecast
Sunny 30°C
kthxbye
Neat! You created two coroutines that ran concurrently to get the forecast and temperature data. When they each completed, they returned a value. Then you combined the two return values into a single print statement:
Sunny 30°C.
Parallel Decomposition
We can take this weather example a step further and see how coroutines can be useful in parallel decomposition of work. Parallel decomposition involves taking a problem and breaking it into smaller subtasks that can be solved in parallel. When the results of the subtasks are ready, you can combine them into a final result.
Run this code:
import kotlinx.coroutines.*

fun main() {
    runBlocking {
        println("Weather forecast")
        println(getWeatherReport())
        println("kthxbye")
    }
}

suspend fun getWeatherReport() = coroutineScope {
    val forecast = async { getForecast() }
    val temperature = async { getTemperature() }
    // No need return keyword here, the last expression in a lambda block is returned
    "${forecast.await()} ${temperature.await()}"
}

suspend fun getForecast(): String {
    delay(1000)
    return "Sunny"
}

suspend fun getTemperature(): String {
    delay(1000)
    return "30\u00b0C"
}
Note
Another way of writing
getWeatherReport()issuspend fun getWeatherReport(): String { return coroutineScope { val forecast = async { getForecast() } val temperature = async { getTemperature() } // No need return keyword here, the last expression in a lambda block is returned "${forecast.await()} ${temperature.await()}" } }
coroutineScope()creates a local scope for this weather report task. The coroutines launched within this scope are grouped together within this scope, which has implications for cancellation and exceptions that you’ll learn about soon.
The output:
Weather forecast
Sunny 30°C
kthxbye
The output is the same, but there are some noteworthy takeaways here. First,
coroutineScope()will only return once all its work, including any coroutines it launched, have completed. In this case, both coroutinesgetForecast()andgetTemperature()need to finish and return their respective results. Then theSunnytext and30°Care combined and returned from the scope. TheSunny 30°Cgets printed to the output, and the caller can proceed to the last print statement ofkthxbye.With
coroutineScope(), even though the function is internally doing work concurrently, it appears to the caller as a synchronous operation becausecoroutineScopewon’t return until all work is done. From the POV of the caller, whethercoroutineScope()is synchronous or not, doesn’t matter. It’s just an “implementation detail” that the caller doesn’t need to know about. Analogy: when ordering a Big Mac Meal, you don’t need to know whether the fries, burger, and drink are prepared sequentially by 1 person, or in parallel by 3 people. All you know is after everything is prepared, you get your meal.The key insight here for structured concurrency is that you can take multiple concurrent operations and put it into a single synchronous operation, where concurrency is an “implementation detail”. The only requirement on the calling code is to be in a suspend function or coroutine. Other than that, the structure of the calling code doesn’t need to take into account the concurrency details.
Exceptions and cancellation
There are some situations where an error may occur, or some work may be cancelled.
Introduction to exceptions
An exception is an unexpected event that happens during execution of your code. You should implement appropriate ways of handling these exceptions, to prevent your app from crashing and impacting the user experience negatively.
Here’s an example of a program that terminates early with an exception. The program is intended to calculate the number of pizzas each person gets to eat, by dividing
numberOfPizzas / numberOfPeople. Say you accidentally forget to set the value of thenumberOfPeopleto an actual value.fun main() { val numberOfPeople = 0 val numberOfPizzas = 20 println("Slices per person: ${numberOfPizzas / numberOfPeople}") }
When you run the program, it will crash with an arithmetic exception because you can’t divide a number by zero.
Exception in thread "main" java.lang.ArithmeticException: / by zero
at FileKt.main (File.kt:4)
at FileKt.main (File.kt:-1)
at jdk.internal.reflect.NativeMethodAccessorImpl.invoke0 (:-2)
This issue has a straightforward fix, where you can change the initial value of
numberOfPeopleto a non-zero number. However, as your code gets more complex, there are certain cases where you can’t anticipate and prevent all exceptions from happening.What happens when one of your coroutines fails with an exception? Modify the code from the weather program to find out.
Exceptions with coroutines
Use this code. Note the exception thrown in the
getTemperature()function.import kotlinx.coroutines.* fun main() { runBlocking { println("Weather forecast") println(getWeatherReport()) println("kthxbye") } } suspend fun getWeatherReport() = coroutineScope { val forecast = async { getForecast() } val temperature = async { getTemperature() } "${forecast.await()} ${temperature.await()}" } suspend fun getForecast(): String { delay(1000) return "Sunny" } suspend fun getTemperature(): String { delay(500) throw AssertionError("Temperature is invalid") return "30\u00b0C" }
The exception simulates that 500 ms after fetching data from the server, an unexpected error happened.
The output:
Weather forecast
Exception in thread "main" java.lang.AssertionError: Temperature is invalid
at FileKt.getTemperature (File.kt:24)
at FileKt$getTemperature$1.invokeSuspend (File.kt:-1)
at kotlin.coroutines.jvm.internal.BaseContinuationImpl.resumeWith (ContinuationImpl.kt:33)
To understand this behavior, you’ll need to know that there is a parent-child relationship among coroutines. You can launch a coroutine (known as the child) from another coroutine (parent). As you launch more coroutines from those coroutines, you can build up a whole hierarchy of coroutines.
The coroutine executing
getTemperature()and the coroutine executinggetForecast()are child coroutines of the same parent coroutine. The behavior you’re seeing with exceptions in coroutines is due to structured concurrency. When one of the child coroutines fails with an exception, it gets propagated upwards. The parent coroutine is cancelled, which in turn cancels any other child coroutines (e.g. the coroutine runninggetForecast()in this case). Lastly, the error gets propagated upwards and the program crashes with theAssertionError.
Try-catch exceptions
If you know that certain parts of your code can possibly throw an exception, then you can surround that code with a try-catch block. You can catch the exception and handle it more gracefully in your app, such as by showing the user a helpful error message. Here’s a code snippet of how it might look:
try {
    // Some code that may throw an exception
} catch (e: IllegalArgumentException) {
    // Handle exception
}
This approach also works for asynchronous code with coroutines. You can still use a try-catch expression to catch and handle exceptions in coroutines. The reason is because with structured concurrency, the sequential code is still synchronous code so the try-catch block will still work in the same expected way.
...

fun main() {
    runBlocking {
        ...
        try {
            ...
            throw IllegalArgumentException("No city selected")
            ...
        } catch (e: IllegalArgumentException) {
            println("Caught exception $e")
            // Handle error
        }
    }
}

...
Here’s example code with a try-catch block. It prints the error that is caught, and a message that the weather report is not available.
import kotlinx.coroutines.*

fun main() {
    runBlocking {
        println("Weather forecast")
        try {
            println(getWeatherReport())
        } catch (e: AssertionError) {
            println("Caught exception in runBlocking(): $e")
            println("Report unavailable at this time")
        }
        println("kthxbye")
    }
}

suspend fun getWeatherReport() = coroutineScope {
    val forecast = async { getForecast() }
    val temperature = async { getTemperature() }
    "${forecast.await()} ${temperature.await()}"
}

suspend fun getForecast(): String {
    delay(1000)
    return "Sunny"
}

suspend fun getTemperature(): String {
    delay(500)
    throw AssertionError("Temperature is invalid")
    return "30\u00b0C"
}
Run the program. Now the error is handled gracefully, and the program can finish executing successfully.
Weather forecast
Caught exception in runBlocking(): java.lang.AssertionError: Temperature is invalid
Report unavailable at this time
kthxbye
If there’s a failure with getting the temperature, then there will be no weather report at all, even if a valid forecast was retrieved.
Here’s an alternative way where the weather report can still print the forecast, even if the temperature failed:
import kotlinx.coroutines.*

fun main() {
    runBlocking {
        println("Weather forecast")
        println(getWeatherReport())
        println("kthxbye")
    }
}

suspend fun getWeatherReport() = coroutineScope {
    val forecast = async { getForecast() }
    val temperature = async {
        try {
            getTemperature()
        } catch (e: AssertionError) {
            println("Caught exception $e")

            // No need return keyword here, the last expression in a lambda block is returned
            "(No temperature found)"
        }
    }

    // No need return keyword here, the last expression in a lambda block is returned
    "${forecast.await()} ${temperature.await()}"
}

suspend fun getForecast(): String {
    delay(1000)
    return "Sunny"
}

suspend fun getTemperature(): String {
    delay(500)
    throw AssertionError("Temperature is invalid")
    return "30\u00b0C"
}
Run the program.
Weather forecast
Caught exception java.lang.AssertionError: Temperature is invalid
Sunny (No temperature found)
kthxbye
Calling
getTemperature()failed with an exception, but the code withinasync()was able to catch that exception and handle it gracefully by having the coroutine still return a String that says the temperature was not found. The weather report is still able to be printed, with a successful forecast of Sunny. The temperature is missing in the weather report, but in its place, there is a message explaining that the temperature was not found. This is a better user experience than the program crashing with the error.A helpful way to think about this error handling approach is that
async()is the producer when a coroutine is started with it.await()is the consumer because it’s waiting to consume the result from the coroutine. The producer does the work and produces a result. The consumer consumes the result. If there’s an exception in the producer, then the consumer will get that exception if it’s not handled, and the coroutine will fail. However, if the producer is able to catch and handle the exception, then the consumer won’t see that exception and will see a valid result.Here’s the
getWeatherReport()code again for reference:suspend fun getWeatherReport() = coroutineScope { val forecast = async { getForecast() } val temperature = async { try { getTemperature() } catch (e: AssertionError) { println("Caught exception $e") "(No temperature found)" } } // No need return keyword here, the last expression in a lambda block is returned "${forecast.await()} ${temperature.await()}" }
In this case, the producer
async()was able to catch and handle the exception and still return(No temperature found). The consumerawait()receives thisStringresult and doesn’t even need to know that an exception happened. This is another option to gracefully handle an exception that you expect could happen in your code.Note
Exceptions are propagated differently for coroutines started with
launch()versusasync(). Within a coroutine started bylaunch(), an exception is thrown immediately so you can surround code with a try-catch block if it’s expected to throw an exception. See example.Warning
Within a
try-catchstatement in your coroutine code, avoid catching a generalExceptionbecause that includes a very broad range of exceptions. You could be inadvertently catching and suppressing an error that is actually a bug that should be fixed in your code. Another important reason is that cancellation of coroutines, which is discussed later in this section, depends onCancellationException. So if you catch any type ofExceptionincludingCancellationExceptionwithout rethrowing them, then the cancellation behavior within your coroutines may behave differently than expected. Instead, catch a specific type of exception that you expect may be thrown from your code.Exceptions propagate upwards in the tree of coroutines, unless they are handled. It’s also important to be careful when the exception propagates all the way to the root of the hierarchy, which could crash your whole app.
Learn more details about exception handling in the Exceptions in coroutines blogpost and Coroutine exceptions handling article.
Cancellation
A similar topic to exceptions is cancellation of coroutines. This scenario is typically user-driven when an event has caused the app to cancel work that it had previously started.
Example:
import kotlinx.coroutines.*

fun main() {
    runBlocking {
        println("Weather forecast")
        println(getWeatherReport())
        println("kthxbye")
    }
}

suspend fun getWeatherReport() = coroutineScope {
    val forecast = async { getForecast() }
    val temperature = async { getTemperature() }

    delay(200)
    temperature.cancel()

    "${forecast.await()}"
}

suspend fun getForecast(): String {
    delay(1000)
    return "Sunny"
}

suspend fun getTemperature(): String {
    delay(1000)
    return "30\u00b0C"
}
Output:
Weather forecast
Sunny
kthxbye
The weather report only consists of the weather forecast
Sunny, but not the temperature because that coroutine was cancelled.A coroutine can be cancelled, but it won’t affect other coroutines in the same scope and the parent coroutine will not be cancelled.
Note
You can learn more about Cancellation of Coroutines in this Android Developers blogpost. Cancellation must be cooperative, so you should implement your coroutine so that it can be cancelled.
In this section, you saw how cancellation and exceptions behave in coroutines and how that’s tied to the coroutine hierarchy. Let’s learn more of the formal concepts behind coroutines, so that you can understand how all the important pieces come together.
Coroutine concepts
When executing work asynchronously or concurrently, some questions arise: how will the work be executed? How long should the coroutine exist? What should happen if it gets cancelled or fails with an error?
Coroutines follow the principle of structured concurrency, which forces you to answer these questions when you use coroutines in your code using a combination of mechanisms.
Job
When you launch a coroutine with the
launch()function, it returns an instance ofJob. TheJobholds a reference to the coroutine, so you can manage its lifecycle.val job = launch { ... }
Note
The
Deferredobject that is returned from a coroutine started with theasync()function is aJobas well, and it holds the future result of the coroutine.The job can be used to control the life cycle, or how long the coroutine lives for, such as cancelling the coroutine if you don’t need the task anymore.
job.cancel()
With a job, you can check if it’s active, cancelled, or completed. The job is completed if the coroutine and any coroutines that it launched have completed all of their work. Note that the coroutine could have completed due to a different reason, such as being cancelled, or failing with an exception, but the job is still considered completed at that point.
Jobs also keep track of the parent-child relationship among coroutines.
Job hierarchy
When a coroutine launches another coroutine, the job that returns from the new coroutine is called the child of the original parent job.
val job = launch {
    ...

    val childJob = launch { ... }

    ...
}
These parent-child relationships form a job hierarchy, where each job can launch jobs, and so on.
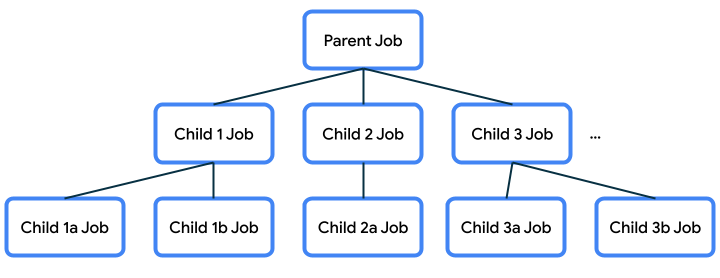
This parent-child relationship is important because it will dictate certain behavior:
If a parent job gets cancelled, then its child jobs also get cancelled.
When a child job is canceled using
job.cancel(), it terminates, but it does not cancel its parent.If a job fails with an exception, it cancels its parent with that exception. This is known as propagating the error upwards (to the parent, the parent’s parent, and so on).
CoroutineScope
Coroutines are typically launched into a
CoroutineScope. This ensures that we don’t have coroutines that are unmanaged and get lost, which could waste resources.launch()andasync()are extension functions onCoroutineScope. Calllaunch()orasync()on the scope to create a new coroutine within that scope.A
CoroutineScopeis tied to a lifecycle, which sets bounds on how long the coroutines within that scope will live. If a scope gets cancelled, then its job is cancelled, and the cancellation of that propagates to its child jobs. If a child job in the scope fails with an exception, then other child jobs get cancelled, the parent job gets cancelled, and the exception gets re-thrown to the caller.
CoroutineScope in Kotlin Playground
In this codelab, you used
runBlocking()which provides aCoroutineScopefor your program. You also learned how to usecoroutineScope { }to create a new scope within thegetWeatherReport()function.
CoroutineScope in Android apps
Android provides coroutine scope support in entities that have a well-defined lifecycle, such as
Activity(lifecycleScope) andViewModel(viewModelScope). Coroutines that are started within these scopes will adhere to the lifecycle of the corresponding entity, such asActivityorViewModel.For example, say you start a coroutine in an
Activitywith the provided coroutine scope calledlifecycleScope. If the activity gets destroyed, then thelifecycleScopewill get canceled and all its child coroutines will automatically get canceled too. You just need to decide if the coroutine following the lifecycle of theActivityis the behavior you want.In the Race Tracker Android app you will be working on, you’ll learn a way to scope your coroutines to the lifecycle of a composable.
Implementation Details of CoroutineScope
CoroutineScopeis declared as an interface, and it contains aCoroutineContextas a variable.The
launch()andasync()functions create a new child coroutine within that scope and the child also inherits the context from the scope. What is contained within the context?
CoroutineContext
The
CoroutineContextprovides information about the context in which the coroutine will be running in. TheCoroutineContextis essentially a key ➜ element map that stores elements. Each element has a unique key. These are not required fields, but here are some examples of what may be contained in a context:name - name of the coroutine, uniquely identifies it
job - controls the lifecycle of the coroutine
dispatcher - dispatches the work to the appropriate thread
exception handler - handles exceptions thrown by the code executed in the coroutine
Note
These are default values for the
CoroutineContext, which will be used if you don’t provide values for them:name:
coroutinejob: none
dispatcher:
Dispatchers.Defaultexception handler: none
Each of the elements in a context can be appended together with the
+operator. For example, oneCoroutineContextcould be defined as follows:Job() + Dispatchers.Main + exceptionHandler
If a name is not provided, the default coroutine name is used.
Within a coroutine, if you launch a new coroutine, the child coroutine will inherit the
CoroutineContextfrom the parent coroutine, but replace the job specifically for the coroutine that just got created. You can also override any elements that were inherited from the parent context by passing in arguments to thelaunch()orasync()functions for the parts of the context that you want to be different.scope.launch(Dispatchers.Default) { ... }
You can learn more about
CoroutineContextand how the context gets inherited from the parent in this KotlinConf conference video talk.You’ve seen the mention of dispatcher several times. Its role is to dispatch or assign the work to a thread. Let’s learn about threads and dispatchers in more detail.
Dispatcher
Coroutines use dispatchers to determine the thread to use for its execution. A thread can be started, does some work (executes some code), and then terminates when there’s no more work to be done.
When a user starts your app, the Android system creates a new process and a single thread of execution for your app, which is known as the main thread. The main thread handles many important operations for your app including Android system events, drawing the UI on the screen, handling user input events, and more. As a result, most of the code you write for your app will likely run on the main thread.
There are two terms to understand when it comes to the threading behavior of your code: blocking and non-blocking.
A regular function blocks the calling thread until its work is completed. That means it does not yield the calling thread until the work is done, so no other work can be done in the meantime.
Non-blocking code yields the calling thread until a certain condition is met, so you can do other work in the meantime. You can use an asynchronous function to perform non-blocking work because it returns before its work is completed.
In the case of Android apps, you should only call blocking code on the main thread if it will execute fairly quickly. The goal is to keep the main thread unblocked, so that it can execute work immediately if a new event is triggered. This main thread is the UI thread for your activities and is responsible for UI drawing and UI related events. When there’s a change on the screen, the UI needs to be redrawn. For something like an animation on the screen, the UI needs to be redrawn frequently so that it appears like a smooth transition. If the main thread needs to execute a long-running block of work, then the screen won’t update as frequently and the user will see an abrupt transition (known as “jank”) or the app may hang or be slow to respond.
Hence we need to move any long-running work items off the main thread and handle it in a different thread. Your app starts off with a single main thread, but you can choose to create multiple threads to perform additional work. These additional threads can be referred to as worker threads. It’s perfectly fine for a long-running task to block a worker thread for a long time, because in the meantime, the main thread is unblocked and can actively respond to the user.
There are some built-in dispatchers that Kotlin provides:
Dispatchers.Main: Use this dispatcher to run a coroutine on the main Android thread. This dispatcher is used primarily for handling UI updates and interactions, and performing quick work.Dispatchers.IO: This dispatcher is optimized to perform disk or network I/O outside of the main thread. For example, read from or write to files, and execute any network operations.Dispatchers.Default: This is a default dispatcher used when callinglaunch()andasync(), when no dispatcher is specified in their context. You can use this dispatcher to perform computationally-intensive work outside of the main thread. For example, processing a bitmap image file.
Note
There’s also
Executor.asCoroutineDispatcher()andHandler.asCoroutineDispatcher()extensions, if you need to make aCoroutineDispatcherfrom aHandlerorExecutorthat you already have available.Try the following example in Kotlin Playground to better understand coroutine dispatchers.
import kotlinx.coroutines.*

fun main() {
    runBlocking {
        launch {
            delay(1000)
            println("10 results found.")
        }
        println("Loading...")
    }
}
Now wrap the contents of the launched coroutine with a call to
withContext()to change theCoroutineContextthat the coroutine is executed within, and specifically override the dispatcher. Switch to using theDispatchers.Default(instead ofDispatchers.Mainwhich is currently being used for the rest of the coroutine code in the program).import kotlinx.coroutines.* fun main() { runBlocking { launch { withContext(Dispatchers.Default) { delay(1000) println("10 results found.") } } println("Loading...") } }
Switching dispatchers is possible because
withContext()is itself a suspending function. It executes the provided block of code using a new CoroutineContext. The new context comes from the context of the parent job (the outerlaunch()block), except it overrides the dispatcher used in the parent context with the one specified here:Dispatchers.Default. This is how we are able to go from executing work withDispatchers.Mainto usingDispatchers.Default.Run the program. The output should be:
Loading...
10 results found.
Add print statements to see what thread you are on by calling
Thread.currentThread().name.import kotlinx.coroutines.* fun main() { runBlocking { println("${Thread.currentThread().name} - runBlocking function") launch { println("${Thread.currentThread().name} - launch function") withContext(Dispatchers.Default) { println("${Thread.currentThread().name} - withContext function") delay(1000) println("10 results found.") } println("${Thread.currentThread().name} - end of launch function") } println("Loading...") } }
Run the program. The output should be:
main @coroutine#1 - runBlocking function
Loading...
main @coroutine#2 - launch function
DefaultDispatcher-worker-1 @coroutine#2 - withContext function
10 results found.
main @coroutine#2 - end of launch function
From this output, you can observe that most of the code is executed in coroutines on the main thread. However, for the portion of your code in the
withContext(Dispatchers.Default)block, that is executed in a coroutine on a Default Dispatcher worker thread (which is not the main thread).Notice that after
withContext()returns, the coroutine returns to running on the main thread (as evidenced by output statement:main @coroutine#2 - end of launch function). This example demonstrates that you can switch the dispatcher by modifying the context that is used for the coroutine.If you have coroutines that were started on the main thread, and you want to move certain operations off the main thread, then you can use
withContextto switch the dispatcher being used for that work. Choose appropriately from the available dispatchers:Main,Default, andIOdepending on the type of operation it is. Then that work can be assigned to a thread (or group of threads called a thread pool) designated for that purpose. Coroutines can suspend themselves, and the dispatcher also influences how they resume.Note that when working with popular libraries like Room and Retrofit (in this unit and the next one), you may not have to explicitly switch the dispatcher yourself if the library code already handles doing this work using an alternative coroutine dispatcher like
Dispatchers.IO
Now you’ve got a high-level overview of the important parts of coroutines and the role that
CoroutineScope,CoroutineContext,CoroutineDispatcher, andJobsplay in shaping the lifecycle and behavior of a coroutine.
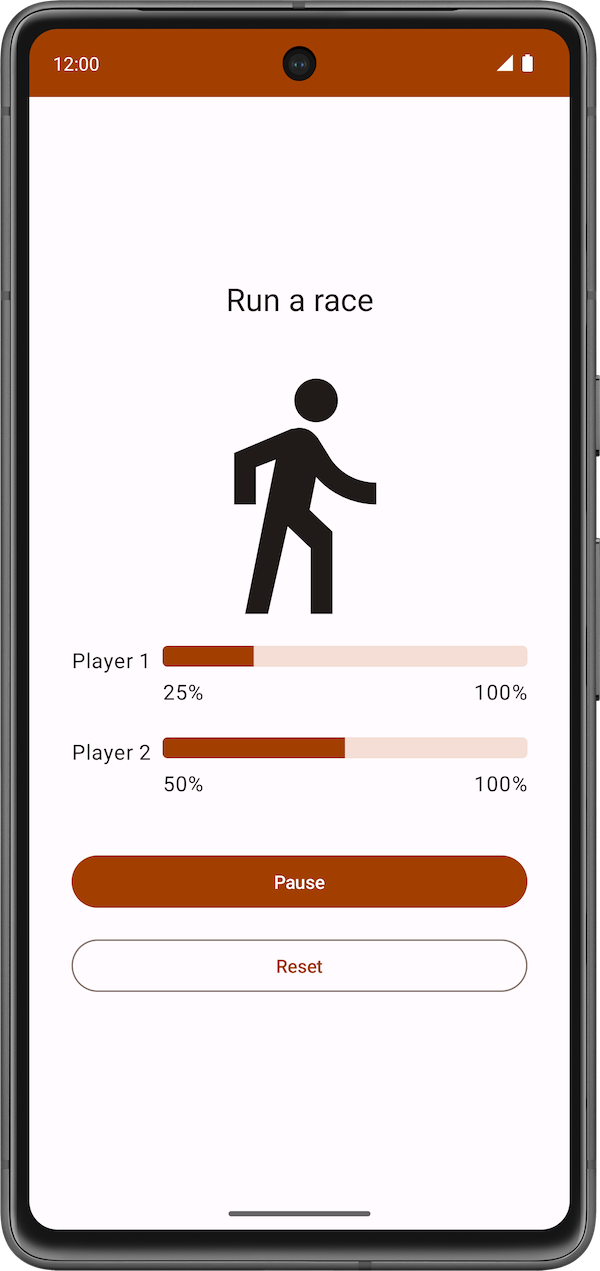
Race Tracker app
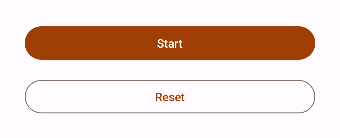
The Race Tracker app simulates two players running a race. The app UI consists of two buttons, Start/Pause and Reset, and two progress bars to show the progress of the racers. Players 1 and 2 are set to “run” the race at different speeds. When the race starts Player 2 progresses twice as fast as Player 1.

Coroutines are used to ensure:
Both players “run the race” concurrently.
The app UI is responsive and the progress bars increments during the race.
The starter code has the UI code ready for the Race Tracker app. The main focus of this part of the codelab is to get you familiar with Kotlin coroutines inside an Android app.
Starter code: Race Tracker app
Branch: starter
Clone:
$ git clone https://github.com/google-developer-training/basic-android-kotlin-compose-training-race-tracker.git
$ cd basic-android-kotlin-compose-training-race-tracker
$ git checkout starter
Starter code overview: Race Tracker app
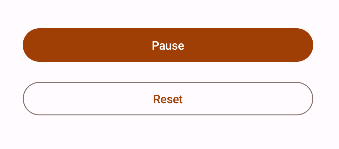
Start the race by clicking the Start button. The text of the Start button changes to Pause while the race is in progress.
At any point in time, you can use this button to pause or continue the race.
When the race starts, you can see the progress of each player through a status indicator. The
StatusIndicatorcomposable function displays the progress status of each player. It uses theLinearProgressIndicatorcomposable to display the progress bar. You’ll be using coroutines to update the value for progress.
RaceParticipant.kt➜class RaceParticipantprovides the data for progress increment. This class is a state holder for each of the players. It maintains:the
nameof the participantthe
maxProgressto reach to finish the racethe delay duration between progress increments
currentProgressin racethe
initialProgress
In the next section, you will use coroutines to implement the functionality to simulate the race progress without blocking the app UI.
Implement race progress
In
RaceParticipant.kt➜class RaceParticipant, add arun()function:class RaceParticipant( val name: String, val maxProgress: Int = 100, val progressDelayMillis: Long = 500L, private val progressIncrement: Int = 1, private val initialProgress: Int = 0 ) { init { require(maxProgress > 0) { "maxProgress=$maxProgress; must be > 0" } require(progressIncrement > 0) { "progressIncrement=$progressIncrement; must be > 0" } } /** * Indicates the race participant's current progress */ var currentProgress by mutableStateOf(initialProgress) private set suspend fun run() { while (currentProgress < maxProgress) { // Simulate different progress intervals in the race delay(progressDelayMillis) // Simulate the runner's progress currentProgress += progressIncrement } } /** * Regardless of the value of [initialProgress] the reset function will reset the * [currentProgress] to 0 */ fun reset() { currentProgress = 0 } }
imports
import kotlinx.coroutines.delay
When you look at the code you just added, you will see an icon on the left of the call to the
delay()function in Android Studio, as shown in the screenshot below: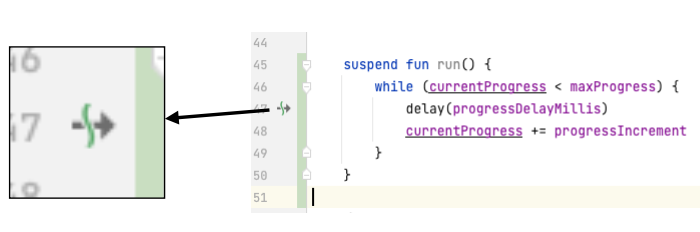
This icon indicates the suspension point when the function might suspend and resume again later.
The main thread is not blocked while the coroutine is waiting to complete the delay duration, as shown in the following diagram:
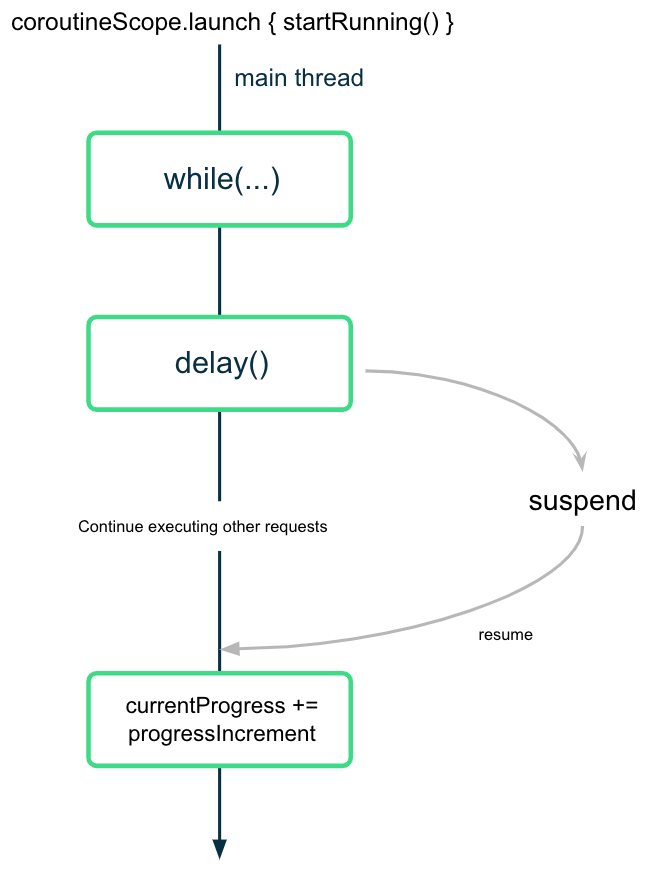
The coroutine suspends (but doesn’t block) the execution after calling the
delay()function with the desired interval value. Once the delay is complete, the coroutine resumes the execution and updates the value of thecurrentProgressproperty.
Start the race
In
RaceTrackerApp.kt➜RaceTrackerApp(), add this code:@Composable fun RaceTrackerApp() { /** * Note: To survive the configuration changes such as screen rotation, [rememberSaveable] should * be used with custom Saver object. But to keep the example simple, and keep focus on * Coroutines that implementation detail is stripped out. */ val playerOne = remember { RaceParticipant(name = "Player 1", progressIncrement = 1) } val playerTwo = remember { RaceParticipant(name = "Player 2", progressIncrement = 2) } var raceInProgress by remember { mutableStateOf(false) } // added code begin if (raceInProgress) { LaunchedEffect(playerOne, playerTwo) { coroutineScope { launch { playerOne.run() } launch { playerTwo.run() } } raceInProgress = false } } // added code end RaceTrackerScreen( playerOne = playerOne, playerTwo = playerTwo, isRunning = raceInProgress, onRunStateChange = { raceInProgress = it }, modifier = Modifier .statusBarsPadding() .fillMaxSize() .verticalScroll(rememberScrollState()) .safeDrawingPadding() .padding(horizontal = dimensionResource(R.dimen.padding_medium)), ) }
imports
import androidx.compose.runtime.LaunchedEffect
When the user presses Start,
raceInProgressis set totrue.The code inside the
if (raceInProgress)block runs.The
LaunchedEffect()function enters the Composition.The
coroutineScope()launches 2 coroutines concurrently. It ensures that both coroutines complete execution, before updating theraceInProgressflag.When
raceInProgressisfalse, theLaunchedEffect()exits the composition. The 2 coroutines are canceled.
Structured concurrency
The way you write code using coroutines is called structured concurrency. The idea is that coroutines have a hierarchy — tasks might launch subtasks, which might launch subtasks in turn. The unit of this hierarchy is referred to as a coroutine scope. Coroutine scopes should always be associated with a lifecycle.
The Coroutines APIs adhere to this structured concurrency by design. You cannot call a suspend function from a function which is not marked suspend. This limitation ensures that you call the suspend functions from coroutine builders, such as
launch. These builders are, in turn, tied to aCoroutineScope.Run the app.
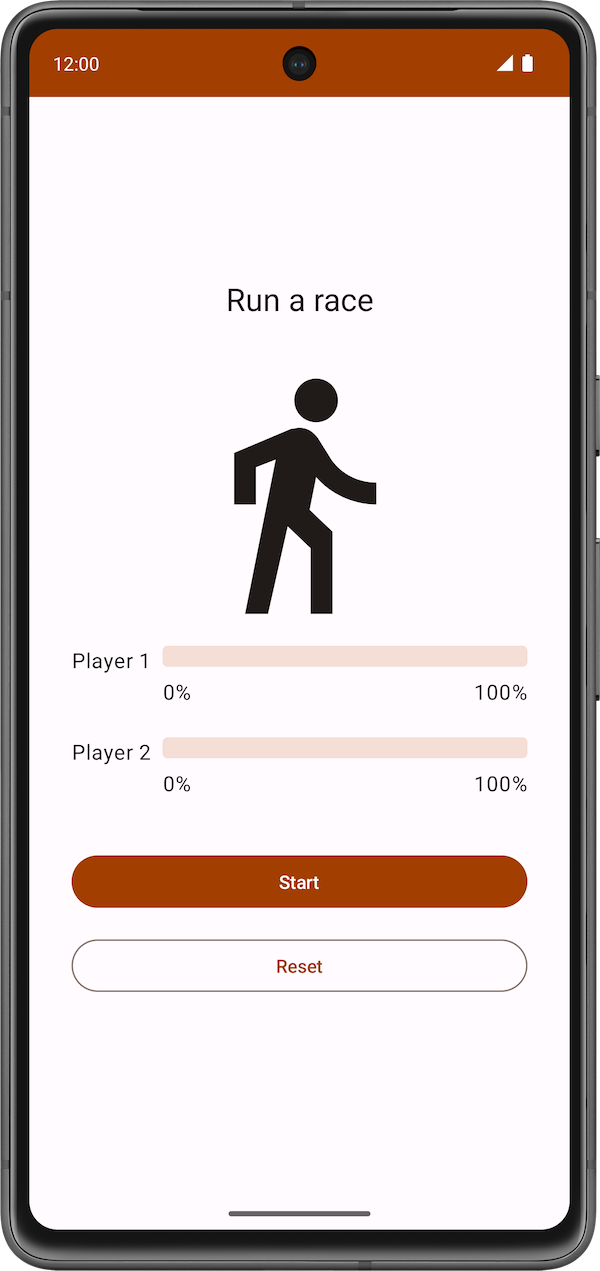
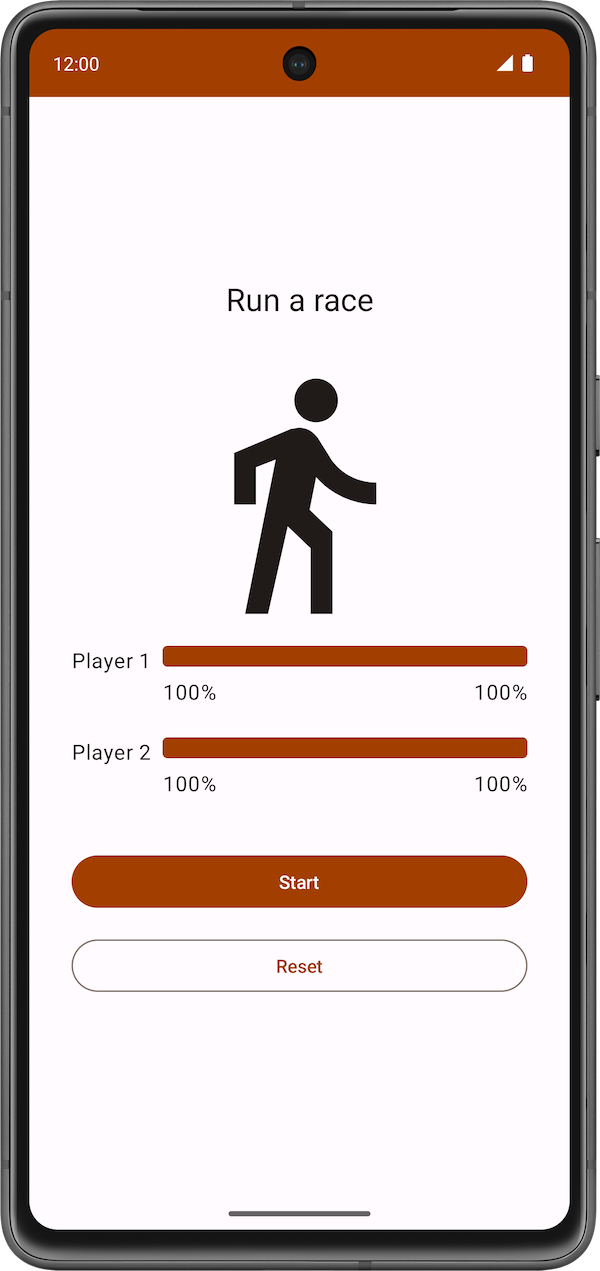
Click the Start button. Player 2 runs faster than Player 1. After the race is complete, which is when both players reach 100% progress, the label for the Pause button changes to Start. You can click the Reset button to reset the race and re-execute the simulation. The race is shown in the following video.
The execution flow is shown in the following diagram.
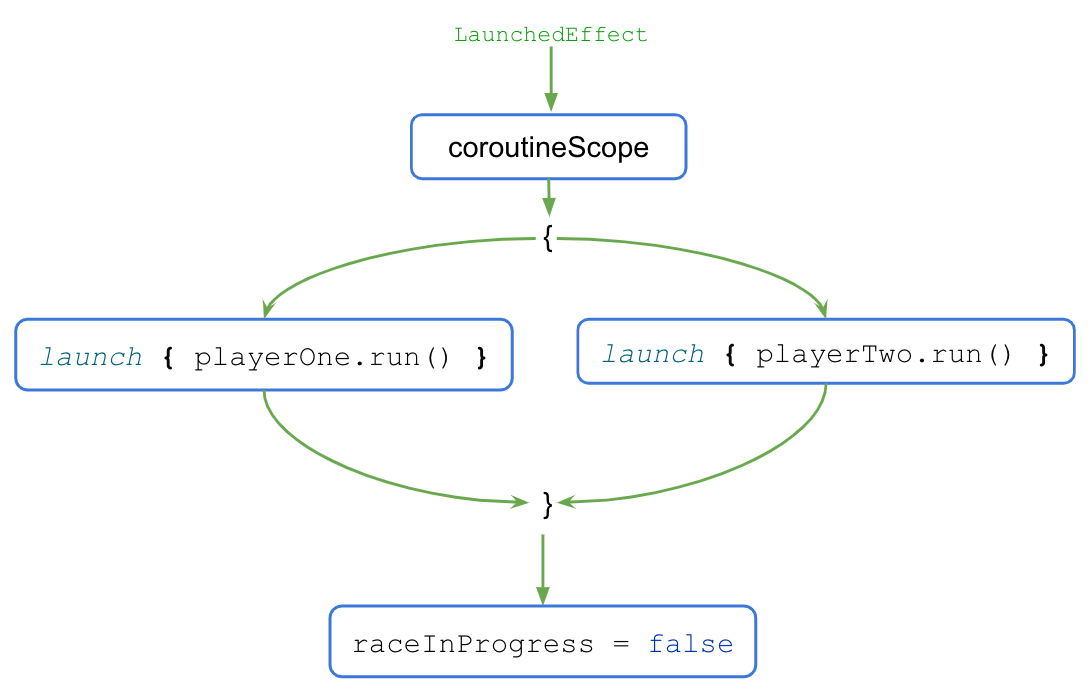
When the
LaunchedEffect()block executes, the control is transferred to thecoroutineScope{..}block.The
coroutineScopeblock launches both coroutines concurrently and waits for them to finish execution.Once the execution is complete, the
raceInProgressflag updates.The
coroutineScopeblock only returns and moves on after all the code inside the block completes execution. For the code outside of the block, the presence or absence of concurrency becomes a mere implementation detail. This coding style provides a structured approach to concurrent programming and is referred to as structured concurrency.When you click the Reset button after the race completes, the coroutines are canceled, and the progress for both players is reset to
0.
Solution code
Branch: main
Clone:
$ git clone https://github.com/google-developer-training/basic-android-kotlin-compose-training-race-tracker.git
$ cd basic-android-kotlin-compose-training-race-tracker
$ git checkout main
HTTP/REST
Most Android apps connect to the internet to perform network operations, such as retrieving emails, messages, or other information from a backend server.
We will use open source and community-driven libraries to build a data layer and get data from a backend server. This greatly simplifies fetching the data and also helps the app follow Android best practices, such as perform operations on a background thread. We will also display an error message if the internet is slow or unavailable, which will keep the user informed about any network connectivity issues.
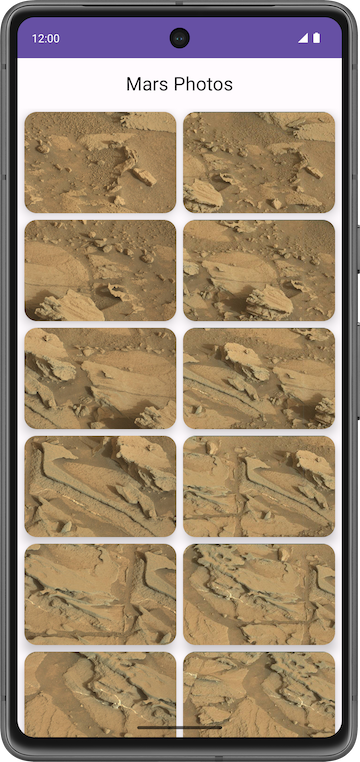
Mars Photos app
You work with the app named Mars Photos, which shows images of the Mars surface. This app connects to a web service to retrieve and display Mars photos. The images are real-life photos from Mars, captured from NASA’s Mars rovers. The following image is a screenshot of the final app, which contains a grid of images.
Note
The preceding image is a screenshot of the final app that you will build at the end of this unit, after additional updates in later codelabs. The screenshot is shown in this codelab to give you a better idea of the overall app functionality.
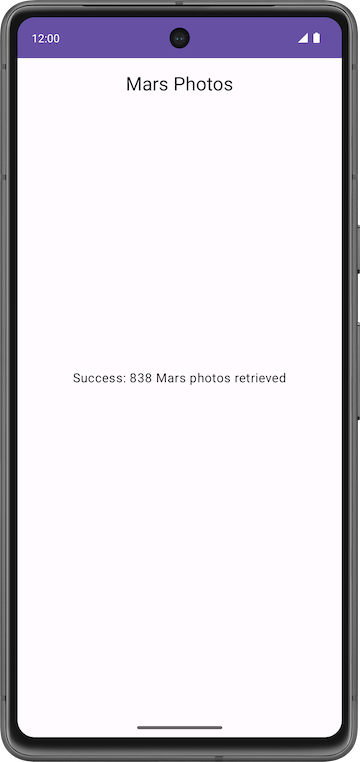
The version of the app you build in this codelab won’t have a lot of bling. This codelab focuses on the data layer part of the app to connect to the internet and download the raw property data using a web service. To ensure that the app correctly retrieves and parses this data, you can print the number of photos received from the backend server in a
Textcomposable.
Solution code: Mars Photos app
Branch: repo-starter
Clone:
$ git clone https://github.com/google-developer-training/basic-android-kotlin-compose-training-mars-photos.git
$ cd basic-android-kotlin-compose-training-mars-photos
$ git checkout repo-starter
We’ll start with the solution code and learn how it works.
Solution code overview: Mars Photos app
network/MarsApiService.ktpackage com.example.marsphotos.network import com.example.marsphotos.model.MarsPhoto import com.jakewharton.retrofit2.converter.kotlinx.serialization.asConverterFactory import kotlinx.serialization.json.Json import okhttp3.MediaType.Companion.toMediaType import retrofit2.Retrofit import retrofit2.http.GET private const val BASE_URL = "https://android-kotlin-fun-mars-server.appspot.com" /** * Use the Retrofit builder to build a retrofit object using a kotlinx.serialization converter */ private val retrofit = Retrofit.Builder() // Creates a Retrofit object. The following lines add various functionality to this object. .addConverterFactory(Json.asConverterFactory("application/json".toMediaType())) // Adds functionality that converts the web service's response into Kotlin objects .baseUrl(BASE_URL) // Tells the Retrofit object which base URL to use when making web service requests .build() // builds the Retrofit object /** * Retrofit service object for creating api calls */ interface MarsApiService { // Gets the response from the web service, and returns it as a List of MarsPhoto objects. // The @GET annotation tells Retrofit that this is a GET request, and that the endpoint is "{BASE_URL}/photos" @GET("photos") suspend fun getPhotos(): List<MarsPhoto> } /** * A public Api object that exposes the lazy-initialized Retrofit service */ object MarsApi { val retrofitService: MarsApiService by lazy { retrofit.create(MarsApiService::class.java) } }
BASE_URLis the base URL for the web service.interface MarsApiServicedefines how Retrofit talks to the web server using HTTP requests. WhenevergetPhotos()is called:Retrofit makes a request to
{BASE_URL}/photos.Retrofit receives a response. This response is a JSON string.
Because of
.addConverterFactory(Json.asConverterFactory("application/json".toMediaType()))andfun getPhotos(): List<MarsPhoto>, Retrofit converts the JSON string intoList<MarsPhoto>, i.e. a list ofMarsPhotoobjects.
object MarsApiis a singleton object used to access the retrofit service. The app needs only one retrofit service, so this object is created to make sure that only one instance of the retrofit service is created.
ui/MarsPhotosApp.kt@file:OptIn(ExperimentalMaterial3Api::class) package com.example.marsphotos.ui import androidx.compose.foundation.layout.fillMaxSize import androidx.compose.material3.CenterAlignedTopAppBar import androidx.compose.material3.ExperimentalMaterial3Api import androidx.compose.material3.MaterialTheme import androidx.compose.material3.Scaffold import androidx.compose.material3.Surface import androidx.compose.material3.Text import androidx.compose.material3.TopAppBarDefaults import androidx.compose.material3.TopAppBarScrollBehavior import androidx.compose.runtime.Composable import androidx.compose.ui.Modifier import androidx.compose.ui.input.nestedscroll.nestedScroll import androidx.compose.ui.res.stringResource import androidx.lifecycle.viewmodel.compose.viewModel import com.example.marsphotos.R import com.example.marsphotos.ui.screens.HomeScreen import com.example.marsphotos.ui.screens.MarsViewModel @Composable fun MarsPhotosApp() { val scrollBehavior = TopAppBarDefaults.enterAlwaysScrollBehavior() Scaffold( modifier = Modifier.nestedScroll(scrollBehavior.nestedScrollConnection), topBar = { MarsTopAppBar(scrollBehavior = scrollBehavior) } ) { Surface( modifier = Modifier.fillMaxSize() ) { val marsViewModel: MarsViewModel = viewModel() HomeScreen( marsUiState = marsViewModel.marsUiState, contentPadding = it ) } } } @Composable fun MarsTopAppBar(scrollBehavior: TopAppBarScrollBehavior, modifier: Modifier = Modifier) { CenterAlignedTopAppBar( scrollBehavior = scrollBehavior, title = { Text( text = stringResource(R.string.app_name), style = MaterialTheme.typography.headlineSmall, ) }, modifier = modifier ) }
MarsPhotosAppdisplays the contents on the screen: the top app bar, theHomeScreencomposable, etc.
screens/MarsViewModel.ktpackage com.example.marsphotos.ui.screens import androidx.compose.runtime.getValue import androidx.compose.runtime.mutableStateOf import androidx.compose.runtime.setValue import androidx.lifecycle.ViewModel import androidx.lifecycle.viewModelScope import com.example.marsphotos.model.MarsPhoto import com.example.marsphotos.network.MarsApi import kotlinx.coroutines.launch import retrofit2.HttpException import java.io.IOException /** * UI state for the Home screen */ sealed interface MarsUiState { data class Success(val photos: String) : MarsUiState object Error : MarsUiState object Loading : MarsUiState } class MarsViewModel : ViewModel() { /** The mutable State that stores the status of the most recent request */ var marsUiState: MarsUiState by mutableStateOf(MarsUiState.Loading) private set /** * Call getMarsPhotos() on init so we can display status immediately. */ init { getMarsPhotos() } /** * Gets Mars photos information from the Mars API Retrofit service and updates the * [MarsPhoto] [List] [MutableList]. */ fun getMarsPhotos() { viewModelScope.launch { marsUiState = MarsUiState.Loading marsUiState = try { val listResult = MarsApi.retrofitService.getPhotos() MarsUiState.Success( "Success: ${listResult.size} Mars photos retrieved" ) } catch (e: IOException) { MarsUiState.Error } catch (e: HttpException) { MarsUiState.Error } } } }
This file is the corresponding view model for the
MarsPhotosApp.This class contains a
MutableStateproperty namedmarsUiState. It stores the status of the most recent request.
screens/HomeScreen.ktpackage com.example.marsphotos.ui.screens import androidx.compose.foundation.Image import androidx.compose.foundation.layout.Arrangement import androidx.compose.foundation.layout.Box import androidx.compose.foundation.layout.Column import androidx.compose.foundation.layout.PaddingValues import androidx.compose.foundation.layout.fillMaxSize import androidx.compose.foundation.layout.fillMaxWidth import androidx.compose.foundation.layout.padding import androidx.compose.foundation.layout.size import androidx.compose.material3.Text import androidx.compose.runtime.Composable import androidx.compose.ui.Alignment import androidx.compose.ui.Modifier import androidx.compose.ui.res.painterResource import androidx.compose.ui.res.stringResource import androidx.compose.ui.tooling.preview.Preview import androidx.compose.ui.unit.dp import com.example.marsphotos.R import com.example.marsphotos.ui.theme.MarsPhotosTheme @Composable fun HomeScreen( marsUiState: MarsUiState, modifier: Modifier = Modifier, contentPadding: PaddingValues = PaddingValues(0.dp), ) { when (marsUiState) { is MarsUiState.Loading -> LoadingScreen(modifier = modifier.fillMaxSize()) is MarsUiState.Success -> ResultScreen( marsUiState.photos, modifier = modifier.fillMaxWidth() ) is MarsUiState.Error -> ErrorScreen( modifier = modifier.fillMaxSize()) } } /** * The home screen displaying the loading message. */ @Composable fun LoadingScreen(modifier: Modifier = Modifier) { Image( modifier = modifier.size(200.dp), painter = painterResource(R.drawable.loading_img), contentDescription = stringResource(R.string.loading) ) } /** * The home screen displaying error message with re-attempt button. */ @Composable fun ErrorScreen(modifier: Modifier = Modifier) { Column( modifier = modifier, verticalArrangement = Arrangement.Center, horizontalAlignment = Alignment.CenterHorizontally ) { Image( painter = painterResource(id = R.drawable.ic_connection_error), contentDescription = "" ) Text(text = stringResource(R.string.loading_failed), modifier = Modifier.padding(16.dp)) } } /** * ResultScreen displaying number of photos retrieved. */ @Composable fun ResultScreen(photos: String, modifier: Modifier = Modifier) { Box( contentAlignment = Alignment.Center, modifier = modifier ) { Text(text = photos) } } @Preview(showBackground = true) @Composable fun LoadingScreenPreview() { MarsPhotosTheme { LoadingScreen() } } @Preview(showBackground = true) @Composable fun ErrorScreenPreview() { MarsPhotosTheme { ErrorScreen() } } @Preview(showBackground = true) @Composable fun PhotosGridScreenPreview() { MarsPhotosTheme { ResultScreen(stringResource(R.string.placeholder_success)) } }
This file contains the
HomeScreenandResultScreencomposables. TheResultScreenhas a simpleBoxlayout that displays the value ofmarsUiStatein aTextcomposable.
MainActivity.kt:The only task for this activity is to load the
ViewModeland display theMarsPhotosAppcomposable.
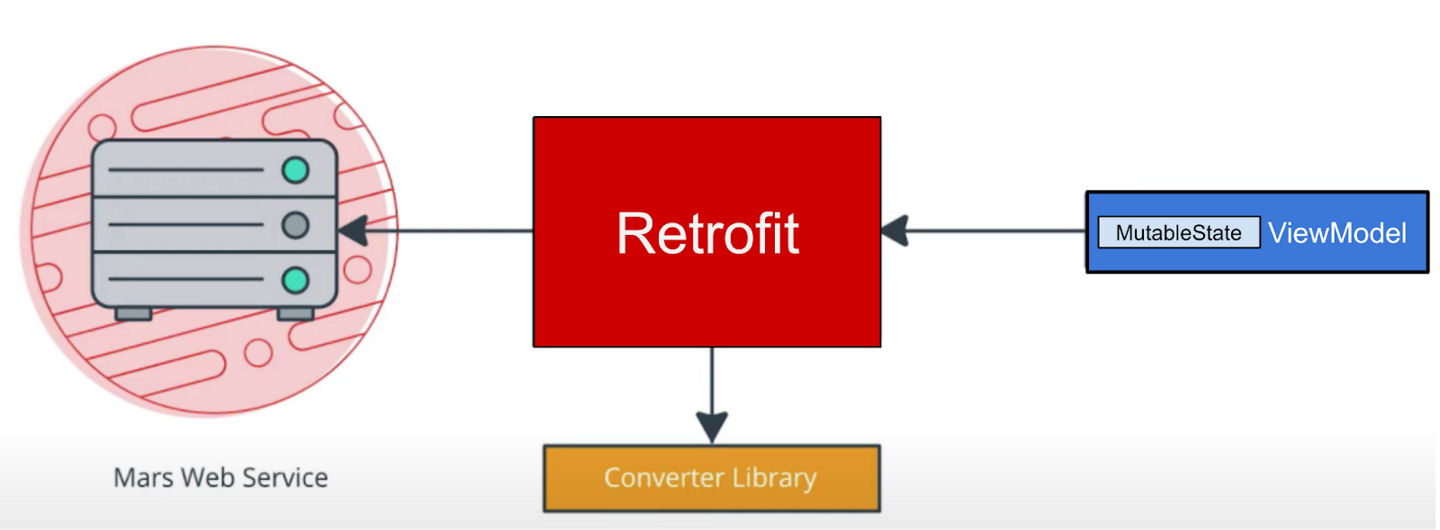
Web services and Retrofit
We’ll create a layer for the network service that communicates with the backend server and fetches the required data. We’ll use a third-party library, called Retrofit, to implement this task.
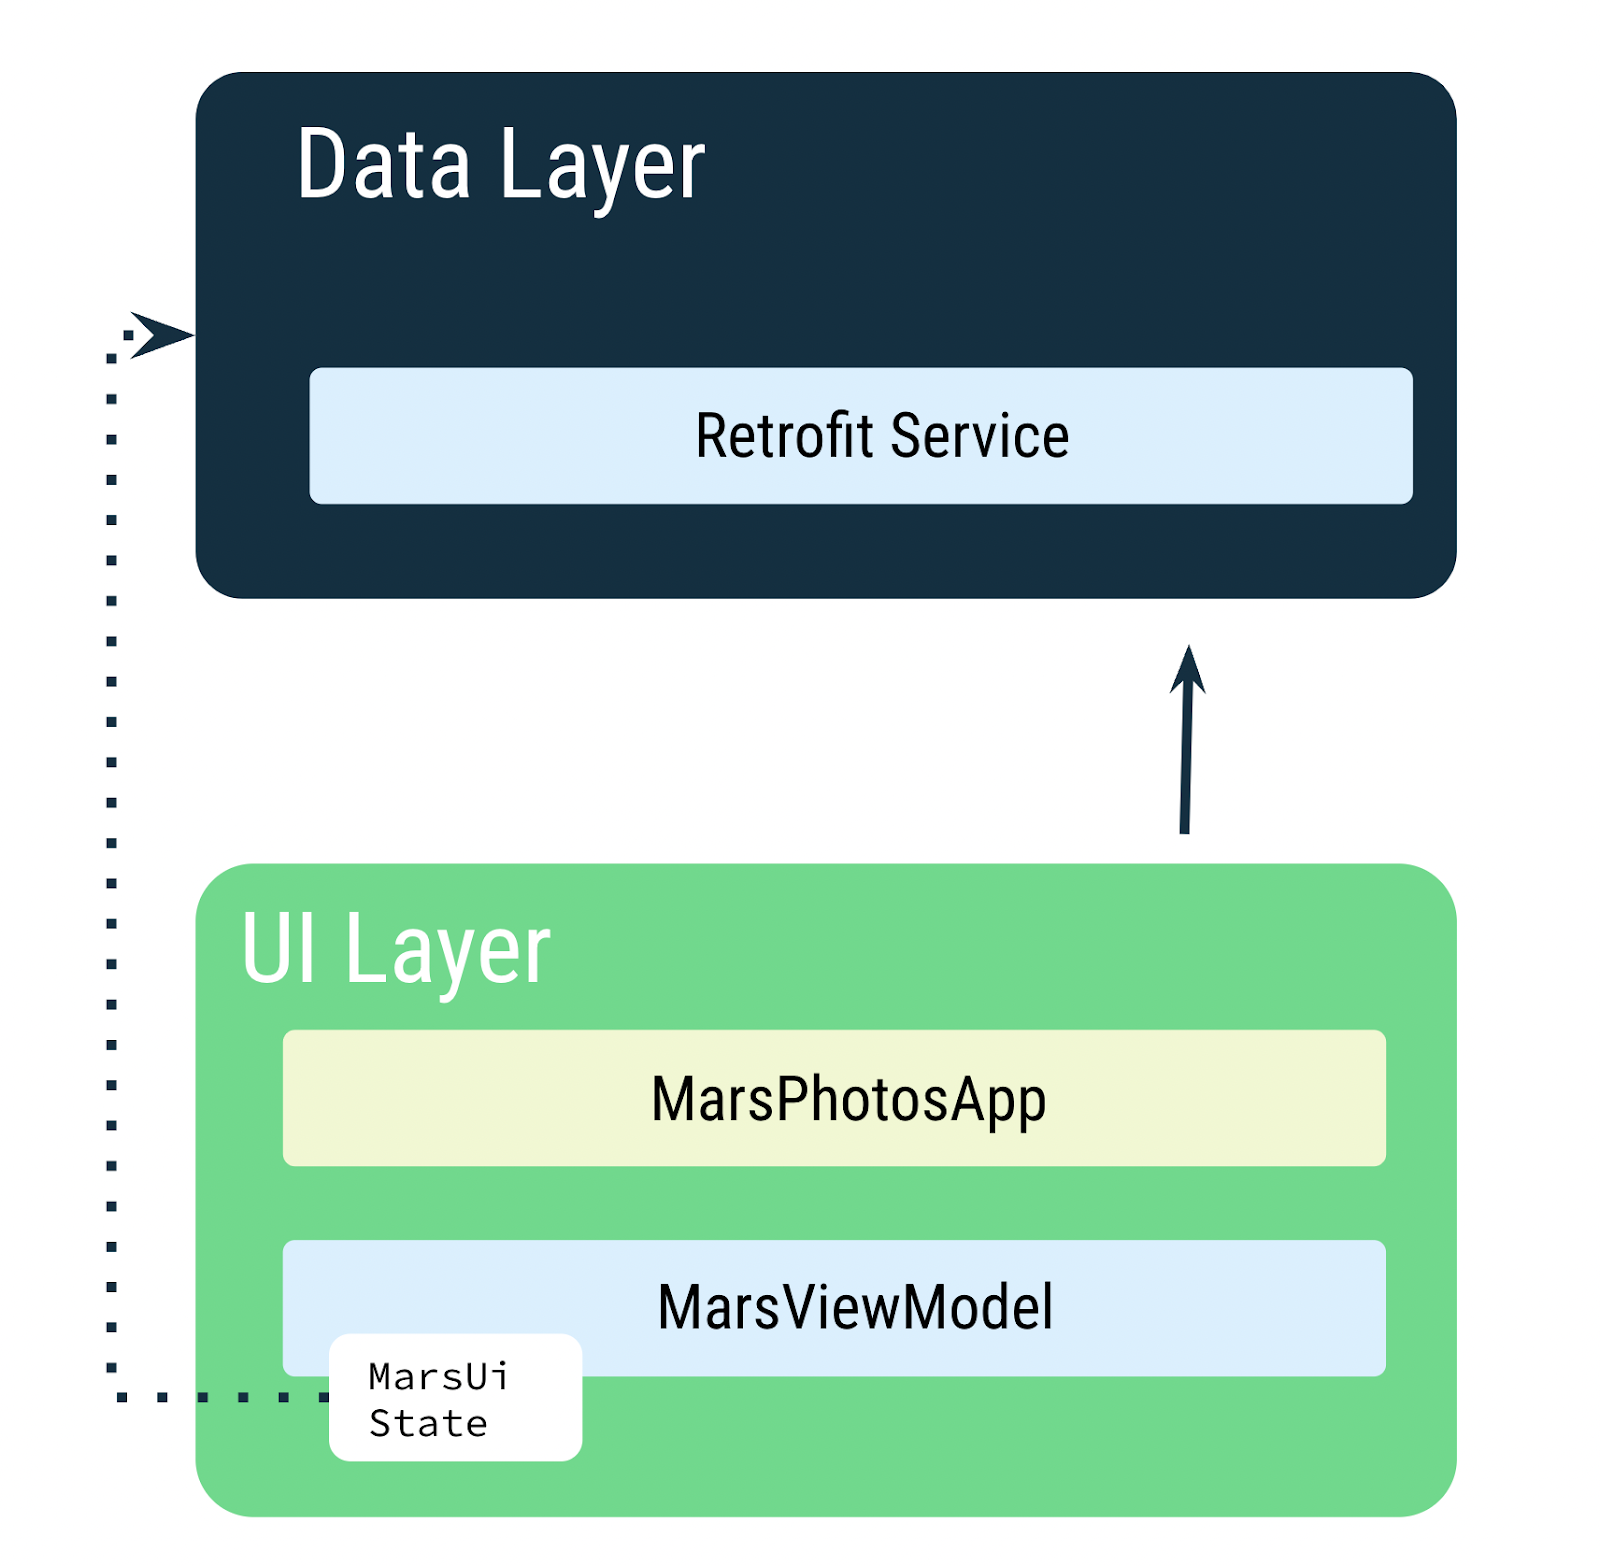
The
MarsViewModelis responsible for making the network call to get the Mars photos data. In theViewModel, useMutableStateto update the app UI when the data changes.Note
In later codelabs, we’ll add a Repository to your data layer. The Repository then communicates with the Retrofit service to fetch the data. The Repository is responsible for exposing the data to the rest of the app.
The Mars photos data is stored on a web server. To get this data into your app, you need to establish a connection and communicate with the server on the internet.
Note
In this codelab, you only retrieve the URLs, not the Mars photos. In a later codelab, you retrieve the Mars photos and display them in a grid.
Most web servers today run web services using a common stateless web architecture known as REpresentational State Transfer (REST). Web services that offer this architecture are known as RESTful services.
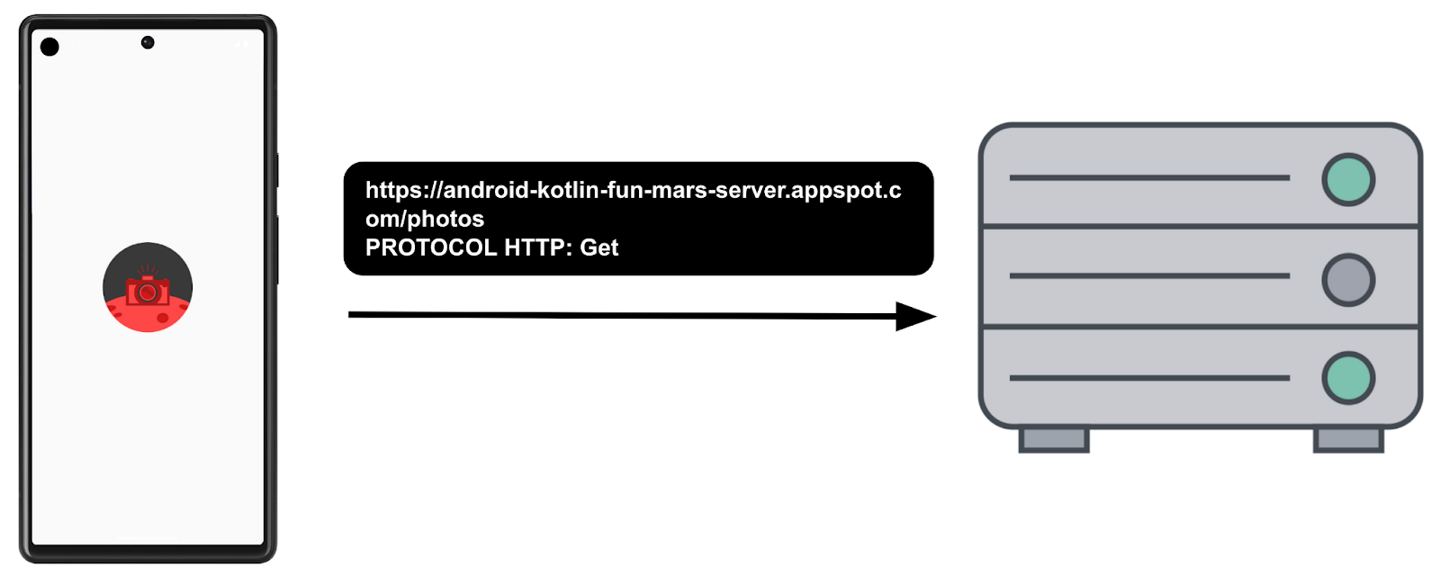
Requests are made to RESTful web services in a standardized way, via Uniform Resource Identifiers (URIs). A URI identifies a resource in the server by name, without implying its location or how to access it. For example, in the app for this lesson, you retrieve the image URLs using the following server URI. This server hosts both Mars real estate and Mars photos:
Note
This server is being accessed by a different sample app where it showcases Mars real estate, so this server has two different endpoints: one for Mars real estate and one for photos. For this course, you use the server to retrieve Mars photos.
A URL (Uniform Resource Locator) is a subset of a URI that specifies where a resource exists and the mechanism for retrieving it. For example:
This URL gets a list of available real estate properties on Mars: https://android-kotlin-fun-mars-server.appspot.com/realestate
This URL gets a list of Mars photos: https://android-kotlin-fun-mars-server.appspot.com/photos
These URLs refer to an identified resource, such as /realestate or /photos, that is obtainable via the Hypertext Transfer Protocol (http:) from the network. You are using the /photos endpoint in this codelab. An endpoint is a URL that allows you to access a web service running on a server.
Note
The familiar web URL is actually a type of URI. This course uses both URL and URI interchangeably.
Web service request
Each web service request contains a URI and is transferred to the server using the same HTTP protocol that’s used by web browsers, like Chrome. HTTP requests contain an operation to tell the server what to do.
Common HTTP operations include:
GET for retrieving server data.
POST for creating new data.
PUT for updating existing data.
DELETE for deleting data.
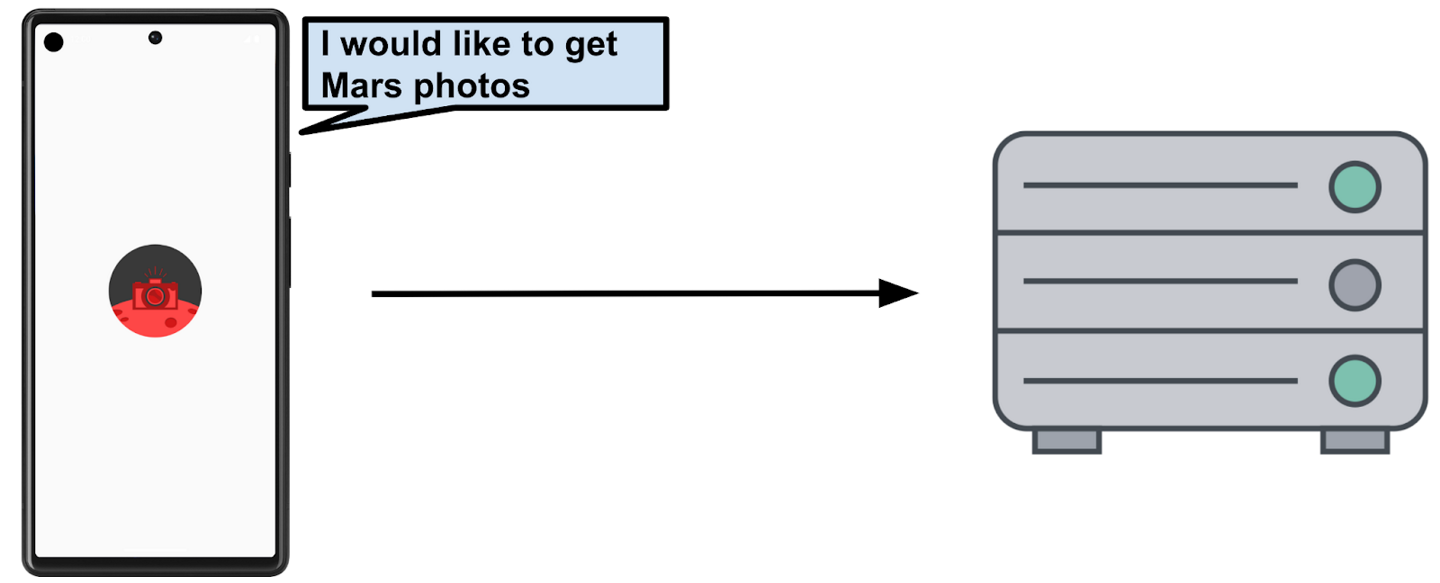
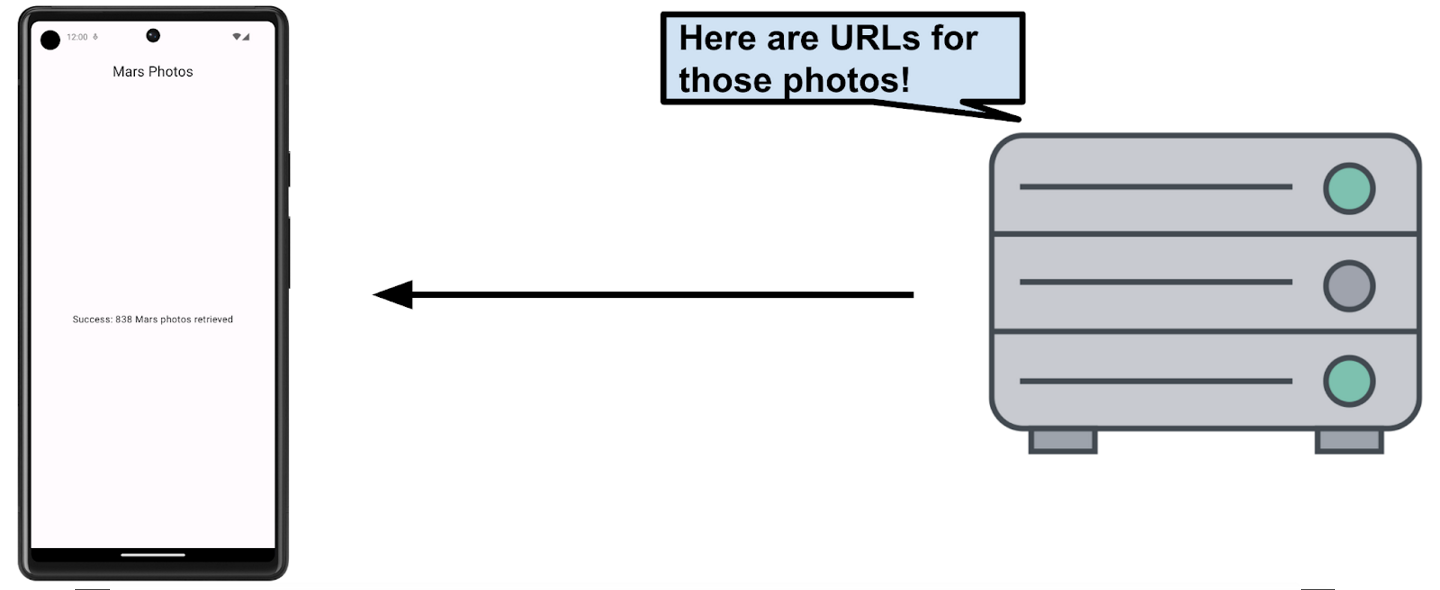
Your app makes an HTTP GET request to the server for the Mars photos information, and then the server returns a response to your app, including the image URLs.
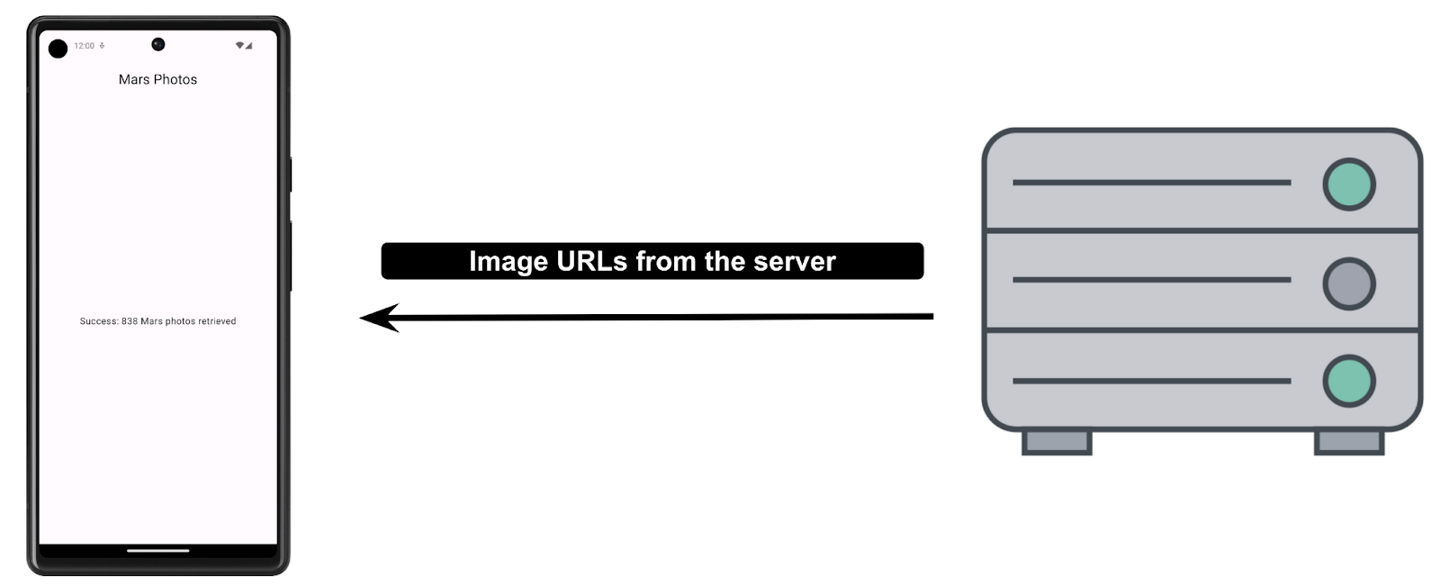
The response from a web service is formatted in one of the common data formats, like XML (eXtensible Markup Language) or JSON (JavaScript Object Notation). The JSON format represents structured data in key-value pairs.
The app establishes a network connection to the server, sends a request, and receives a JSON response. The Retrofit library takes care of the communication with the server.
External Libraries
External libraries, or third-party libraries, are like extensions to the core Android APIs. The libraries you use in this course are open source, community-developed, and maintained by the collective contributions from the huge Android community around the world. These resources help Android developers like you to build better apps.
Warning
Using community-developed and maintained libraries can be a huge timesaver. However, choose these libraries wisely because your app is ultimately responsible for what the code does in these libraries.
Retrofit Library
The Retrofit library that you use in this codelab to talk to the RESTful Mars web service is a good example of a well-supported and maintained library. You can tell this by looking at its GitHub page and reviewing the open and closed issues (some are feature requests). If the developers are regularly resolving the issues and responding to the feature requests, the library is likely well-maintained and a good candidate to use in the app. You can also refer to Retrofit documentation to learn more about the library.
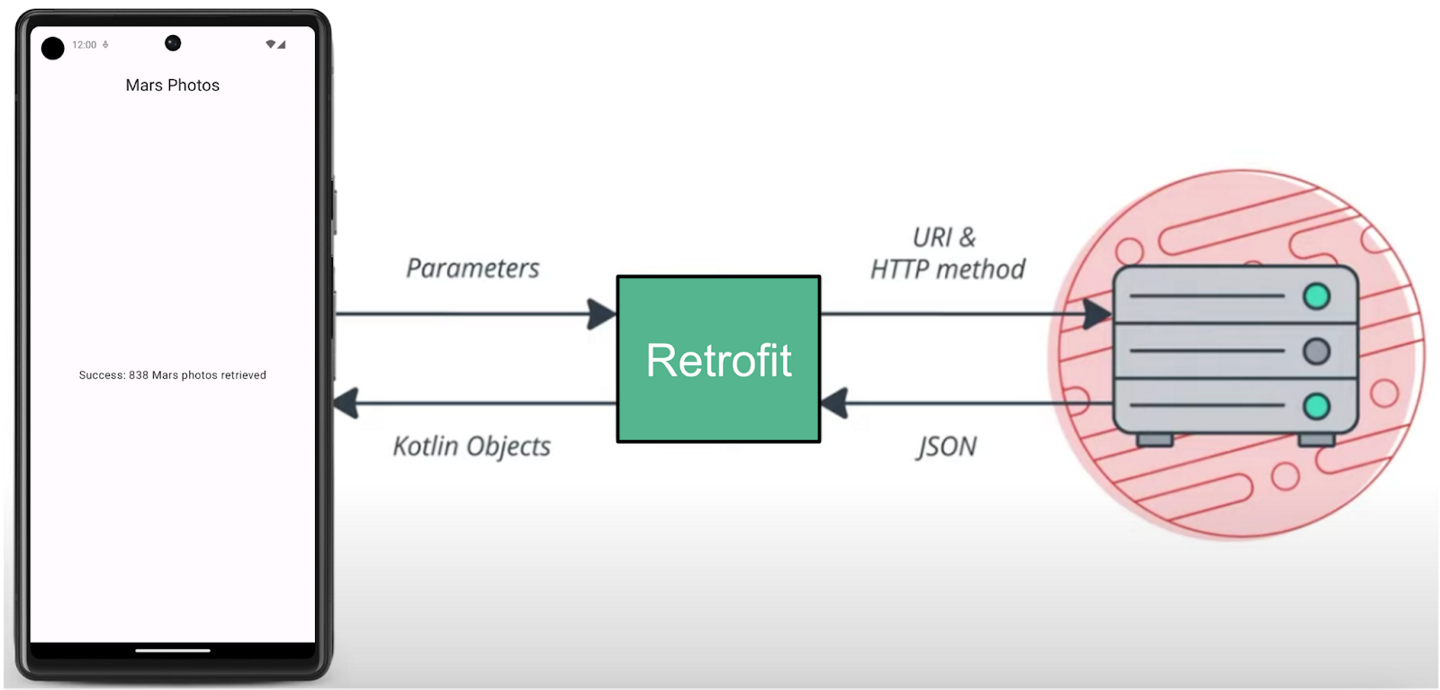
The Retrofit library communicates with the REST backend. It takes URIs and parameters as input.
Retrofit dependencies
Android Gradle lets you add external libraries to your project. In addition to the library dependency, you also need to include the repository where the library is hosted.
For Retrofit, the libraries are added in the
build.gradle.kts (Module :app)file:dependencies { // ... // Retrofit implementation("com.jakewharton.retrofit:retrofit2-kotlinx-serialization-converter:1.0.0") implementation("com.squareup.retrofit2:retrofit:2.9.0") implementation("com.squareup.okhttp3:okhttp:4.11.0") implementation("io.coil-kt:coil-compose:2.4.0") // ... }
Connecting to the Internet
Retrofit fetches data from the web service, and converts it to some othe format (in this case, JSON). Retrofit includes built-in support for popular data formats, such as XML and JSON. Retrofit ultimately creates the code to call and consume this service for you, including critical details, such as running the requests on background threads.
In
network/MarsApiService.kt, this code creates a singleton object calledMarsApithat initializes the Retrofit service. The singleton pattern ensures that one, and only one, instance of the retrofit object is created.object MarsApi { val retrofitService : MarsApiService by lazy { retrofit.create(MarsApiService::class.java) } }
by lazycauses the retrofit object to be lazily initialized. Lazy initialization is when object creation is purposely delayed, until you actually need that object, to avoid unnecessary computation or use of other computing resources. Kotlin has first-class support for lazy instantiation.
Warning
Singleton pattern is not a recommended practice. Singletons represent global states that are hard to predict, particularly in tests. Objects should define which dependencies they need, instead of describing how to create them.
Dependency injection is preferred over the singleton pattern. More on Dependency injection later.
ViewModelScope
A
viewModelScopeis the built-in coroutine scope defined for eachViewModelin your app. Any coroutine launched in this scope is automatically canceled if theViewModelis cleared.You can use
viewModelScopeto launch the coroutine and make the web service request in the background. SinceviewModelScopebelongs toViewModel, the request continues even if the app goes through a configuration change.Inside
getMarsPhotos(),viewModelScope.launchlaunches the coroutine:private fun getMarsPhotos() { viewModelScope.launch { marsUiState = MarsUiState.Loading marsUiState = try { val listResult = MarsApi.retrofitService.getPhotos() MarsUiState.Success( "Success: ${listResult.size} Mars photos retrieved" ) } catch (e: IOException) { MarsUiState.Error } catch (e: HttpException) { MarsUiState.Error } } }
Internet permissions
The purpose of permissions on Android is to protect the privacy of an Android user. Android apps must declare or request permissions to access sensitive user data, such as contacts, call logs, and certain system features, such as camera or internet.
In order for your app to access the Internet, it needs the
INTERNETpermission. Connecting to the internet introduces security concerns, which is why apps do not have internet connectivity by default. You need to explicitly declare that the app needs access to the internet. This declaration is considered a normal permission. To learn more about Android permissions and its types, please refer to the Permissions on Android.In
AndroidManifest.xml, here’s where the permission is declared:<manifest xmlns:android="http://schemas.android.com/apk/res/android" xmlns:tools="http://schemas.android.com/tools"> <uses-permission android:name="android.permission.INTERNET" /> <application android:allowBackup="true" android:icon="@mipmap/ic_launcher" android:label="@string/app_name" android:roundIcon="@mipmap/ic_launcher_round" android:supportsRtl="true" android:theme="@style/Theme.MarsPhotos" tools:targetApi="33"> <activity android:name=".MainActivity" android:exported="true" android:label="@string/app_name" android:theme="@style/Theme.MarsPhotos"> <intent-filter> <action android:name="android.intent.action.MAIN" /> <category android:name="android.intent.category.LAUNCHER" /> </intent-filter> </activity> </application> </manifest>
Exception Handling
Exceptions are errors that can occur during runtime, not compile time, and they terminate the app abruptly without notifying the user. This can result in a poor user experience. Exception handling is a mechanism by which you prevent the app from terminating abruptly and handle the situation in a user-friendly way.
Examples of potential issues while connecting to a server include the following:
The URL or URI used in the API is incorrect.
The server is unavailable, and the app could not connect to it.
A network latency issue.
Poor or no internet connection on the device.
These exceptions can’t be handled during compile time, but you can use a
try-catchblock to handle the exception in runtime.Example syntax for try-catch block
try {
    // some code that can cause an exception.
} catch (e: SomeException) {
    // handle the exception to avoid abrupt termination.
}
Inside the
tryblock, you add the code where you anticipate an exception. In your app, this is a network call. In thecatchblock, you need to implement the code that prevents abrupt termination of the app. If there is an exception, then thecatchblock executes to recover from the error instead of terminating the app abruptly.In
MarsViewModel.kt➜getMarsPhotos(), this code handlesIOExceptionandHttpExceptionexceptions, settingMarsUiStateaccordingly. What exactly isMarsUiState? Read on to find out.fun getMarsPhotos() { viewModelScope.launch { marsUiState = MarsUiState.Loading marsUiState = try { val listResult = MarsApi.retrofitService.getPhotos() MarsUiState.Success( "Success: ${listResult.size} Mars photos retrieved" ) } catch (e: IOException) { MarsUiState.Error } catch (e: HttpException) { MarsUiState.Error } } }
State UI
In the
MarsViewModelclass, the status of the most recent web request,marsUiState, is saved as a mutable state object. This class can represent 3 possible states:Loading: the app is waiting for data.
Success: the data was successfully retrieved from the web service.
Error: any network or connection errors.
To represent these three states in your application, a
sealed interfaceis used. Asealed interfacemakes it easy to manage state by limiting the possible values. InMarsViewModel.kt:sealed interface MarsUiState { data class Success(val photos: String) : MarsUiState object Error : MarsUiState object Loading : MarsUiState }
Using
sealed interfacelimits the values that themarsUiStateobject can have:When the response is successful, data is received from the server, and is stored in a newly created
data class Success.In the case of the
LoadingandErrorstates, we don’t need to store any data, just useobject Loadingandobject Error.
In
screens/HomeScreen.kt, we show a Loading, Result or Error screen depending on the value ofmarsUiState.import androidx.compose.foundation.layout.fillMaxSize fun HomeScreen( marsUiState: MarsUiState, modifier: Modifier = Modifier ) { when (marsUiState) { is MarsUiState.Loading -> LoadingScreen(modifier = modifier.fillMaxSize()) is MarsUiState.Success -> ResultScreen(marsUiState.photos, modifier = modifier.fillMaxWidth()) is MarsUiState.Error -> ErrorScreen( modifier = modifier.fillMaxSize()) } } @Composable fun LoadingScreen(modifier: Modifier = Modifier) { // ... } @Composable fun ErrorScreen(modifier: Modifier = Modifier) { // ... }
Note
If you implement
MarsUiStateinterface without asealedkeyword, it requires you to add a Success, Error, Loading andelsebranch. Since there is no fourth option (else), you use asealedinterface to tell the compiler that there are only three options (thus making the conditionals exhaustive).
Parse JSON with kotlinx.serialization
JavaScript Object Notation
Web services typically respond in one of the common data formats like Extensible Markup Language (XML) or JavaScript Object Notation (JSON). Each call returns structured data, and your app needs to know what that structure is in order to read the data from the response.
For example, in this app, you are retrieving the data from https://android-kotlin-fun-mars-server.appspot.com/photos. When you enter this URL in the browser, you see a list of IDs and image URLs of the surface of Mars in a JSON format!
Structure of sample JSON response
The structure of a JSON response has the following features:
JSON response is an array, indicated by the square brackets. The array contains JSON objects.
JSON objects are surrounded by curly brackets.
Each JSON object contains a set of key-value pairs separated by a comma.
A colon separates the key and value in a pair.
Names are surrounded by quotes.
Values can be numbers, strings, a boolean, an array, an object (JSON object), or null.
For example, the
img_srcis a URL, which is a string. When you paste the URL into a web browser, you see a Mars surface image.
In the app, Retrofit gets a JSON response from the Mars web service, and then converts them to Kotlin objects. This process is called deserialization.
Serialization is the process of converting data used by an application to a format that can be transferred over a network. As opposed to serialization, deserialization is the process of reading data from an external source (like a server) and converting it into a runtime object. They are both essential components of most applications that exchange data over the network.
kotlinx.serializationprovides sets of libraries that convert a JSON string into Kotlin objects. There is a community developed third party library that works with Retrofit, Kotlin Serialization Converter.
kotlinx.serialization library dependencies
Here are the dependencies in
build.gradle.kts (Module :app)plugins { // ... id("org.jetbrains.kotlin.plugin.serialization") version "1.9.10" } dependencies { // ... implementation("com.jakewharton.retrofit:retrofit2-kotlinx-serialization-converter:1.0.0") implementation("com.squareup.okhttp3:okhttp:4.11.0") implementation("org.jetbrains.kotlinx:kotlinx-serialization-json:1.6.0") // ... }
The Mars Photo data class
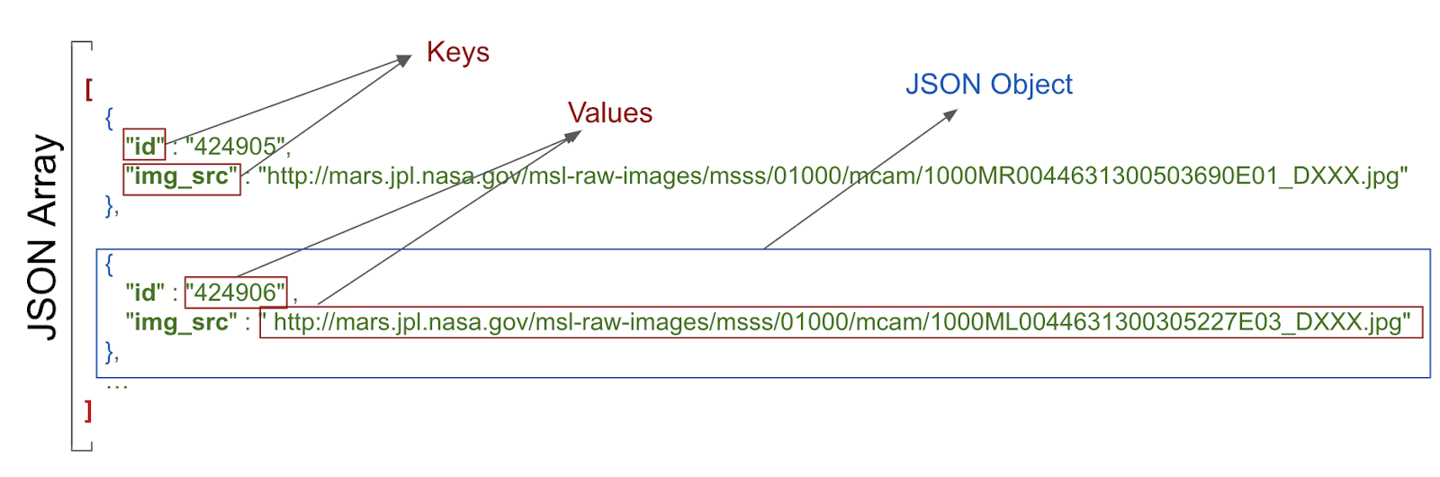
A sample entry of the JSON response you get from the web service looks something like the following:
[ { "id":"424906", "img_src":"http://mars.jpl.nasa.gov/msl-raw-images/msss/01000/mcam/1000ML0044631300305227E03_DXXX.jpg" }, ...]In the example above, notice that each Mars photo entry has the following JSON key and value pairs:
id: the ID of the property, as a string. Since it is wrapped in quotes (" "), it is of the typeString, notInteger.img_src: The image’s URL, as a string.
kotlinx.serializationparses this JSON data and converts it into Kotlin objects. To do this,kotlinx.serializationneeds to have a Kotlin data class to store the parsed results.In
model/MarsPhoto.kt, the data class is:@Serializable data class MarsPhoto( val id: String, @SerialName(value = "img_src") val imgSrc: String )
The
@Serializableannotation is used to make the class serializable, which means it can be converted to and from a JSON string.Notice that each of the variables in the
MarsPhotoclass corresponds to a key name in the JSON object. To match the types in our specific JSON response, you useStringobjects for all the values.When
kotlinx serializationparses the JSON, it matches the keys by name and fills the data objects with appropriate values.
@SerialName Annotation
Sometimes the key names in a JSON response can make confusing Kotlin properties or may not match recommended coding style. For example, in the JSON file, the
img_srckey uses an underscore, whereas Kotlin convention for properties uses upper and lowercase letters (camel case).To use variable names in a data class that differ from the key names in the JSON response, use the
@SerialNameannotation. Indata class MarsPhoto, the name of the variable in the data class isimgSrc. The variable can be mapped to the JSON attributeimg_srcusing@SerialName(value = "img_src").
MarsApiService and MarsViewModel
In
network/MarsApiService.kt,kotlinx.serialization.json.Jsonconverts JSON to Kotlin objects. The code:import kotlinx.serialization.json.Json private val retrofit = Retrofit.Builder() .addConverterFactory(Json.asConverterFactory("application/json".toMediaType())) .baseUrl(BASE_URL) .build()
In
MarsViewModel.kt:getMarsPhotos()callsMarsApi.retrofitService.getPhotos()MarsApi.retrofitService.getPhotos():Sends a request to https://android-kotlin-fun-mars-server.appspot.com/photos
If successful, the response from the server will be a JSON string.
The JSON string is converted to a list of zero or more
MarsPhotoobjects.The list of
MarsPhotoobjects is returned togetMarsPhotos().
fun getMarsPhotos() {
    viewModelScope.launch {
        marsUiState = MarsUiState.Loading
        marsUiState = try {
            val listResult = MarsApi.retrofitService.getPhotos()
            MarsUiState.Success(
                "Success: ${listResult.size} Mars photos retrieved"
            )
        } catch (e: IOException) {
            MarsUiState.Error
        } catch (e: HttpException) {
            MarsUiState.Error
        }
    }
}
When the app is run, it should show the number of photos retrieved:
The Data Layer
Add repository and Manual Dependency Injection
We’ve learnt how to get data from a web service by having the
ViewModelretrieve the URLs of Mars photos from the network using an API service. While this approach works and is simple to implement, it does not scale well as your app grows and needs to work with more than one data source. To address this issue, Android architecture best practices recommend separating out your UI layer and data layer.We’ll refactor the Mars Photos app into separate UI and data layers. We’ll learn how to implement the repository pattern and use dependency injection. Dependency injection creates a more flexible coding structure that helps with development and testing.
Starter code: Mars Photos app, with data layer
Branch: repo-starter
Clone:
$ git clone https://github.com/google-developer-training/basic-android-kotlin-compose-training-mars-photos.git
$ cd basic-android-kotlin-compose-training-mars-photos
$ git checkout repo-starter
Separate the UI layer and Data layer
Why different layers?
Separating the code into different layers makes your app more scalable, more robust, and easier to test. Having multiple layers with clearly defined boundaries also makes it easier for multiple developers to work on the same app without negatively impacting each other.
Android’s Recommended app architecture states that an app should have at least a UI layer and a data layer.
In this codelab, you concentrate on the data layer and make changes so your app follows the recommended best practices.
What is a data layer?
A data layer is responsible for the business logic of your app and for sourcing and saving data for your app. The data layer exposes data to the UI layer using the Unidirectional Data Flow pattern. Data can come from multiple sources, like a network request, a local database, or from a file on the device.
An app may even have more than one source of data. When the app opens, it retrieves data from a local database on the device, which is the first source. While the app is running, it makes a network request to the second source to retrieve newer data.
By having the data in a separate layer from the UI code, you can make changes in one part of the code without affecting another. This approach is part of a design principle called separation of concerns. A section of code focuses on its own concern and encapsulates its inner workings from other code. Encapsulation is a form of hiding how the code internally works from other sections of code. When one section of code needs to interact with another section of code, it does it through an interface.
The UI layer’s concern is displaying the data it is provided. The UI no longer retrieves the data as that is the data layer’s concern.
The data layer is made up of one or more repositories. Repositories themselves contain zero or more data sources.
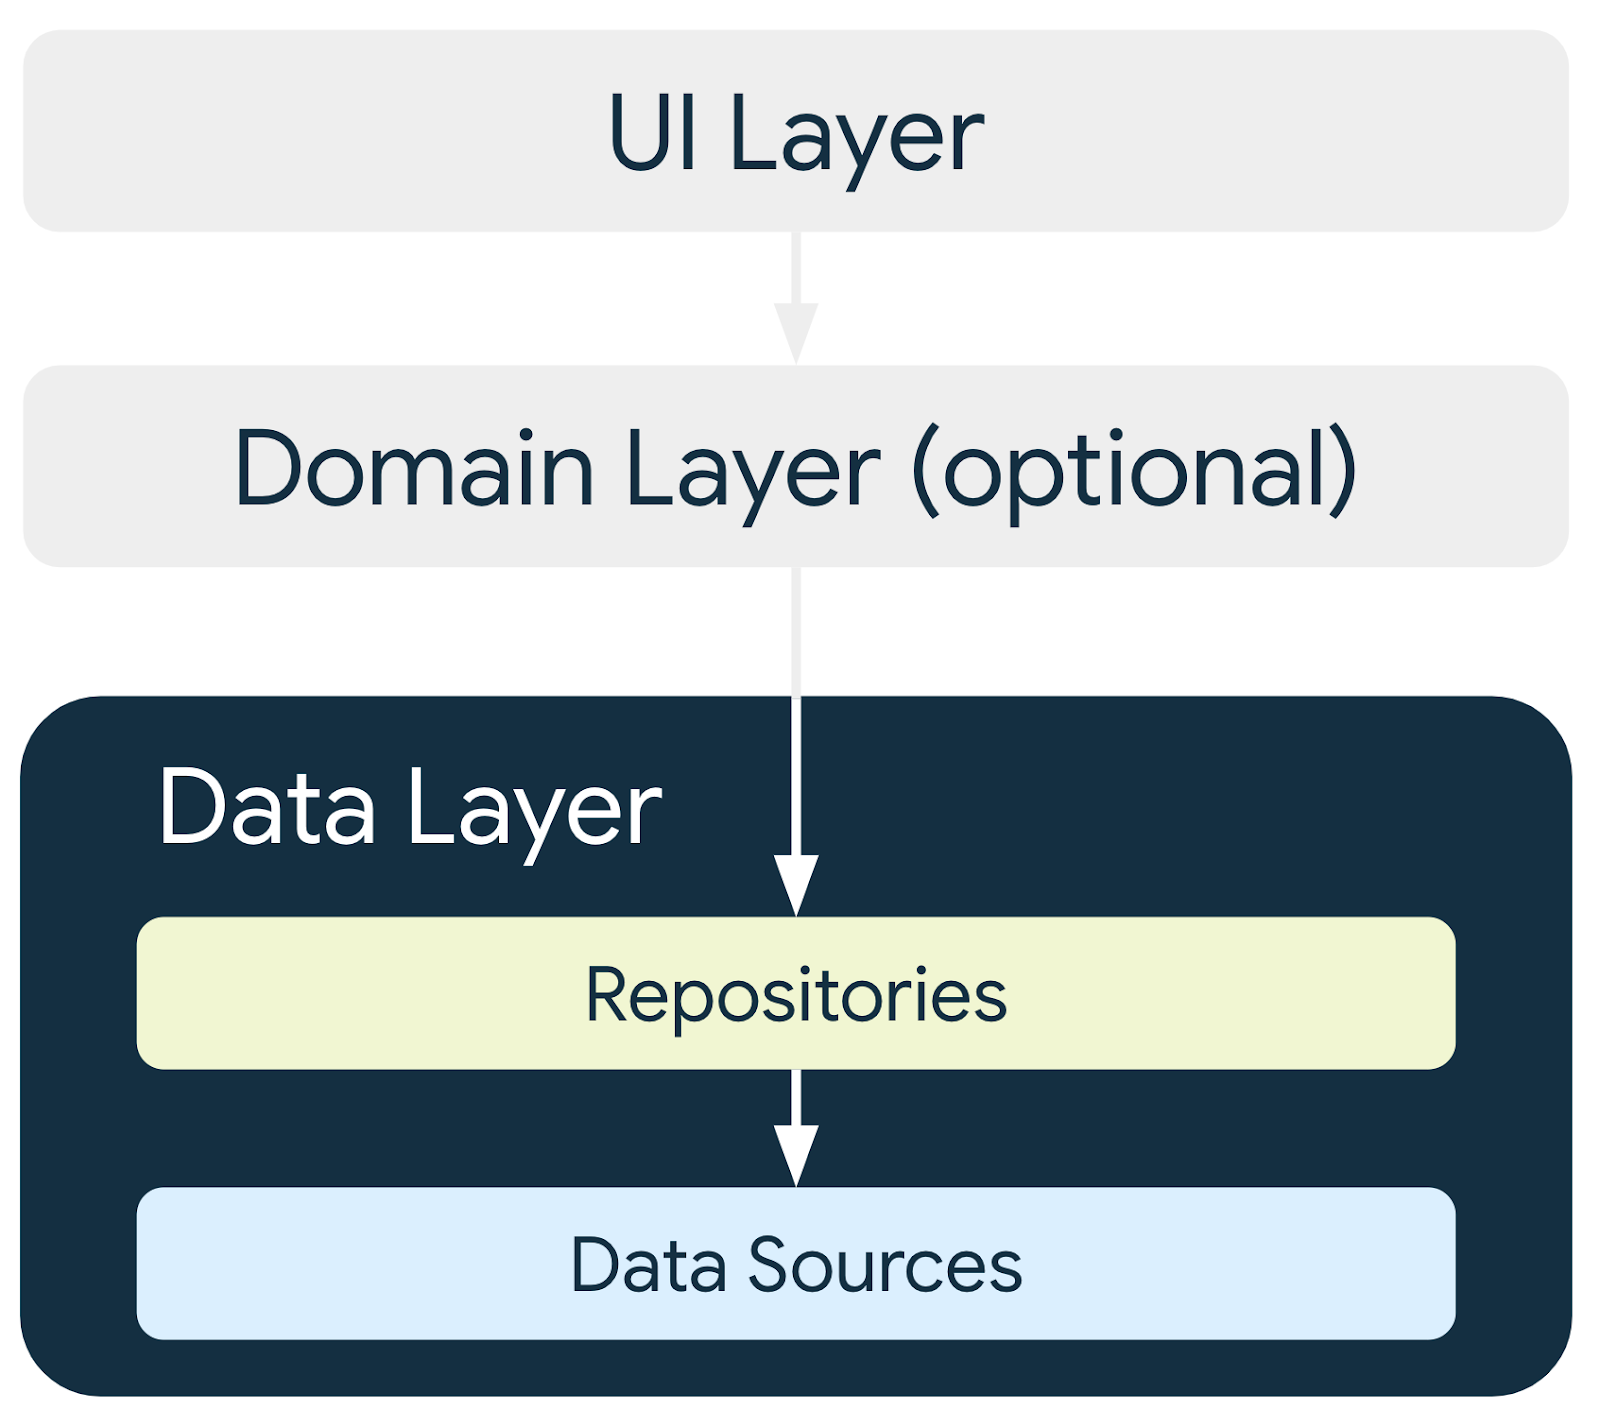
Best practices require the app to have a repository for each type of data source your app uses.
In this codelab, the app has one data source, so it has one repository after you refactor the code. For this app, the repository that retrieves data from the internet completes the data source’s responsibilities. It does so by making a network request to an API. If the data source coding is more complex or additional data sources are added, the data source responsibilities are encapsulated in separate data source classes, and the repository is responsible for managing all the data sources.
What is a repository?
In general a repository class:
Exposes data to the rest of the app.
Centralizes changes to data.
Resolves conflicts between multiple data sources.
Abstracts sources of data from the rest of the app.
Contains business logic.
The Mars Photos app has a single data source, which is the network API call. It does not have any business logic, as it is just retrieving data. The data is exposed to the app through the repository class, which abstracts away the source of the data.
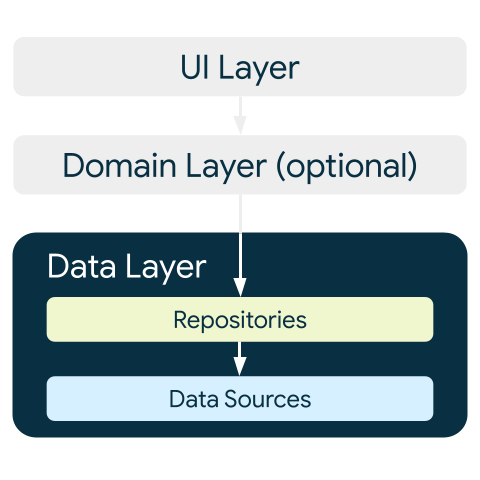
Create Data layer
First, you need to create the repository class. The Android developers guide states that repository classes are named after the data they’re responsible for. The repository naming convention is type of data + Repository. In your app, this is
MarsPhotosRepository.
Create repository
Right-click on
com.example.marsphotos➜ New ➜ Package ➜ enterdata.Right-click on the
datapackage ➜ New ➜ Kotlin Class/File ➜ select Interface ➜ enterMarsPhotosRepositoryAdd this code:
import com.example.marsphotos.model.MarsPhoto
import com.example.marsphotos.network.MarsApi

interface MarsPhotosRepository {
    suspend fun getMarsPhotos(): List<MarsPhoto>
}

class NetworkMarsPhotosRepository() : MarsPhotosRepository {
    override suspend fun getMarsPhotos(): List<MarsPhoto> {
        return MarsApi.retrofitService.getPhotos()
    }
}
Next, you need to update the
ViewModelcode to use the repository to get the data as Android best practices suggest.In
ui/screens/MarsViewModel.kt➜getMarsPhotos(), replace the lineval listResult = MarsApi.retrofitService.getPhotos()with the following code:val marsPhotosRepository = NetworkMarsPhotosRepository() val listResult = marsPhotosRepository.getMarsPhotos()
imports
import com.example.marsphotos.data.NetworkMarsPhotosRepository
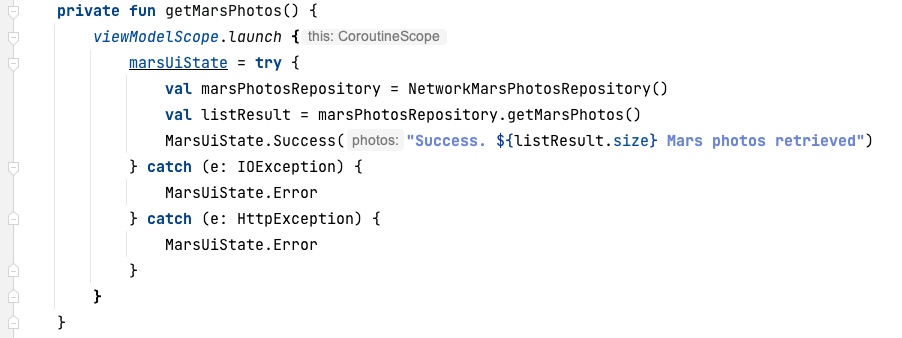
Run the app. Notice that the results displayed are the same as the previous results.
Instead of the
ViewModeldirectly making the network request for the data, the repository provides the data. TheViewModelno longer directly references theMarsApicode.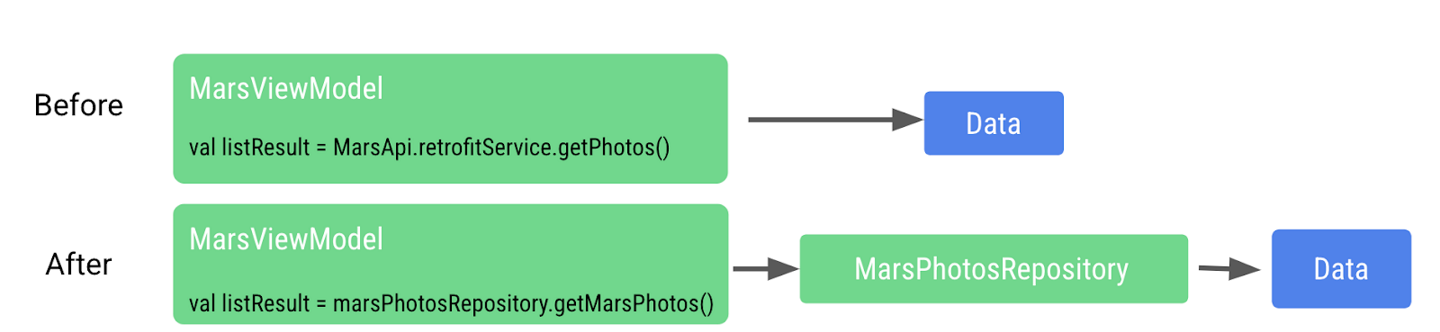
This approach helps make the code retrieving the data loosely coupled from
ViewModel. Being loosely coupled allows changes to be made to theViewModelor the repository without adversely affecting the other, as long as the repository has a function calledgetMarsPhotos().We are now able to make changes to the implementation inside the repository without affecting the caller. For larger apps, this change can support multiple callers.
Dependency injection
Many times, classes require objects of other classes to function. When a class requires another class, the required class is called a dependency.
In the following examples, the
Carobject depends on anEngineobject.There are two ways for a class to get these required objects. One way is for the class to instantiate the required object itself.
interface Engine {
    fun start()
}

class GasEngine : Engine {
    override fun start() {
        println("GasEngine started!")
    }
}

class Car {

    private val engine = GasEngine()

    fun start() {
        engine.start()
    }
}

fun main() {
    val car = Car()
    car.start()
}
The other way is by passing the required object in as an argument.
interface Engine {
    fun start()
}

class GasEngine : Engine {
    override fun start() {
        println("GasEngine started!")
    }
}

class Car(private val engine: Engine) {
    fun start() {
        engine.start()
    }
}

fun main() {
    val engine = GasEngine()
    val car = Car(engine)
    car.start()
}
Having a class instantiate the required objects is easy, but this approach makes the code inflexible and more difficult to test as the class and the required object are tightly coupled.
The calling class needs to call the object’s constructor, which is an implementation detail. If the constructor changes, the calling code needs to change, too.
To make the code more flexible and adaptable, a class must not instantiate the objects it depends on. The objects it depends on must be instantiated outside the class and then passed in. This approach creates more flexible code, as the class is no longer hardcoded to one particular object. The implementation of the required object can change without needing to modify the calling code.
Continuing with the preceding example, if an
ElectricEngineis needed, it can be created and passed into theCarclass. TheCarclass does not need to be modified in any way.interface Engine { fun start() } class ElectricEngine : Engine { override fun start() { println("ElectricEngine started!") } } class Car(private val engine: Engine) { fun start() { engine.start() } } fun main() { val engine = ElectricEngine() val car = Car(engine) car.start() }
Passing in the required objects is called dependency injection (DI). It is also known as inversion of control.
DI is when a dependency is provided at runtime instead of being hardcoded into the calling class.
Implementing dependency injection:
Helps with the reusability of code. Code is not dependent on a specific object, which allows for greater flexibility.
Makes refactoring easier. Code is loosely coupled, so refactoring one section of code does not impact another section of code.
Helps with testing. Test objects can be passed in during testing.
One example of how DI can help with testing is when testing the network calling code. For this test, you are really trying to test that the network call is made and that data is returned. If you had to pay for mobile data each time you made a network request during a test, you might decide to skip testing this code, as it can get expensive. Now, imagine if we can fake the network request for testing. How much happier (and wealthier) does that make you? For testing, you can pass a test object to the repository that returns fake data when called without actually performing a real network call.
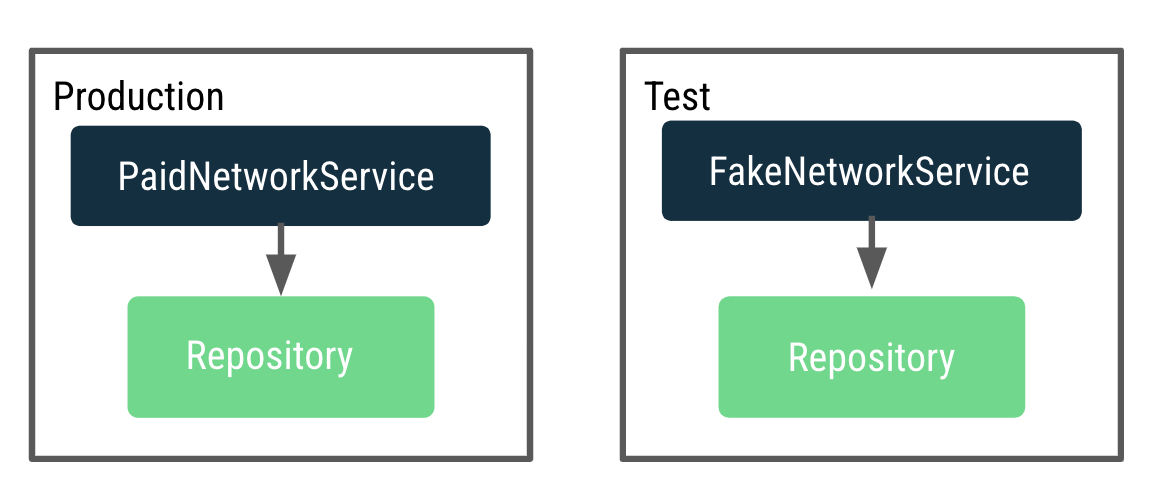
We want to make the
ViewModeltestable, but it currently depends on a repository that makes actual network calls. When testing with the real production repository, it makes many network calls. To fix this issue, instead of theViewModelcreating the repository, we need a way to decide and pass a repository instance to use for production and test dynamically.This process is done by implementing an application container that provides the repository to
MarsViewModel.A container is an object that contains the dependencies that the app requires. These dependencies are used across the whole application, so they need to be in a common place that all activities can use. You can create a subclass of the Application class and store a reference to the container.
Create an Application Container
Right-click on the
datapackage and select New > Kotlin Class/File.In the dialog, select Interface, and enter
AppContaineras the name of the interface.Inside the
AppContainerinterface, add an abstract property calledmarsPhotosRepositoryof typeMarsPhotosRepository.
Below the interface definition, create a class called
DefaultAppContainerthat implements the interfaceAppContainer.From
network/MarsApiService.kt, move the code for variablesBASE_URL,retrofit, andretrofitServiceinto theDefaultAppContainerclass so that they are all located within the container that maintains the dependencies.import retrofit2.Retrofit import com.example.marsphotos.network.MarsApiService import com.jakewharton.retrofit2.converter.kotlinx.serialization.asConverterFactory import kotlinx.serialization.json.Json import okhttp3.MediaType.Companion.toMediaType class DefaultAppContainer : AppContainer { private const val BASE_URL = "https://android-kotlin-fun-mars-server.appspot.com" private val retrofit: Retrofit = Retrofit.Builder() .addConverterFactory(Json.asConverterFactory("application/json".toMediaType())) .baseUrl(BASE_URL) .build() private val retrofitService: MarsApiService by lazy { retrofit.create(MarsApiService::class.java) } }
For variable
BASE_URL, remove theconstkeyword. Removingconstis necessary becauseBASE_URLis no longer a top level variable and is now a property of theDefaultAppContainerclass. Refactor it to camelcasebaseUrl.For variable
retrofitService, add aprivatevisibility modifier. Theprivatemodifier is added because variableretrofitServiceis only used inside the class by propertymarsPhotosRepository, so it does not need to be accessible outside the class.The
DefaultAppContainerclass implements the interfaceAppContainer, so we need to override themarsPhotosRepositoryproperty. After the variableretrofitService, add the following code:override val marsPhotosRepository: MarsPhotosRepository by lazy { NetworkMarsPhotosRepository(retrofitService) }
The completed DefaultAppContainer class should look like this:
class DefaultAppContainer : AppContainer {

    private val baseUrl =
        "https://android-kotlin-fun-mars-server.appspot.com"

    /**
    * Use the Retrofit builder to build a retrofit object using a kotlinx.serialization converter
    */
    private val retrofit = Retrofit.Builder()
        .addConverterFactory(Json.asConverterFactory("application/json".toMediaType()))
        .baseUrl(baseUrl)
        .build()

    private val retrofitService: MarsApiService by lazy {
        retrofit.create(MarsApiService::class.java)
    }

    override val marsPhotosRepository: MarsPhotosRepository by lazy {
        NetworkMarsPhotosRepository(retrofitService)
    }
}
Open the
data/MarsPhotosRepository.ktfile. We are now passingretrofitServicetoNetworkMarsPhotosRepository, and you need to modify theNetworkMarsPhotosRepositoryclass.In the
NetworkMarsPhotosRepositoryclass declaration, add the constructor parametermarsApiServiceas shown in the following code.import com.example.marsphotos.network.MarsApiService class NetworkMarsPhotosRepository( private val marsApiService: MarsApiService ) : MarsPhotosRepository {
In the
NetworkMarsPhotosRepositoryclass, change thegetMarsPhotos()function:override suspend fun getMarsPhotos(): List<MarsPhoto> = marsApiService.getPhotos()
Remove the following import from the
MarsPhotosRepository.ktfile.// Remove import com.example.marsphotos.network.MarsApi
From the
network/MarsApiService.ktfile, we moved all the code out of the object. We can now delete the remaining object declaration as it is no longer needed. Delete the following code:object MarsApi { }
Attach application container to the app
The steps in this section connect the application object to the application container as shown in the following figure.
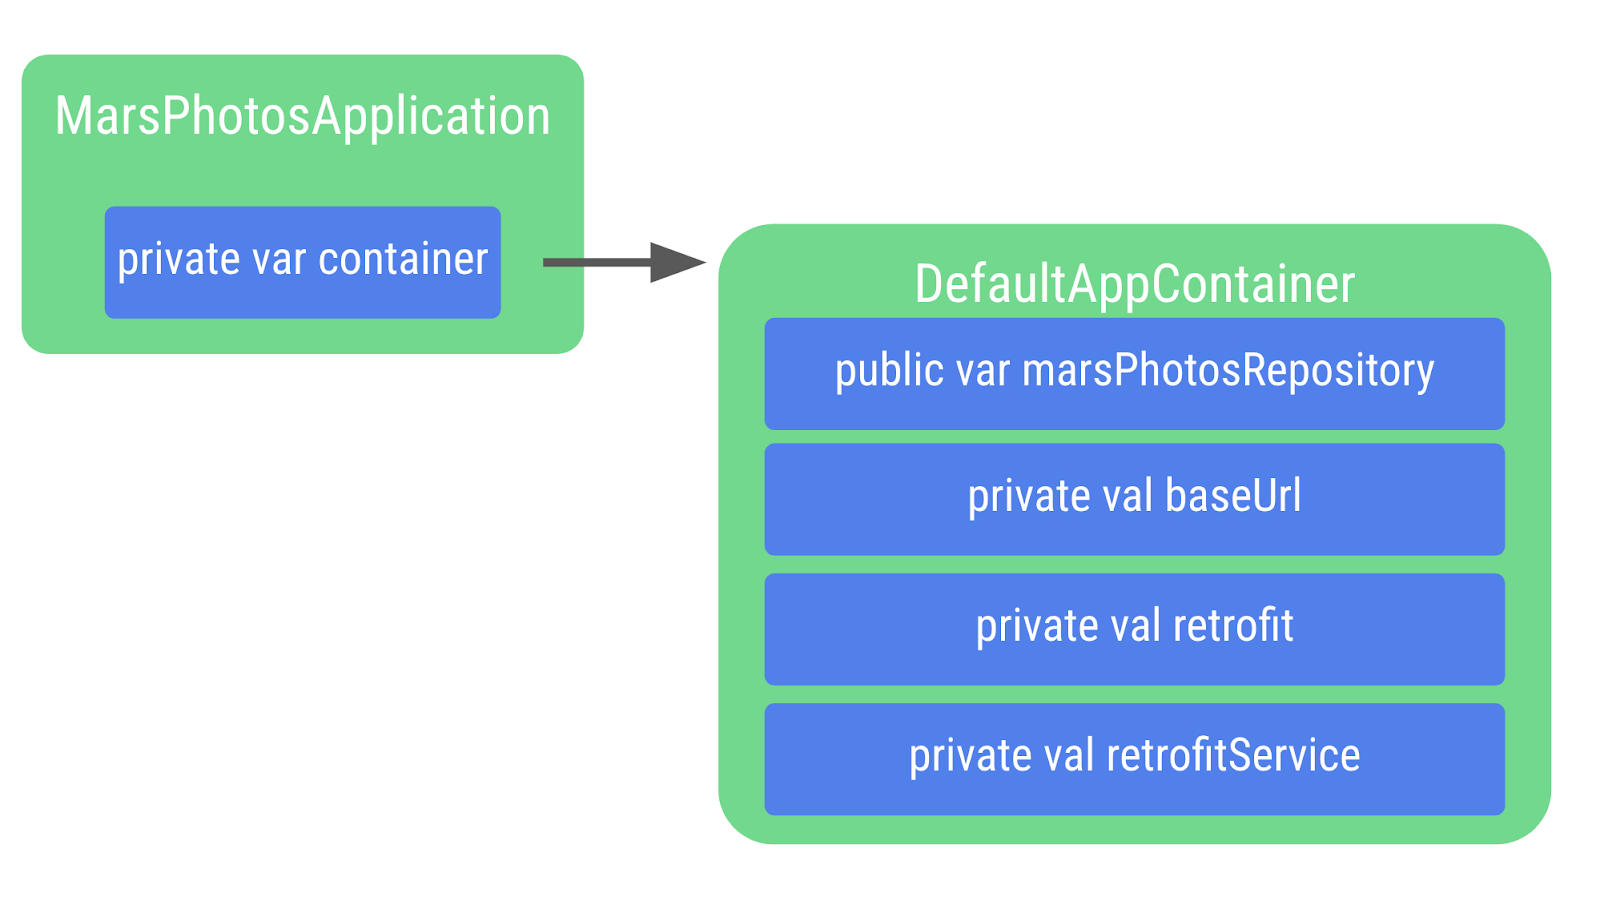
Right-click on com.example.marsphotos and select New > Kotlin Class/File.
In the dialog, enter
MarsPhotosApplication. This class inherits from the application object, so you need to add it to the class declaration.import android.app.Application class MarsPhotosApplication : Application() { }
Inside the
MarsPhotosApplicationclass, declare a variable calledcontainerof the typeAppContainerto store theDefaultAppContainerobject. The variable is initialized during the call toonCreate(), so the variable needs to be marked with thelateinitmodifier.import com.example.marsphotos.data.AppContainer import com.example.marsphotos.data.DefaultAppContainer lateinit var container: AppContainer override fun onCreate() { super.onCreate() container = DefaultAppContainer() }
The complete
MarsPhotosApplication.ktfile should look like the following code:package com.example.marsphotos import android.app.Application import com.example.marsphotos.data.AppContainer import com.example.marsphotos.data.DefaultAppContainer class MarsPhotosApplication : Application() { lateinit var container: AppContainer override fun onCreate() { super.onCreate() container = DefaultAppContainer() } }
You need to update the Android manifest so the app uses the application class you just defined. Open the
manifests/AndroidManifest.xmlfile.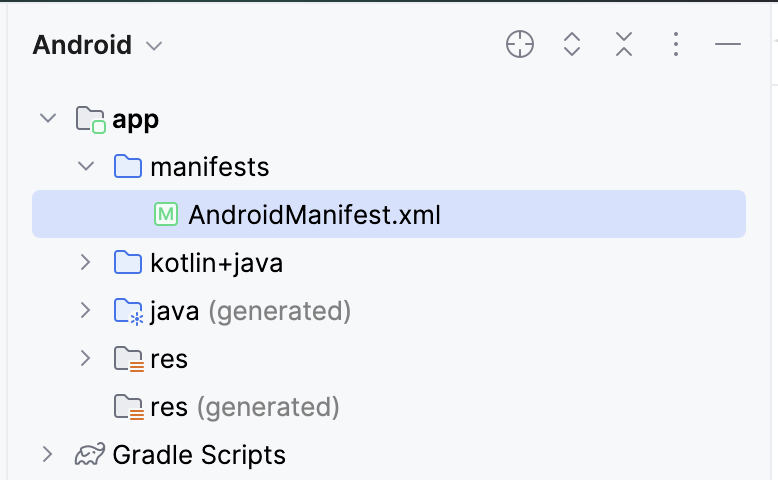
In the
applicationsection, add theandroid:nameattribute with a value of application class name".MarsPhotosApplication".<application android:name=".MarsPhotosApplication" android:allowBackup="true" ... </application>
Add repository to ViewModel
Once you complete these steps, the
ViewModelcan call the repository object to retrieve Mars data.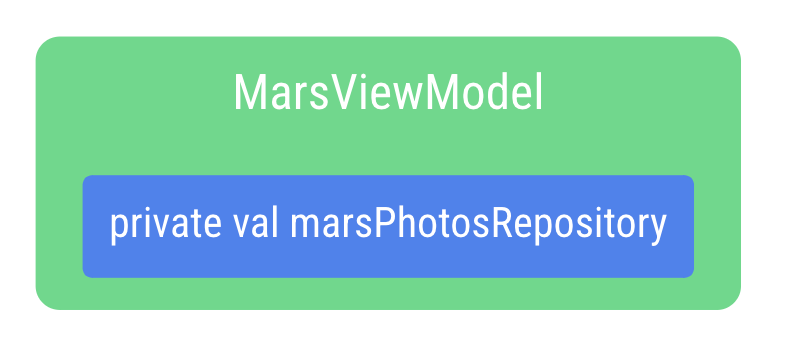
Open the
ui/screens/MarsViewModel.ktfile.In the class declaration for
MarsViewModel, add a private constructor parametermarsPhotosRepositoryof type MarsPhotosRepository. The value for the constructor parameter comes from the application container because the app is now using dependency injection.import com.example.marsphotos.data.MarsPhotosRepository class MarsViewModel(private val marsPhotosRepository: MarsPhotosRepository) : ViewModel(){
In the
getMarsPhotos()function, remove the following line of code asmarsPhotosRepositoryis now being populated in the constructor call.val marsPhotosRepository = NetworkMarsPhotosRepository()
Because the Android framework does not allow a
ViewModelto be passed values in the constructor when created, we implement aViewModelProvider.Factoryobject, which lets us get around this limitation.The Factory pattern is a creational pattern used to create objects. The
MarsViewModel.Factoryobject uses the application container to retrieve themarsPhotosRepository, and then passes this repository to theViewModelwhen theViewModelobject is created.Below the function
getMarsPhotos(), type the code for the companion object.A companion object helps us by having a single instance of an object that is used by everyone without needing to create a new instance of an expensive object. This is an implementation detail, and separating it lets us make changes without impacting other parts of the app’s code.
The
APPLICATION_KEYis part of theViewModelProvider.AndroidViewModelFactory.Companionobject and is used to find the app’sMarsPhotosApplicationobject, which has thecontainerproperty used to retrieve the repository used for dependency injection.import androidx.lifecycle.ViewModelProvider import androidx.lifecycle.ViewModelProvider.AndroidViewModelFactory.Companion.APPLICATION_KEY import androidx.lifecycle.viewModelScope import androidx.lifecycle.viewmodel.initializer import androidx.lifecycle.viewmodel.viewModelFactory import com.example.marsphotos.MarsPhotosApplication companion object { val Factory: ViewModelProvider.Factory = viewModelFactory { initializer { val application = (this[APPLICATION_KEY] as MarsPhotosApplication) val marsPhotosRepository = application.container.marsPhotosRepository MarsViewModel(marsPhotosRepository = marsPhotosRepository) } } }
Open the
theme/MarsPhotosApp.ktfile, inside theMarsPhotosApp()function, update theviewModel()to use the factory.Surface( // ... ) { val marsViewModel: MarsViewModel = viewModel(factory = MarsViewModel.Factory) // ... }
This
marsViewModelvariable is populated by the call to theviewModel()function that is passed theMarsViewModel.Factoryfrom the companion object as an argument to create theViewModel.Run the app to confirm it is still behaving as it was previously.
Congratulations on refactoring the Mars Photos app to use a repository and dependency injection! By implementing a data layer with a repository, the UI and data source code have been separated to follow Android best practices.
Solution code: Mars Photos app, with data layer
Branch: coil-starter
Clone:
$ git clone https://github.com/google-developer-training/basic-android-kotlin-compose-training-mars-photos.git
$ cd basic-android-kotlin-compose-training-mars-photos
$ git checkout coil-starter
Load and display images from the internet
So far, we’ve learnt how to get data from a web service using a repository pattern and parse the response into a Kotlin object. Now, we’ll build on that knowledge to load and display photos from a web URL. We’ll also revisit how to build a
LazyVerticalGridand use it to display a grid of images on the overview page.
App overview
We’ll continue working with the Mars Photos app from a previous codelab. The Mars Photos app connects to a web service to retrieve and display the number of Kotlin objects retrieved. These Kotlin objects contain the URLs of real-life photos from the Mars surface captured from NASA’s Mars Rovers.

In this codelab, the app will display Mars photos in a grid of images. The images are retrieved from the web service. The Coil library loads and displays the images. A
LazyVerticalGridcreates the grid layout for the images. The app also handles network errors gracefully by displaying an error message.
Solution code: Mars Photos app, with Coil
Branch: main
Clone:
$ git clone https://github.com/google-developer-training/basic-android-kotlin-compose-training-mars-photos.git
Display a downloaded image
Displaying a photo from a web URL might sound straightforward, but there is quite a bit of engineering to make it work well. The image has to be downloaded, cached, and decoded from its compressed format to an image that Android can use. You can cache the image to an in-memory cache, a storage-based cache, or both. All this has to happen in low-priority background threads, so the UI remains responsive. Also, for the best network and CPU performance, it’s best to fetch and decode more than one image at once.
A community-developed library called Coil simplifies this process. Without the use of Coil, much more work has to be done.
Coil needs two things:
The URL of the image you want to load and display.
An
AsyncImagecomposable to actually display that image.
Displaying a single image from the Mars web service looks like this:
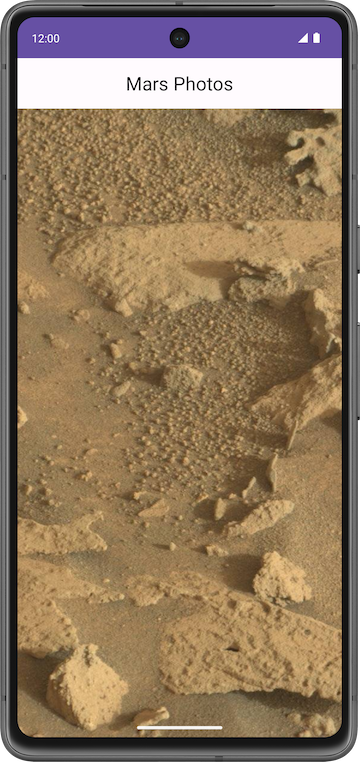
Coil dependency
In
build.gradle.kts (Module :app), in thedependenciessection, this line is added for Coil:// Coil implementation("io.coil-kt:coil-compose:2.4.0")
The AsyncImage composable
The
AsyncImagecomposable loads and displays a single photo.AsyncImageis a composable that executes an image request asynchronously, and renders the result. Example:AsyncImage( model = "https://android.com/sample_image.jpg", contentDescription = null )
The
modelargument is either anImageRequestobject, or itsImageRequest.data. In the preceding example, theImageRequest.datavalue is used, which is the image URLhttps://android.com/sample_image.jpg. The following example code shows how to assign anImageRequesttomodelAsyncImage( model = ImageRequest.Builder(LocalContext.current) .data("https://example.com/image.jpg") .crossfade(true) .build(), placeholder = painterResource(R.drawable.placeholder), contentDescription = stringResource(R.string.description), contentScale = ContentScale.Crop, modifier = Modifier.clip(CircleShape) )
AsyncImagesupports the same arguments as the standard Image composable. Additionally, it supports settingplaceholder/error/fallbackpainters andonLoading/onSuccess/onErrorcallbacks. The preceding example code loads the image with a circle crop and crossfade and sets a placeholder.contentDescriptionsets the text used by accessibility services to describe what this image represents.In
ui/screens/HomeScreen.kt, the composable function calledMarsPhotoCard()usesAsyncImage()and displays only a single image:@Composable fun MarsPhotoCard(photo: MarsPhoto, modifier: Modifier = Modifier) { Card( modifier = modifier, shape = MaterialTheme.shapes.medium, elevation = CardDefaults.cardElevation(defaultElevation = 8.dp) ) { AsyncImage( model = ImageRequest.Builder(context = LocalContext.current).data(photo.imgSrc) .crossfade(true).build(), error = painterResource(R.drawable.ic_broken_image), placeholder = painterResource(R.drawable.loading_img), contentDescription = stringResource(R.string.mars_photo), contentScale = ContentScale.Crop, // Fill the available space on screen modifier = Modifier.fillMaxWidth() ) } }
crossfade(true)enables a crossfade animation when the request completes successfully.
Loading and error images
To improve the user experience, show a placeholder image while loading the image. You can also display an error image if the loading fails due to an issue, such as a missing or corrupt image file.
Open
res/drawable/ic_broken_image.xmland click the Design or Split tab on the right. It’s a broken-image icon that’s available in the built-in icon library. This can be used for the error image. This vector drawable uses theandroid:tintattribute to color the icon gray.
Open
res/drawable/loading_img.xml. This drawable is an animation that rotates an image drawable,loading_img.xml, around the center point. (You don’t see the animation in the preview.)
Error and placeholder attributes can be added to
AsyncImageas shown:// ... AsyncImage( // ... error = painterResource(R.drawable.ic_broken_image), placeholder = painterResource(R.drawable.loading_img), // ... )
This code sets the placeholder loading image to use while loading (the
loading_imgdrawable). It also sets the image to use if image loading fails (theic_broken_imagedrawable).
Display a grid of images with a LazyVerticalGrid
MarsPhotoCarddisplays a single image. To display a grid of images, use aLazyVerticalGridwith a Grid layout manager.
Lazy grids
The LazyVerticalGrid and LazyHorizontalGrid composables provide support to display items in a grid. A lazy vertical grid displays its items in a vertically scrollable container, spanned across multiple columns, while a lazy horizontal grid has the same behavior on the horizontal axis.

From a design perspective, Grid Layout is best for displaying Mars photos as icons or images.
The
columnsparameter inLazyVerticalGridandrowsparameter inLazyHorizontalGridcontrol how cells are formed into columns or rows. The following example code displays items in a grid, usingGridCells.Adaptiveto set each column to be at least128.dpwide:// Sample code, not for the app @Composable fun PhotoGrid(photos: List<Photo>) { LazyVerticalGrid( columns = GridCells.Adaptive(minSize = 150.dp) ) { items(photos) { photo -> PhotoItem(photo) } } }
LazyVerticalGridlets you specify a width for items, and the grid then fits as many columns as possible. After calculating the number of columns, the grid distributes any remaining width equally among the columns. This adaptive way of sizing is especially useful for displaying sets of items across different screen sizes.Note
If you know the exact amount of columns to be used, you can instead provide an instance of
GridCells.Fixedcontaining the number of required columns.In this codelab, to display Mars photos, you use the
LazyVerticalGridcomposable withGridCells.Adaptive, with each column set to150.dpwide.
Use LazyVerticalGrid
In
HomeScreen.ktthePhotosGridScreen()composable takes a list ofMarsPhotoand amodifieras arguments, and displays a grid.@Composable fun PhotosGridScreen( photos: List<MarsPhoto>, modifier: Modifier = Modifier, contentPadding: PaddingValues = PaddingValues(0.dp), ) { LazyVerticalGrid( columns = GridCells.Adaptive(150.dp), modifier = modifier.padding(horizontal = 4.dp), contentPadding = contentPadding, ) { items(items = photos, key = { photo -> photo.id }) { photo -> MarsPhotoCard( photo, modifier = Modifier .padding(4.dp) .fillMaxWidth() .aspectRatio(1.5f) ) } } }
Inside the
LazyVerticalGridlambda,items()takes in the list ofMarsPhotoand an item key asphoto.id.When the user scrolls through the grid (a
LazyRowwithin aLazyColumn), the list item position changes. However, due to an orientation change or if the items are added or removed, the user can lose the scroll position within the row. Item keys help you maintain the scroll position based on the key.By providing keys, you help Compose handle reorderings correctly. For example, if your item contains a remembered state, setting keys allows Compose to move this state together with the item when its position changes.
In-lesson Practice: Amphibians app
So far, you’ve learnt how to take your app to the next level by retrieving data from the internet. Your app can now show the latest data available from the server and is not restricted to what was statically available when you opened the app. This is very important functionality in most of the real world applications.
In this practice set, you will build an app to display a list of amphibians, along with their details and image. The data is retrieved from the internet by making a network request and contains each amphibian’s name, type, description, and image URL.
The amphibian JSON data is hosted at https://android-kotlin-fun-mars-server.appspot.com/amphibians.
The provided solution code displays the following UI design:
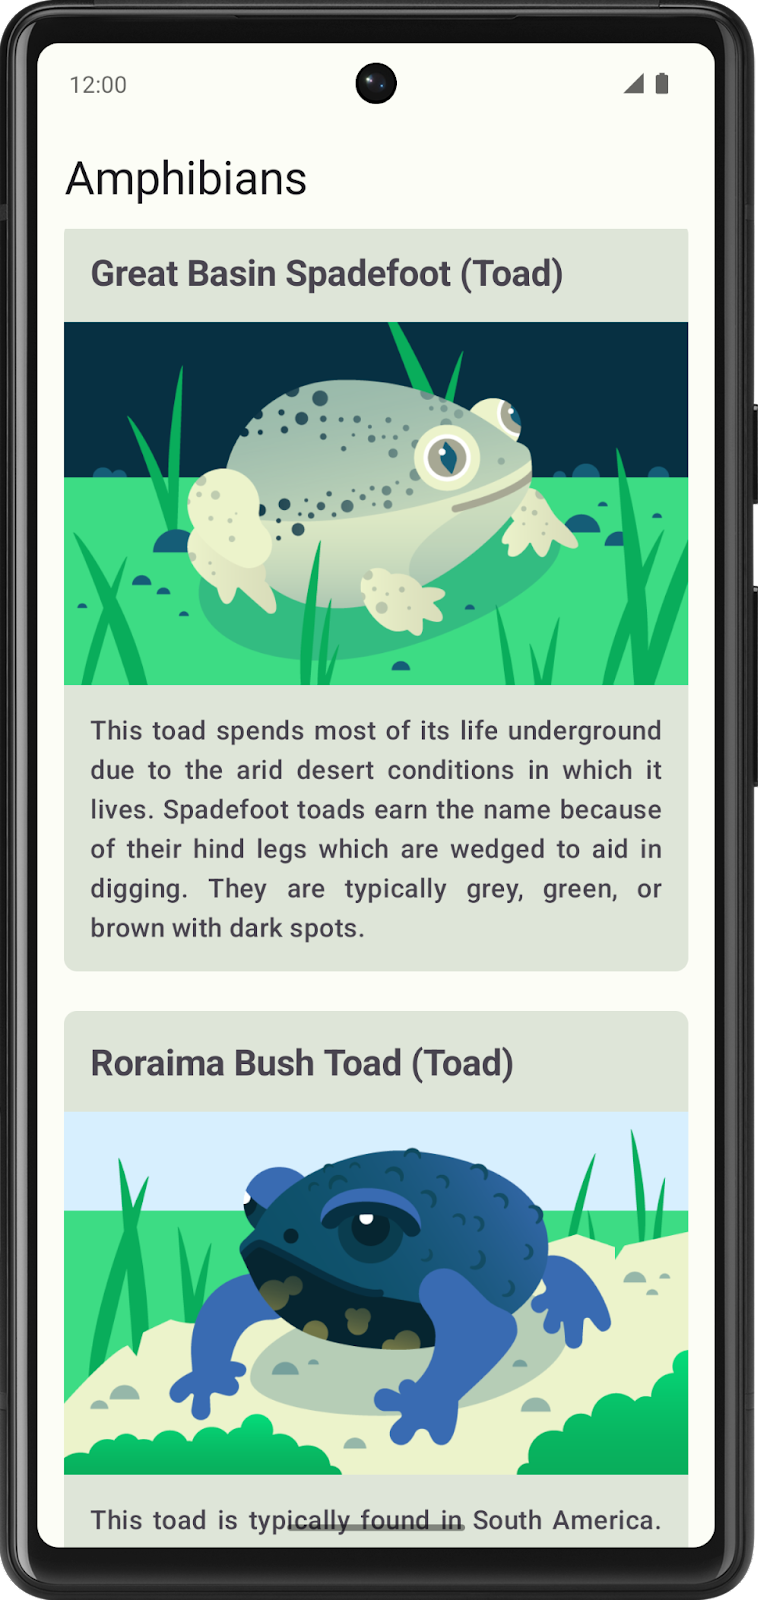
Plan the app
Before you begin coding, take some time to understand the Mars Photo App, then sketch out the different elements for your app and how they connect together.
Doing this preparation work helps identify what you need to do, might indicate where you can run into problems, and helps you think about ways to resolve issues.
Solution code: Amphibians app
Branch: main
Clone:
$ git clone https://github.com/google-developer-training/basic-android-kotlin-compose-training-amphibians.git
$ cd basic-android-kotlin-compose-training-amphibians
$ git checkout main
Start with the solution code
Instead of starting from scratch, do this.
Checkout the solution code.
Open the project in Android Studio and run it to see how it works.
Remove the code from these files below, but keep all
packageandimportstatements.data/AmphibiansRepository.kt
data/AppContainer.kt
network/Amphibians/ApiService.kt
AmphibiansApplication.kt
Fill in the code for these files. Refer to the Mars Photos app if necessary.
If this is too difficult, at least read the solution code and understand how it works.
The guidelines to build this app are covered next.
Set up dependencies
The app uses Retrofit for network requests, Coil for image loading, and the kotlinx.serialization library for parsing the JSON returned by the Amphibians API.
Add their dependencies to
app/build.gradle.kts.
Create UI layer
It is recommended that you follow Android app architecture best practices and create a UI layer for this app.
This layer contains the
ViewModeland composable functions that display theUiStatecoming from theViewModelon the screen. TheViewModelis in charge of exposing the screen UI state, and handling the business logic in the UI layer and calling the business logic from other layers of the hierarchy.The UI layer also contains the visual elements that your users see and interact with. This layer is where you decide how the various elements go together to create the UI you envision. You are deciding on the colors, fonts, and how you display images.
Create a data layer
The data layer is responsible for retrieving the amphibian data from the API.
You probably want to include a data class for the amphibian data, a repository to manage the data, and a data source class to retrieve the data from the network.
If you need some help making the network calls, you can refer to Web services and Retrofit from the Get data from the internet codelab.
For help parsing the network response, refer to Parse the JSON response with kotlinx.serialization.
For loading images with Coil, you can check out the official documentation or refer back to the Display a downloaded image section of the Load and display images from the Internet codelab.
Implement Dependency Injection
You should use Dependency Injection (DI) to keep your app flexible, robust, and ready to scale.
DI keeps app components loosely coupled and easier to test.
When implementing DI, you need to create an application container, which is used to get the dependencies that your app needs.
The application container needs to be accessible to the whole application. You can achieve this by holding the dependencies container in a custom
Applicationclass. This class then inherits from theApplicationclass.
Project: Create a Bookshelf app
To practice the concepts you learned in this unit, you’re going to build an app on your own that displays a list of books with images from the Google Books API.
The app is expected to do the following:
Make a request to the Google Books API using Retrofit.
Parse the response.
Display asynchronously downloaded images of the books along with their titles in a vertical grid.
Implement best practices, separating the UI and data layer, by using a repository.
Write tests for code that requires the network service, using dependency injection.
The goal of this project is twofold. First, you get to put all the concepts you’ve learned in this unit into practice. You also get to work with a brand new REST API, read documentation, and apply the skills you’ve learned into a new app, just like you’d do as a professional Android developer.
The following screenshot shows an example of the finished Bookshelf app. The exact layout and books displayed by the app is up to you. You learn more about how to retrieve the book data in the following sections.

Plan your UI
You can design your app’s UI however you want. You need to consider how your app’s layout adapts to different device form factors.
Because you’re using a scrolling grid of images, you need to load multiple images simultaneously onscreen. After you’ve obtained the URL of the image, you can use the
AsyncImagecomposable provided by the Coil library to download the data in the background. Where possible, be sure to indicate to users when your app is using the network.
Plan the network layer
Previously, you learned how to get data from the network and parse JSON responses. For the Bookshelf app, the data layer needs to do the following three things:
Create a Retrofit service to get data from the Google Books API.
Add methods for the service to get a list of books and get information about a specific book.
Extract meaningful data from the JSON response returned by the API.
Let’s briefly go over the methods of the Google Books API that you need for this project.
Search for books
The Google Books API provides a method that returns a list of books based on a particular search term, as described in Using the API <https://developers.google.com/books/docs/v1/using#PerformingSearch>.
For example, this URL returns search results for the term “jazz history”.
https://www.googleapis.com/books/v1/volumes?q=jazz+history
There are several query parameters to filter your search. For the Bookshelf app, the
qparameter (short for query) is sufficient.The documentation also shows the expected JSON response. For the Bookshelf app, you need to extract the book’s
id.
Request info for a specific book
You need to make a request to get info on a specific book. This endpoint takes the id you extracted from the previous response.
https://www.googleapis.com/books/v1/volumes/<volume_id>
You can find thumbnail links in the
imageLinksobject in thevolumeInfoobject. For this app, the images you want to download are under thethumbnailkey.... "imageLinks": { "smallThumbnail": "http://books.google.com/books/publisher/content?id=EPUTEAAAQBAJ&printsec=frontcover&img=1&zoom=5&edge=curl&imgtk=AFLRE734s3CngIs16gM_Ht6GeGF4ew664I7oOGghmfk4pgfFcDYb4GlYCYdjtqqXluL2KUyfq_Ni5MSyv4JxEJ8W679zQ2Ib3okUKau3I1ruqBGrWOt2_haUauWC8sXEgjN7JHm4uOjS&source=gbs_api", "thumbnail": "http://books.google.com/books/publisher/content?id=EPUTEAAAQBAJ&printsec=frontcover&img=1&zoom=1&edge=curl&imgtk=AFLRE71N0ldzv6rliUV_K5ZACa9yPNcT8Ino6YKXJUMje_z4GsC9cp6gFql5TxlmqMoYN3CDhM3XAIO2riFeMXUnFVr5pTLq91htTtG1DDyvOdiR4yI6xu3yEEAn0dRbvNFZ5m7dUC9E&source=gbs_api", "small": "http://books.google.com/books/publisher/content?id=EPUTEAAAQBAJ&printsec=frontcover&img=1&zoom=2&edge=curl&imgtk=AFLRE71HmTwpoe3KR0AISYk5sDgV2Fz-F-6CDKJtFdvlXSZv3jEzFtsSXGJnEGjtCuoDMxP_6sgP8au1yadB7OmI2MhIBquel7ivcDB8e9ieLyh4HNoXnX3zmxfF_CfIfnNXDv0WHuyA&source=gbs_api", "medium": "http://books.google.com/books/publisher/content?id=EPUTEAAAQBAJ&printsec=frontcover&img=1&zoom=3&edge=curl&imgtk=AFLRE72LMPH7Q2S49aPeQ3Gm8jLEf6zH4ijuE0nvbOyXBUAgyL816pXzaw0136Pk8jXpfYYFY0IsqL7G7MMDMgKcJhnaoHojWNZpljZmGHeWLL_M7hxkOpmdmO7xza8dfVfPbFmBH4kl&source=gbs_api", "large": "http://books.google.com/books/publisher/content?id=EPUTEAAAQBAJ&printsec=frontcover&img=1&zoom=4&edge=curl&imgtk=AFLRE71w0J9EOzUzu1O5GMbwhnpI8BLWzOEtzqc9IfyxEDqimZ--H4JlNAZh_1zx8pqPNRf1qDt7FPb57lH5ip-LBlK3zjMC-MCBYcciuoPjTJOFmLv7pp5B6_-UFBap1KRfC0eG7P4d&source=gbs_api", "extraLarge": "http://books.google.com/books/publisher/content?id=EPUTEAAAQBAJ&printsec=frontcover&img=1&zoom=6&edge=curl&imgtk=AFLRE73t0gcxT-jzEETp8Yo5Osr15nVL7ntKL2WSe2S8kRSio7w0CGgErAq4WbPWIsH4TmOdP_EO6ZoPNSP-YGSOwqfPMw8_IlYE6hy9IKeAs5V_xaHy7drZleF0eizAQiEVg5ci7qby&source=gbs_api" }, ...Note
Tip: Because you need to make two sets of requests to get the image URLs, getting the list of book images is more involved than what you did in the Mars photos app.
The following approach might help you implement this app:
Perform the first request to search for books.
Perform the requests to get individual book data one after another in the same coroutine. This way, each request is performed one after the other until the coroutine finishes. After all the requests have finished, store each thumbnail in a
MutableList.Load each of the thumbnails in the
AsyncImagecomposables.
Download book thumbnails
After you have the thumbnail URL, it can be provided to the
AsyncImagecomposable in each grid item.Warning
Warning: You need to replace
httpwithhttpsin the URLs for the images to show. You can do this using theString.replace()method.
Build the Bookshelf app
Now that you have an overview of the Google Books API, it’s time to build the Bookshelf API. Even though you’re using a different web service, you’ve already learned all the concepts needed to complete this project. You can always refer to previous codelabs and sample apps from this unit if you need a refresher. The codelabs in this unit might be useful to you as you work on your project.
Week 9 Blended Learning Questions
What criteria would you use to determine whether to use launch or async in a coroutine-based application?
#solulu
Return Value Requirement:
Use
launchif the coroutine does not need to return a result.Use
asyncif the coroutine needs to return a value. It returns aDeferred<T>.
Exception Handling
launchimmediately propagates exceptions to the parent scope, and they can be handled withtry-catchinside the coroutine.asyncdelays exception propagation untilawait()is called, meaning unhandled exceptions may go unnoticed if not awaited.
Concurrency Control
launchis used for fire-and-forget tasks that run in the background without waiting for results.asyncis used when parallel decomposition is needed, where multiple results are computed independently and then combined.
Performance Considerations
launchis lightweight and does not require additional memory for storing results.asyncstores results in Deferred, so it has some overhead if not necessary.
Choose an app on your phone. Think about the tasks that this app performs, e.g. displaying a picture, sending a message, drawing a button. For each of the dispatchers below, describe 1-3 specific tasks that are suitable for that dispatcher.
Dispatcher.DefaultDispatcher.IODispatcher.Main
What are the strengths and weaknesses of using Dependency Injection?