Week 5: Display Lists
More Kotlin Fundamentals
Generics, Objects, Extensions
Make a reusable class with generics
Let’s say you’re writing an app for an online quiz. There are various types of quiz questions, such as fill-in-the-blank, or true/false. An individual quiz question can be represented by a class, with several properties.
The question text in a quiz can be represented by a string. Quiz questions also need to represent the answer. However, different question types — such as true/false — may need to represent the answer using a different data type. Let’s define three different types of questions.
Fill-in-the-blank: The answer is a word represented by a
String.True/false: The answer is represented by a
Boolean.Math problems: The answer is a numeric value, represented by an
Int.
In addition, quiz questions also have a difficulty rating. The difficulty rating is represented by a string with three possible values:
"easy","medium", or"hard".Let’s define classes to represent each type of quiz question.
You can use the Kotlin playground to run this code.
Above
main(), define a class for fill-in-the-blank questions:class FillInTheBlankQuestion( val questionText: String, val answer: String, val difficulty: String )
Define another class for true/false questions:
class TrueOrFalseQuestion( val questionText: String, val answer: Boolean, val difficulty: String )
Finally, define a class for numeric questions:
class NumericQuestion( val questionText: String, val answer: Int, val difficulty: String )
Do you notice the repetition?
class FillInTheBlankQuestion( val questionText: String, val answer: String, val difficulty: String ) class TrueOrFalseQuestion( val questionText: String, val answer: Boolean, val difficulty: String ) class NumericQuestion( val questionText: String, val answer: Int, val difficulty: String )
All three classes have the exact same properties. The only difference is the data type of the
answerproperty.The obvious solution might be to create a parent class with the
questionTextanddifficulty, and make each subclass define theanswerproperty. However, using inheritance has the same problem as above. Every time a new type of question is added, theanswerproperty also needs to be added with a different data type. It also looks strange to have a parent classQuestionthat doesn’t have ananswerproperty.When you want a property to have differing data types, subclassing is not the answer. Instead, use generic types to have a single property that can have differing data types, depending on the specific use case.
What is a generic data type?
Generic types, or generics for short, allow a data type, such as a class, to specify an unknown placeholder data type that can be used with its properties and methods. What exactly does this mean?
In the above example, instead of defining an answer property for each possible data type, you can create a single class to represent any question, and use a placeholder name for the data type of the
answerproperty. The actual data type —String,Int,Boolean, wtv — is specified when that class is instantiated. Wherever the placeholder name is used, the data type passed into the class is used instead.Syntax for defining a generic type for a class:
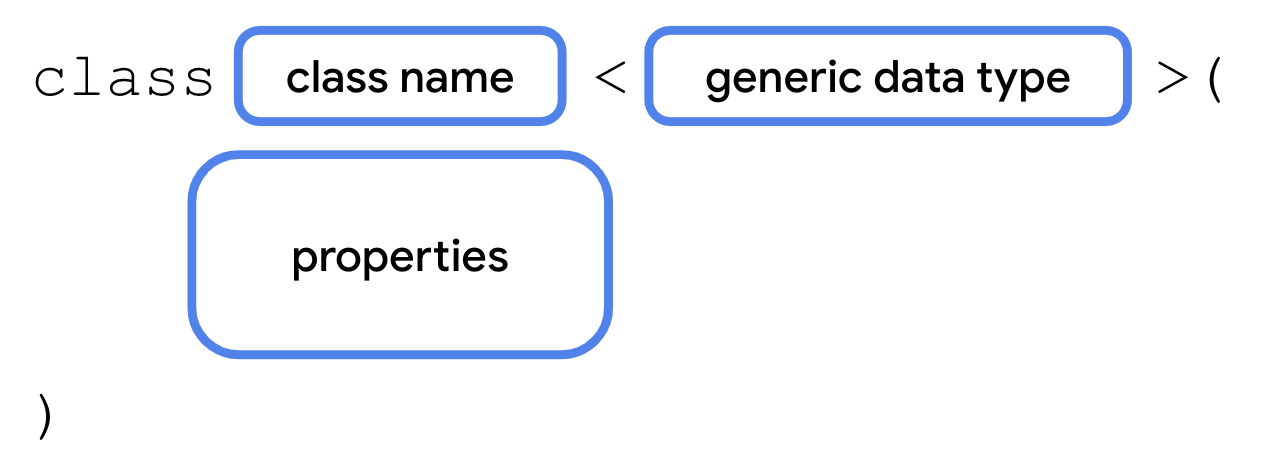
You’ll often see a generic type named
T(short for type), or other capital letters if the class has multiple generic types. However, there is definitely not a rule and you’re welcome to use a more descriptive name for generic types.The placeholder name can then be used wherever you use a real data type within the class, such as for a property.
How would your class ultimately know which data type to use? The data type is passed as a parameter in angle brackets when you instantiate the class.

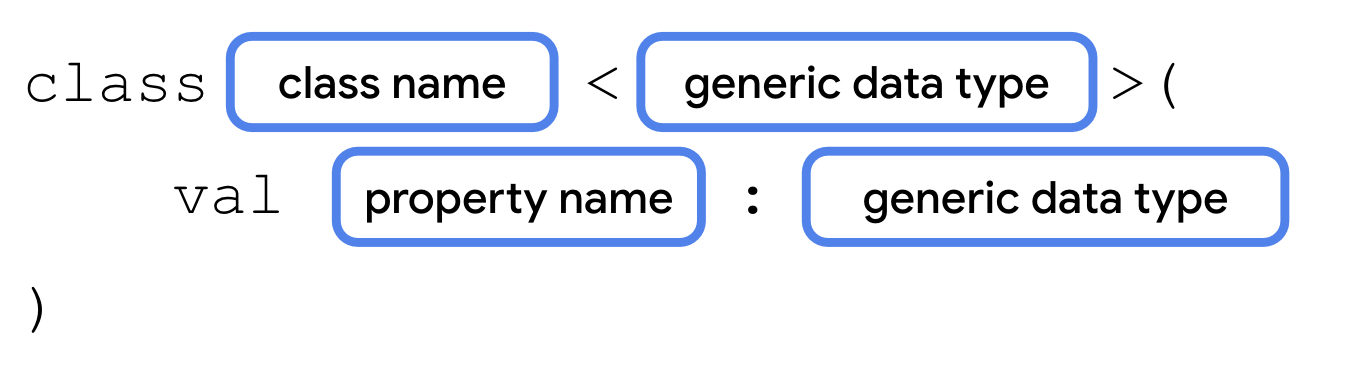
After the class name comes a
<, followed by the actual data type:String,Boolean,Int, etc, followed by a>. The data type of the value that you pass in for the generic property must match the data type in the angle brackets. You’ll make the answer property generic so that you can use one class to represent any type of quiz question, whether the answer is aString,Boolean,Int, or any arbitrary data type.
Refactor your code to use generics
Let’s refactor the code to use a single class named
Questionwith a generic answer property.Remove the class definitions for
FillInTheBlankQuestion,TrueOrFalseQuestion, andNumericQuestion.Create a new class named Question, with a generic type parameter
T:class Question<T>( val questionText: String, val answer: T, val difficulty: String )
To see how this works, create three instances of the Question class in
main().fun main() { val question1 = Question<String>("Quoth the raven ___", "nevermore", "medium") val question2 = Question<Boolean>("The sky is green. True or false", false, "easy") val question3 = Question<Int>("How many days are there between full moons?", 28, "hard") }
Run your code to make sure everything works. You should now have three instances of the
Questionclass — each with different data types foranswer. If you want to handle questions with a different answer type, you can reuse the same Question class.
Use an enum class
The
difficultyproperty has three possible values: “easy”, “medium”, and “hard”. There are a couple of problems.Accidentally mistyping one of the three possible strings could introduce bugs.
If the values change, for example,
"medium"is renamed to"average", then you need to update all usages of the string.Someone might accidentally using a different string that isn’t one of the three valid values.
The code is harder to maintain when more difficulty levels are added.
Kotlin helps you address these problems with a special type of class called an enum class. An enum class is used to create types with a limited set of possible values. In the real world, for example, the four cardinal directions — north, south, east, and west — could be represented by an enum class. The code shouldn’t allow any additional directions.
Syntax for an enum class:
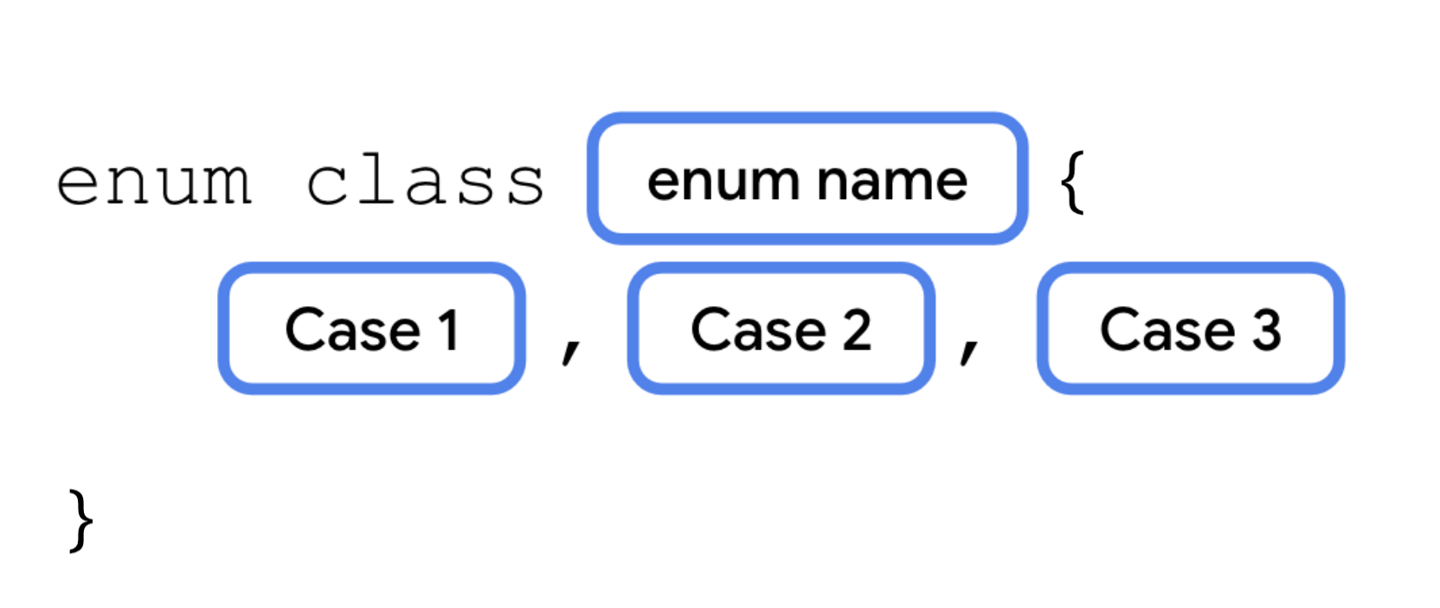
Each possible value of an enum is called an enum constant. Enum constants are placed inside the curly braces separated by commas. The convention is to capitalize every letter in the constant name.
Refer to enum constants using the
.operator.
Modify your code to use an enum constant, instead of a
String, to represent the difficulty.Below the
Questionclass, define an enum class called Difficulty.enum class Difficulty { EASY, MEDIUM, HARD }
In the
Questionclass, change the data type ofdifficultyfromStringtoDifficulty.class Question<T>( val questionText: String, val answer: T, val difficulty: Difficulty )
When initializing the three questions, pass in the enum constant for the difficulty.
val question1 = Question<String>("Quoth the raven ___", "nevermore", Difficulty.MEDIUM) val question2 = Question<Boolean>("The sky is green. True or false", false, Difficulty.EASY) val question3 = Question<Int>("How many days are there between full moons?", 28, Difficulty.HARD)
Use a data class
Many of the classes you’ve worked with so far, such as subclasses of
Activity, have several methods to perform different actions. These classes don’t just represent data, but also contain a lot of functionality.Classes like the
Questionclass, on the other hand, only contain data. They don’t have any methods that perform an action. These can be defined as a data class.Defining a class as a data class allows the Kotlin compiler to make certain assumptions, and to automatically implement some methods. For example,
toString()is called behind the scenes by theprintln()function. When you use a data class,toString()and other methods are implemented automatically based on the class’s properties.Define a data class using
data class
A data class needs to have at least one parameter in its constructor, and all constructor parameters must be marked with
valorvar. A data class also cannot beabstract,open,sealed, orinner.First, you’ll see what happens when you try to call a method like
toString()on a class that isn’t a data class. Then, you’ll convertQuestioninto a data class, so that this and other methods will be implemented by default.In
main():fun main() { val question1 = Question<String>("Quoth the raven ___", "nevermore", Difficulty.MEDIUM) val question2 = Question<Boolean>("The sky is green. True or false", false, Difficulty.EASY) val question3 = Question<Int>("How many days are there between full moons?", 28, Difficulty.HARD) println(question1.toString()) }
Run the code. The output only shows the class name and a unique identifier for the object.
Question@37f8bb67
Make Question into a data class using the data keyword.
data class Question<T>( val questionText: String, val answer: T, val difficulty: Difficulty )
Run your code again. By marking this as a data class, Kotlin is able to determine how to display the class’s properties when calling
toString().Question(questionText=Quoth the raven ___, answer=nevermore, difficulty=MEDIUM)
When a class is defined as a data class, the following methods are implemented.
equals()hashCode()(for working with certain collection types)toString()componentN():component1(),component2(), etc.copy()
Use a singleton object
There are many scenarios where you want a class to only have one instance. For example:
Player stats in a mobile game for the current user.
Interacting with a single hardware device, like sending audio through a speaker.
An object to access a remote data source (such as a Firebase database).
Authentication, where only one user should be logged in at a time.
In the above scenarios, you’d probably need to use a class. However, you’ll only ever need to instantiate one instance of that class. If there’s only one hardware device, or only one user logged in at once, there would be no reason to create more than a single instance. Having two objects that access the same hardware device simultaneously could lead to some really strange and buggy behavior.
You can clearly communicate in your code that an object should have only one instance by defining it as a singleton. A singleton is a class that can only have a single instance. Kotlin provides a special construct, called an object, that can be used to make a singleton class.
Define a singleton object
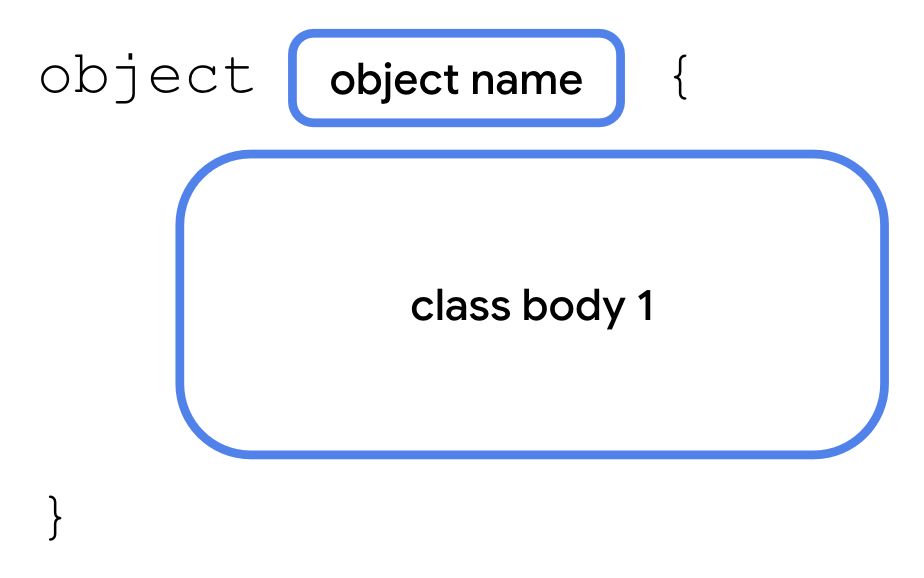
The syntax for an object is similar to that of a class. Simply use the
objectkeyword instead of theclasskeyword. A singleton object can’t have a constructor as you can’t create instances directly. Instead, all the properties are defined within the curly braces and are given an initial value.Some of the examples given earlier might not seem obvious, especially if you haven’t worked with specific hardware devices or dealt with authentication yet in your apps. However, you’ll see singleton objects come up as you continue learning Android development. Let’s see it in action with a simple example using an object for user state, in which only one instance is needed.
For a quiz, it would be great to have a way to keep track of the total number of questions, and the number of questions the student answered so far. You’ll only need one instance of this class to exist, so instead of declaring it as a class, declare it as a singleton object.
For this example, we’ll assume: 10 questions in total, and 3 of them are answered.
Create an object named
StudentProgresswith two properties.object StudentProgress { var total: Int = 10 var answered: Int = 3 }
Access a singleton object
There’s only one instance of a singleton in existence at any one time. Access its properties like this:

Update
main()to access the properties of the singleton object. Inmain(), print the number of questions answered and the total number of questions:fun main() { ... println("${StudentProgress.answered} of ${StudentProgress.total} answered.") }
Run your code to verify that everything works.
... 3 of 10 answered.
Declare objects as companion objects
A singleton object can be declared inside another class. One way of doing this is to use a companion object. A companion object allows you to access its properties and methods from inside the class, if the object’s properties and methods belong to that class
This makes the syntax more concise. Example: a singleton object’s property can be accessed using
Class.SingletonObject.property. When using a companion object, you can just useClass.property.To declare a companion object:

In
main(), removeprintln(question1.toString()).You’ll create a new class called
Quizto store the quiz questions, and makeStudentProgressa companion object of theQuizclass.Below the
Difficultyenum, define a new class namedQuiz. Movequestion1,question2, andquestion3frommain()intoQuiz.class Quiz { val question1 = Question<String>("Quoth the raven ___", "nevermore", Difficulty.MEDIUM) val question2 = Question<Boolean>("The sky is green. True or false", false, Difficulty.EASY) val question3 = Question<Int>("How many days are there between full moons?", 28, Difficulty.HARD) }
Move the
StudentProgressobject into the Quiz class.class Quiz { val question1 = Question<String>("Quoth the raven ___", "nevermore", Difficulty.MEDIUM) val question2 = Question<Boolean>("The sky is green. True or false", false, Difficulty.EASY) val question3 = Question<Int>("How many days are there between full moons?", 28, Difficulty.HARD) object StudentProgress { var total: Int = 10 var answered: Int = 3 } }
Add a
println()to reference the properties.fun main() { println("${Quiz.StudentProgress.answered} of ${Quiz.StudentProgress.total} answered.") }
Run your code to verify the output.
3 of 10 answered.
Now, add the
companionkeyword to makeStudentProgressa companion object:class Quiz { val question1 = Question<String>("Quoth the raven ___", "nevermore", Difficulty.MEDIUM) val question2 = Question<Boolean>("The sky is green. True or false", false, Difficulty.EASY) val question3 = Question<Int>("How many days are there between full moons?", 28, Difficulty.HARD) companion object StudentProgress { var total: Int = 10 var answered: Int = 3 } }
Change the
println().fun main() { println("${Quiz.answered} of ${Quiz.total} answered.") }
Run your code to verify the output.
3 of 10 answered.
Extend classes with new properties and methods
When working with Compose, you may have noticed some interesting syntax when specifying the size of UI elements. Numeric types, such as
Double, appear to have properties likedpandspspecifying dimensions.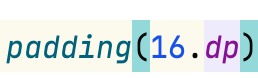
Why would the designers of the Kotlin language include properties and functions on built-in data types, specifically for building Android UI? Were they able to predict the future? Was Kotlin designed to be used with Compose even before Compose existed?
Of course not! When you’re writing a class, you often don’t know exactly how another developer will use it, or plans to use it, in their app. It’s not possible to predict all future use cases, nor is it wise to add unnecessary bloat to your code for some unforeseen use case.
What the Kotlin language does, is give other developers the ability to extend existing data types, adding properties and methods that can be accessed with dot syntax, as if they were part of that data type. A developer who didn’t work on the floating point types in Kotlin, for example, such as someone building the Compose library, might choose to add properties and methods specific to UI dimensions.
Since you’ve seen this syntax when learning Compose in the first two units, it’s about time for you to learn how this works under the hood. You’ll add some properties and methods to extend existing types.
Add an extension property
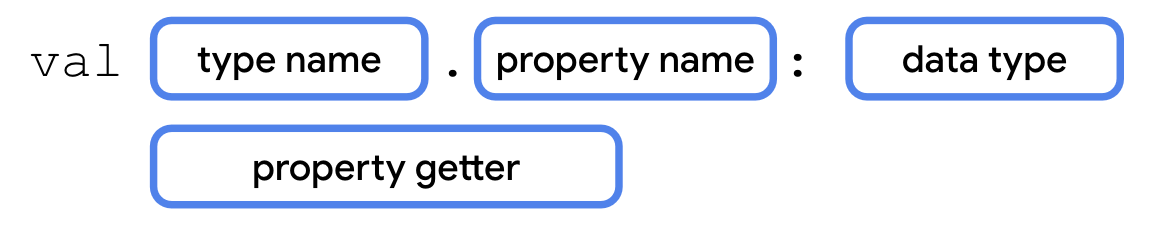
To define an extension property:
You’ll refactor the code in
main()to print the quiz progress with an extension property.Below the
Quizclass, define an extension propertyQuiz.StudentProgress.progressText, with a getter method. Extension properties can’t store data, so they must be get-only.val Quiz.StudentProgress.progressText: String get() = "${answered} of ${total} answered"
Replace the code in
main()with code that printsprogressText.fun main() { println(Quiz.progressText) }
Run your code to verify it works.
3 of 10 answered.
Add an extension function
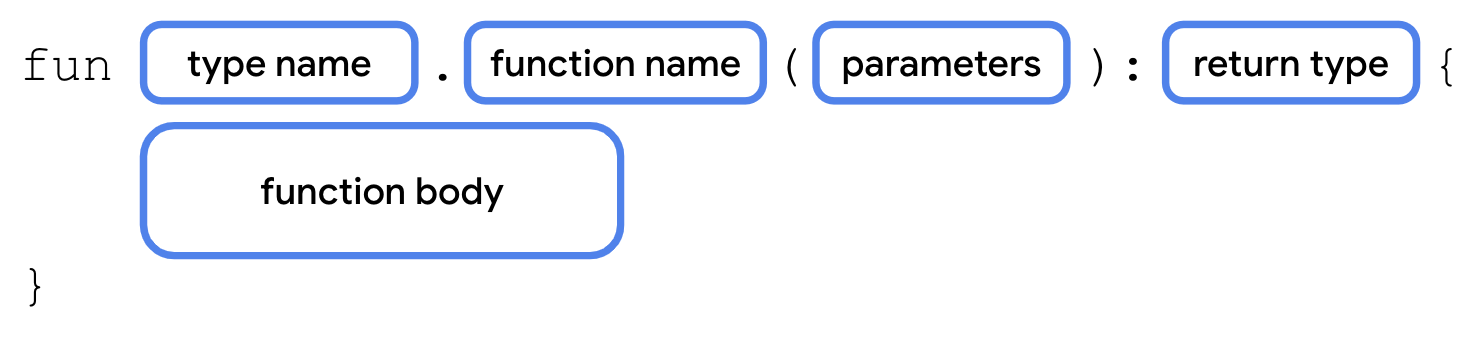
To define an extension function, add the type name and a dot operator (.) before the function name.
You’ll add an extension function to output the quiz progress as a progress bar.
Add an extension function
StudentProgress.printProgressBar().fun Quiz.StudentProgress.printProgressBar() { repeat(Quiz.answered) { print("▓") } // represents answered questions repeat(Quiz.total - Quiz.answered) { print("▒") } // represents unanswered questions println() println(Quiz.progressText) }
Update the code in
main()to call printProgressBar().fun main() { Quiz.printProgressBar() }
Run your code to verify the output.
▓▓▓▒▒▒▒▒▒▒ 3 of 10 answered.
Having the option of extension properties and methods gives you more options to expose your code to other developers. Using dot syntax on other types can make your code easier to read, both for yourself and for other developers.
Rewrite extension functions using interfaces
On the previous page, you saw how to add properties and methods to the
StudentProgressobject without adding code to it directly, using extension properties and extension functions.While this is a great way to add functionality to one class that’s already defined, extending a class isn’t always necessary if you have access to the source code. There are also situations where you don’t know what the implementation should be, only that a certain method or property should exist.
If you need multiple classes to have the same additional properties and methods, perhaps with differing behavior, you can define these properties and methods with an interface.
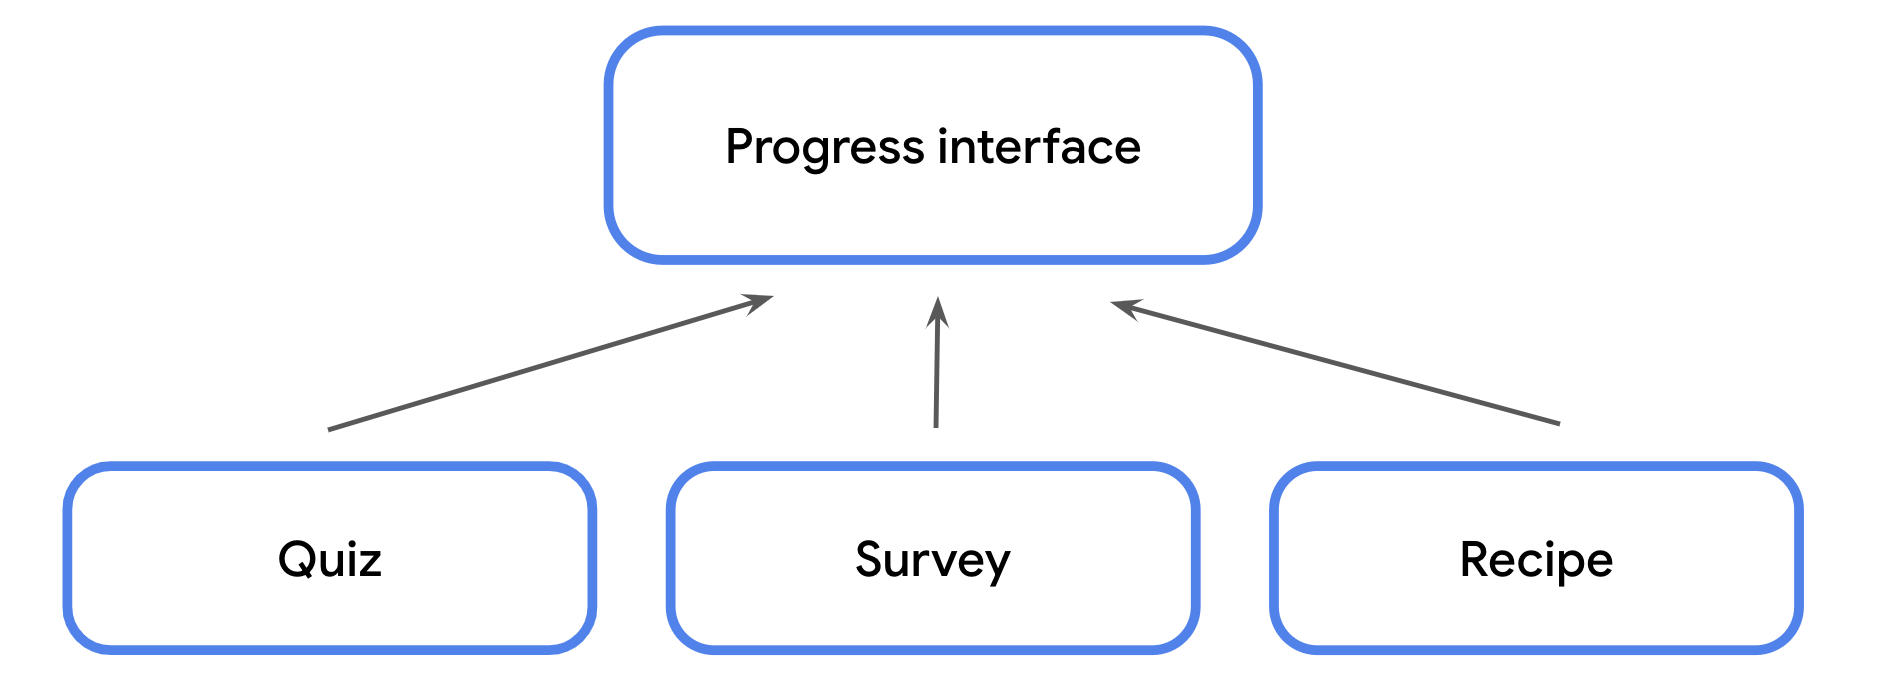
For example, in addition to quizzes, let’s say you also have classes for surveys, steps in a recipe, or any other ordered data that could use a progress bar. You can define an interface that specifies the methods and/or properties that each of these classes must include.
An interface is defined using the
interfacekeyword, followed by a name in UpperCamelCase, followed by opening and closing curly braces. Within the curly braces, you can define any method signatures or get-only properties that any class conforming to the interface must implement.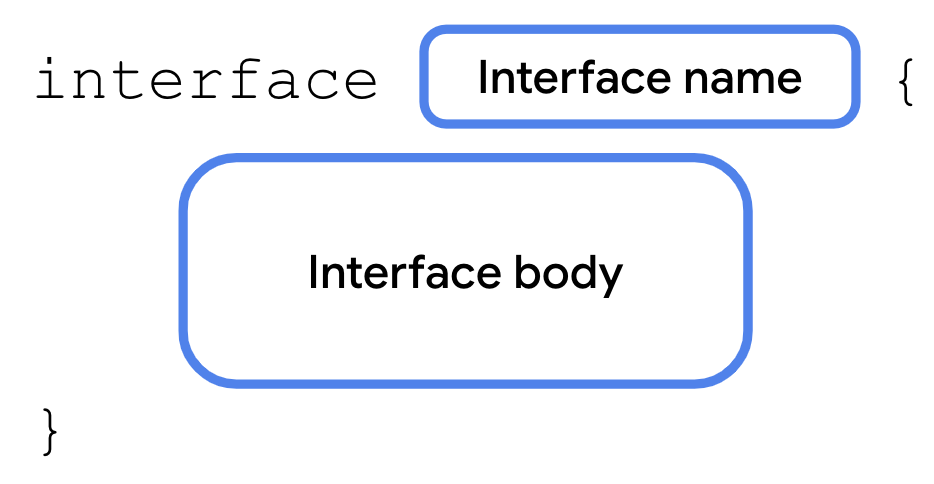
An interface is a contract. A class that conforms to an interface is said to extend the interface. A class can declare that it would like to extend an interface using:
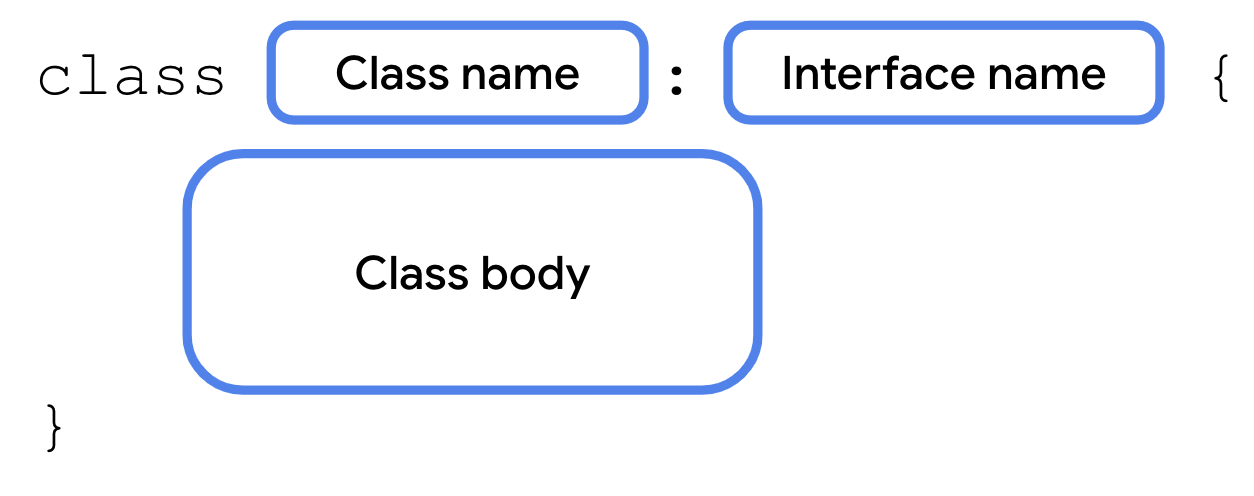
In return, the class must implement all properties and methods specified in the interface. This lets you easily ensure that any class that needs to extend the interface implements the exact same methods with the exact same method signature.
If you modify the interface in any way, such as add or remove properties or methods or change a method signature, the compiler requires you to update any class that extends the interface, keeping your code consistent and easier to maintain.
Interfaces allow for variation in the behavior of classes that extend them. It’s up to each class to provide the implementation.
Re-factoring the progress bar code to use an interface may look like this:
enum class Difficulty { EASY, MEDIUM, HARD } data class Question<T>( val questionText: String, val answer: T, val difficulty: Difficulty ) interface ProgressPrintable { val progressText: String fun printProgressBar() } // The ``Quiz`` class implements the ``ProgressPrintable`` interface class Quiz : ProgressPrintable { val question1 = Question<String>("Quoth the raven ___", "nevermore", Difficulty.MEDIUM) val question2 = Question<Boolean>("The sky is green. True or false", false, Difficulty.EASY) val question3 = Question<Int>("How many days are there between full moons?", 28, Difficulty.HARD) // use ``override`` because this is from the ProgressPrintable interface override val progressText: String get() = "${answered} of ${total} answered" // use ``override`` because this is from the ProgressPrintable interface override fun printProgressBar() { repeat(Quiz.answered) { print("▓") } repeat(Quiz.total - Quiz.answered) { print("▒") } println() println(progressText) } companion object StudentProgress { var total: Int = 10 var answered: Int = 3 } } fun main() { Quiz().printProgressBar() }
Run your code. The output is unchanged, but your code is now more modular. As your codebases grow, you can easily add classes that conform to the same interface to reuse code without inheriting from a superclass.
▓▓▓▒▒▒▒▒▒▒
3 of 10 answered.
There are numerous use cases for interfaces to help structure your code and you’ll start to see them used frequently in the common units. The following are some examples of interfaces you may encounter as you continue working with Kotlin.
Manual dependency injection. Create an interface defining all the properties and methods of the dependency. Require the interface as the data type of the dependency (activity, test case, etc.) so that an instance of any class implementing the interface can be used. This allows you to swap out the underlying implementations.
Mocking for automated tests. Both the mock class and the real class conform to the same interface.
Accessing the same dependencies in a Compose Multiplatform app. For example, create an interface that provides a common set of properties and methods for Android and desktop, even if the underlying implementation differs for each platform.
Several data types in Compose, such as
Modifier, are interfaces. This allows you to add new modifiers without needing to access or modify the underlying source code.
Use scope functions to access class properties and methods
Scope functions can eliminate repetitive object references
Scope functions: higher-order functions that allow you to access properties and methods of an object without referring to the object’s name.
They are called scope functions because the body of the function passed in takes on the scope of the object that the scope function is called with.
For example, some scope functions allow you to access the properties and methods in a class, as if the functions were defined as a method of that class. This can make your code more readable by allowing you to omit the object name when including it is redundant.
To better illustrate this, let’s take a look at a few different scope functions that you’ll encounter later in the course.
Use let() to replace long object names
let()allows you to refer to an object in a lambda expression using the identifierit. This can help you avoid using a long, more descriptive object name repeatedly when accessing more than one property. Thelet()function is an extension function that can be called on any Kotlin object using dot notation.For example, in the code below, the entire variable name is used each time. If the variable’s name changed, you’d need to update every usage.
fun printQuiz() {
    println(question1.questionText)
    println(question1.answer)
    println(question1.difficulty)
    println()
    println(question2.questionText)
    println(question2.answer)
    println(question2.difficulty)
    println()
    println(question3.questionText)
    println(question3.answer)
    println(question3.difficulty)
    println()
}
Instead, here’s an alternative using
let():fun printQuiz() { question1.let { println(it.questionText) println(it.answer) println(it.difficulty) } println() question2.let { println(it.questionText) println(it.answer) println(it.difficulty) } println() question3.let { println(it.questionText) println(it.answer) println(it.difficulty) } println() }
Use apply() to call an object’s methods without a variable
One of the cool features of scope functions is that you can call them on an object before that object has even been assigned to a variable. For example, the
apply()function is an extension function that can be called on an object using dot notation. Theapply()function also returns a reference to that object so that it can be stored in a variable.Example:
val quiz = Quiz()
quiz.printQuiz()
could be re-written as:
Quiz().apply {
    printQuiz()
}
Scope functions can make your code more concise and avoid repeating the same variable name.
The above code demonstrates just two examples, but you’re encouraged to bookmark and refer to the Scope Functions documentation as you encounter their usage later in the course.
Collections
In many apps, data is displayed as a list: contacts, settings, search results, etc.
Collection types (sometimes called data structures) let you store multiple values, typically of the same data type, in an organized way. A collection might be an ordered list, a grouping of unique values, or a mapping of values of one data type to values of another.
The ability to effectively use collections enables you to implement common features of Android apps, such as scrolling lists, as well as solve a variety of real-life programming problems that involve arbitrary amounts of data.
This codelab discusses how to work with multiple values in your code, and introduces a variety of data structures, including arrays, lists, sets, and maps.
Arrays
An
Arrayis a sequence of values that all have the same data type. It contains multiple values called elements, or items.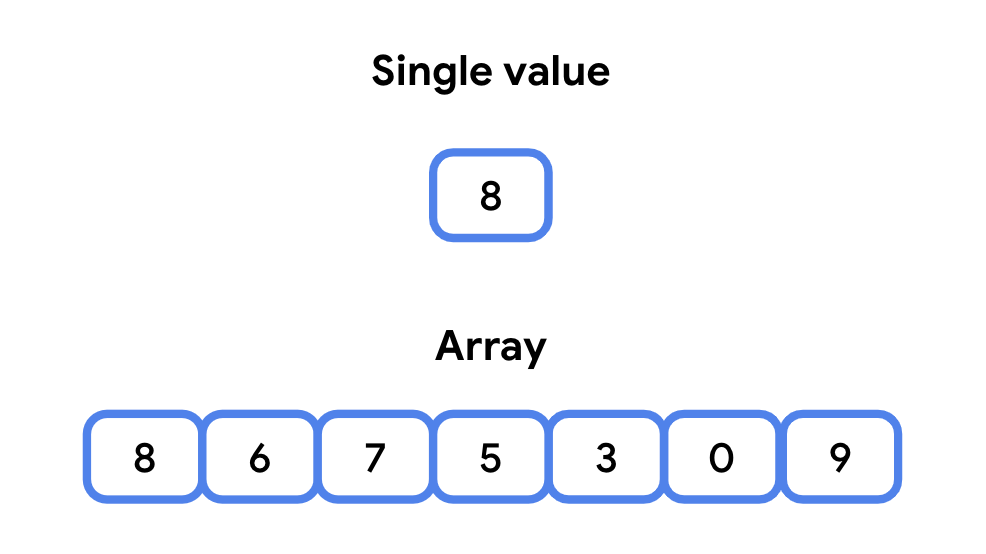
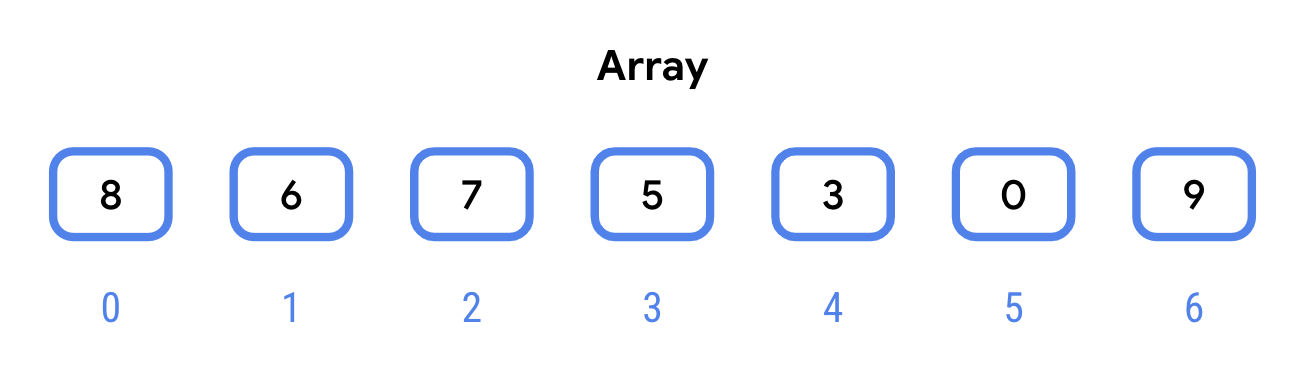
The elements in an array are ordered and are accessed with an index starting from 0.
In the device’s memory, elements in the array are stored next to each other. This has two important implications:
Accessing an array element by its index is fast. You can access any random element of an array by its index and expect it to take about the same amount of time to access any other random element. This is why it’s said that arrays have random access.
An array has a fixed size. This means that you can’t add elements to an array beyond this size. Trying to access the element at index 100 in a 100 element array will throw an exception because the highest index is 99. You can, however, modify the values at indexes in the array.
Note
In this codelab, memory refers to the short-term Random Access Memory (RAM) of the device, not the long-term persistent storage. It’s called “Random Access” because it allows for fast access to any arbitrary location in memory.
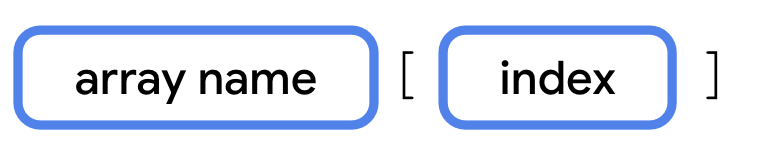
Syntax for declaring an array:

arrayOf()takes the array elements as parameters, and returns an array of the type matching the parameters passed in.arrayOf()has a varying number of parameters. If you pass in two arguments toarrayOf(), the resulting array contains two elements, indexed 0 and 1. If you pass in three arguments, the resulting array will have 3 elements, indexed 0, 1, 2.Example:
val rockPlanets = arrayOf<String>("Mercury", "Venus", "Earth", "Mars")
Due to type inference, you can omit the type name.
val gasPlanets = arrayOf("Jupiter", "Saturn", "Uranus", "Neptune")
To add two arrays:
val solarSystem = rockPlanets + gasPlanets
Access an element of an array:
Example:
println(solarSystem[1])
println(solarSystem[2])
println(solarSystem[3])
println(solarSystem[5])
println(solarSystem[6])
println(solarSystem[7])
Set the value of an array element:

Example:
solarSystem[3] = "Little Earth"
If you try to access an element that doesn’t exist, your program will throw an exception.
solarSystem[888] = "Pluto"
Running this code throws an
ArrayIndexOutOfBoundsexception:Exception in thread "main" java.lang.ArrayIndexOutOfBoundsException: Index 888 out of bounds for length 8
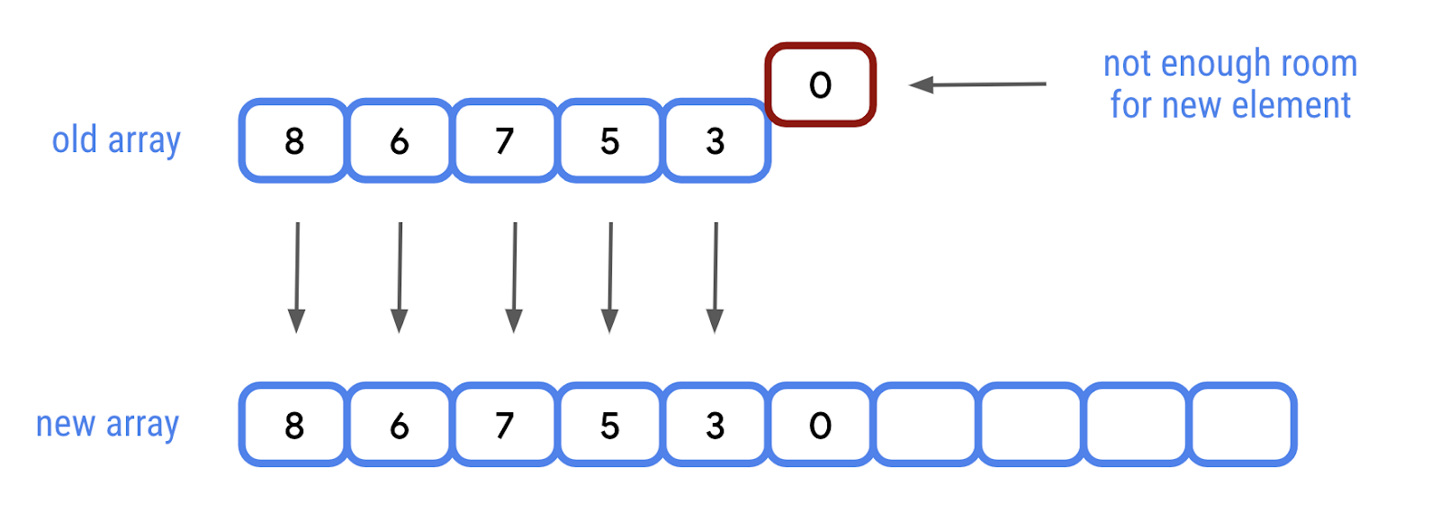
Lists
A list is an ordered, resizable collection, typically implemented as a resizable array. When the array is filled to capacity and you try to insert a new element, the array is copied to a new bigger array.
With a list, you can also insert new elements between other elements at a specific index.

In most cases, it takes the same amount of time to add any element to a list, regardless of how many elements are in the list. Every once in a while, if adding a new element would put the array above its defined size, the array elements might have to move to make room for new elements. Lists do all of this for you, but behind the scenes, it’s just an array that gets swapped out for a new array when needed.
List and MutableList
Collection types implement one or more interfaces. Interfaces provide a standard set of properties and methods for a class to implement. A class that implements the
Listinterface provides implementations for all the properties and methods of theListinterface. The same is true forMutableList.So what do
ListandMutableListdo?Listis an interface that defines properties and methods related to a read-only ordered collection of items.MutableListextends theListinterface by defining methods to modify a list, such as adding and removing elements.
These interfaces only specify the properties and methods of a
Listand/orMutableList. It’s up to the class that extends them to determine how each property and method is implemented. The array-based implementation described above is what you’ll use most, if not all of the time, but Kotlin allows other classes to extendListandMutableList.
The listOf() function
Like
arrayOf(), thelistOf()function takes the items as parameters, but returns a List rather than an array.Remove the existing code from
main(). Inmain(), create aListof planets calledsolarSystem:fun main() { val solarSystem = listOf("Mercury", "Venus", "Earth", "Mars", "Jupiter", "Saturn", "Uranus", "Neptune") }
Listhas asizeproperty to get the number of elements in the list:println(solarSystem.size)
Run your code. The size of the list should be 8.
Access elements from a list
Like an array, you can access an element at a specific index from a
Listusing subscript syntax. You can do the same using theget()method. Subscript syntax and theget()method take anIntas a parameter and return the element at that index.These are equivalent:
println(solarSystem[2])
println(solarSystem.get(2))
In addition to getting an element by its index, you can also search for the index of a specific element using the
indexOf()method. TheindexOf()method searches the list for a given element (passed in as an argument), and returns the index of the first occurrence of that element. If the element doesn’t occur in the list, it returns-1.Example:
println(solarSystem.indexOf("Earth"))
println(solarSystem.indexOf("Pluto"))
Run your code. An element matches
"Earth", so the index,2, is printed. There isn’t an element that matches"Pluto", so-1is printed.
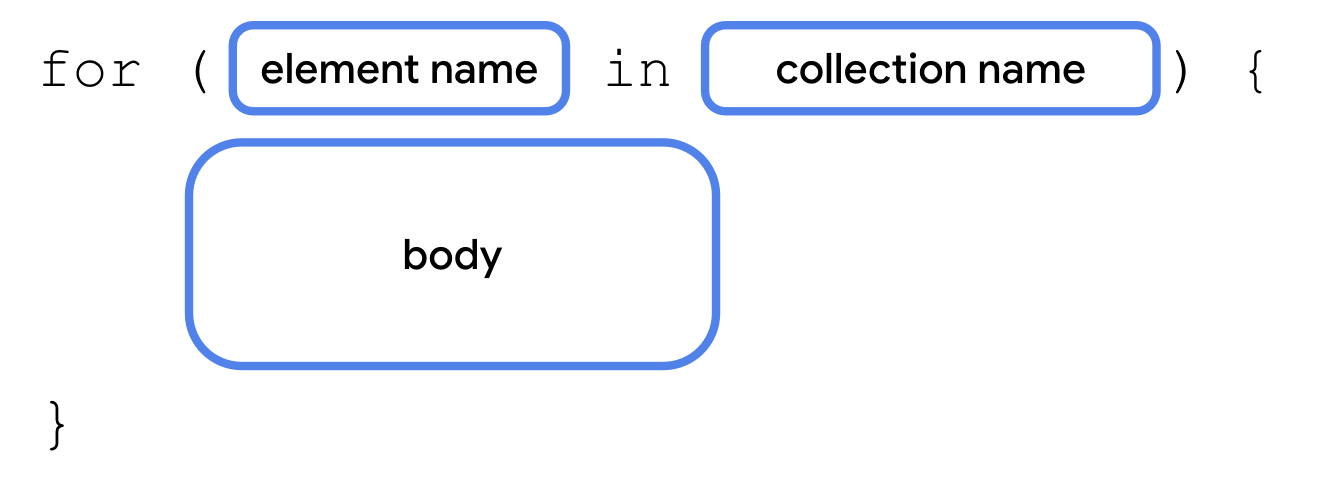
Iterate over list elements using a for loop
Syntax for looping through a list:
Example:
for (planet in solarSystem) {
    println(planet)
}
Add elements to a list
The ability to add, remove, and update elements in a collection is exclusive to classes that implement the
MutableListinterface. If you were keeping track of newly discovered planets, you’d likely want the ability to frequently add elements to a list. You need to specifically call themutableListOf()function, instead oflistOf(), when creating a list you wish to add and remove elements from.Example:
val solarSystem = mutableListOf("Mercury", "Venus", "Earth", "Mars", "Jupiter", "Saturn", "Uranus", "Neptune")
To add something to the end of a list:
solarSystem.add("Pluto")
To add something to a specific index:
solarSystem.add(3, "Theia")
Update elements
You can update existing elements with subscript syntax.
Example:
solarSystem[3] = "Future Moon"
Remove elements
To remove an element at a specific index:
solarSystem.removeAt(9)
This searches the list, and if a matching element is found, it will be removed:
solarSystem.remove("Future Moon")
Check if a list contains an element:
println(solarSystem.contains("Pluto"))
or
println("Future Moon" in solarSystem)
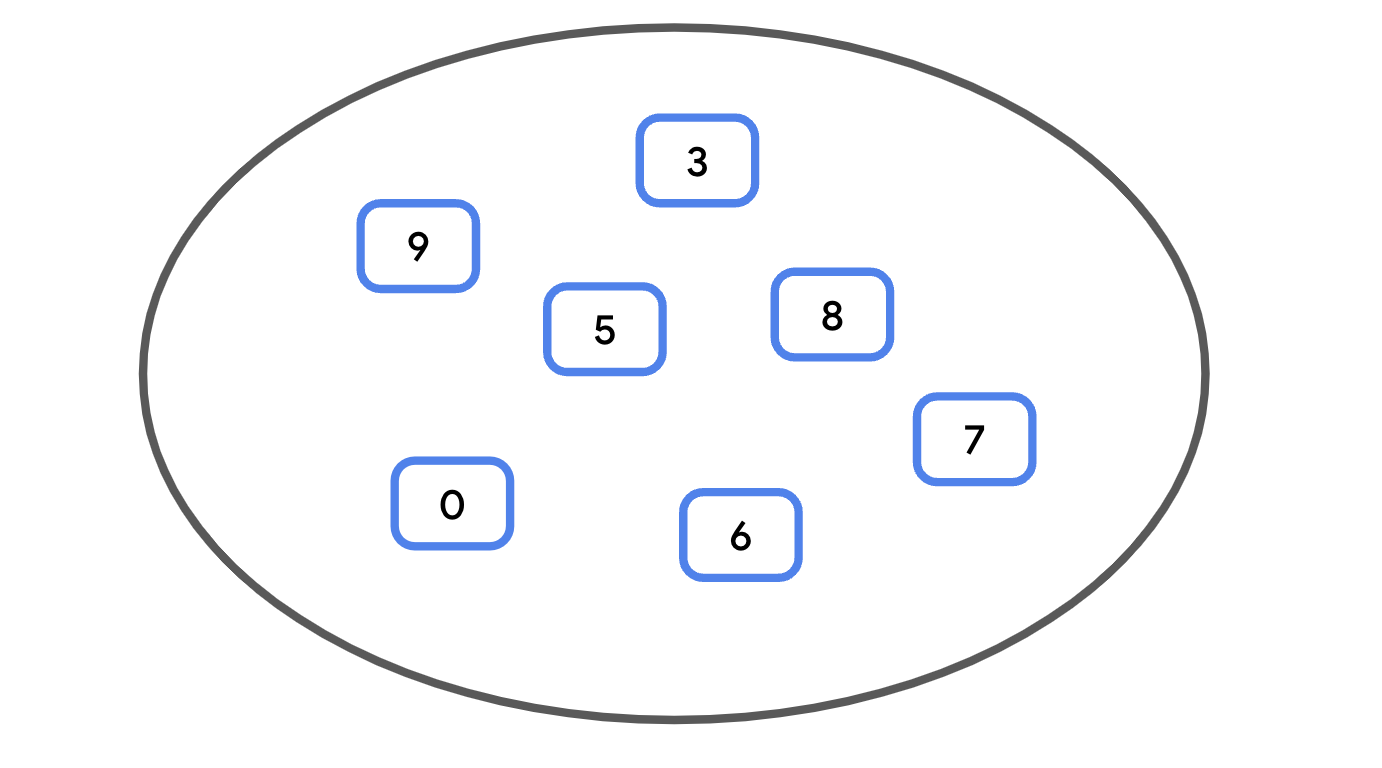
Sets
A set is a collection that does not have a specific order and does not allow duplicate values.
Sets have two important properties:
Searching for a specific element in a set is fast — compared with lists — especially for large collections. While the
indexOf()of aListrequires checking each element from the beginning until a match is found, on average, it takes the same amount of time to check if an element is in a set, whether it’s the first element or the hundred thousandth.Sets tend to use more memory than lists for the same amount of data, since more array indices are often needed than the data in the set.
The benefit of sets is ensuring uniqueness. If you were writing a program to keep track of newly discovered planets, a set provides a simple way to check if a planet has already been discovered. With large amounts of data, this is often preferable to checking if an element exists in a list, which requires iterating over all the elements.
Like
ListandMutableList, there’s both aSetand aMutableSet.MutableSetimplementsSet, so any class implementingMutableSetneeds to implement both.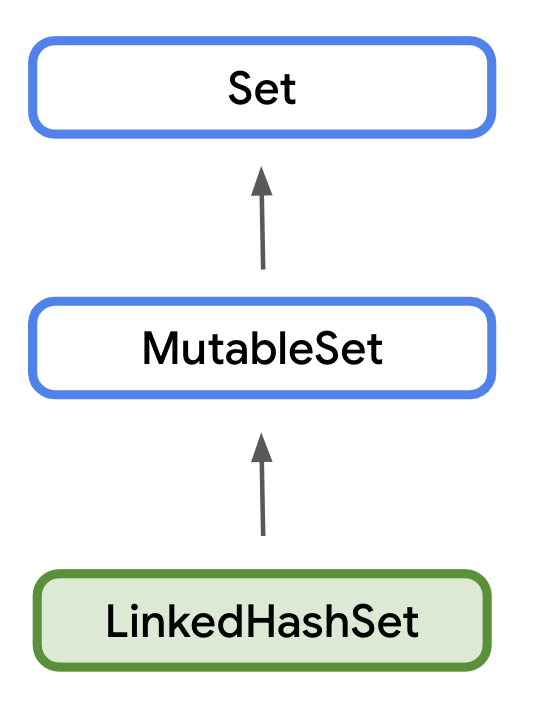
Use a MutableSet in Kotlin
We’ll use a
MutableSetin the example to demonstrate how to add and remove elements.Remove the existing code from
main().Create a
Setof planets called solarSystem usingmutableSetOf(). This returns a MutableSet, the default implementation of which isLinkedHashSet().val solarSystem = mutableSetOf("Mercury", "Venus", "Earth", "Mars", "Jupiter", "Saturn", "Uranus", "Neptune")
Print the size of the set using the size property.
println(solarSystem.size)
Add
"Pluto":solarSystem.add("Pluto")
Print the
sizeof the set:println(solarSystem.size)
Check if
"Pluto"is insolarSystem:println(solarSystem.contains("Pluto"))
Note
Alternatively, you can use the
inoperator to check if an element is in a collection, for example:"Pluto" in solarSystemis equivalent tosolarSystem.contains("Pluto").Run your code. The size has increased and
contains()now returnstrue.8 9 true
As mentioned before, sets can’t contain duplicates. Try adding “Pluto” again, and print the size of the set.
solarSystem.add("Pluto")
println(solarSystem.size)
Run your code again. “Pluto” isn’t added as it is already in the set. The size should not increase this time.
...
9
Use the
remove()function to remove an element:solarSystem.remove("Pluto")
Note
Remember that sets are an unordered collection. There’s no way to remove a value from a set by its index, as sets don’t have indices.
Print the size of the collection and call
contains()again to check if"Pluto"is still in the set.println(solarSystem.size) println(solarSystem.contains("Pluto"))
Run your code.
"Pluto"is no longer in the set and the size is now 8.... 8 false
Maps
A
Mapis a collection consisting of keys and values. It’s called a map because unique keys are mapped to other values. A key and its accompanying value are often called akey-valuepair.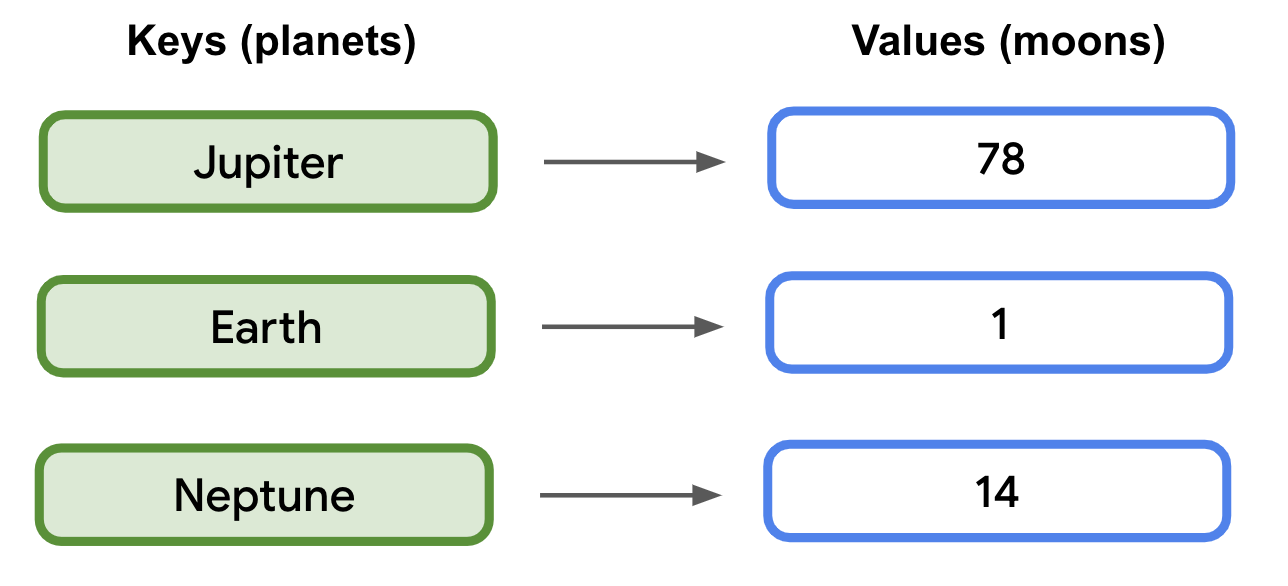
A map’s keys are unique. A map’s values, however, are not. Two different keys could map to the same value. For example,
"Mercury"has0moons, and"Venus"has0moons.Accessing a value from a map by its key is generally faster than searching through a large list, such as with
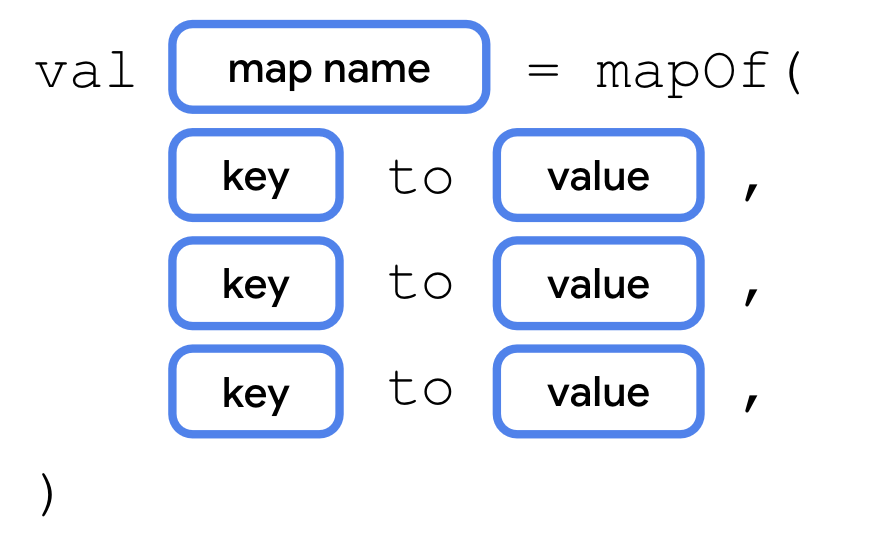
indexOf().Maps can be declared using the
mapOf()ormutableMapOf()function:
A map can also use type inference if it has initial values. To populate a map with initial values:
Let’s take a closer look at how to use maps, and some useful properties and methods.
Remove the existing code from
main().Create a map called
solarSystemusingmutableMapOf()with initial values as shown.
val solarSystem = mutableMapOf(
    "Mercury" to 0,
    "Venus" to 0,
    "Earth" to 1,
    "Mars" to 2,
    "Jupiter" to 79,
    "Saturn" to 82,
    "Uranus" to 27,
    "Neptune" to 14
)
Print the size of the
solarSystemmap:println(solarSystem.size)
Set the key
"Pluto"to a value of5:solarSystem["Pluto"] = 5
Print the size again:
println(solarSystem.size)
Print the number of moons for the key
"Pluto":println(solarSystem["Pluto"])
You can also access values with the
get()method. Whether you use subscript syntax or callget(), it’s possible that the key you pass in isn’t in the map. If there isn’t a key-value pair, it will returnnull. Print the number of moons for"Theia":println(solarSystem.get("Theia"))
Run your code. The number of moons for Pluto should print. However, because Theia isn’t in the map, calling
get()returnsnull.8 9 5 null
The
remove()method removes the key-value pair with the specified key. It also returns the removed value, ornull, if the specified key isn’t in the map.Print the result from calling
remove()and passing in"Pluto".solarSystem.remove("Pluto")
To verify that the item was removed, print the size again.
println(solarSystem.size)
Run your code. The size of the map is 8 after removing the entry.
...
8
Subscript syntax, or the
put()method, can also modify a value for a key that already exists. Use subscript syntax to update Jupiter’s moons to 78 and print the new value.solarSystem["Jupiter"] = 78 println(solarSystem["Jupiter"])
Run your code. The value for the existing key,
"Jupiter", is updated.... 78
Higher-order functions with collections
Introduction
In the Use function types and lambda expressions in Kotlin codelab, you learned about higher-order functions, which are functions that take other functions as parameters and/or return a function, such as
repeat(). Higher-order functions are especially relevant to collections as they help you perform common tasks, like sorting or filtering, with less code.
forEach() and string templates with lambdas
Starter code
In the following examples, you’ll take a
Listrepresenting a bakery’s cookie menu (how delicious!), and use higher-order functions to format the menu in different ways.Start by setting up the initial code.
Navigate to the Kotlin Playground.
Above the
main()function, add theCookieclass. Each instance ofCookierepresents an item on the menu, with aname,price, and other information about the cookie.class Cookie( val name: String, val softBaked: Boolean, val hasFilling: Boolean, val price: Double ) fun main() { }
Below the
Cookieclass, outside ofmain(), create a list of cookies as shown. The type is inferred to beList<Cookie>.class Cookie( val name: String, val softBaked: Boolean, val hasFilling: Boolean, val price: Double ) val cookies = listOf( Cookie( name = "Chocolate Chip", softBaked = false, hasFilling = false, price = 1.69 ), Cookie( name = "Banana Walnut", softBaked = true, hasFilling = false, price = 1.49 ), Cookie( name = "Vanilla Creme", softBaked = false, hasFilling = true, price = 1.59 ), Cookie( name = "Chocolate Peanut Butter", softBaked = false, hasFilling = true, price = 1.49 ), Cookie( name = "Snickerdoodle", softBaked = true, hasFilling = false, price = 1.39 ), Cookie( name = "Blueberry Tart", softBaked = true, hasFilling = true, price = 1.79 ), Cookie( name = "Sugar and Sprinkles", softBaked = false, hasFilling = false, price = 1.39 ) ) fun main() { }
Loop over a list with forEach()
The first higher-order function that you learn about is the
forEach()function. TheforEach()function executes the function passed as a parameter once for each item in the collection. This works similarly to therepeat()function, or aforloop. The lambda is executed for the first element, then the second element, and so on, until it’s executed for each element in the collection. The method signature is as follows:forEach(action: (T) -> Unit)
forEach()takes a single action parameter — a function of type(T) -> Unit.Tcorresponds to whatever data type the collection contains. Because the lambda takes a single parameter, you can omit the name and refer to the parameter withit.Use the
forEach()function to print the items in thecookieslist.In
main(), callforEach()on thecookieslist, using trailing lambda syntax. Because the trailing lambda is the only argument, you can omit the parentheses when calling the function.fun main() { cookies.forEach { } }
In the lambda body, add a println() statement that prints it.
fun main() {
    cookies.forEach {
        println("Menu item: $it")
    }
}
Run your code and observe the output. All that prints is the name of the type (
Cookie), and a unique identifier for the object, but not the contents of the object.Menu item: Cookie@5a10411 Menu item: Cookie@68de145 Menu item: Cookie@27fa135a Menu item: Cookie@46f7f36a Menu item: Cookie@421faab1 Menu item: Cookie@2b71fc7e Menu item: Cookie@5ce65a89
Embed expressions in strings
When you were first introduced to string templates, you saw how the dollar symbol (
$) could be used with a variable name to insert it into a string. However, this doesn’t work as expected when combined with the dot operator (.) to access properties.In the call to
forEach(), modify the lambda’s body to insert$it.nameinto the string.cookies.forEach { println("Menu item: $it.name") }
Run your code. Notice that this inserts the name of the class,
Cookie, and a unique identifier for the object followed by.name. The value of thenameproperty isn’t accessed.Menu item: Cookie@5a10411.name Menu item: Cookie@68de145.name Menu item: Cookie@27fa135a.name Menu item: Cookie@46f7f36a.name Menu item: Cookie@421faab1.name Menu item: Cookie@2b71fc7e.name Menu item: Cookie@5ce65a89.name
To access properties and embed them in a string, you need an expression. You can make an expression part of a string template by surrounding it with curly braces.
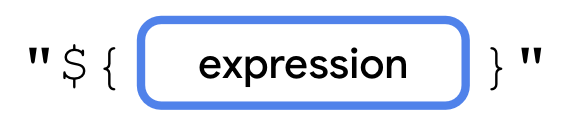
The lambda expression is placed between the opening and closing curly braces. You can access properties, perform math operations, call functions, etc., and the return value of the lambda is inserted into the string.
Let’s modify the code so that the name is inserted into the string.
Surround
it.namein curly braces to make it a lambda expression.cookies.forEach { println("Menu item: ${it.name}") }
Run your code. The output contains the
nameof eachCookie.Menu item: Chocolate Chip Menu item: Banana Walnut Menu item: Vanilla Creme Menu item: Chocolate Peanut Butter Menu item: Snickerdoodle Menu item: Blueberry Tart Menu item: Sugar and Sprinkles
map()
The
map()function lets you transform a collection into a new collection with the same number of elements. For example,map()could transform aList<Cookie>into aList<String>only containing the cookie’sname, provided you tell themap()function how to create aStringfrom eachCookieitem.
Let’s say you are writing an app that displays an interactive menu for a bakery. When the user navigates to the screen that shows the cookie menu, they might want to see the data presented in a logical manner, such as the name followed by the price. You can create a list of strings, formatted with the relevant data (name and price), using the
map()function.Remove all the previous code from main(). Create a new variable called fullMenu, and set it equal to the result of calling map() on the cookies list.
val fullMenu = cookies.map {

}
In the lambda’s body, add a string formatted to include
it.nameandit.price.val fullMenu = cookies.map { "${it.name} - $${it.price}" }
Note
There’s a second
$used before the expression. The first is treated as the dollar sign character ($) since it’s not followed by a variable name or lambda expression.Print the contents of
fullMenu. You can do this usingforEach(). ThefullMenucollection returned frommap()has typeList<String>rather thanList<Cookie>. EachCookieincookiescorresponds to aStringinfullMenu.println("Full menu:") fullMenu.forEach { println(it) }
Run your code. The output matches the contents of the fullMenu list.
Full menu:
Chocolate Chip - $1.69
Banana Walnut - $1.49
Vanilla Creme - $1.59
Chocolate Peanut Butter - $1.49
Snickerdoodle - $1.39
Blueberry Tart - $1.79
Sugar and Sprinkles - $1.39
filter()
The
filter()function lets you create a subset of a collection. For example, if you had a list of numbers, you could usefilter()to create a new list that only contains numbers divisible by 2.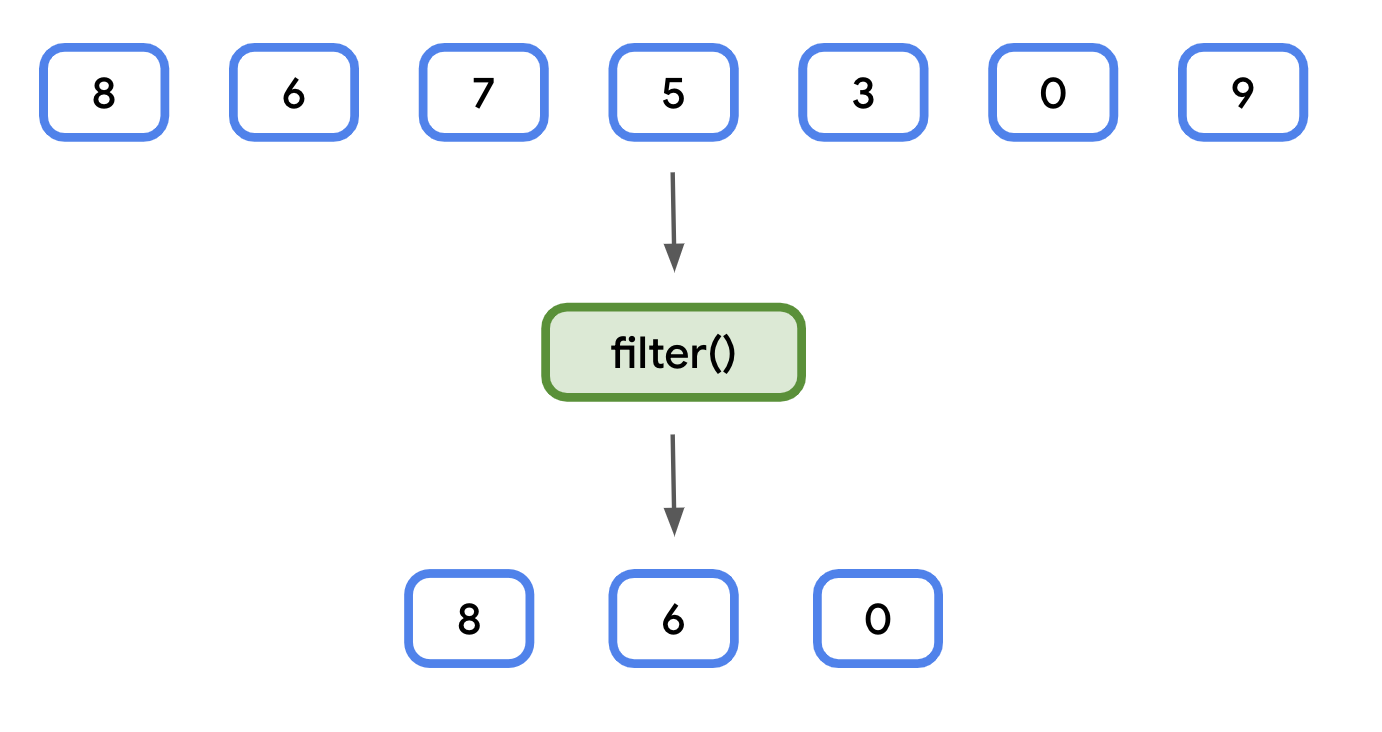
Whereas the result of the
map()function always yields a collection of the same size,filter()yields a collection of the same size or smaller than the original collection. Unlikemap(), the resulting collection also has the same data type, so filtering aList<Cookie>will result in anotherList<Cookie>.Like
map()andforEach(),filter()takes a single lambda expression as a parameter. The lambda has a single parameter representing each item in the collection and returns aBooleanvalue.For each item in the collection:
If the result of the lambda expression is
true, then the item is included in the new collection.If the result is
false, the item is not included in the new collection.
This is useful if you want to get a subset of data in your app. For example, let’s say the bakery wants to highlight its soft-baked cookies in a separate section of the menu. You can first
filter()thecookieslist, before printing the items.In
main(), create a new variable calledsoftBakedMenu, and set it to the result of callingfilter()on thecookieslist.val softBakedMenu = cookies.filter { }
In the lambda’s body, add a boolean expression to check if the cookie’s
softBakedproperty is equal totrue. BecausesoftBakedis aBooleanitself, the lambda body only needs to containit.softBaked.val softBakedMenu = cookies.filter { it.softBaked }
Print the contents of
softBakedMenuusingforEach().println("Soft cookies:") softBakedMenu.forEach { println("${it.name} - $${it.price}") }
Run your code. The menu is printed as before, but only includes the soft-baked cookies.
... Soft cookies: Banana Walnut - $1.49 Snickerdoodle - $1.39 Blueberry Tart - $1.79
groupBy()
The
groupBy()function can be used to turn a list into a map, based on a function. Each unique return value of the function becomes a key in the resulting map. The values for each key are all the items in the collection that produced that unique return value.
The data type of the keys is the same as the return type of the function passed into
groupBy(). The data type of the values is a list of items from the original list.Note
The value doesn’t have to be the same type of the list. There’s another version of
groupBy()that can transform the values into a different type. However, that version is not covered here.This can be hard to conceptualize, so let’s start with a simple example. Given the same list of numbers as before, group them as odd or even.
You can check if a number is odd or even by dividing it by
2and checking if the remainder is0or1. If the remainder is0, the number is even. Otherwise, if the remainder is1, the number is odd.This can be achieved with the modulo operator (
%). The modulo operator divides the dividend on the left side of an expression by the divisor on the right.
Instead of returning the result of the division, like the division operator (
/), the modulo operator returns the remainder. This makes it useful for checking if a number is even or odd.
The
groupBy()function is called with the following lambda expression:{ it % 2 }.The resulting map has two keys:
0and1. Each key has a value of typeList<Int>. The list for key0contains all even numbers, and the list for key1contains all odd numbers.A real-world use case might be a photos app that groups photos by the subject or location where they were taken. For our bakery menu, let’s group the menu by whether or not a cookie is soft baked.
Use
groupBy()to group the menu based on thesoftBakedproperty.Remove the call to
filter()from the previous step. Code to remove:val softBakedMenu = cookies.filter { it.softBaked } println("Soft cookies:") softBakedMenu.forEach { println("${it.name} - $${it.price}") }
Call
groupBy()on thecookieslist, storing the result in a variable calledgroupedMenu.val groupedMenu = cookies.groupBy {}
Pass in a lambda expression that returns
it.softBaked. The return type will beMap<Boolean, List<Cookie>>.val groupedMenu = cookies.groupBy { it.softBaked }
Create a
softBakedMenuvariable containing the value ofgroupedMenu[true], and acrunchyMenuvariable containing the value ofgroupedMenu[false]. Because the result of subscripting aMapis nullable, you can use the Elvis operator (?:) to return an empty list.val softBakedMenu = groupedMenu[true] ?: listOf() val crunchyMenu = groupedMenu[false] ?: listOf()
Note
Alternatively,
emptyList()creates an empty list and may be more readable.Add code to print the menu for soft cookies, followed by the menu for crunchy cookies.
println("Soft cookies:") softBakedMenu.forEach { println("${it.name} - $${it.price}") } println("Crunchy cookies:") crunchyMenu.forEach { println("${it.name} - $${it.price}") }
Run your code. Using the
groupBy()function, you split the list into two, based on the value of one of the properties.... Soft cookies: Banana Walnut - $1.49 Snickerdoodle - $1.39 Blueberry Tart - $1.79 Crunchy cookies: Chocolate Chip - $1.69 Vanilla Creme - $1.59 Chocolate Peanut Butter - $1.49 Sugar and Sprinkles - $1.39
fold()
The
fold()function is used to generate a single value from a collection. This is most commonly used for things like calculating a total of prices, or summing all the elements in a list to find an average.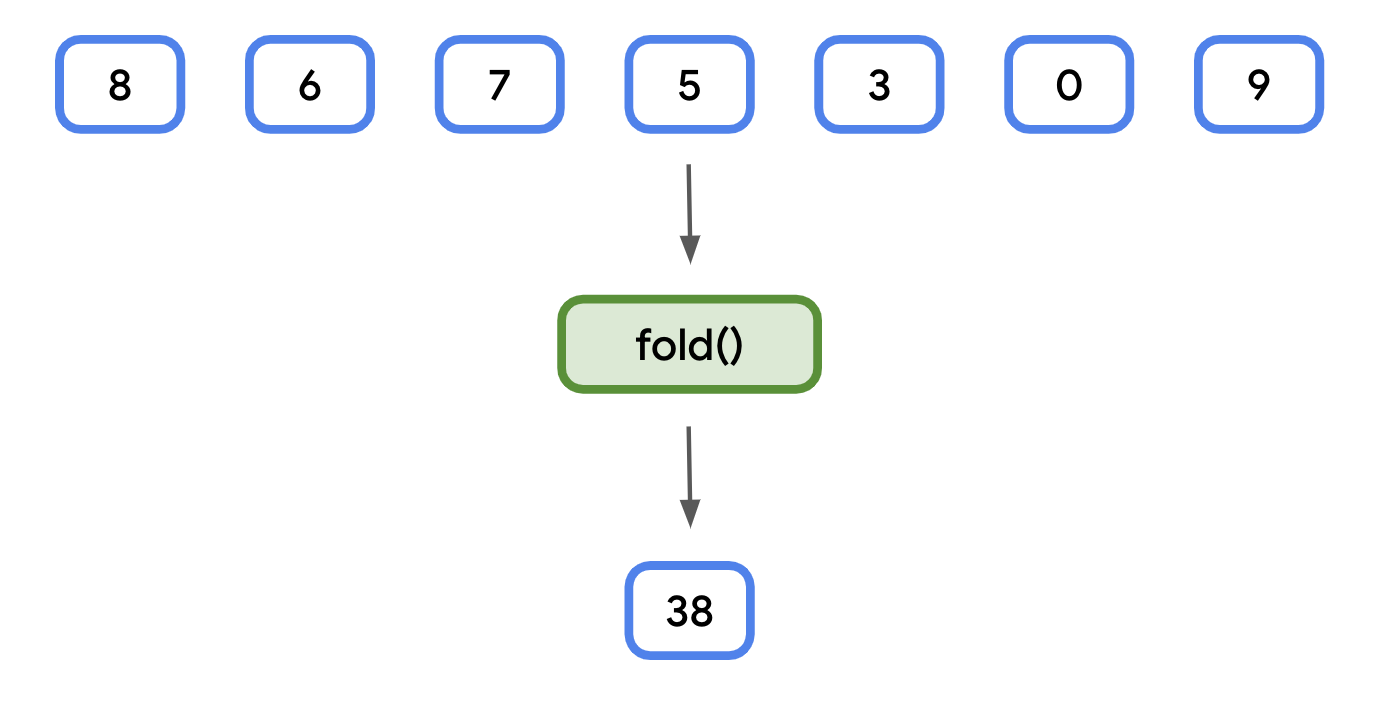
The
fold()function takes two parameters:An initial value. The data type is inferred when calling the function (that is, an initial value of
0is inferred to be anInt).A lambda expression that returns a value with the same type as the initial value.
The lambda expression additionally has two parameters:
The first is known as the accumulator. It has the same data type as the initial value. Think of this as a running total. Each time the lambda expression is called, the accumulator is equal to the return value from the previous time the lambda was called.
The second is the same type as each element in the collection.
Like other functions you’ve seen, the lambda expression is called for each element in a collection, so you can use
fold()as a concise way to sum all the elements.Let’s use
fold()to calculate the total price of all the cookies.In
main(), create a new variable called totalPrice and set it equal to the result of callingfold()on thecookieslist. Pass in0.0for the initial value. Its type is inferred to beDouble.val totalPrice = cookies.fold(0.0) { }
You’ll need to specify both parameters for the lambda expression. Use
totalfor the accumulator, andcookiefor the collection element. Use the arrow (->) after the parameter list.val totalPrice = cookies.fold(0.0) {total, cookie -> }
In the lambda’s body, calculate the sum of
totalandcookie.price. This is inferred to be the return value and is passed in fortotalthe next time the lambda is called.val totalPrice = cookies.fold(0.0) {total, cookie -> total + cookie.price }
Print the value of
totalPrice, formatted as a string for readability.println("Total price: $${totalPrice}")
Run your code. The result should be equal to the sum of the prices in the
cookieslist.... Total price: $10.83
Note
fold() is sometimes called reduce(). The fold() function in Kotlin works the same as the reduce() function found in JavaScript, Swift, Python, etc. Note that Kotlin also has its own function called reduce(), where the accumulator starts with the first element in the collection, rather than an initial value passed as an argument.
Note
Kotlin collections also have a sum() function for numeric types, as well as a higher-order sumOf() function.
sortedBy()
When you first learned about collections, you learned that the
sort()function could be used to sort the elements. However, this won’t work on a collection ofCookieobjects. TheCookieclass has several properties and Kotlin won’t know which properties (name,price, etc.) you want to sort by.For these cases, Kotlin collections provide a
sortedBy()function.sortedBy()lets you specify a lambda that returns the property you’d like to sort by. For example, if you’d like to sort by price, the lambda would returnit.price. So long as the data type of the value has a natural sort order — strings are sorted alphabetically, numeric values are sorted in ascending order — it will be sorted just like a collection of that type.
You’ll use
sortedBy()to sort the list of cookies alphabetically.In
main(), after the existing code, add a new variable called alphabeticalMenu and set it equal to callingsortedBy()on the cookies list.val alphabeticalMenu = cookies.sortedBy { }
In the lambda expression, return
it.name. The resulting list will still be of typeList<Cookie>, but sorted based on thename.val alphabeticalMenu = cookies.sortedBy { it.name }
Print the names of the cookies in
alphabeticalMenu. You can useforEach()to print each name on a new line.println("Alphabetical menu:") alphabeticalMenu.forEach { println(it.name) }
Run your code. The cookie names are printed in alphabetical order.
...
Alphabetical menu:
Banana Walnut
Blueberry Tart
Chocolate Chip
Chocolate Peanut Butter
Snickerdoodle
Sugar and Sprinkles
Vanilla Creme
Note
Kotlin collections also have a sort() function if the data type has a natural sort order.
Practice: Classes and Collections
If you need more practice, do these exercises. If not, feel free to skip them.
App overview
You are the newest software engineer on the events tracking app team. The purpose of this app is to allow users to track their events. Your team will assign you tasks in order to help build out the app’s functionality.
At the end of each task, you should compare your solution with the one provided. There are different ways to achieve the desired functionality, so don’t worry if your code doesn’t match the provided solution code exactly.
Use the solution code provided in the previous task as the starting code for the next task in order to begin at a common starting point.
Task 1
Another software engineer already completed some high-level work for the app and you are tasked with implementing the details.
You need to implement the
Eventclass. This class is used to hold the details of the event entered by the user. (Hint: This class does not need to define any methods or perform any actions.)For this task you need to create a data class named
Event.An instance of this class should be able to store the:
Event title as a string.
Event description as a string (can be
null).Event daypart as a string. We only need to track if the event starts in the morning, afternoon, or evening.
Event duration in minutes as an integer.
Before continuing, try writing the code for yourself.
Using your code, create an instance using the following information:
Title: Study Kotlin
Description: Commit to studying Kotlin at least 15 minutes per day.
Daypart: Evening
Duration: 15
Try printing your object to verify that you get the following output:
Event(title=Study Kotlin, description=Commit to studying Kotlin at least 15 minutes per day., daypart=Evening, durationInMinutes=15)
Once you complete the task, or give it your best attempt, click Next to see how we coded it.
Task 1 Solution
data class Event(
    val title: String,
    val description: String? = null,
    val daypart: String,
    val durationInMinutes: Int,
)
Task 2
To keep the project on track, your manager decides to use the code we provided for the data class.
After your team members used the
Eventclass for some time, the senior teammate realizes that using a string for the daypart is not ideal.Some developers stored the value of “Morning”, some used “morning”, and still others used “MORNING”. This caused many problems.
Your task is to fix this issue by doing some refactoring. Refactoring is the process of improving your code without changing its functionality. Some examples are simplifying the logic or moving repeated code into separate functions.
What type of class can be used to model a limited set of distinct values to help correct this problem?
Your team wants you to change the daypart code to use an enum class. By using an enum class, your teammates are forced to choose one of the provided daypart values, which prevents these types of issues.
The enum class should be named
Daypart. It should have three values:MORNINGAFTERNOONEVENING
How would you create this enum class? How would you refactor your Event class to use it? Try coding your solution now before continuing.
Click Next to see how we coded it.
Task 2 Solution
enum class Daypart {
    MORNING,
    AFTERNOON,
    EVENING,
}
data class Event(
    val title: String,
    val description: String? = null,
    val daypart: Daypart,
    val durationInMinutes: Int,
)
Task 3
Your colleagues enjoy using the refactored
Daypart, but they have other issues.The following code is how they currently create and store the user’s events.
val event1 = Event(title = "Wake up", description = "Time to get up", daypart = Daypart.MORNING, durationInMinutes = 0)
val event2 = Event(title = "Eat breakfast", daypart = Daypart.MORNING, durationInMinutes = 15)
val event3 = Event(title = "Learn about Kotlin", daypart = Daypart.AFTERNOON, durationInMinutes = 30)
val event4 = Event(title = "Practice Compose", daypart = Daypart.AFTERNOON, durationInMinutes = 60)
val event5 = Event(title = "Watch latest DevBytes video", daypart = Daypart.AFTERNOON, durationInMinutes = 10)
val event6 = Event(title = "Check out latest Android Jetpack library", daypart = Daypart.EVENING, durationInMinutes = 45)
They created a lot of events, and each event currently requires its own variable. As more events are created, it becomes more difficult to keep track of them all. Using this approach, how difficult would it be to determine how many events the user scheduled?
Can you think of a better way to organize the storage of these events?
What way can you store all the events in one variable? (Note: It has to be flexible, as more events may be added. It also needs to efficiently return the count of the number of the events stored in the variable.)
Which class or data type would you use? What is one way to add more events?
Now it’s your turn to implement this feature. Try to write the code before clicking Next to see our solution.
Task 3 Solution
val events = mutableListOf<Event>(event1, event2, event3, event4, event5, event6)
Task 4
Your manager likes how the app is coming along, but decides the user should be able to see a summary of their short events, based on the event’s duration. For example, “You have 5 short events.”
A “short” event is an event that is less than 60 minutes.
Using the
eventsvariable code from the previous task’s solution, how would you achieve this result?Note
It might help to solve this problem in multiple steps. How would you filter the events based on their duration? Once you filter the desired events, how do you determine the quantity?
Click Next to continue onto our solution.
Task 4 Solution
val shortEvents = events.filter { it.durationInMinutes < 60 }
println("You have ${shortEvents.size} short events.")
Task 5
Your teammates like how the app is coming along, but they want users to be able to see a summary of all the events and their daypart.
The output should be similar to:
Morning: 3 events
Afternoon: 4 events
Evening: 2 events
Using the
eventsvariable code from the previous step, how can you achieve this result?Note
It might help to solve this problem in multiple steps. This is similar to the previous task, except instead of splitting the events into two groups, you need to split them into multiple groups. How would you group the events by their dayparts? Once you have them grouped, how do you count the events in each daypart?
Click Next to see the solution code.
Task 5 Solution
val groupedEvents = events.groupBy { it.daypart }
groupedEvents.forEach { (daypart, events) ->
    println("$daypart: ${events.size} events")
}
Task 6
Currently, your colleague finds and prints the last item by using its index. The code used is:
println("Last event of the day: ${events[events.size - 1].title}").
Your manager suggests checking the Kotlin documentation for a function that could simplify this code. What function did you find? Try using it to confirm you get the same results to print.
Click Next to see the solution.
Task 6 Solution
println("Last event of the day: ${events.last().title}")
Task 7
Your team likes the data class you designed, but finds it repetitive to write code each time they need an event’s duration as a string:
val durationOfEvent = if (events[0].durationInMinutes < 60) {
        "short"
    } else {
        "long"
    }
println("Duration of first event of the day: $durationOfEvent")
While you could fix this repetition by adding a method directly to the class, that is not ideal, as other teams started using your event class in their apps. If the class changes, they would need to retest all of their code to make sure nothing breaks because of your change.
Without directly changing the data class, how can you write an extension property that returns the same values as the code above?
When correctly implemented, you will be able to use the following code, and it will print the same message as the code shown at the start of this task.
println("Duration of first event of the day: ${events[0].durationOfEvent}")
Click Next to continue to the solution.
Task 7 Solution
val Event.durationOfEvent: String
    get() = if (this.durationInMinutes < 60) {
        "short"
    } else {
        "long"
    }
Affirmations App
Solution code: Affirmations app
Branch: intermediate
Clone:
$ git clone https://github.com/google-developer-training/basic-android-kotlin-compose-training-affirmations.git
$ cd basic-android-kotlin-compose-training-affirmations
$ git checkout intermediate
Add a scrollable list
Create a list item data class
Lists are made up of list items. For single pieces of data, this could be something simple like a string or an integer. For list items that have multiple pieces of data, like an image and text, you will need a class that contains all of these properties.
Data class: a class that only contains properties, and possibly some utility methods to work with those properties.
In this app, the data class is in the
app/src/main/java/com/example/affirmations/model/Affirmation.ktfile. The data class contains 2 properties that are related to an “Affirmation”: a string resource, and an image resource.data class Affirmation( // A string resource ID for the affirmation text @StringRes val stringResourceId: Int, // An image resource ID for the affirmation image @DrawableRes val imageResourceId: Int )
imports
import androidx.annotation.DrawableRes
import androidx.annotation.StringRes
In the
app/src/main/java/com/example/affirmations/model/Datasource.ktfile, theloadAffirmations()method returns a list ofAffirmationobjects. This will be used to build the scrollable list.class Datasource() { fun loadAffirmations(): List<Affirmation> { return listOf<Affirmation>( Affirmation(R.string.affirmation1, R.drawable.image1), Affirmation(R.string.affirmation2, R.drawable.image2), Affirmation(R.string.affirmation3, R.drawable.image3), Affirmation(R.string.affirmation4, R.drawable.image4), Affirmation(R.string.affirmation5, R.drawable.image5), Affirmation(R.string.affirmation6, R.drawable.image6), Affirmation(R.string.affirmation7, R.drawable.image7), Affirmation(R.string.affirmation8, R.drawable.image8), Affirmation(R.string.affirmation9, R.drawable.image9), Affirmation(R.string.affirmation10, R.drawable.image10)) } }
Add a list to the app
Create a list item card
This app is meant to display a list of affirmations. The first step is to create a list item for each affirmation.
The item will be comprised of a
Cardcomposable, containing anImageand aTextcomposable. ACarddisplays content and actions. The Affirmation card will look like this in the preview:
The card shows an image with some text beneath it. This vertical layout can be achieved using a
Columncomposable wrapped in aCardcomposable.Here’s the code from
MainActivity.ktthat achieves this:@Composable fun AffirmationCard(affirmation: Affirmation, modifier: Modifier = Modifier) { Card(modifier = modifier) { Column { Image( painter = painterResource(affirmation.imageResourceId), contentDescription = stringResource(affirmation.stringResourceId), modifier = Modifier .fillMaxWidth() .height(194.dp), contentScale = ContentScale.Crop ) Text( text = LocalContext.current.getString(affirmation.stringResourceId), modifier = Modifier.padding(16.dp), style = MaterialTheme.typography.headlineSmall ) } } }
imports
import com.example.affirmations.model.Affirmation
import androidx.compose.material3.Card
import androidx.compose.foundation.layout.Column
import androidx.compose.foundation.Image
import androidx.compose.foundation.layout.fillMaxWidth
import androidx.compose.foundation.layout.height
import androidx.compose.ui.layout.ContentScale
import androidx.compose.ui.res.painterResource
import androidx.compose.ui.res.stringResource
import androidx.compose.ui.unit.dp
import androidx.compose.material3.Text
import androidx.compose.foundation.layout.padding
import androidx.compose.ui.platform.LocalContext
Each
AffirmationCardcomprises aCardcomposable that contains aColumn. TheColumnis used to stack anImageandTextcomposable vertically.For the
Imagecomposable:fillMaxWidth(): makes theImageoccupy the full width of its container, in this case stretching it horizontally to fill theColumn.height(194.dp): sets a fixed height for the Image to 194 density-independent pixels (dp). Ensures all images in the affirmation cards have a consistent height, regardless of their original sizes.contentScale = ContentScale.Crop: scales the image to cover the entire target area. If the aspect ratio doesn’t match the target area, may result in parts of the image being cropped.
For the
Textcomposable:LocalContext.current.getString(affirmation.stringResourceId): retrieves the string with the IDaffirmation.stringResourceIdModifier.padding(16.dp): adds padding around the textMaterialTheme.typography.headlineSmall: sets the text style to a smaller headline
Create the list
A list of
AffirmationCards is called anAffirmationList. This is a composable that displays a scrollable list of affirmations.@Composable fun AffirmationList(affirmationList: List<Affirmation>, modifier: Modifier = Modifier) { LazyColumn(modifier = modifier) { items(affirmationList) { affirmation -> AffirmationCard( affirmation = affirmation, modifier = Modifier.padding(8.dp) ) } } }
imports
import androidx.compose.foundation.lazy.items
import androidx.compose.foundation.lazy.LazyColumn
A scrollable list can be made using the
LazyColumncomposable. The difference between aLazyColumnand aColumnis that aColumnloads all the items at once, and should be used when you have only a small number of items to display. AColumncan only hold a predefined, or fixed, number of composables.A
LazyColumncan add content on demand, which makes it good for long lists and particularly when the length of the list is unknown. It’s suitable for apps like Instagram. ALazyColumnalso provides scrolling by default, without additional code.The
items()method adds items to theLazyColumn. This method is somewhat unique to this composable, not a common practice for most composables.items()takes a lambda function as an argument. The function takes one list item (an affirmation) as input, and callsAffirmationCard()to display that affirmation.
In-lesson practice: Courses app
This is done during the lesson.
This exercise focuses on creating the components necessary to build a scrollable list.
Some sections might require you to use composables or modifiers, which you may not have seen before. In such cases, see the References available for each problem, where you can find links to documentation related to the modifiers, properties, or composables that you are not familiar with. You can read the documentation and determine how to incorporate the concepts in the app. The ability to understand documentation is an essential skill that you should develop to grow your knowledge.
You will need the following resources to complete the code for these practice problems
Topic images. These images represent each topic in the list.
ic_grain.xml. This is the decorative icon that appears next to the number of courses in the topic.
In these practice problems, you will build out the Courses app from scratch. The Courses app displays a list of course topics.
The practice problems are split into sections, where you will build:
A course topic data class: the topic data will have an image, a name, and the number of associated courses in that topic.
A composable to represent a course topic grid item: each topic item will display the image, the name, the number of associated courses, and a decorative icon.
A composable to display a grid of those course topic items.
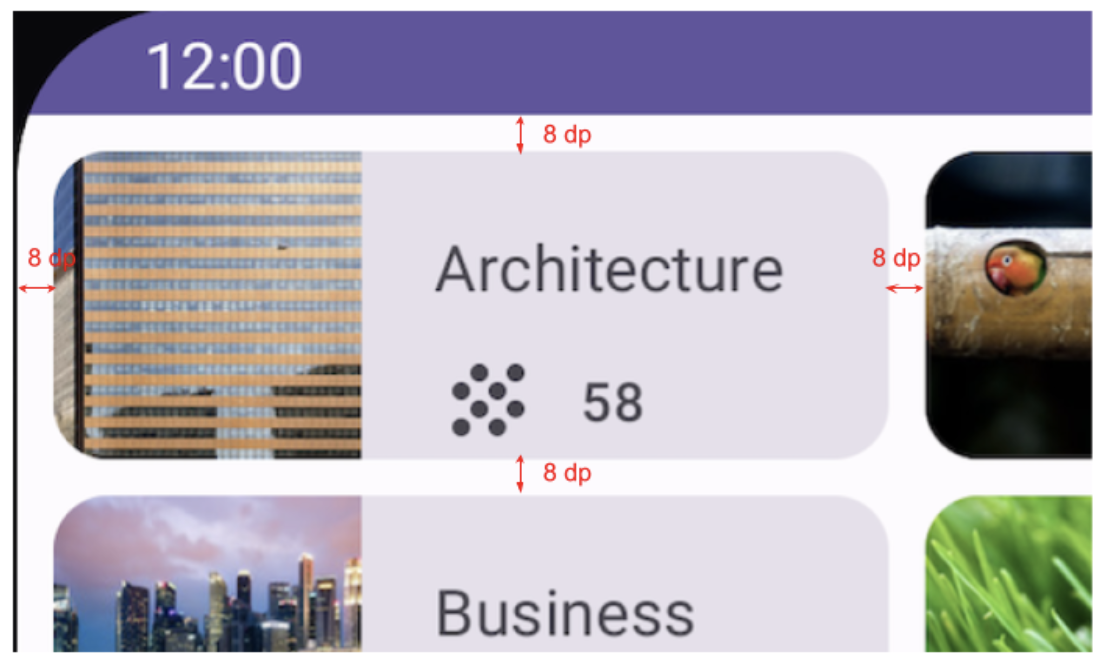
The final app will look like this:
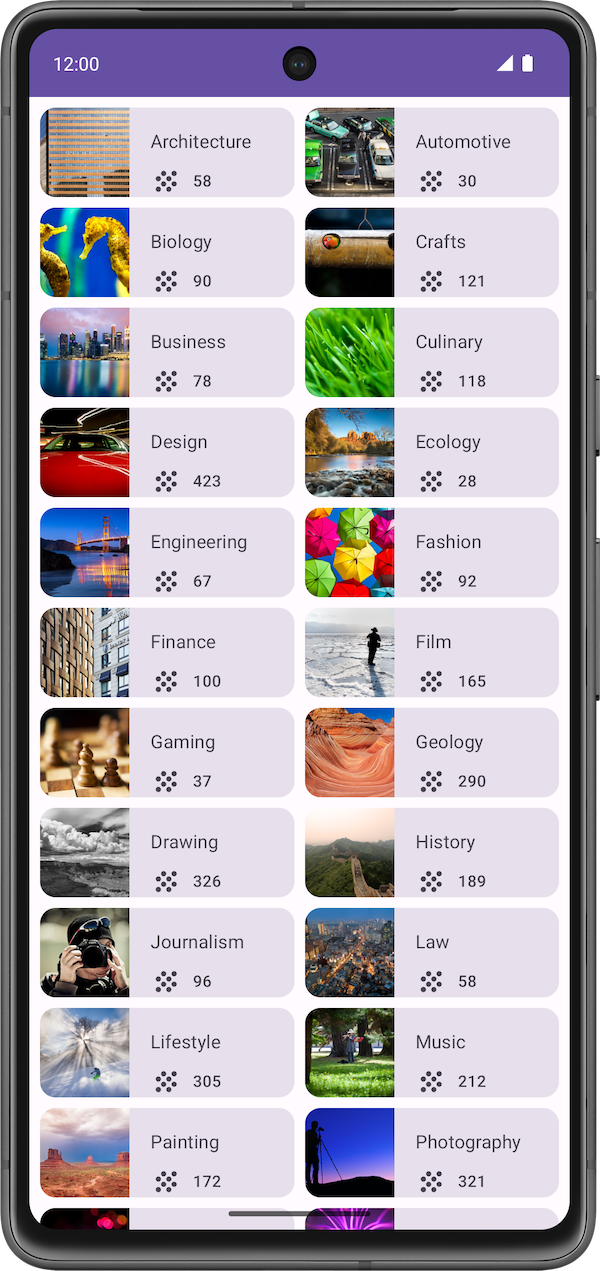
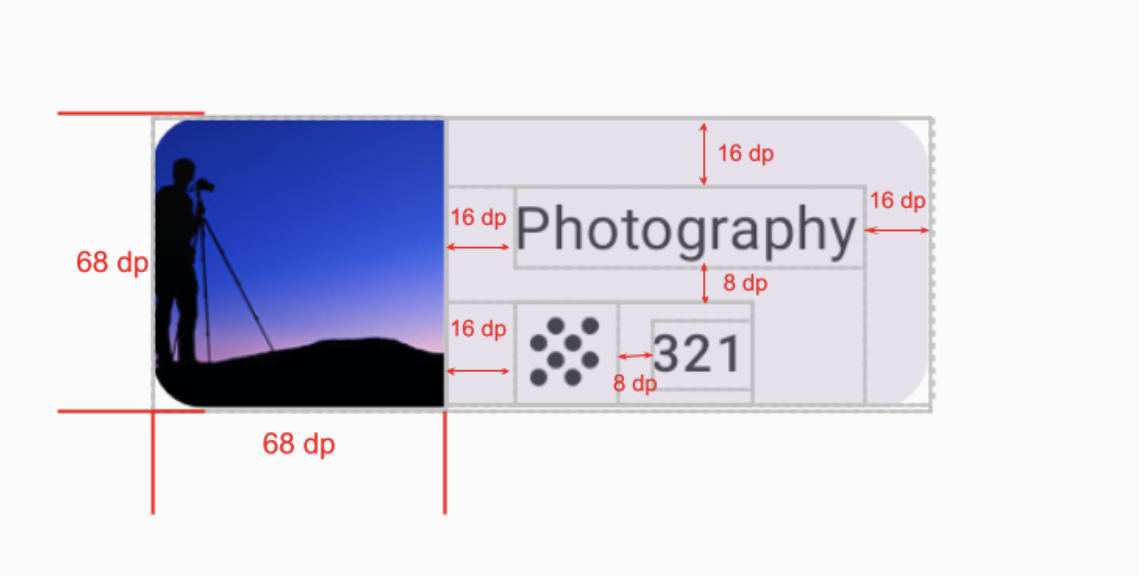
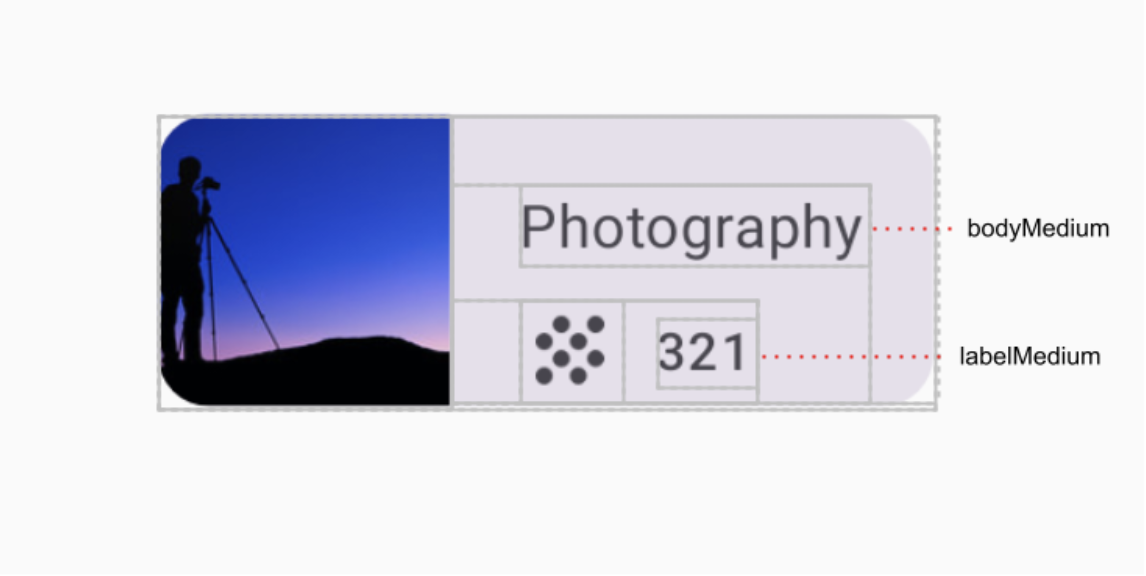
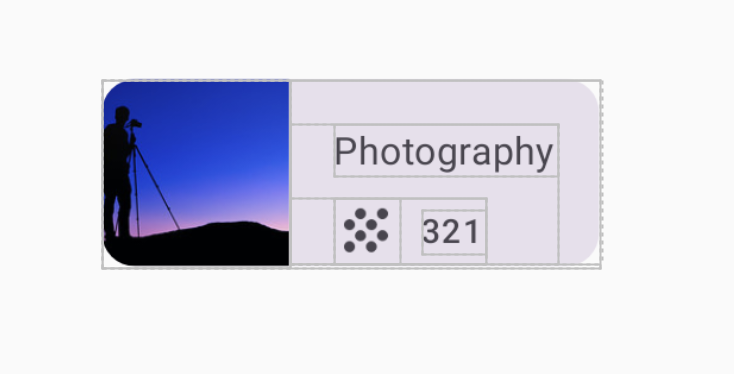
Final screenshot: after you finish the implementation, your topic item layout should match the screenshot below:

UI specifications:
Get started
Create a New Project with the Empty Activity template and a minimum SDK of 24.
Topic data class
Create an empty file
app/src/main/java/com/example/courses/model/Topic.kt. ThisTake a look at the items from the final app.
Each course topic holds three pieces of unique information. Using the unique content of each item as a reference, create a class inside
Topic.ktto hold this data.
Data source
In this section, you create a data set for the grid of courses.
Copy the following items into
app/src/main/res/values/strings.xml:<string name="architecture">Architecture</string> <string name="crafts">Crafts</string> <string name="business">Business</string> <string name="culinary">Culinary</string> <string name="design">Design</string> <string name="fashion">Fashion</string> <string name="film">Film</string> <string name="gaming">Gaming</string> <string name="drawing">Drawing</string> <string name="lifestyle">Lifestyle</string> <string name="music">Music</string> <string name="painting">Painting</string> <string name="photography">Photography</string> <string name="tech">Tech</string>
Create an empty file
app/src/main/java/com/example/courses/data/DataSource.kt. Copy this code into the file:package com.example.courses.data import com.example.courses.R import com.example.courses.model.Topic object DataSource { val topics = listOf( Topic(R.string.architecture, 58, R.drawable.architecture), Topic(R.string.crafts, 121, R.drawable.crafts), Topic(R.string.business, 78, R.drawable.business), Topic(R.string.culinary, 118, R.drawable.culinary), Topic(R.string.design, 423, R.drawable.design), Topic(R.string.fashion, 92, R.drawable.fashion), Topic(R.string.film, 165, R.drawable.film), Topic(R.string.gaming, 164, R.drawable.gaming), Topic(R.string.drawing, 326, R.drawable.drawing), Topic(R.string.lifestyle, 305, R.drawable.lifestyle), Topic(R.string.music, 212, R.drawable.music), Topic(R.string.painting, 172, R.drawable.painting), Topic(R.string.photography, 321, R.drawable.photography), Topic(R.string.tech, 118, R.drawable.tech) ) }
MainActivity.kt
Use this code in
app/src/main/java/com/example/courses/MainActivity.kt:package com.example.courses import android.os.Bundle import androidx.activity.ComponentActivity import androidx.activity.compose.setContent import androidx.activity.enableEdgeToEdge import androidx.compose.foundation.Image import androidx.compose.foundation.layout.Arrangement import androidx.compose.foundation.layout.Box import androidx.compose.foundation.layout.Column import androidx.compose.foundation.layout.Row import androidx.compose.foundation.layout.aspectRatio import androidx.compose.foundation.layout.fillMaxSize import androidx.compose.foundation.layout.padding import androidx.compose.foundation.layout.size import androidx.compose.foundation.layout.statusBarsPadding import androidx.compose.foundation.lazy.grid.GridCells import androidx.compose.foundation.lazy.grid.LazyVerticalGrid import androidx.compose.foundation.lazy.grid.items import androidx.compose.material3.Card import androidx.compose.material3.Icon import androidx.compose.material3.MaterialTheme import androidx.compose.material3.Surface import androidx.compose.material3.Text import androidx.compose.runtime.Composable import androidx.compose.ui.Alignment import androidx.compose.ui.Modifier import androidx.compose.ui.layout.ContentScale import androidx.compose.ui.res.dimensionResource import androidx.compose.ui.res.painterResource import androidx.compose.ui.res.stringResource import androidx.compose.ui.tooling.preview.Preview import androidx.compose.ui.unit.dp import com.example.courses.data.DataSource import com.example.courses.model.Topic import com.example.courses.ui.theme.CoursesTheme class MainActivity : ComponentActivity() { override fun onCreate(savedInstanceState: Bundle?) { enableEdgeToEdge() super.onCreate(savedInstanceState) setContent { CoursesTheme { // A surface container using the 'background' color from the theme Surface( modifier = Modifier .fillMaxSize() .statusBarsPadding(), color = MaterialTheme.colorScheme.background ) { TopicGrid( modifier = Modifier.padding( start = dimensionResource(R.dimen.padding_small), top = dimensionResource(R.dimen.padding_small), end = dimensionResource(R.dimen.padding_small), ) ) } } } } } @Composable fun TopicGrid(modifier: Modifier = Modifier) { LazyVerticalGrid( columns = GridCells.Fixed(2), verticalArrangement = Arrangement.spacedBy(dimensionResource(R.dimen.padding_small)), horizontalArrangement = Arrangement.spacedBy(dimensionResource(R.dimen.padding_small)), modifier = modifier ) { // FILL THIS IN ON YOUR OWN, IT'S JUST 3 LINES OF CODE } } @Composable fun TopicCard(topic: Topic, modifier: Modifier = Modifier) { // FILL THIS IN ON YOUR OWN } @Preview(showBackground = true) @Composable fun TopicPreview() { CoursesTheme { val topic = Topic(R.string.photography, 321, R.drawable.photography) Column( modifier = Modifier.fillMaxSize(), verticalArrangement = Arrangement.Center, horizontalAlignment = Alignment.CenterHorizontally ) { TopicCard(topic = topic) } } }
If you’re not sure how to fill in
TopicCard, have a look at the code below for guidance. If you’d like to, you can also copy-paste the code and create comments to make sure you understand what the code does.
References: Topic grid item
Solution code: Courses app
Solution code: https://github.com/google-developer-training/basic-android-kotlin-compose-training-courses/tree/main
Branch: main
To clone:
$ git clone https://github.com/google-developer-training/basic-android-kotlin-compose-training-courses.git
The app that you built in this exercise is a modified version of the Owl app courses screen. The Owl app is a comprehensive sample app demonstrating the capabilities of Compose. Other Compose sample apps can be found in the compose-samples GitHub repository.
Week 5 Blended Learning Questions
What to do?
Individual work: place your responses to the questions in your Personal RefleXions doc (no need to share with teacher).
Team work: share responses, resolve differences, produce one set of responses as a team, place them in the Team RefleXions doc (share with teacher).
Choose an app on your phone. Explain how it might use any one of these features:
Singleton objects
Interfaces
Generics
Extension properties
Extension functions
LazyColumn
example
Grab offers various types of rides like GrabCar, GrabTaxi, etc. An interface might be used to define the common functionality of different types of rides. The interface could contain methods like
calculateFare(),getDriverLocation(), etc. Each type of ride can implement this interface in its own way.#solulu
Singleton objects: a media player could use a singleton object that’s responsible for playing audio. This ensures that only one song/video is playing at a time.
Interfaces: an interface for an in-app game could include common functions that need to be implemented, like
setGameScore(), etc. Example: https://github.com/elbekD/kt-telegram-bot/blob/4a749ffc7f10b2e0a5d3a313c7f7df904ba14892/library/src/main/kotlin/com/elbekd/bot/api/TelegramGameApi.ktGenerics: Instagram can show both videos and images, it could use a generic List<T> to work with both types
Extension properties: a weather app could use an extension property to convert temperature from Celsius to Fahrenheit
Extension functions: a messaging app could use an extension function to format a message before sending it
LazyColumn: anything that scrolls, like Instagram, TikTok, reddit could all use a LazyColumn to display items only on demand
LazyColumn tries to optimize performance by loading items on-demand. What are other similar methods that apps on your phone use to achieve the same effect?
#solulu
Pagination: loads items one page at a time
Infinite scroll: loads items as the user scrolls
Map loading: show the details like roads, buildings, etc. only when the user zooms in
Image galleries: load a low-resolution thumbnail first, then load the full-resolution image when the user taps on it
Chat history: load old messages from a year ago only if user taps on that specific date
What is one specific example of an ick you have with a animations in a mobile app, and how would you improve it?
#solulu
Progress bars that are stuck at 90+% feel scammy. Either compute the progress more accurately, or show a different animation that doesn’t imply completion.