Week 6: Lifecycle and App Architecture
In Android, an activity is the entry point for interacting with the user.
With current best practices, one activity might display multiple screens by swapping them in and out as needed.
During its lifetime, an activity transitions through, and sometimes back to, various states. This transitioning of states is known as the activity lifecycle.
The activity lifecycle extends from the creation of the activity to its destruction, when the system reclaims that activity’s resources. As a user navigates in and out of an activity, each activity transitions between different states in the activity lifecycle.
As an Android developer, you need to understand the activity lifecycle. If your activities do not correctly respond to lifecycle state changes, your app can generate strange bugs, confusing behavior for your users, or use too many Android system resources. Understanding the Android lifecycle and responding correctly to lifecycle state changes is an important part of Android development.
Dessert Clicker app
In the Dessert Clicker app, each time the user taps a dessert on the screen, the app “purchases” the dessert for the user. The app updates values in the layout for the:
Number of desserts that are “purchased”
Total revenue for the “purchased” desserts
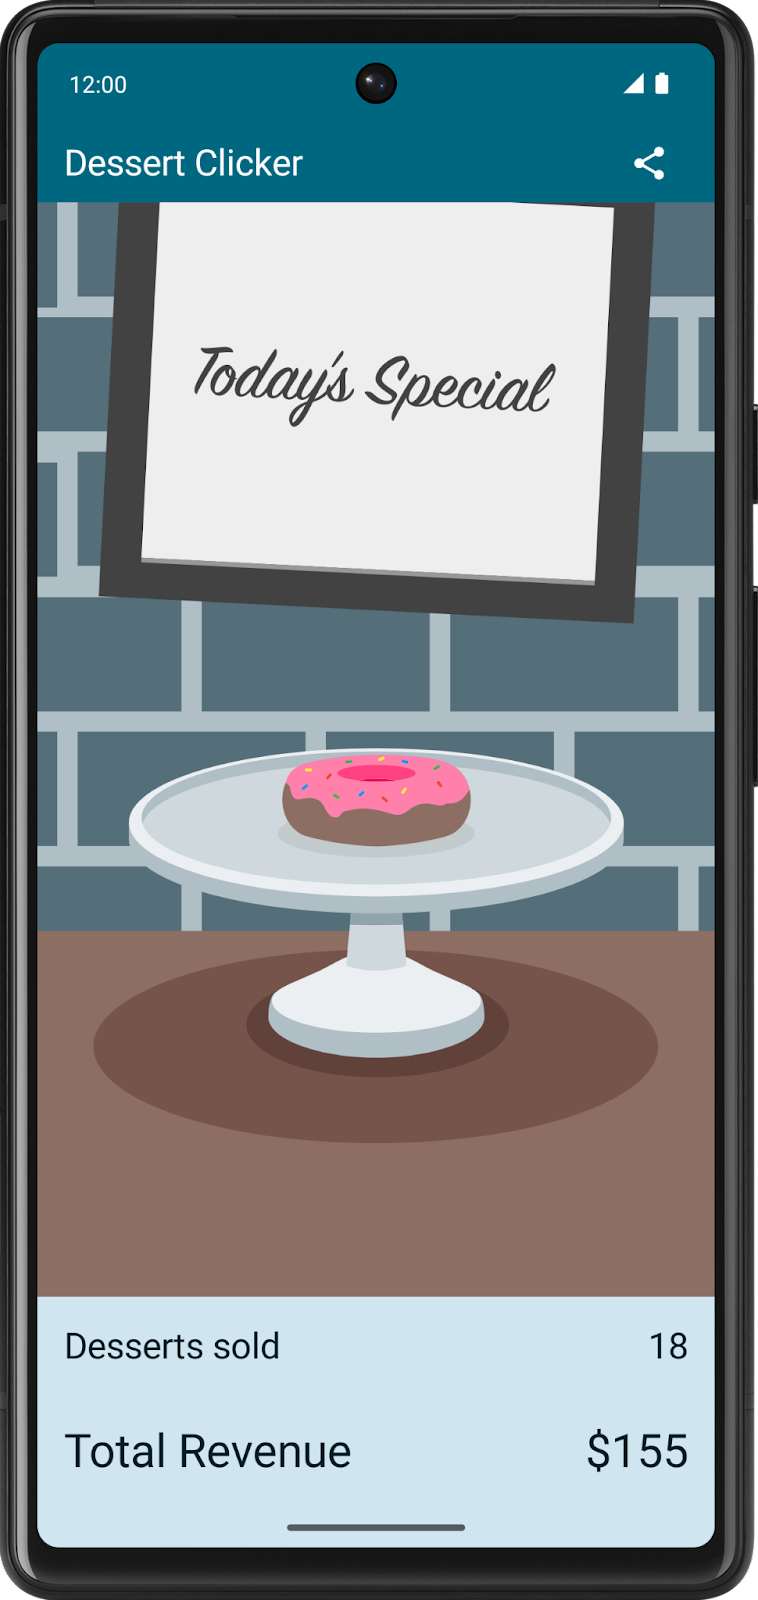
This app contains several bugs related to the Android lifecycle. For example, in certain circumstances, the app resets the dessert values to 0. Understanding the Android lifecycle will help you understand why these problems happen and how to fix them.
Starter code
Branch: starter
Clone:
$ git clone https://github.com/google-developer-training/basic-android-kotlin-compose-training-dessert-clicker.git
$ cd basic-android-kotlin-compose-training-dessert-clicker
$ git checkout starter
Explore the lifecycle methods and add basic logging
Every activity has what is known as a lifecycle. This term is an allusion to plant and animal lifecycles, like the lifecycle of a butterfly — the different states of the butterfly show its growth from egg to caterpillar to pupa to butterfly to death.
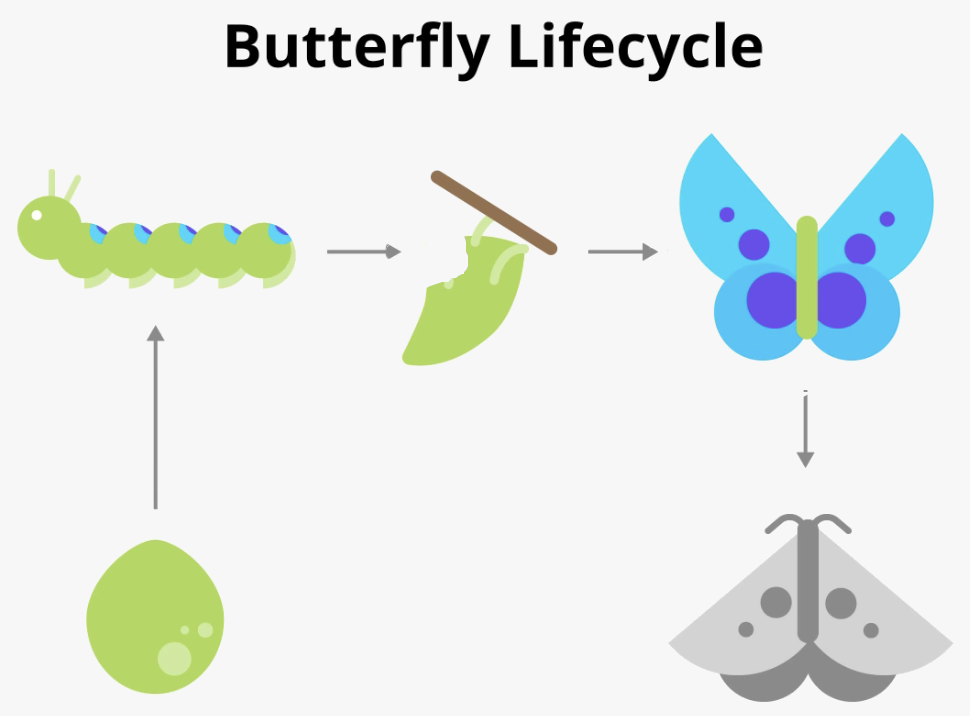
Similarly, the activity lifecycle consists of the different states that an activity can go through, from when the activity first initializes to its destruction, at which time the operating system reclaims its memory. Typically, the entry point of a program is the
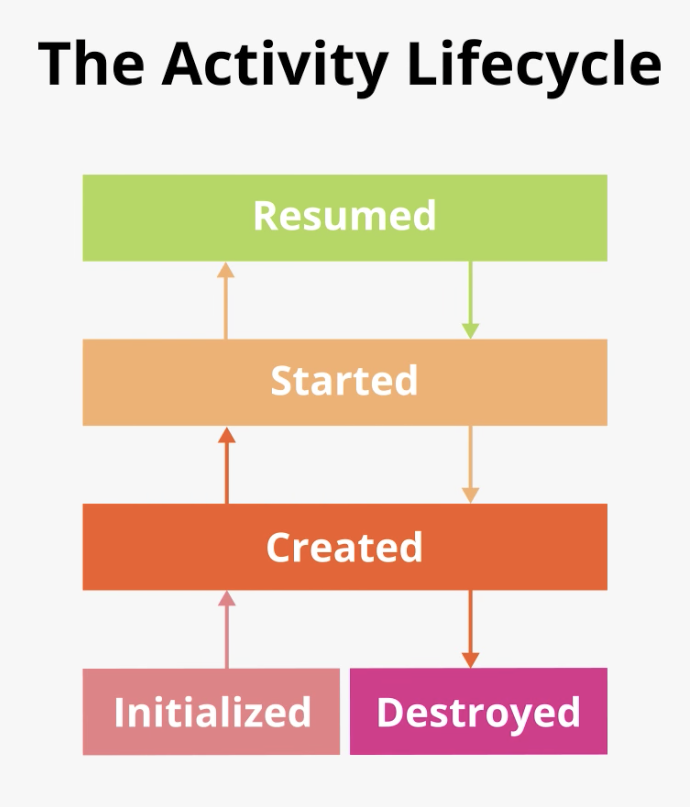
main()method. Android activities, however, begin with theonCreate()method; this method would be the equivalent of the egg stage in the above example. You have used activities already, many times throughout this course, and you might recognize theonCreate()method. As the user starts your app, navigates between activities, navigates inside and outside of your app, the activity changes state.The following diagram shows all the activity lifecycle states. As their names indicate, these states represent the status of the activity. Notice that, unlike the butterfly lifecycle, an activity can go back and forth between states throughout the lifecycle, instead of only moving in a single direction.
Note
An Android app can have multiple activities. However, it is recommended to have a single activity, and so far that is what you have been implementing in this course.
Often, you want to change some behavior, or run some code, when the activity lifecycle state changes. Therefore, the
Activityclass itself, and any subclasses ofActivitysuch asComponentActivity, implement a set of lifecycle callback methods. Android invokes these callbacks when the activity moves from one state to another, and you can override those methods in your own activities to perform tasks in response to those lifecycle state changes. The following diagram shows the lifecycle states along with the available overridable callbacks.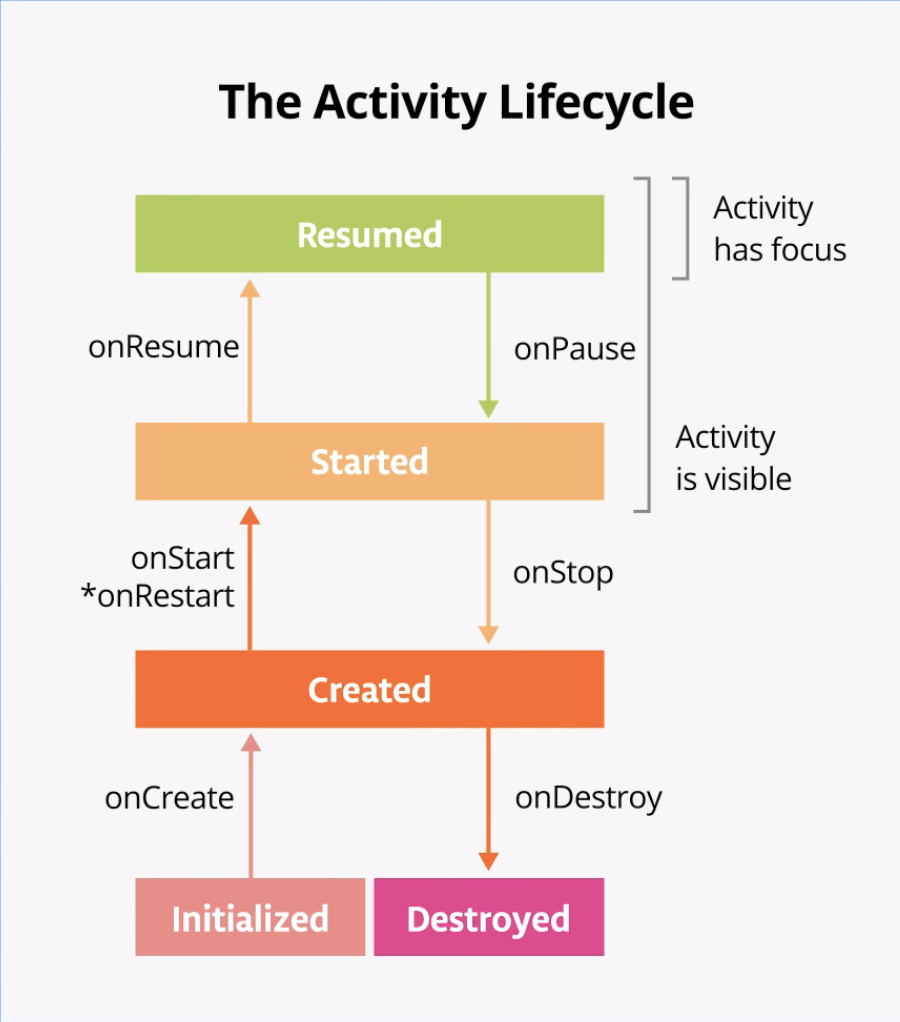
Note
The asterisk on the
onRestart()method indicates that this method is not called every time the state transitions between Created and Started. It is only called ifonStop()was called and the activity is subsequently restarted.It’s important to know when Android invokes the overridable callbacks and what to do in each callback method, but both of these diagrams are complex and can be confusing. In this codelab, instead of just reading what each state and callback means, you’re going to do some detective work and build your understanding of the Android activity lifecycle.
Step 1: Examine the onCreate() method and add logging
To figure out what’s going on with the Android lifecycle, it’s helpful to know when the various lifecycle methods are called. This information helps you identify where things are going wrong in the Dessert Clicker app.
A simple way to determine this information is to use the Android logging functionality. Logging enables you to write short messages to a console while the app runs and use it to see when different callbacks are triggered.
Run the Dessert Clicker app and tap several times on the picture of the dessert. Note how the value for Desserts sold and the total dollar amount changes.
Open
MainActivity.ktand examine theonCreate()method for this activity:override fun onCreate(savedInstanceState: Bundle?) { // ... }
In the activity lifecycle diagram, you may recognize the
onCreate()method, because you’ve used this callback before. It’s the one method that every activity must implement. TheonCreate()method is where you should do any one-time initializations for your activity. For example, inonCreate(), you callsetContent(), which specifies the activity’s UI layout.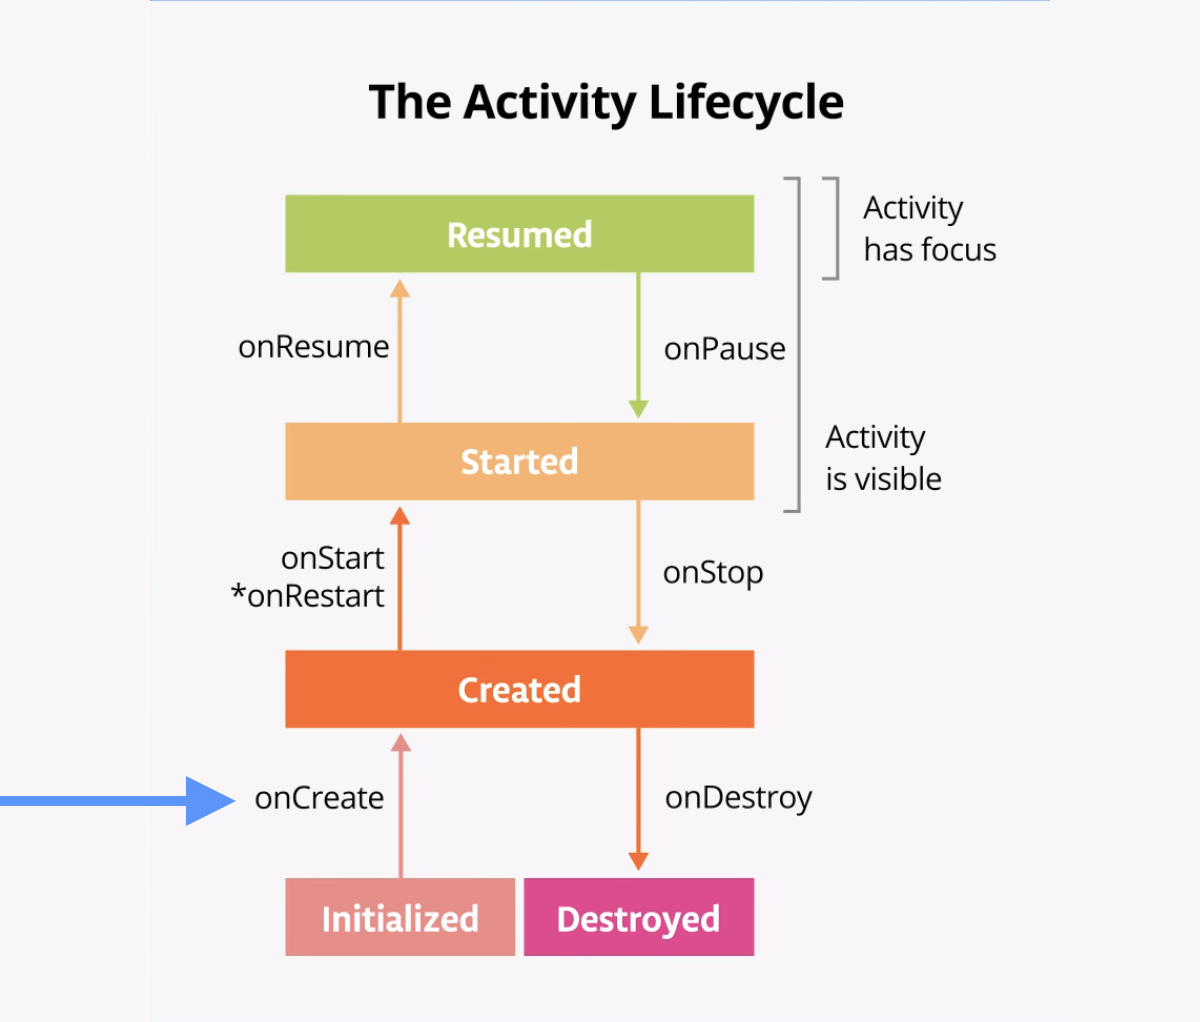
The
onCreate()lifecycle method is called once, just after the activity initializes—when the OS creates the newActivityobject in memory. AfteronCreate()executes, the activity is considered created.Note
When you override the
onCreate()method, you must call the superclass implementation to complete the creation of the Activity, so within it, you must immediately callsuper.onCreate(). The same is true for other lifecycle callback methods.A good convention is to declare a
TAGconstant in your file as its value will not change.To mark it as a compile-time constant, use
constwhen declaring the variable. A compile-time constant is a value that is known during compilation.Add the following constant at the top level of the
MainActivity.kt, above the class declarationclass MainActivity.private const val TAG = "MainActivity"
In the
onCreate()method, just after the call tosuper.onCreate(), add the following line:Log.d(TAG, "onCreate Called")
imports
import android.util.Log
The
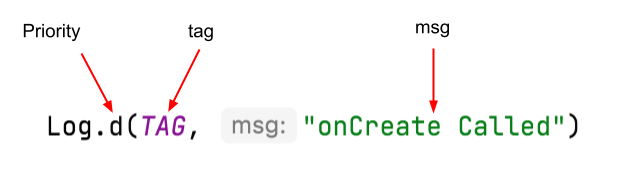
Logclass writes messages to the Logcat. The Logcat is the console for logging messages. Messages from Android about your app appear here, including the messages you explicitly send to the log with theLog.d()method or otherLogclass methods.There are three important aspects of the
Loginstruction:The priority of the log message, that is, how important the message is.
Log.v()logs verbose messages.Log.d()logs debug messages.Log.i()logs informational messages.Log.w()logs warnings.Log.e()logs errors.
The log tag (the first parameter), in this case
"MainActivity". The tag is a string that lets you more easily find your log messages in the Logcat. The tag is typically the name of the class.The actual log message, called
msg(the second parameter), is a short string, which in this case is"onCreate Called".
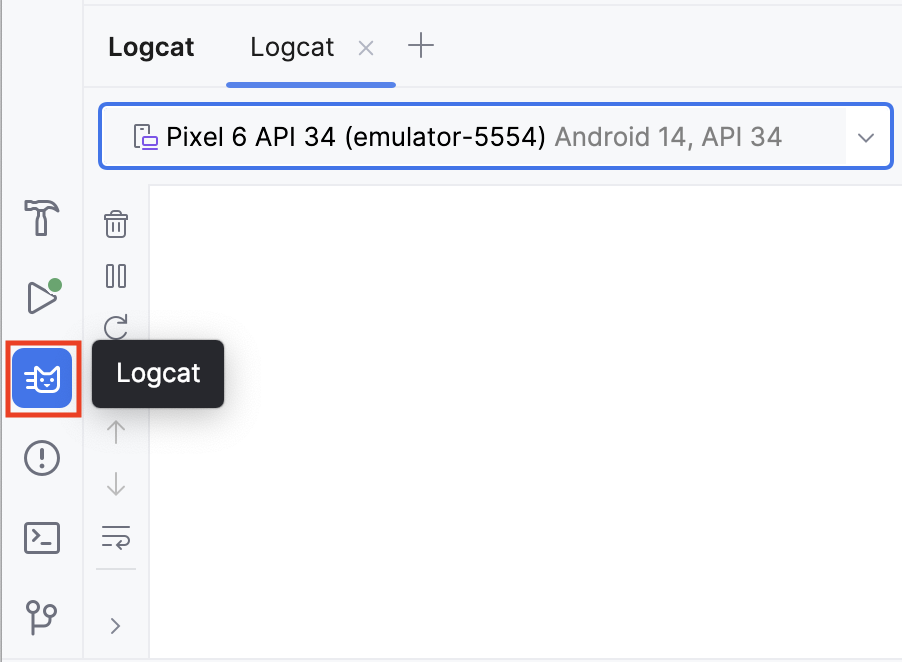
Compile and run the Dessert Clicker app. You don’t see any behavior differences in the app when you tap the dessert. In Android Studio, at the bottom of the screen, click the Logcat tab.
In the Logcat window, type tag:MainActivity into the search field.
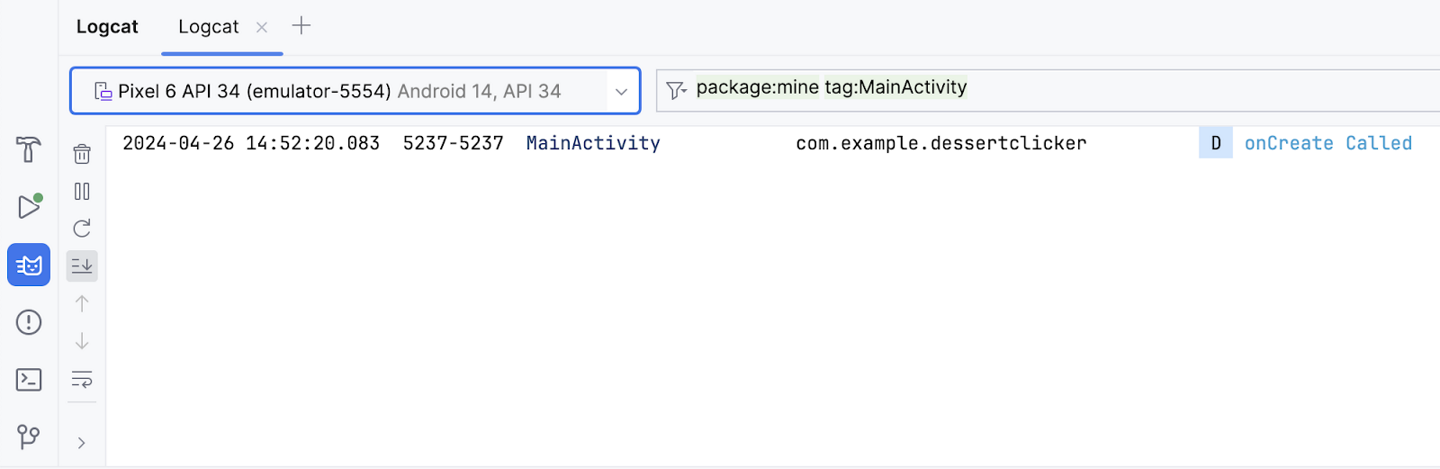
The Logcat can contain many messages, most of which aren’t useful to you. You can filter the Logcat entries in many ways, but searching is the easiest. Because you used
MainActivityas the log tag in your code, you can use that tag to filter the log. Your log message includes the date and time, your log tag, the name of the package (com.example.dessertclicker), and the actual message. Because this message appears in the log, you know thatonCreate()was executed.
Step 2: Implement the onStart() method
The
onStart()lifecycle method is called just afteronCreate(). AfteronStart()runs, your activity is visible on the screen. UnlikeonCreate(), which is called only once to initialize your activity,onStart()can be called by the system many times in the lifecycle of your activity.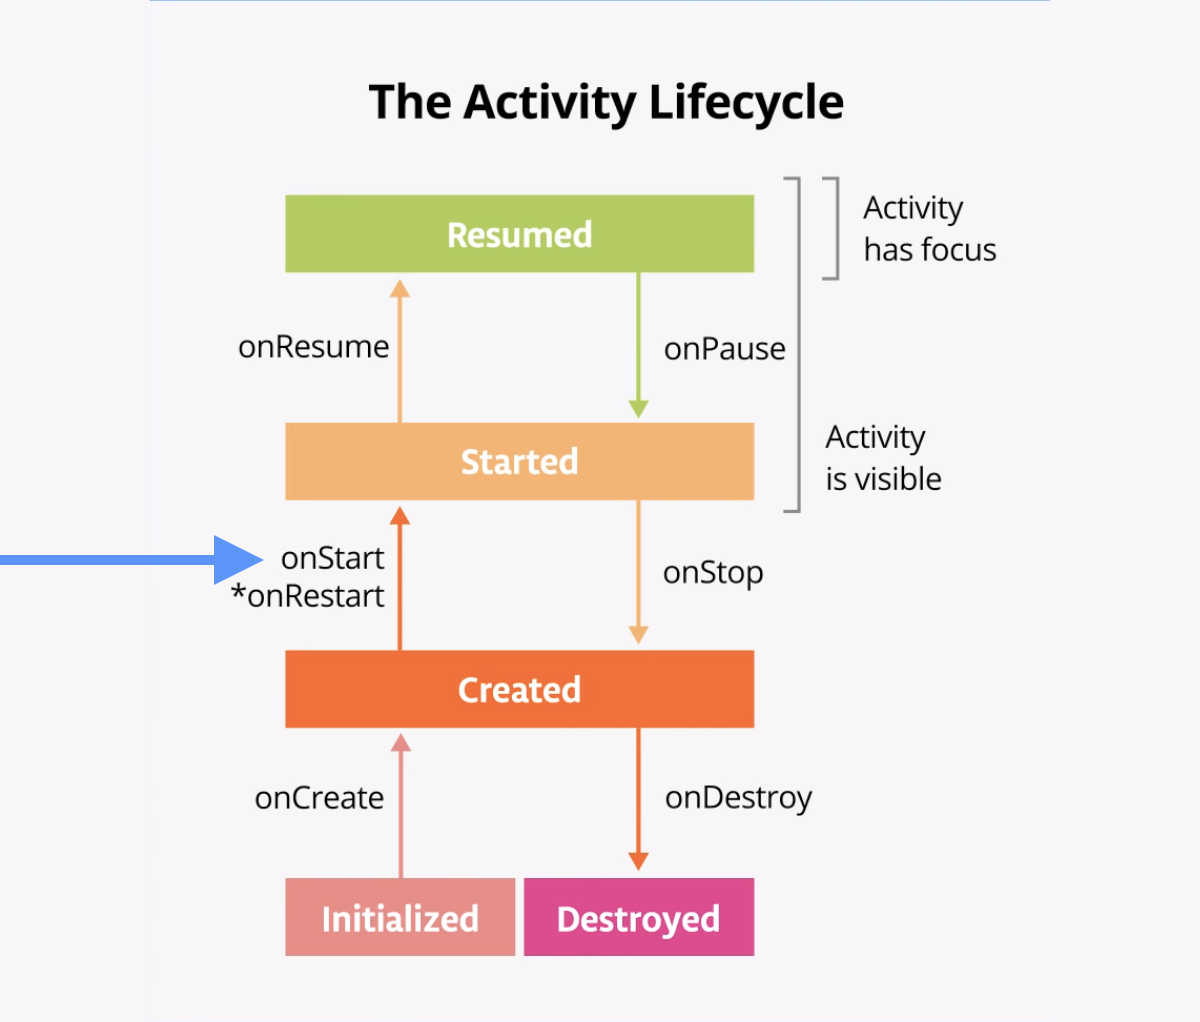
Note that
onStart()is paired with a correspondingonStop()lifecycle method. If the user starts your app and then returns to the device’s home screen, the activity is stopped and is no longer visible on screen.Click on any line of code in
MainActivity.kt. Select Code > Override Methods… or press Control+O. A dialog appears with a long list of all the methods you can override in this class.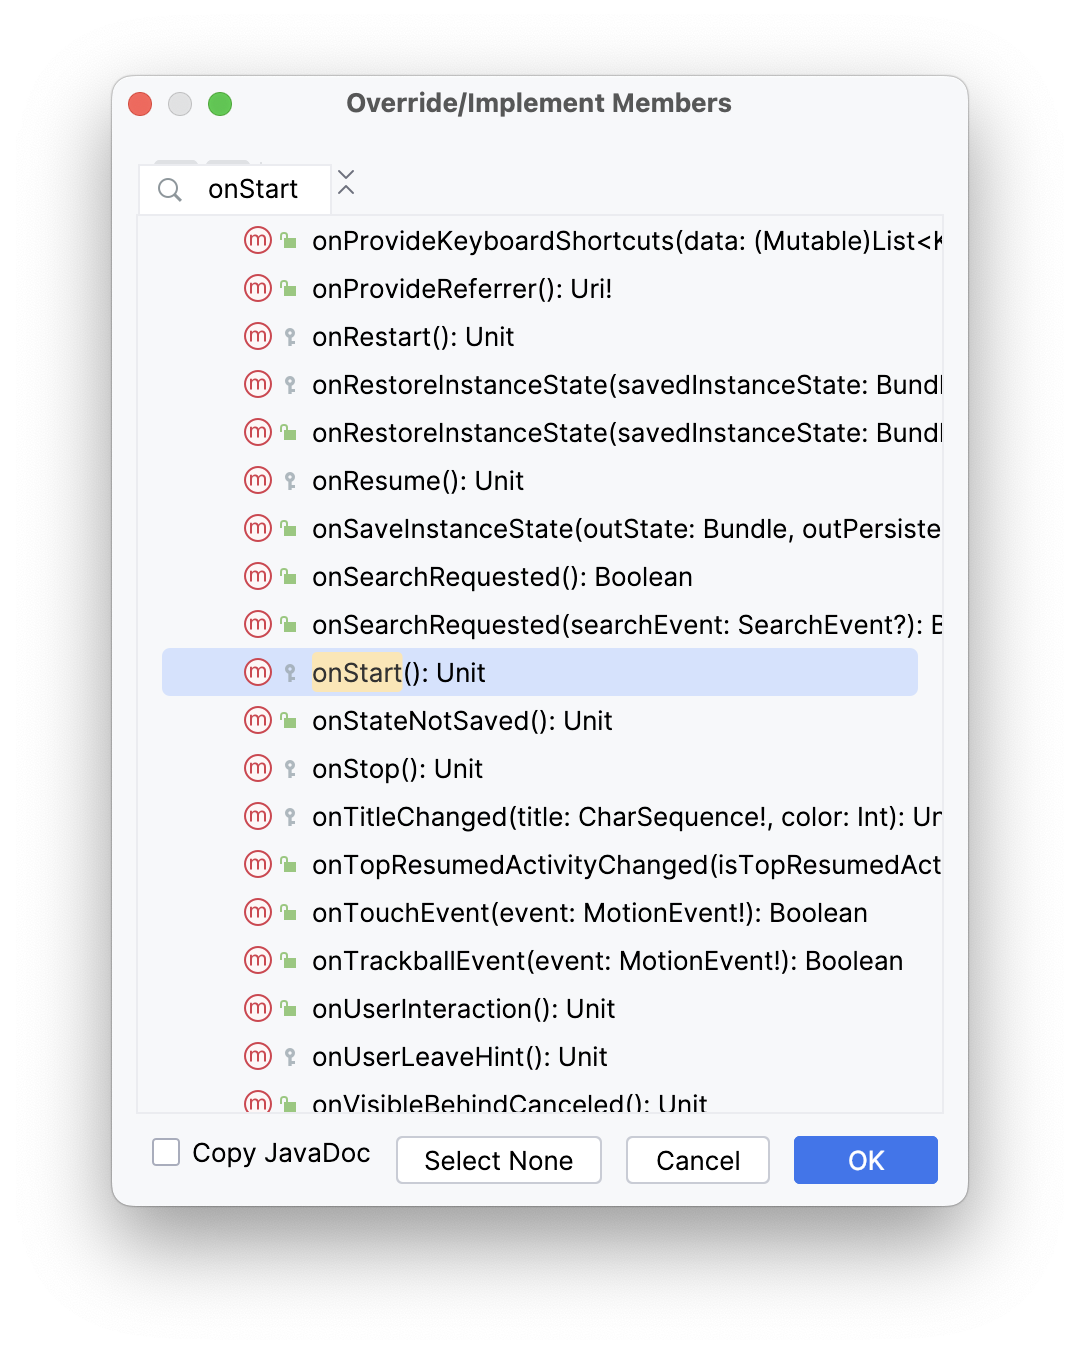
Start typing
onStartto search for the correct method. Press ↓ untilonStart()appears, then click OK to insert the boilerplate override code:override fun onStart() { super.onStart() }
Inside the
onStart()method, add a log message:override fun onStart() { super.onStart() Log.d(TAG, "onStart Called") }
Compile and run the Dessert Clicker app and open the Logcat pane.
Type tag:MainActivity into the search field to filter the log. Notice that both the
onCreate()andonStart()methods were called one after the other, and that your activity is visible on screen.Press the Home button on the device and then use the Recents screen to return to the activity. Notice that the activity resumes where it left off, with all the same values, and that
onStart()is logged a second time to Logcat. Notice also that theonCreate()method is not called again.2024-04-26 14:54:48.721 5386-5386 MainActivity com.example.dessertclicker D onCreate Called 2024-04-26 14:54:48.756 5386-5386 MainActivity com.example.dessertclicker D onStart Called 2024-04-26 14:55:41.674 5386-5386 MainActivity com.example.dessertclicker D onStart Called
Note
As you experiment with your device and observe the lifecycle callbacks, you might notice unusual behavior when you rotate your device. More deets later.
Step 3: Add more log statements
In this step, you implement logging for all the other lifecycle methods.
Override the remainder of the lifecycle methods in your
MainActivityand add log statements for each one, as shown in the following code:override fun onResume() { super.onResume() Log.d(TAG, "onResume Called") } override fun onRestart() { super.onRestart() Log.d(TAG, "onRestart Called") } override fun onPause() { super.onPause() Log.d(TAG, "onPause Called") } override fun onStop() { super.onStop() Log.d(TAG, "onStop Called") } override fun onDestroy() { super.onDestroy() Log.d(TAG, "onDestroy Called") }
Compile and run Dessert Clicker again and examine Logcat.
Notice that this time, in addition to
onCreate()andonStart(), there’s a log message for theonResume()lifecycle callback.2024-04-26 14:56:48.684 5484-5484 MainActivity com.example.dessertclicker D onCreate Called 2024-04-26 14:56:48.709 5484-5484 MainActivity com.example.dessertclicker D onStart Called 2024-04-26 14:56:48.713 5484-5484 MainActivity com.example.dessertclicker D onResume Called
When an activity starts from the beginning, you see all three of these lifecycle callbacks called in order:
onCreate()when the system creates the app.onStart()makes the app visible on the screen, but the user is not yet able to interact with it.onResume()brings the app to the foreground, and the user is now able to interact with it.
Despite the name, the
onResume()method is called at startup, even if there is nothing to resume.
Explore lifecycle use cases
Now that you have set up the Dessert Clicker app for logging, you’re ready to start using the app and exploring how lifecycle callbacks are triggered.
Use case 1: Opening and closing the activity
You start with the most basic use case, which is to start your app for the first time and then close the app.
Compile and run the Dessert Clicker app, if it is not already running. As you’ve seen, the
onCreate(),onStart(), andonResume()callbacks are called when the activity starts for the first time.2024-04-26 14:56:48.684 5484-5484 MainActivity com.example.dessertclicker D onCreate Called 2024-04-26 14:56:48.709 5484-5484 MainActivity com.example.dessertclicker D onStart Called 2024-04-26 14:56:48.713 5484-5484 MainActivity com.example.dessertclicker D onResume Called
Tap the cupcake a few times.
Tap the Back button on the device.
Notice in Logcat that
onPause()andonStop()are called in that order.2024-04-26 14:58:19.984 5484-5484 MainActivity com.example.dessertclicker D onPause Called 2024-04-26 14:58:20.491 5484-5484 MainActivity com.example.dessertclicker D onStop Called 2024-04-26 14:58:20.517 5484-5484 MainActivity com.example.dessertclicker D onDestroy Called
In this case, using the Back button causes the activity (and the app) to be removed from the screen and moved to the back of the activity stack.
The Android OS might close your activity if your code manually calls the activity’s
finish()method or if the user force-quits the app. For example, the user can force-quit or close the app in the Recents screen. The OS might also shut down your activity on its own if your app has not been onscreen for a long time. Android does so to preserve battery life and to reclaim the resources the app was using so they are available to other apps. These are just a few examples of why the Android system destroys your activity. There are additional cases when the Android system destroys your activity without providing a warning.Note
onCreate()andonDestroy(), which this codelab teaches later, are only called once during the lifetime of a single activity instance:onCreate()to initialize the app for the very first time, andonDestroy()to nullify, close, or destroy objects that the activity may have been using so that they don’t continue to use resources, like memory.
Use case 2: Navigating away from and back to the activity
Now that you’ve started the app and closed it, you’ve seen most of the lifecycle states for when the activity gets created for the first time. You’ve also seen most of the lifecycle states that the activity goes through when it gets closed. But as users interact with their Android devices, they switch between apps, return home, start new apps, and handle interruptions by other activities such as phone calls.
Your activity does not close down entirely every time the user navigates away from that activity:
When your activity is no longer visible on screen, the status is known as putting the activity into the background. The opposite of this is when the activity is in the foreground, or onscreen.
When the user returns to your app, that same activity is restarted and becomes visible again. This part of the lifecycle is called the app’s visible lifecycle.
When your app is in the background, it generally should not be actively running to preserve system resources and battery life. You use the
Activitylifecycle and its callbacks to know when your app is moving to the background so that you can pause any ongoing operations. You then restart the operations when your app comes into the foreground.In this step, you look at the activity lifecycle when the app goes into the background and returns again to the foreground.
With the Dessert Clicker app running, click the cupcake a few times.
Press the Home button on your device and observe the Logcat in Android Studio. Returning to the home screen puts your app into the background, rather than shutting down the app altogether. Notice that the
onPause()andonStop()methods are called.
2024-04-26 15:00:04.905  5590-5590  MainActivity            com.example.dessertclicker           D  onPause Called
2024-04-26 15:00:05.430  5590-5590  MainActivity            com.example.dessertclicker           D  onStop Called
When
onPause()is called, the app no longer has focus. AfteronStop(), the app is no longer visible on screen. Although the activity is stopped, theActivityobject is still in memory in the background. The Android OS has not destroyed the activity. The user might return to the app, so Android keeps your activity resources around.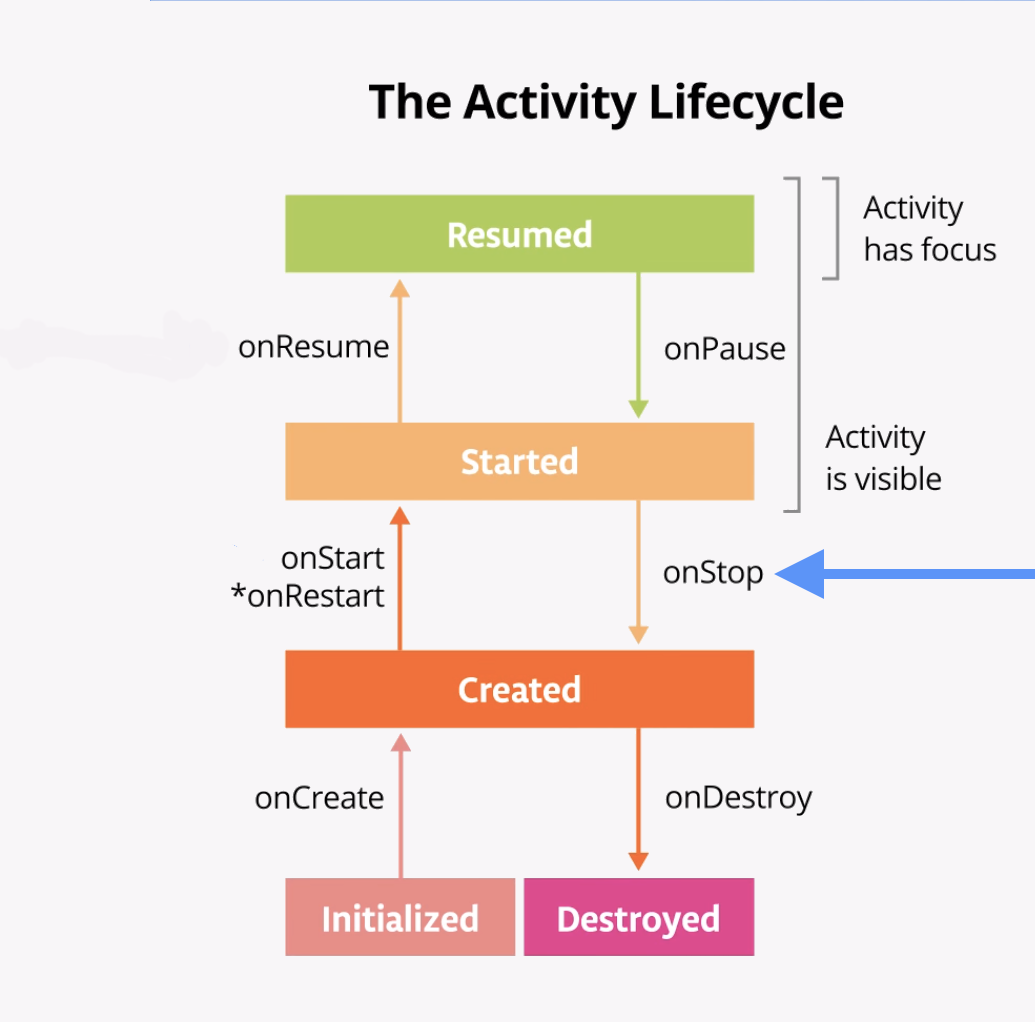
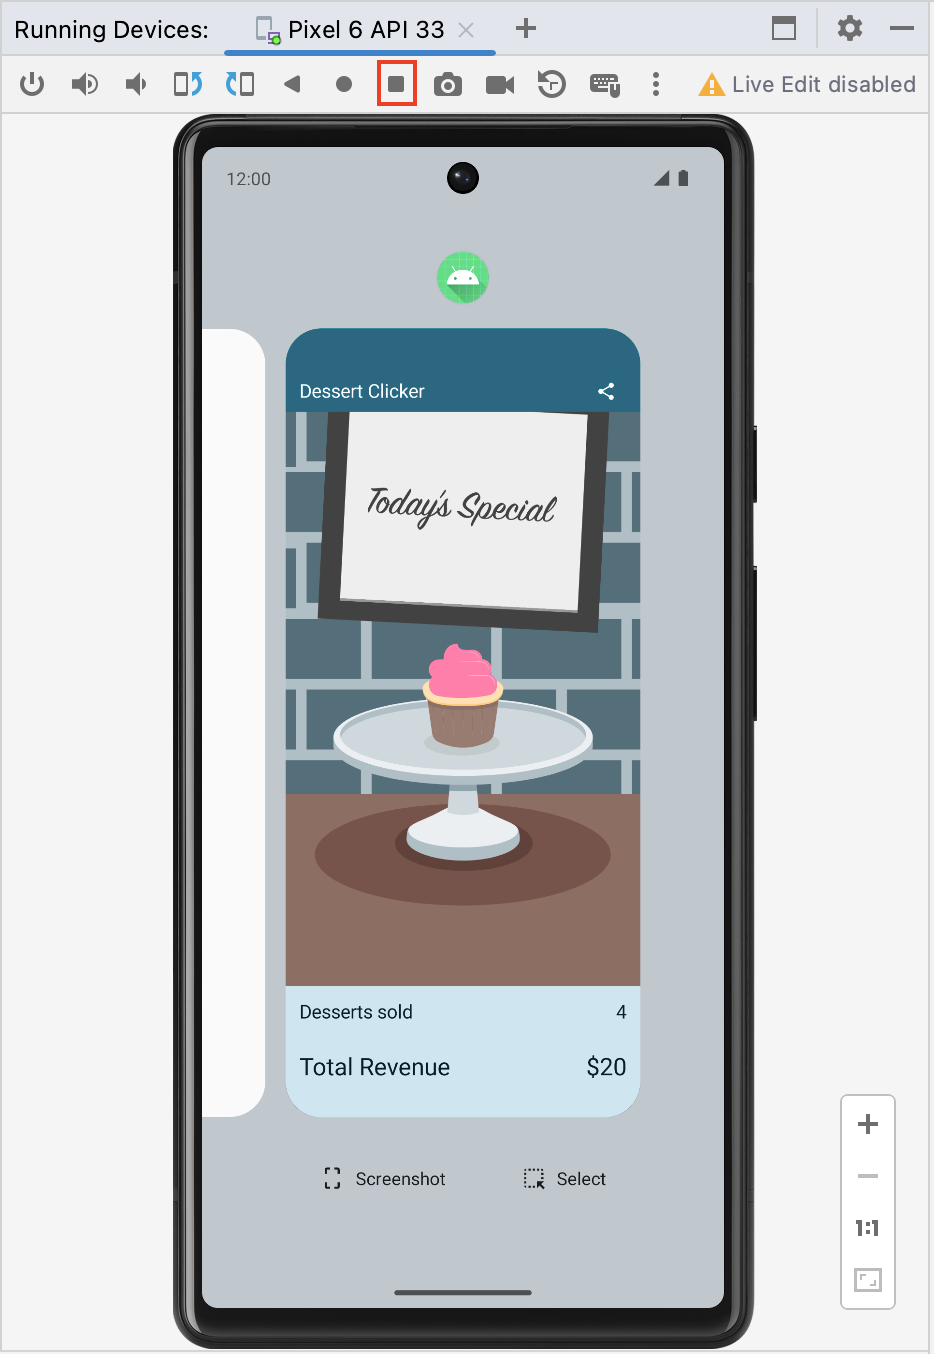
Use the Recents screen to return to the app. On the emulator, the Recents screen can be accessed by the square system button shown in the image below.
Notice in Logcat that the activity restarts with
onRestart()andonStart()and then resumes withonResume().2024-04-26 15:00:39.371 5590-5590 MainActivity com.example.dessertclicker D onRestart Called 2024-04-26 15:00:39.372 5590-5590 MainActivity com.example.dessertclicker D onStart Called 2024-04-26 15:00:39.374 5590-5590 MainActivity com.example.dessertclicker D onResume Called
Note
onRestart()is only called by the system if the activity has already been created and eventually enters the Created state whenonStop()is called, but returns back to the Started state instead of entering the Destroyed state. TheonRestart()method is a place to put code that you only want to call if your activity is not being started for the first time.When the activity returns to the foreground, the
onCreate()method is not called again. The activity object was not destroyed, so it doesn’t need to be created again. Instead ofonCreate(), theonRestart()method is called. Notice that this time when the activity returns to the foreground, the Desserts sold number is retained.Start at least one app other than Dessert Clicker so that the device has a few apps in its Recents screen.
Bring up the Recents screen and open another recent activity. Then go back to recent apps and bring Dessert Clicker back to the foreground.
Notice that you see the same callbacks in Logcat here as when you pressed the Home button.
onPause()andonStop()are called when the app goes into the background, and thenonRestart(),onStart(), andonResume()are called when it comes back.Note
onStart()andonStop()are called multiple times as the user navigates to and from the activity.These methods are called when the app stops and moves into the background or when the app restarts and returns to the foreground. If you need to do some work in your app during these cases, then override the relevant lifecycle callback method.
Use case 3: Partially hide the activity
You’ve learned that when an app is started and
onStart()is called, the app becomes visible on the screen. WhenonResume()is called, the app gains the user focus – that is, the user can interact with the app. The part of the lifecycle in which the app is fully onscreen and has user focus is called the foreground lifetime.When the app goes into the background, the focus is lost after
onPause(), and the app is no longer visible afteronStop().The difference between focus and visibility is important. An activity can be partially visible on the screen but not have the user focus. In this step, you look at one case in which an activity is partially visible but doesn’t have user focus.
With the Dessert Clicker app running, click the Share button in the top right of the screen. The sharing activity appears in the lower half of the screen, but the activity is still visible in the top half.
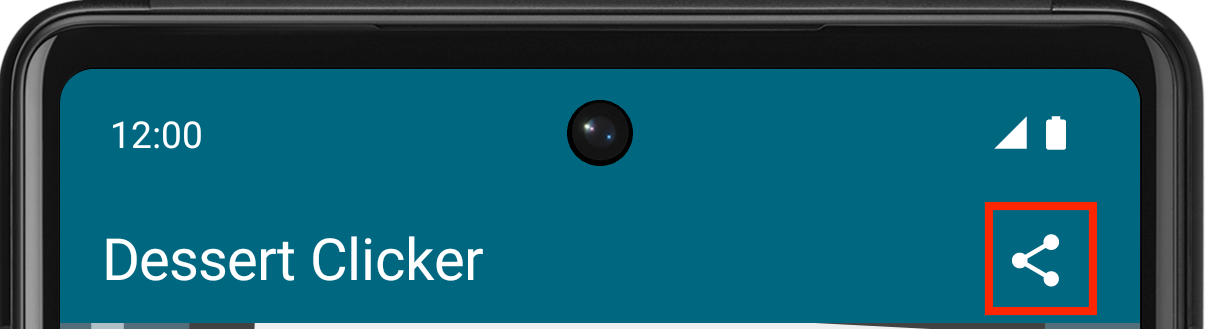
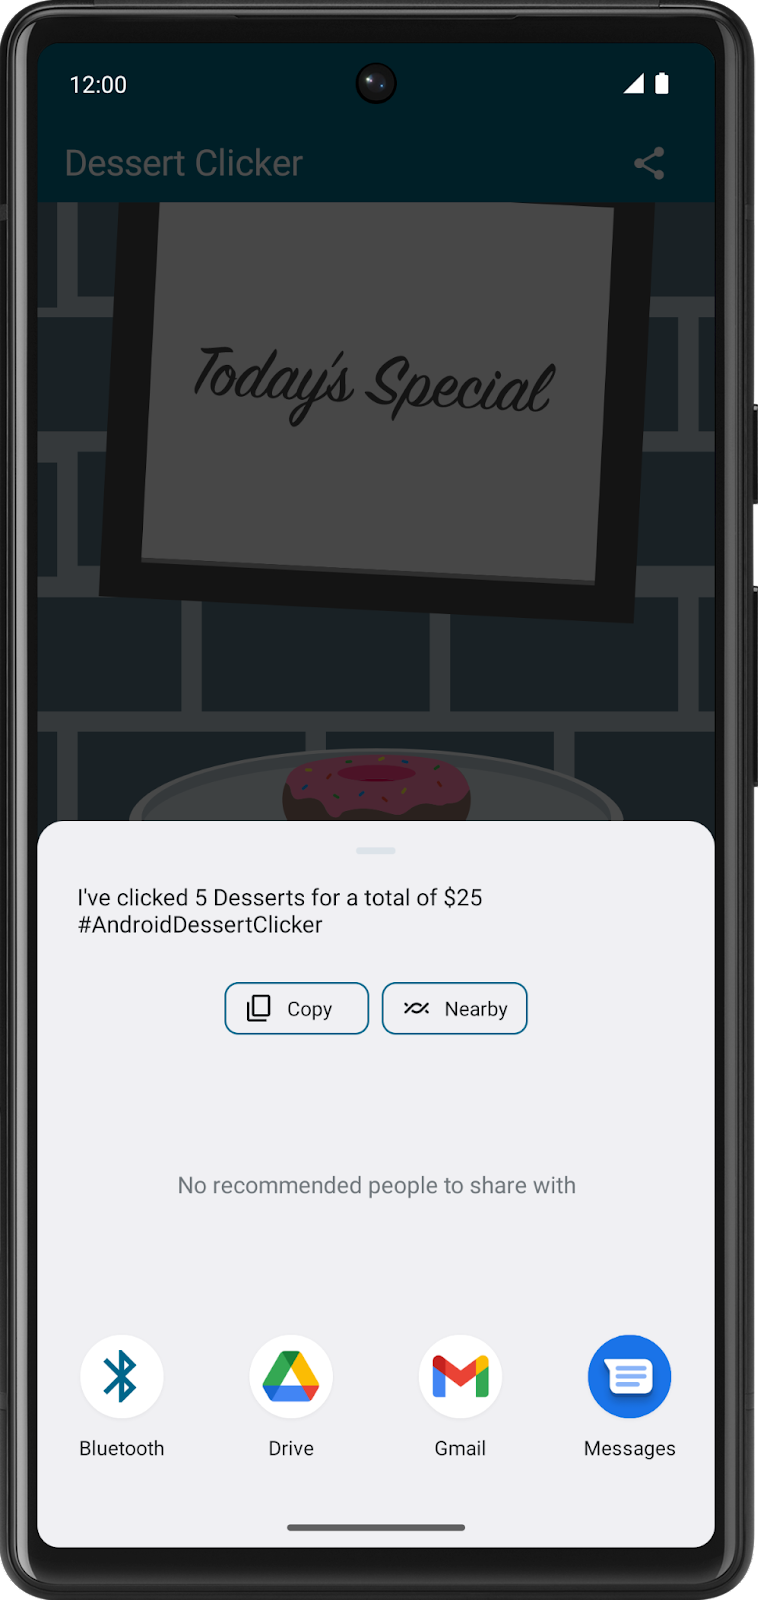
Examine Logcat and note that only
onPause()was called.2024-04-26 15:01:49.535 5590-5590 MainActivity com.example.dessertclicker D onPause Called
In this use case,
onStop()is not called because the activity is still partially visible. But the activity does not have user focus, and the user can’t interact with it—the “share” activity that’s in the foreground has the user focus.Why is this difference important? The interruption with only
onPause()usually lasts a short time before returning to your activity or navigating to another activity or app. You generally want to keep updating the UI so the rest of your app doesn’t appear to freeze.Whatever code runs in
onPause()blocks other things from displaying, so keep the code inonPause()lightweight. For example, if a phone call comes in, the code inonPause()may delay the incoming-call notification.Click outside the share dialog to return to the app, and notice that
onResume()is called.Both
onResume()andonPause()have to do with focus. TheonResume()method is called when the activity gains focus, andonPause()is called when the activity loses focus.
Explore configuration changes
There’s another case in managing the activity lifecycle that is important to understand: how configuration changes affect the lifecycle of your activities.
A configuration change occurs when the state of the device changes so radically that the easiest way for the system to resolve the change is to completely shut down and rebuild the activity. For example, if the user changes the device language, the whole layout might need to change to accommodate different text directions and string lengths. If the user plugs the device into a dock or adds a physical keyboard, the app layout may need to take advantage of a different display size or layout. And if the device orientation changes — if the device is rotated from portrait to landscape or back the other way — the layout might need to change to fit the new orientation. Let’s look at how the app behaves in this scenario.
The last lifecycle callback to demonstrate is
onDestroy(), which is called afteronStop(). It is called just before the activity is destroyed. This can happen when the app’s code callsfinish(), or the system needs to destroy and recreate the activity because of a configuration change.
Configuration change causes onDestroy() to be called
Screen rotation is one type of a configuration change that causes the activity to shutdown and restart. To simulate this configuration change and examine its effects, complete the following steps:
Compile and run your app.
Ensure the screen rotation lock in the emulator is disabled.
Rotate the device or emulator to landscape mode. You can rotate the emulator left or right with the rotation buttons.
Examine Logcat and observe that as the activity shuts down, it calls
onPause(),onStop(), andonDestroy(), in that order.2024-04-26 15:03:32.183 5716-5716 MainActivity com.example.dessertclicker D onPause Called 2024-04-26 15:03:32.185 5716-5716 MainActivity com.example.dessertclicker D onStop Called 2024-04-26 15:03:32.205 5716-5716 MainActivity com.example.dessertclicker D onDestroy Called
Data loss on device rotation
Compile and run your app and open Logcat.
Click the cupcake a few times and note that the desserts sold and total revenue are not zero.
Ensure the screen rotation lock in the emulator is disabled.
Rotate the device or emulator to landscape mode. You can rotate the emulator left or right with the rotation buttons.

Examine the output in Logcat. Filter the output on
MainActivity.2024-04-26 15:04:29.356 5809-5809 MainActivity com.example.dessertclicker D onCreate Called 2024-04-26 15:04:29.378 5809-5809 MainActivity com.example.dessertclicker D onStart Called 2024-04-26 15:04:29.382 5809-5809 MainActivity com.example.dessertclicker D onResume Called 2024-04-26 15:06:52.168 5809-5809 MainActivity com.example.dessertclicker D onPause Called 2024-04-26 15:06:52.183 5809-5809 MainActivity com.example.dessertclicker D onStop Called 2024-04-26 15:06:52.219 5809-5809 MainActivity com.example.dessertclicker D onDestroy Called 2024-04-26 15:06:52.302 5809-5809 MainActivity com.example.dessertclicker D onCreate Called 2024-04-26 15:06:52.308 5809-5809 MainActivity com.example.dessertclicker D onStart Called 2024-04-26 15:06:52.312 5809-5809 MainActivity com.example.dessertclicker D onResume Called
Notice that when the device or emulator rotates the screen, the system calls all the lifecycle callbacks to shut down the activity. Then, as the activity is re-created, the system calls all the lifecycle callbacks to start the activity.
When the device is rotated, and the activity is shut down and re-created, the activity re-starts with default values — the dessert image, number of desserts sold, and total revenue reset back to zero.
To learn why these values are being reset and how to correct them, you need to learn about the lifecycle of a composable and how it knows to observe and retain its state.
Lifecycle of a composable
The UI of your app is initially built from running composable functions in a process called Composition.
When the state of your app changes, a recomposition is scheduled. Recomposition is when Compose re-executes the composable functions whose state might have changed and creates an updated UI. The Composition is updated to reflect these changes.
The only way to create or update a Composition is by its initial composition and subsequent recompositions.
Composable functions have their own lifecycle that is independent of the Activity lifecycle. Its lifecycle is composed of these events:
Entering the Composition,
Recomposing 0 or more times, and then
Leaving the Composition.
In order for Compose to track and trigger a recomposition, it needs to know when state has changed. To indicate to Compose that it should track an object’s state, the object needs to be of type
StateorMutableState. TheStatetype is immutable and can only be read. AMutableStatetype is mutable and allows reads and writes.You have already seen and used
MutableStatein the Lemonade app and the Tip Time app.To create the mutable variable
revenue, declare it usingmutableStateOf. Its initial default value is 0.var revenue = mutableStateOf(0)
While this is enough to have Compose trigger a recomposition when the revenue value changes, it is not enough to retain its updated value. Each time the composable is reexecuted, it will reinitialize the revenue value to its initial default value of
0.To instruct Compose to retain and reuse its value during recompositions, you need to use
remember.var revenue by remember { mutableStateOf(0) }
If the value of
revenuechanges, Compose schedules all composable functions that read this value for recomposition.While Compose remembers the revenue state during recompositions, it does not retain this state during a configuration change. For Compose to retain the state during a configuration change, you must use
rememberSaveable.
Use rememberSaveable to save values across configuration changes
You use the
rememberSaveablefunction to save values that you need if Android OS destroys and recreates the activity.To save values during recompositions, you need to use
remember. UserememberSaveableto save values during recompositions AND configuration changes.Note
Sometimes Android shuts down an entire app process, which includes every activity associated with the app. Android does this kind of shutdown when the system is stressed and in danger of visually lagging, so no additional callbacks or code is run at this point. Your app’s process is simply shut down silently in the background. But to the user, it doesn’t look like the app is closed. When the user navigates back to an app that the Android system shuts down, Android restarts that app. You want to ensure that the user doesn’t experience any data loss when this happens.
Saving the value using
rememberSaveableensures that it is available when the activity is restored, if it is needed.In
MainActivity, update the 5 variables that currently useremembertorememberSaveable.var revenue by remember { mutableStateOf(0) } var dessertsSold by remember { mutableStateOf(0) } val currentDessertIndex by remember { mutableStateOf(0) } var currentDessertPrice by remember { mutableStateOf(desserts[currentDessertIndex].price) } var currentDessertImageId by remember { mutableStateOf(desserts[currentDessertIndex].imageId) }
var revenue by rememberSaveable { mutableStateOf(0) }
var dessertsSold by rememberSaveable { mutableStateOf(0) }
...
var currentDessertImageId by rememberSaveable {
    mutableStateOf(desserts[currentDessertIndex].imageId)
}
Compile and run your app.
Click the cupcake a few times and note that the desserts sold and total revenue are not zero.
Rotate the device or emulator to landscape mode.
Observe that after the activity is destroyed and recreated, the dessert image, desserts sold, and total revenue are restored to their previous values.
Solution code
Branch: main
Clone:
$ git clone https://github.com/google-developer-training/basic-android-kotlin-compose-training-dessert-clicker.git
$ cd basic-android-kotlin-compose-training-dessert-clicker
$ git checkout main
App architecture
Architecture: The UI Layer
ViewModel and State
You’ve learned about the lifecycle of activities and the related lifecycle issues with configuration changes. When a configuration change occurs, you can save an app’s data through different ways, such as using
rememberSaveable.However, these options can create problems. Most of the time, you can use
rememberSaveable, but that might mean keeping the logic in or near composables. When apps grow, you should move data and logic away from composables.A more robust way to preserve app data during configuration changes is to use the Android Jetpack library’s
ViewModel, and Android app architecture guidelines.Android Jetpack libraries are a collection of libraries to make it easier for you to develop great Android apps. These libraries help you follow best practices, free you from writing boilerplate code, and simplify complex tasks so that you can focus on the code you care about, like the app logic.
App architecture is a set of design rules for an app. Much like the blueprint of a house, your architecture provides the structure for your app. A good app architecture can make your code robust, flexible, scalable, testable, and maintainable for years to come. The Guide to app architecture provides recommendations on app architecture and recommended best practices.
We’ll now learn how to use
ViewModel, one of the architecture components from Android Jetpack libraries that can store your app data. The stored data is not lost if the framework destroys and recreates the activities during a configuration change or other events. However, the data is lost if the activity is destroyed because of process death. TheViewModelonly caches data through quick activity recreations.
Unscramble app
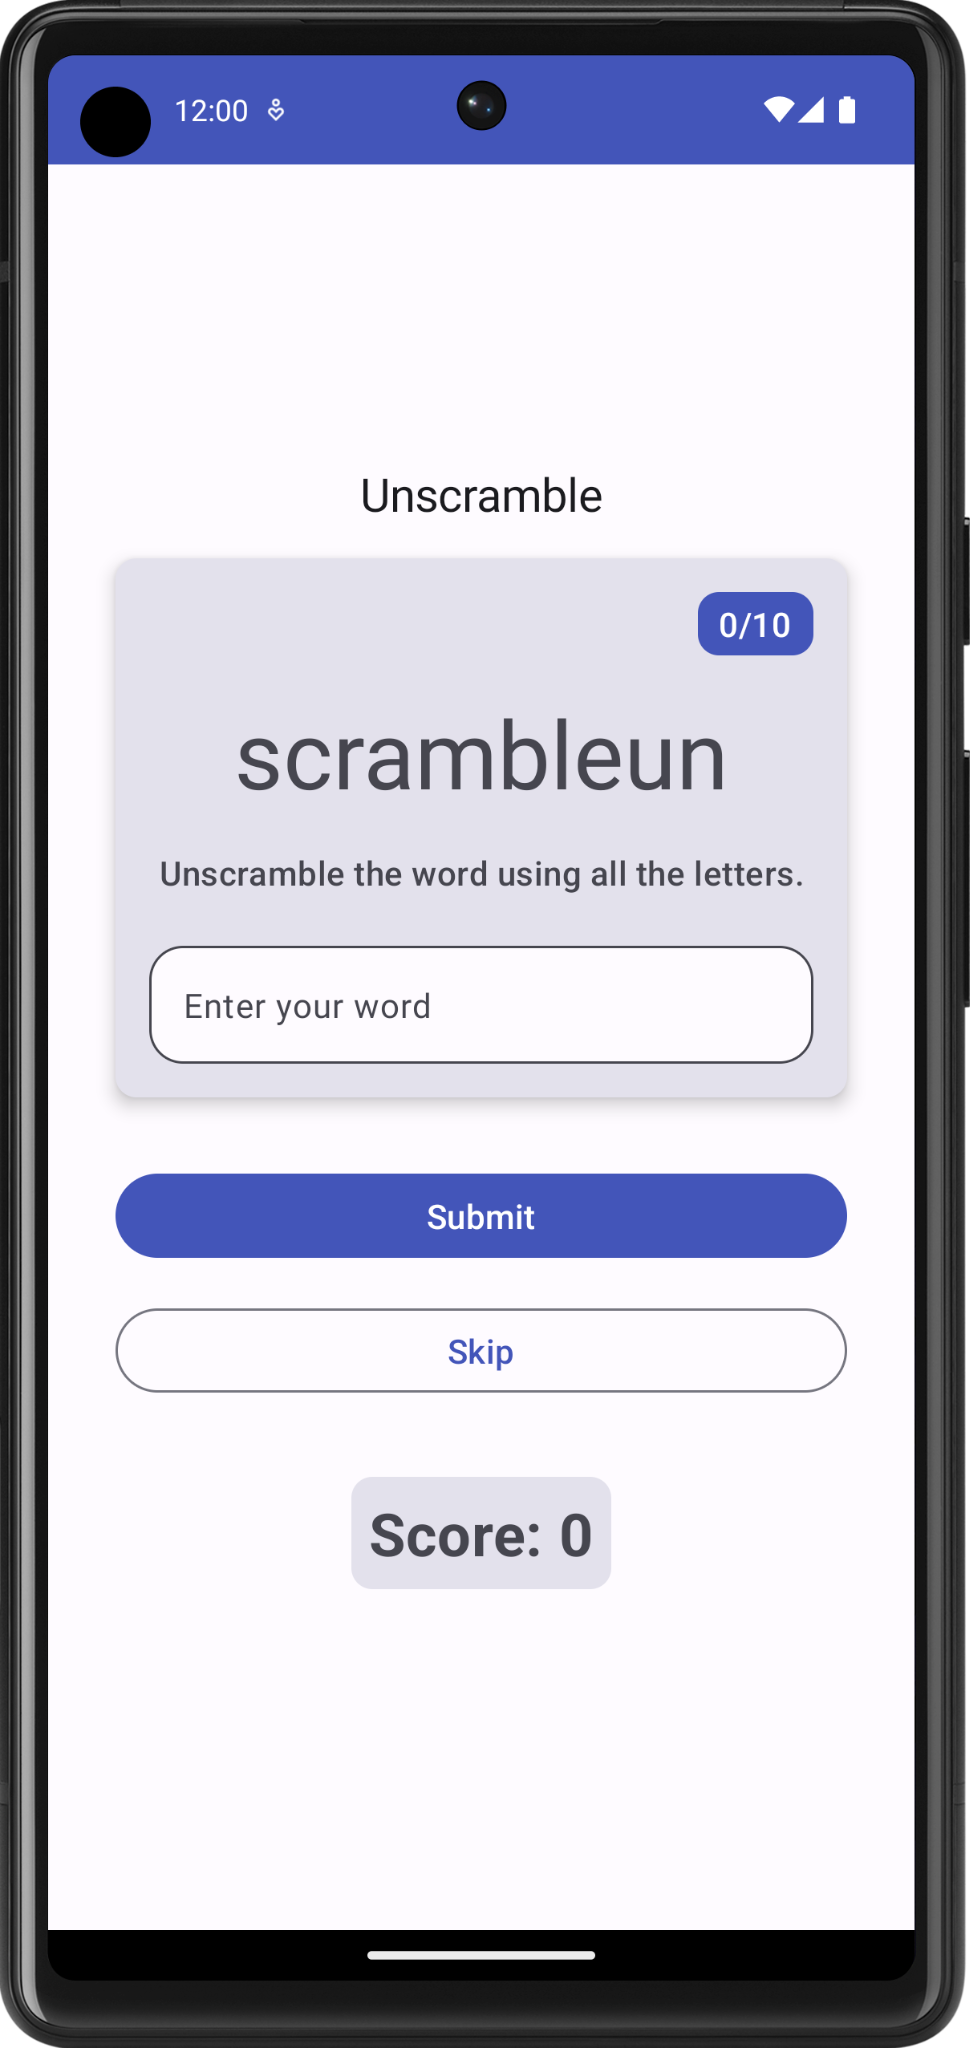
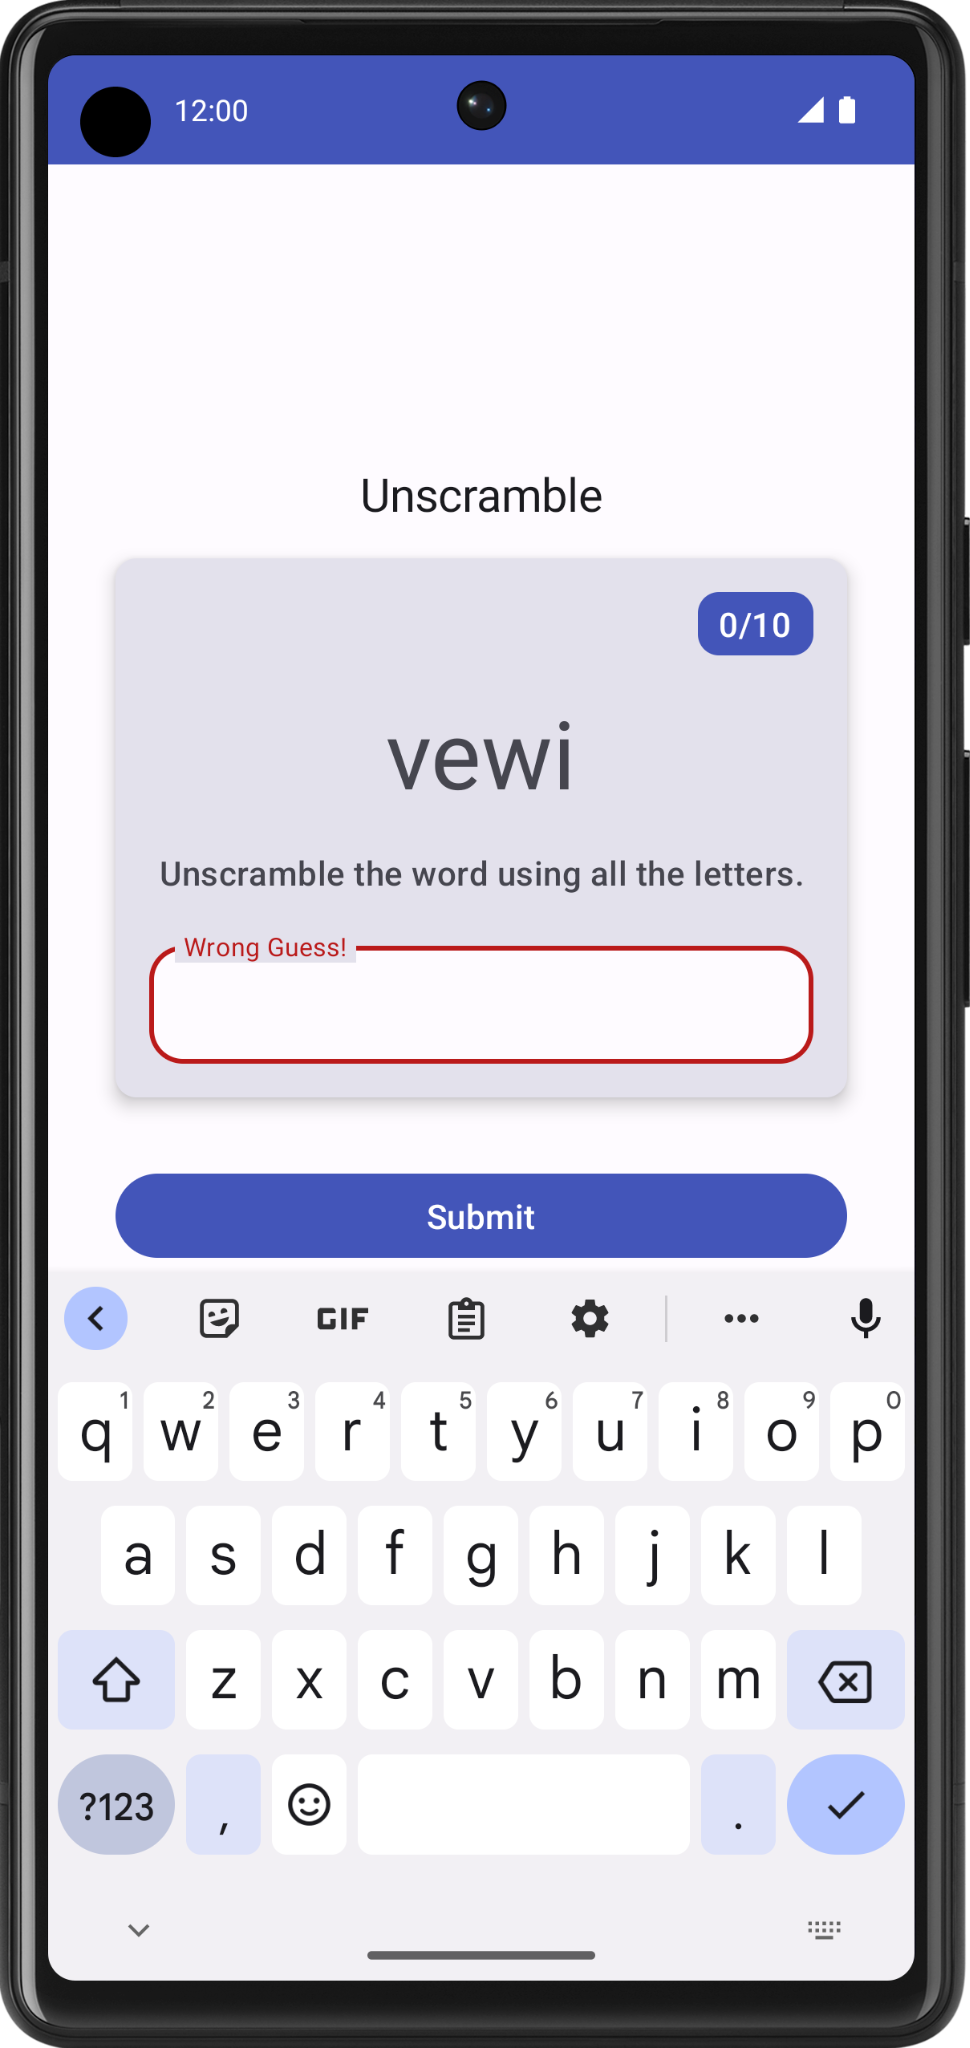
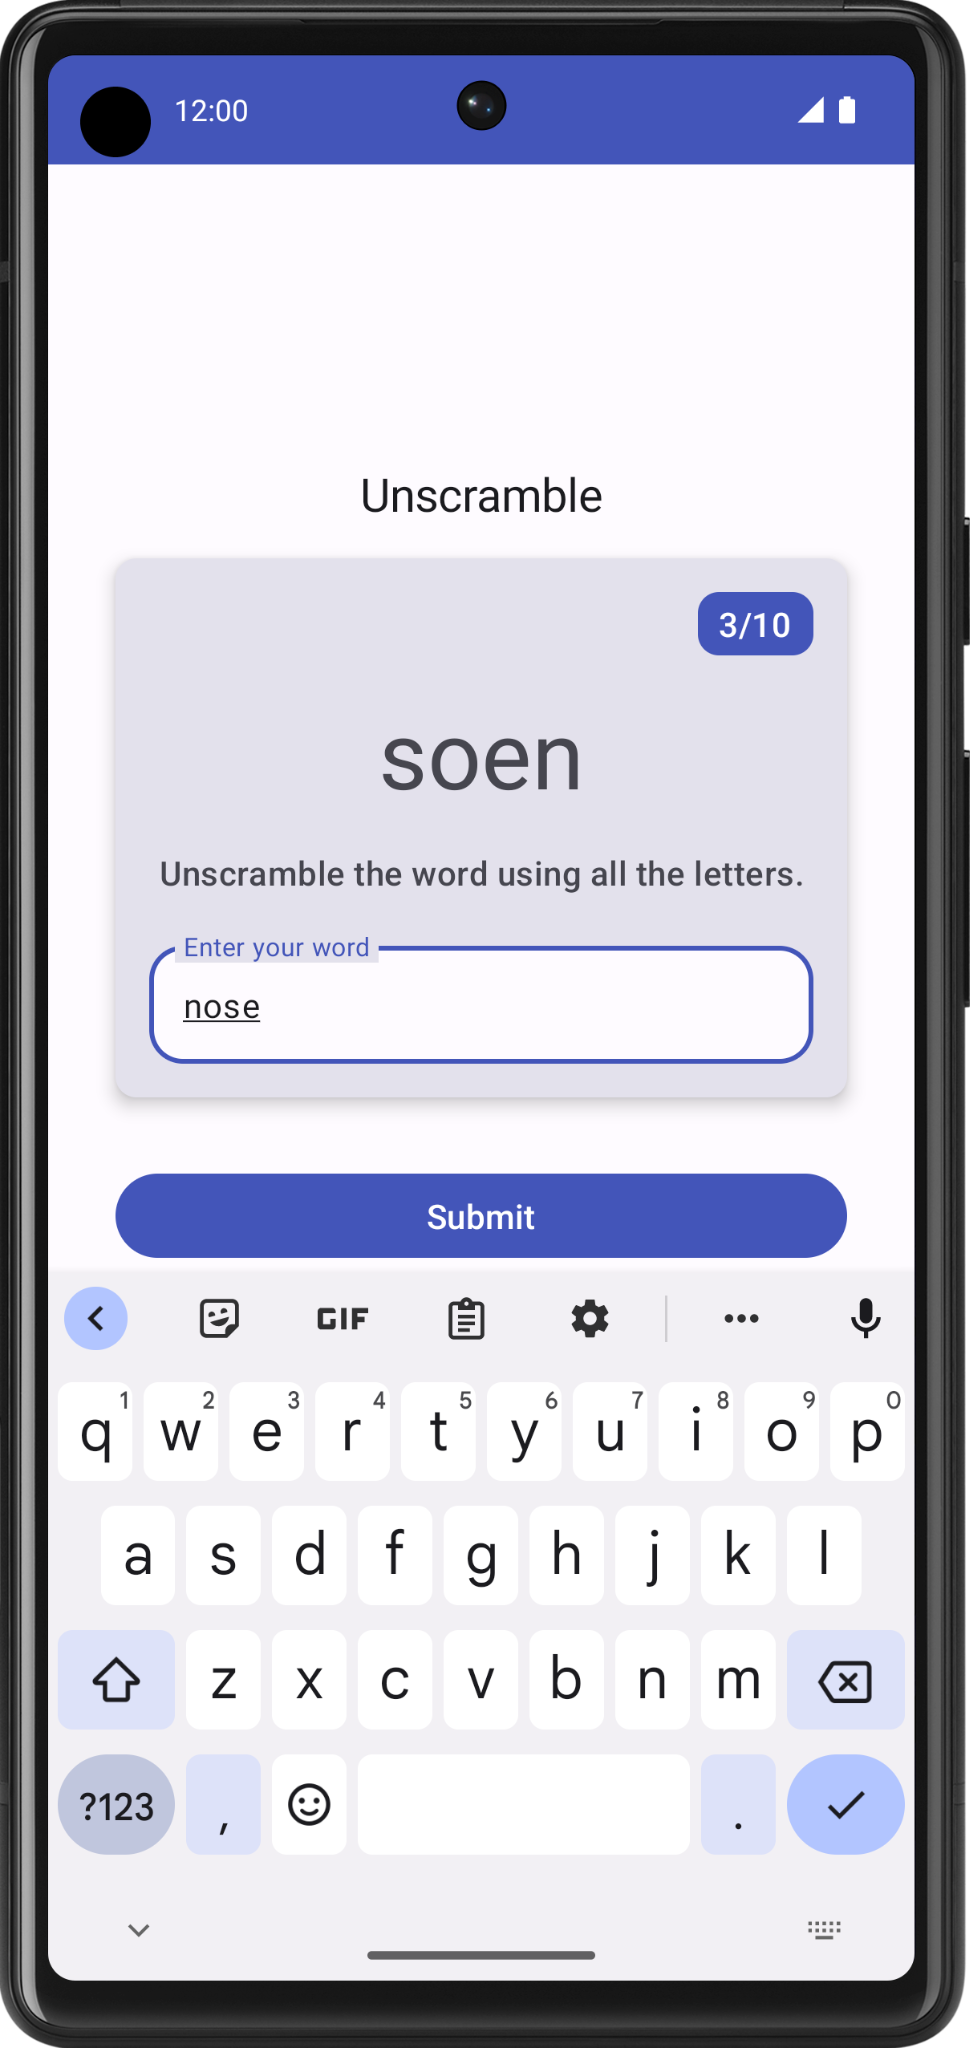
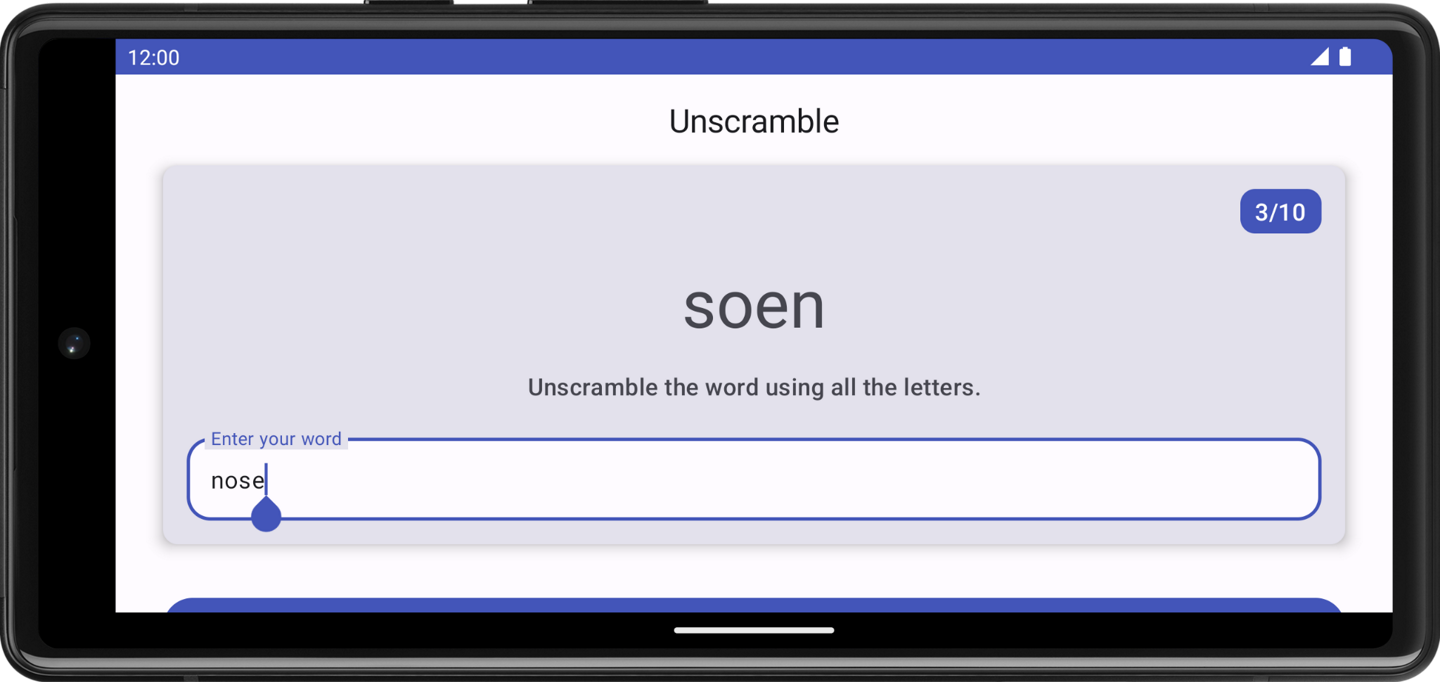
The Unscramble app is a single player word scrambler game. The app displays a scrambled word, and the player has to guess the word using all the letters shown. The player scores points if the word is correct. Otherwise, the player can try to guess the word any number of times. The app also has an option to skip the current word. In the top right corner, the app displays the word count, which is the number of scrambled words played in the current game. There are 10 scrambled words per game.
We’ll look at the solution code and focus on learning how app architecture is implemented, using the solution code as an example.
Solution code: Unscramble app
Branch: viewmodel
Clone:
$ git clone https://github.com/google-developer-training/basic-android-kotlin-compose-training-unscramble.git
$ cd basic-android-kotlin-compose-training-unscramble
$ git checkout viewmodel
Solution code overview
To familiarize yourself with the solution code:
Open the project with the solution code in Android Studio.
Run the app on an Android device or an emulator.
Test the app.
WordsData.kt
This file contains a list of the words used in the game, constants for the maximum number of words per game, and the number of points the player scores for every correct word. This file is part of the Data Layer.
package com.example.android.unscramble.data

const val MAX_NO_OF_WORDS = 10
const val SCORE_INCREASE = 20

// Set with all the words for the Game
val allWords: Set<String> =
    setOf(
        "animal",
        "auto",
        "anecdote",
        "alphabet",
        "all",
        "awesome",
        "arise",
        "balloon",
        "basket",
        "bench",
        // ...
        "zoology",
        "zone",
        "zeal"
  )
Warning
It is not a recommended practice to hardcode strings in the code. Add strings to
strings.xmlfor easier localization. Strings are hardcoded in this example app for simplicity and to enable you to focus on the app architecture.
MainActivity.kt
This file contains mostly template generated code. The
GameScreencomposable is displayed.
GameScreen.kt
All the UI composables are defined in the
GameScreen.ktfile. Some of the composables are described below.
GameStatus
GameStatusdisplays the game score at the bottom of the screen. The composable function contains a text composable in aCard.
GameLayout
GameLayoutdisplays the main game functionality, which includes the scrambled word, the game instructions, and a text field that accepts the user’s guesses.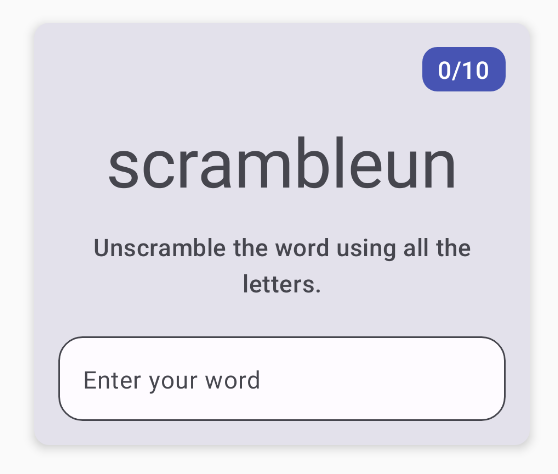
The
GameLayoutcontains aCard, which contains aColumn, which contains several child elements: the scrambled word text, the instructions text, and the text field for the user’s guess.The
OutlinedTextFieldcomposable is similar to theTextFieldcomposable from apps in previous codelabs.Text fields come in two types:
Filled text fields
Outlined text fields
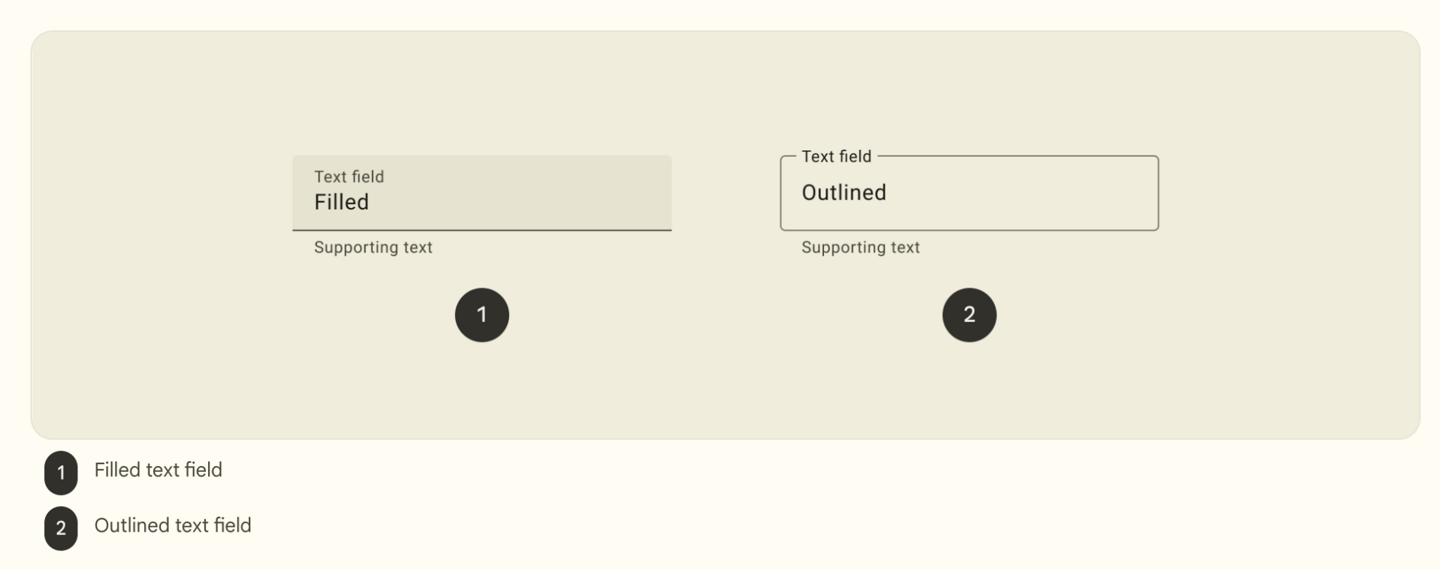
Outlined text fields have less visual emphasis than filled text fields. When they appear in places like forms, where many text fields are placed together, their reduced emphasis helps simplify the layout.
GameScreen
GameScreencontains the:GameStatusandGameLayoutcomposablesGame title
Word count
Submit and Skip buttons
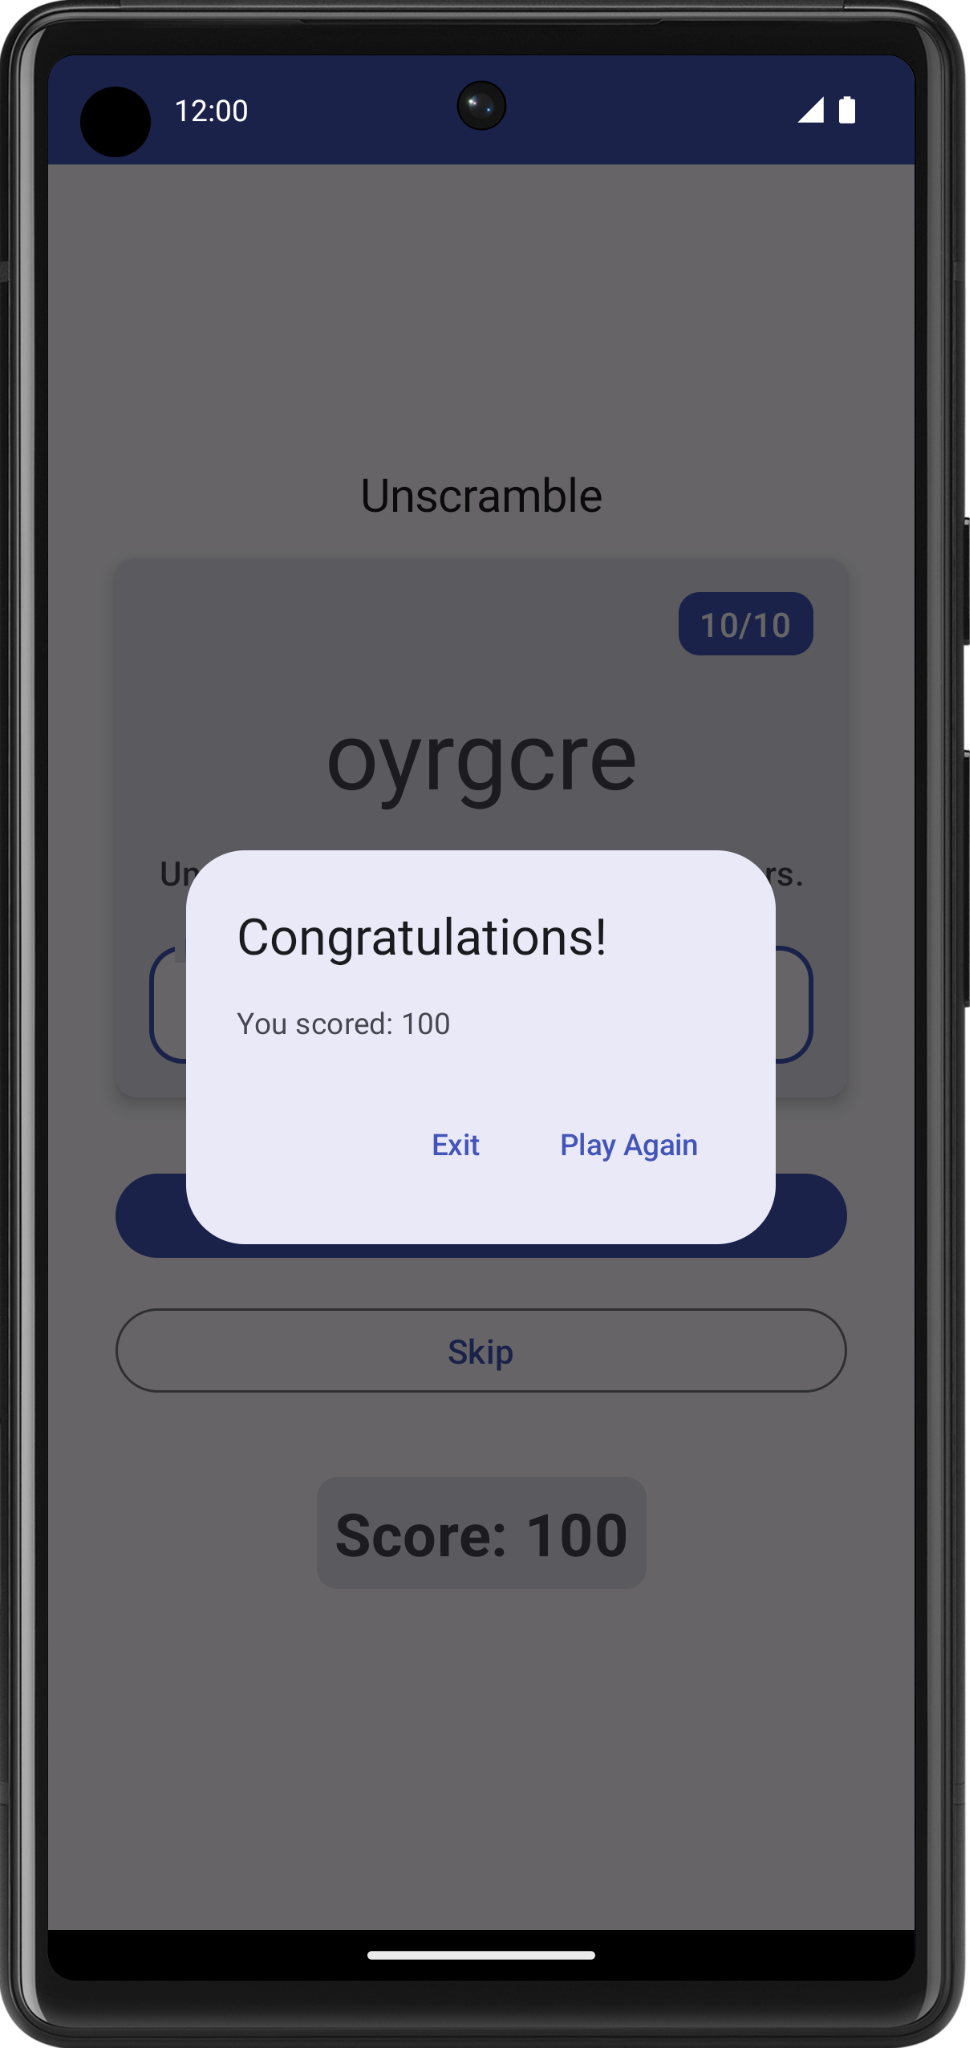
FinalScoreDialog
The
FinalScoreDialogcomposable displays a dialog with options to Play Again or Exit.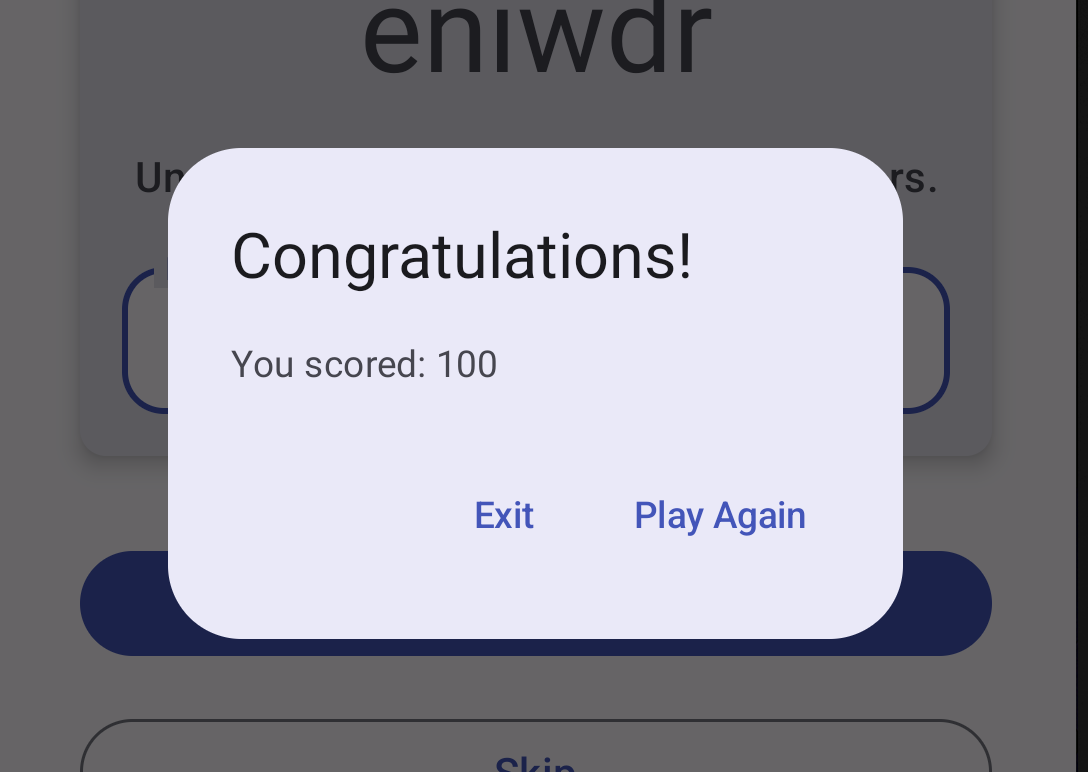
Recommended app architecture
An app’s architecture provides guidelines to help you allocate the app responsibilities between the classes. A well-designed app architecture helps you scale your app and extend it with additional features. Architecture can also simplify team collaboration.
The most common architectural principles are separation of concerns and driving UI from a model.
Separation of concerns: states that the app is divided into classes of functions, each with separate responsibilities.
Drive UI from a model: states that you should drive your UI from a model, preferably a persistent model. Models are components responsible for handling the data for an app. They’re independent from the UI elements and app components in your app, so they’re unaffected by the app’s lifecycle and associated concerns.
Note
In this codelab, “exposes” means “shares” or “makes available”, like sharing some data from one class to another class.
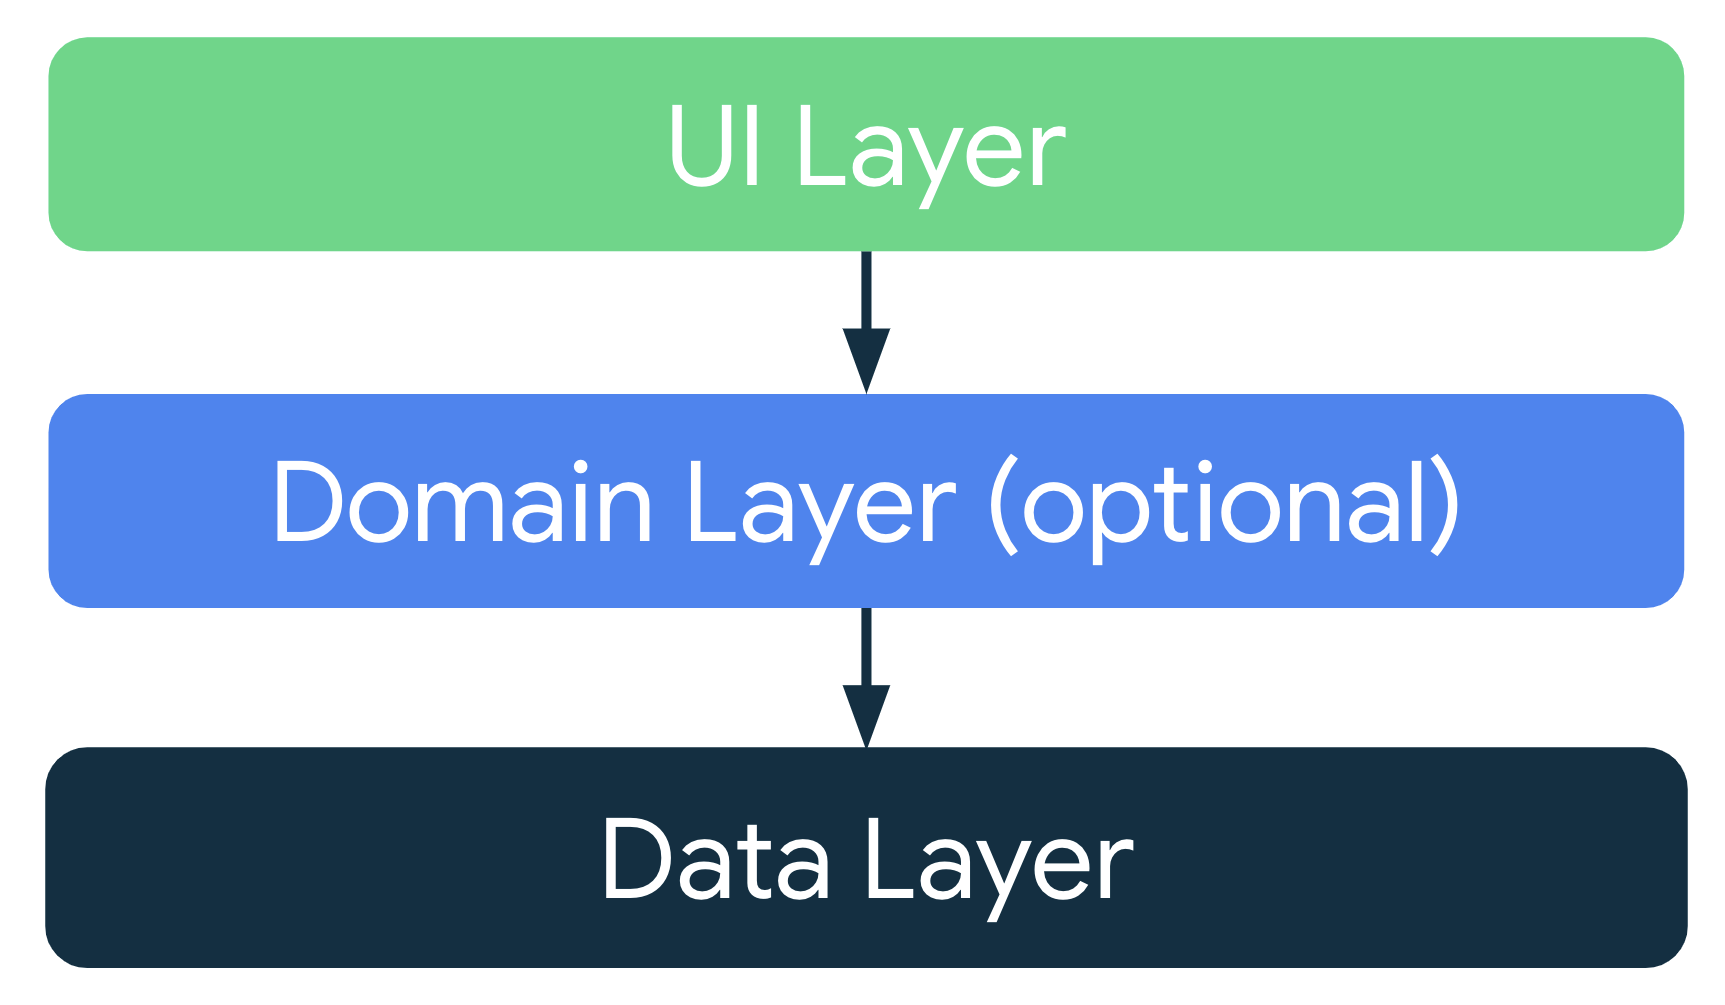
Considering the common architectural principles mentioned in the previous section, each app should have at least two layers:
UI layer: a layer that displays the app data on the screen but is independent of the data. Also known as the presentation layer.
Data layer: a layer that stores, retrieves, and exposes the app data.
You can add another layer, called the domain layer, to simplify and reuse the interactions between the UI and data layers. This layer is optional and beyond the scope of this mod.
Note
The arrows in the diagrams in this guide represent dependencies between classes. For example, the domain layer depends on data layer classes.
UI Layer
The role of the UI layer is to display the application data on the screen. Whenever the data changes due to a user interaction, such as pressing a button, the UI should update to reflect the changes.
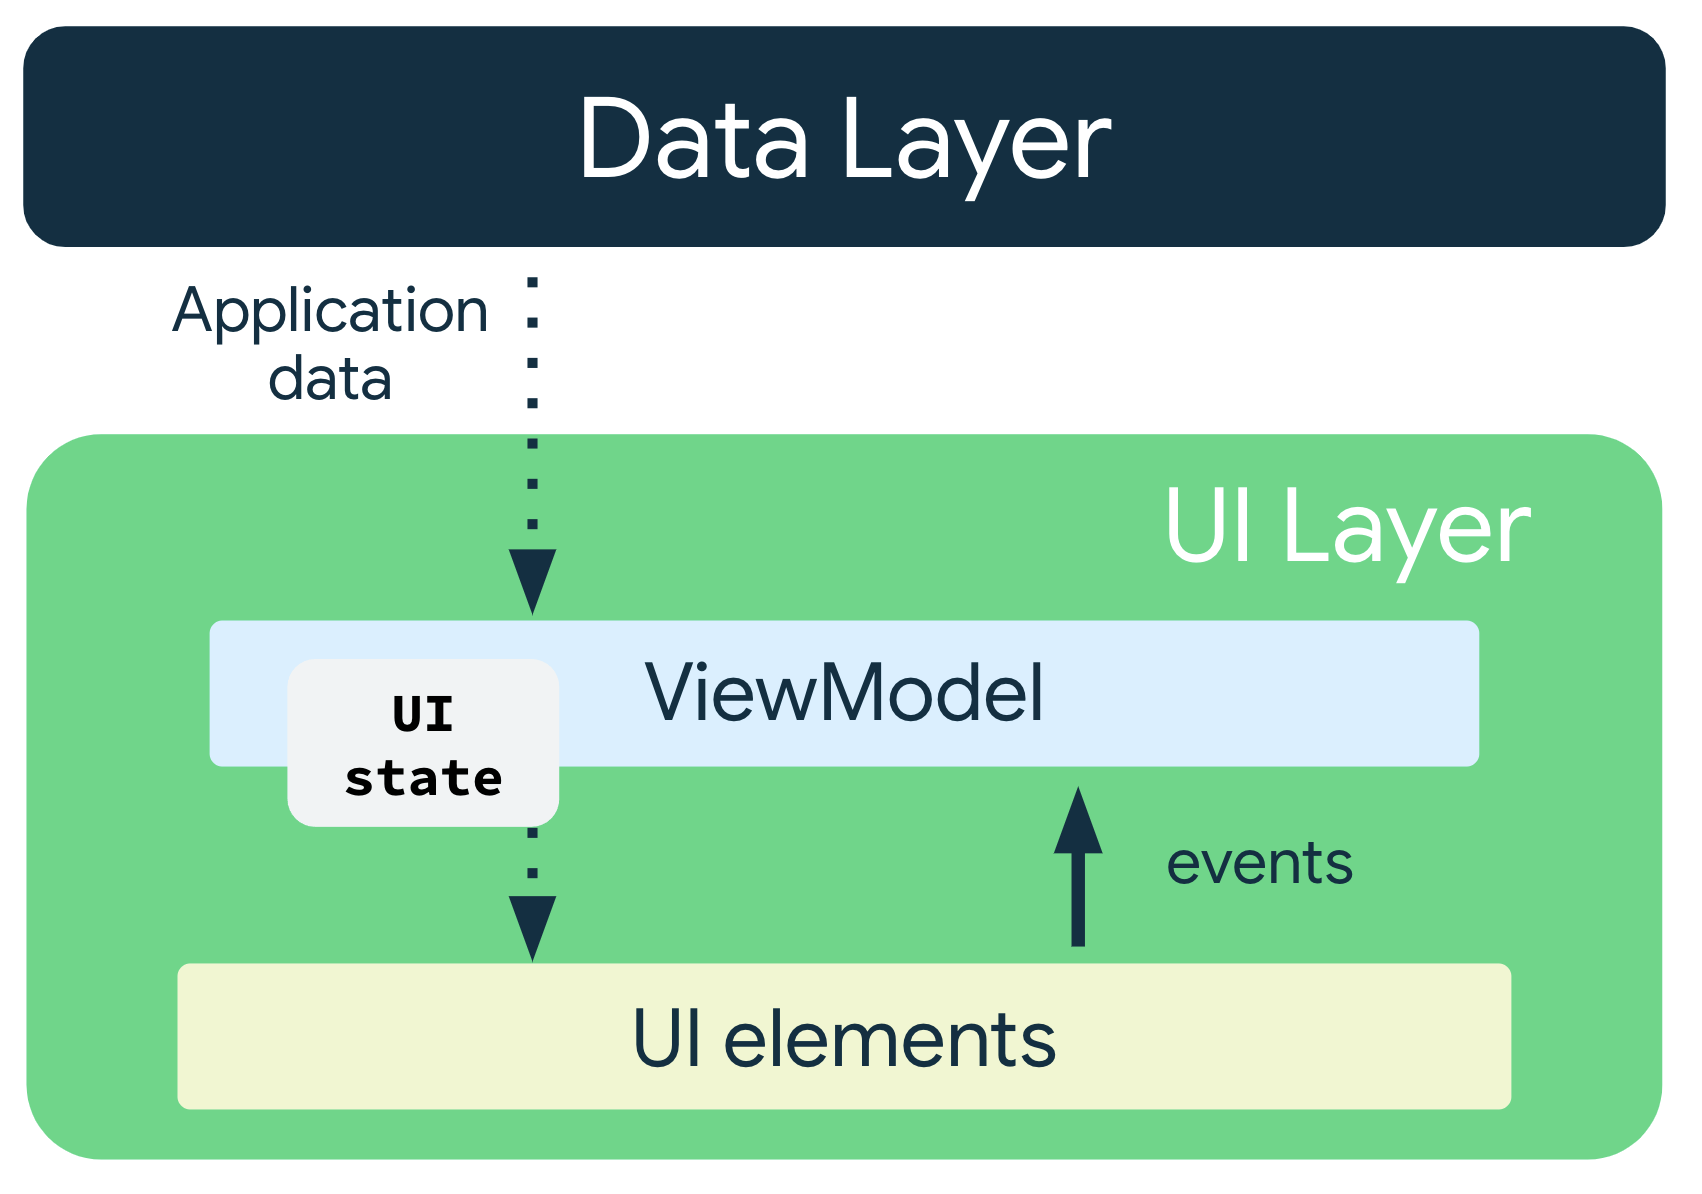
The UI layer is made up of the following components:
UI elements: components that are displayed on the screen. You build these elements using Jetpack Compose.
State holders: components that hold some of the application data, the state of the application, and handle the app logic. The app logic looks at the relevant application data, and tells the UI elements what to display. An example state holder is ViewModel.
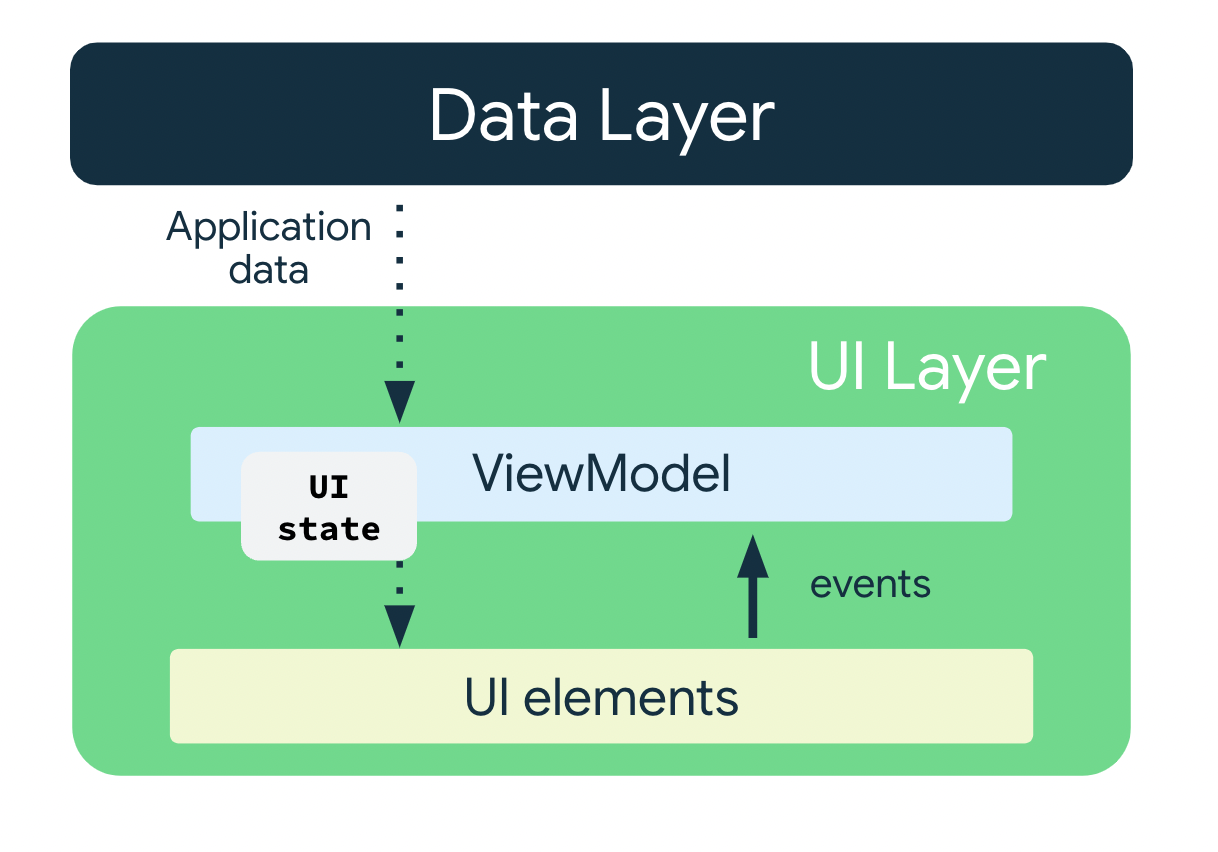
UI Elements + UI State = UI
The UI is a result of combining UI elements with the UI state.

UI Elements
These are the components that are displayed on the screen. Examples: buttons, text fields, images.
UI State
The UI is what the user sees, and the UI state is what the app says they should see. The UI is the visual representation of the UI state. Any changes to the UI state are reflected in the UI. Analogy: feeling happy is like a UI state, smiling is like the UI.
UI state is the property that describes the UI. There are two types of UI state:
Screen UI state: what you need to display on the screen. For example, a NewsUiState class can contain news articles and other information that needs to be displayed on the screen.
// Example of UI state definition, do not copy over

data class NewsItemUiState(
    val title: String,
    val body: String,
    val bookmarked: Boolean = false,
    ...
)
UI element state: properties intrinsic to UI elements that influence how they are rendered. Examples: whether a UI element is shown or hidden, its font size, etc. In Jetpack Compose, composables should be stateless as far as possible. The state can be placed in a state holder, or hoisted out of the composable.
UI state is immutable. Immutable objects provide guarantees that multiple sources do not alter the state of the app at an instant in time. This frees the UI to focus on a single role: reading state and updating UI elements accordingly.
Therefore, you should never modify the UI state in the UI directly, unless the UI itself is the sole source of its data. Violating this principle results in multiple sources of truth for the same piece of information, leading to data inconsistencies and subtle bugs.
The ViewModel state holder
ViewModelis a state holder. It exposes state to the UI and encapsulates related business logic. Its principal advantage is that it caches state and persists it through configuration changes. This means that your UI doesn’t have to fetch data again when navigating between activities, or following configuration changes, such as when rotating the screen.ViewModelholds the state the UI consumes. It processes the application data, decides what the UI state is, and if necessary, tells the UI elements what to display.ViewModellets your app follow the architecture principle of driving the UI from the model.ViewModelstores the app-related data that isn’t destroyed when the activity is destroyed and recreated by the Android framework. Unlike the activity instance,ViewModelobjects are not destroyed. The app automatically retainsViewModelobjects during configuration changes so that the data they hold is immediately available after the recomposition.To implement
ViewModel, extend theViewModelclass, which comes from the architecture components library.
Unscramble app architecture
Data Layer
Stores application data:
List of words used in the game
Maximum number of words per game
Number of points the player scores for each correct word
Does not hold the UI state (current score, whether a player’s guess is correct, etc)
Does not contain the application logic (what to do when user guesses correctly, how to keep track of the score, etc)
UI elements
Comprises composables that display the UI elements on the screen.
Does not hold the UI state
Does not contain the application logic
ViewModel
GameViewModel.kt
Holds the UI state in GameUiState.kt
Current scrambled word
Current score
Number of words shown to the user so far
Whether the user guessed the current word correctly or not
Uses application data from the data layer, but does not store it
Contains the application logic
File organization
Data Layer files belong in the
com.example.unscramble.datapackage.UI Layer files belong in the
com.example.unscramble.uipackage.
GameViewModel
The
app/src/main/java/com/example/unscramble/ui/GameUiState.ktfile contains the UI state:data class GameUiState( // Current word that user is supposed to unscramble val currentScrambledWord: String = "", // Number of words that have been shown to the user so far val currentWordCount: Int = 1, // User's score val score: Int = 0, // Whether the user has unscrambled the current word wrongly val isGuessedWordWrong: Boolean = false, // Whether the max number of words has been reached val isGameOver: Boolean = false )
The
app/src/main/java/com/example/unscramble/ui/GameViewModel.ktfile contains the view model:package com.example.unscramble.ui import androidx.compose.runtime.getValue import androidx.compose.runtime.mutableStateOf import androidx.compose.runtime.setValue import androidx.lifecycle.ViewModel import com.example.unscramble.data.MAX_NO_OF_WORDS import com.example.unscramble.data.SCORE_INCREASE import com.example.unscramble.data.allWords import kotlinx.coroutines.flow.MutableStateFlow import kotlinx.coroutines.flow.StateFlow import kotlinx.coroutines.flow.asStateFlow import kotlinx.coroutines.flow.update class GameViewModel : ViewModel() { // Create a new private instance of GameUiState to hold the UI state private val _uiState = MutableStateFlow(GameUiState()) // Expose the UI state as a StateFlow, for the UI elements in GameScreen.kt to access the state val uiState: StateFlow<GameUiState> = _uiState.asStateFlow() // Holds the user's guess. No need to use ``remember`` here, because GameViewModel is not affected by recomposition var userGuess by mutableStateOf("") private set // Set of words that have already been used in the game private var usedWords: MutableSet<String> = mutableSetOf() // Current word that user is supposed to unscramble private lateinit var currentWord: String // Initializes the ViewModel init { resetGame() } /* * Re-initializes the game data to restart the game. */ fun resetGame() { usedWords.clear() // Creates a new UI state, assigning a random word to ``currentScrambledWord`` _uiState.value = GameUiState(currentScrambledWord = pickRandomWordAndShuffle()) } /* * Called by GameScreen.kt when the user enters a guess. */ fun updateUserGuess(guessedWord: String){ userGuess = guessedWord } /* * Checks if the user's guess is correct, then adjusts the score or shows an error */ fun checkUserGuess() { if (userGuess.equals(currentWord, ignoreCase = true)) { // User's guess is correct. Increase the score, call updateGameState() to prepare the game for next round val updatedScore = _uiState.value.score.plus(SCORE_INCREASE) updateGameState(updatedScore) } else { // User's guess is wrong, show an error _uiState.update { currentState -> currentState.copy(isGuessedWordWrong = true) } } // Reset user guess updateUserGuess("") } /* * Skips to next word. Called by GameScreen.kt when user presses the Skip button. */ fun skipWord() { updateGameState(_uiState.value.score) // Reset user guess updateUserGuess("") } /* * Picks a new currentWord and currentScrambledWord and updates UiState according to * current game state. */ private fun updateGameState(updatedScore: Int) { if (usedWords.size == MAX_NO_OF_WORDS){ // Last round in the game, update isGameOver to true, don't pick a new word _uiState.update { currentState -> currentState.copy( isGuessedWordWrong = false, score = updatedScore, isGameOver = true ) } } else{ // Normal round in the game _uiState.update { currentState -> currentState.copy( isGuessedWordWrong = false, currentScrambledWord = pickRandomWordAndShuffle(), currentWordCount = currentState.currentWordCount.inc(), score = updatedScore ) } } } /* * Scrambles a word. */ private fun shuffleCurrentWord(word: String): String { val tempWord = word.toCharArray() // Scramble the word tempWord.shuffle() while (String(tempWord) == word) { tempWord.shuffle() } return String(tempWord) } /* * Picks a random unused word */ private fun pickRandomWordAndShuffle(): String { // Get a word from the Data Layer (WordsData.kt) currentWord = allWords.random() return if (usedWords.contains(currentWord)) { // The word has been used, try another one pickRandomWordAndShuffle() } else { // Mark this word as being used, then scramble and return the word usedWords.add(currentWord) shuffleCurrentWord(currentWord) } } }
StateFlow
A
StateFlowis used to hold state. It works well with classes that must maintain an observable immutable state. AStateFlowis immutable; aMutableStateFlowis mutable.A
StateFlowcan be accessed by UI elements, so that they will be informed when the UI state is updated, and they can update the display accordingly.In this code, a
MutableStateFlowis used to hold the UI state.// Create a new private instance of GameUiState to hold the UI state private val _uiState = MutableStateFlow(GameUiState())
The state flow can be read/updated using
_uiState.value
Backing property
A backing property lets you return something from a getter other than the exact object itself.
For a
varproperty, Kotlin generates getters and setters. You can override one or both of these methods, and provide your own custom behavior. To implement a backing property, you override the getter method to return a read-only version of your data. The following example shows a backing property://Example code, no need to copy over // Declare private mutable variable that can only be modified within the class it is declared. private var _count = 0 // Declare another public immutable field and override its getter method. // Return the private property's value in the getter method. // When count is accessed, the get() function is called and the value of _count is returned. val count: Int get() = _count
In the code below,
_uiStateis a backing property foruiState.// Create a new private instance of GameUiState to hold the UI state private val _uiState = MutableStateFlow(GameUiState()) // Expose the UI state as a StateFlow, for the UI elements in GameScreen.kt to access the state val uiState: StateFlow<GameUiState> = _uiState.asStateFlow()
The private
_uiStateholds an instance ofMutableStateFlow(GameUiState()), which contains the UI state. The UI state can be read/updated using_uiState.value.We don’t want to let the UI elements (in
GameScreen.kt) update the UI state. That’s why_uiStateis private, and only meant for use within theGameViewModelclass.However, we do want to let the UI elements read the UI state. Therefore, a public
uiStateis used to expose the UI state to the UI elements. The UI elements can read (but not update) the UI state usinguiState.value.In summary, the backing property used here protects the state inside the
ViewModelfrom unwanted and unsafe updates by external classes, but it lets UI elements safely read the state.
Architecting the UI
In Compose, the only way to update the UI is by changing the app state. Whenever the UI state changes, Compose recreates the parts of the UI tree that changed. Composables accept state, and expose events. For example, an
OutlinedTextFieldaccepts a value and exposes a callbackonValueChangethat requests the callback handler (e.g. a ViewModel) to change the value.// Example code no need to copy over var name by remember { mutableStateOf("") } OutlinedTextField( value = name, onValueChange = { name = it }, label = { Text("Name") } )
Because composables accept state and expose events, the unidirectional data flow pattern fits well with Jetpack Compose. This section focuses on how to implement the unidirectional data flow pattern in Compose, how to implement events and state holders, and how to work with
ViewModelin Compose.
Unidirectional data flow
A unidirectional data flow (UDF) is a design pattern in which state flows down and events flow up. By following unidirectional data flow, you can decouple composables that display state in the UI from the parts of your app that store and change state.
The UI update loop for an app using unidirectional data flow looks like the following:
Event: Part of the UI generates an event and passes it upward (such as a button click passed to the ViewModel to handle), or an event is passed from other layers of your app, such as an indication that the user session has expired.
Update state: An event handler might change the state.
Display state: The state holder passes down the state, and the UI displays it.
The use of the UDF pattern for app architecture has the following implications:
The
ViewModelholds and exposes the state the UI consumes.The UI state is application data transformed by the
ViewModel.The UI notifies the
ViewModelof user events.The
ViewModelhandles the user actions and updates the state.The updated state is fed back to the UI to render.
This process repeats for any event that causes a mutation of state.
Pass the data
In
GameLayout, this code takes in the current scrambled word as a parameter, and displays it.@Composable fun GameLayout( currentScrambledWord: String, modifier: Modifier = Modifier ) { // ... Column() { Text( text = currentScrambledWord, ) //... } }
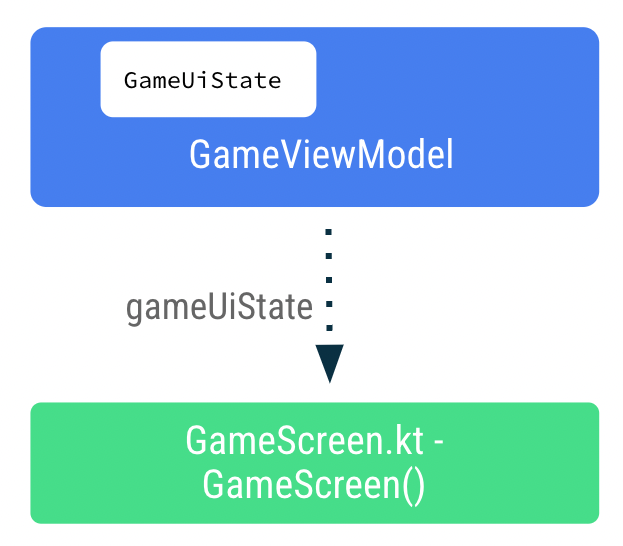
In
GameScreen, this code reads the UI state, and passes the current scrambled word toGameLayout.@Composable fun GameScreen(gameViewModel: GameViewModel = viewModel()) { // Ensures that whenever there is a change in the ``uiState`` value, recomposition occurs for the composables using the ``gameUiState`` value. val gameUiState by gameViewModel.uiState.collectAsState() // ... Column() { // ... GameLayout( currentScrambledWord = gameUiState.currentScrambledWord, // ... ) } }
GameScreenaccesses the state usinggameViewModel.uiState.collectAsState().GameViewModel.uiStateis aStateFlow<GameUiState>object. ThecollectAsState()function gets the latest value fromGameViewModel.uiState. WheneverGameViewModel.uiStateis updated, a recomposition is triggered.An illustration:
Display the guess word
In the
GameLayoutcomposable, updating the user’s guess word is an event that flows up to theGameViewModel. The stategameViewModel.userGuesswill flow down from theGameViewModelto theGameLayout.
In
GameScreen, this is how the state flows:fun GameScreen(gameViewModel: GameViewModel = viewModel()) { // ... GameLayout( onUserGuessChanged = { gameViewModel.updateUserGuess(it) }, // GameLayout ➜ GameViewModel wordCount = gameUiState.currentWordCount, // GameViewModel ➜ GameLayout userGuess = gameViewModel.userGuess, // GameViewModel ➜ GameLayout onKeyboardDone = { gameViewModel.checkUserGuess() }, // GameLayout ➜ GameViewModel currentScrambledWord = gameUiState.currentScrambledWord, // GameViewModel ➜ GameLayout isGuessWrong = gameUiState.isGuessedWordWrong, // GameViewModel ➜ GameLayout ) // ... }
In
GameViewModel, this is where the event callback flows up (GameLayout ➜ GameViewModel)var userGuess by mutableStateOf("") private set fun updateUserGuess(guessedWord: String) { userGuess = guessedWord }
The
var userGuessis used to store the user’s guess. UsemutableStateOf()so that Compose observes this value, and sets the initial value to"".Since
GameViewModelis not a composable,userGuessis not affected by recompositions, andrememberis not needed.
The above code will cause the text field to display the user’s guess.

Verify guess word
This code verifies the user’s guess, and displays an error if the guess is wrong.
The flow:

In
GameViewModel.kt➜class GameViewModel, this app logic handles the user’s guess, and updates the state. The flow is GameViewModel ➜ GameLayoutfun checkUserGuess() { if (userGuess.equals(currentWord, ignoreCase = true)) { // ... } else { // User's guess is wrong, update the UI state to show an error _uiState.update { currentState -> currentState.copy(isGuessedWordWrong = true) } } // ... }
_uiState.update()updates the_uiState.valueusing a lambda which takes the current state as input, and returns the new state.Use
copy()to copy an object, altering some of its properties while keeping the rest unchanged. Example:val jack = User(name = "Jack", age = 1) val olderJack = jack.copy(age = 2)
In
GameScreen.kt➜GameScreen():@Composable fun GameScreen(gameViewModel: GameViewModel = viewModel()) { // ... GameLayout( // ... onKeyboardDone = { gameViewModel.checkUserGuess() } // GameLayout ➜ GameViewModel isGuessWrong = gameUiState.isGuessedWordWrong, // GameViewModel ➜ GameLayout // ... ) // ... Button( modifier = Modifier.fillMaxWidth(), onClick = { gameViewModel.checkUserGuess() } // GameLayout ➜ GameViewModel ) { // ... } // ... }
Update score and word count
If the user’s guess was correct, this code updates the score, and the number of words shown to the user.
In
GameViewModel.kt➜class GameViewModel, this code updates the score, increments the current word count, and picks a new work.import com.example.unscramble.data.SCORE_INCREASE fun checkUserGuess() { if (userGuess.equals(currentWord, ignoreCase = true)) { // User's guess is correct, increase the score val updatedScore = _uiState.value.score.plus(SCORE_INCREASE) // and call updateGameState() to prepare the game for next round updateGameState(updatedScore) } else { //... } } private fun updateGameState(updatedScore: Int) { // ... // Normal round in the game _uiState.update { currentState -> currentState.copy( isGuessedWordWrong = false, currentScrambledWord = pickRandomWordAndShuffle(), currentWordCount = currentState.currentWordCount.inc(), score = updatedScore ) } // ... }
Pass score and word count
This code passes the score and word count down from
ViewModelto theGameStatus.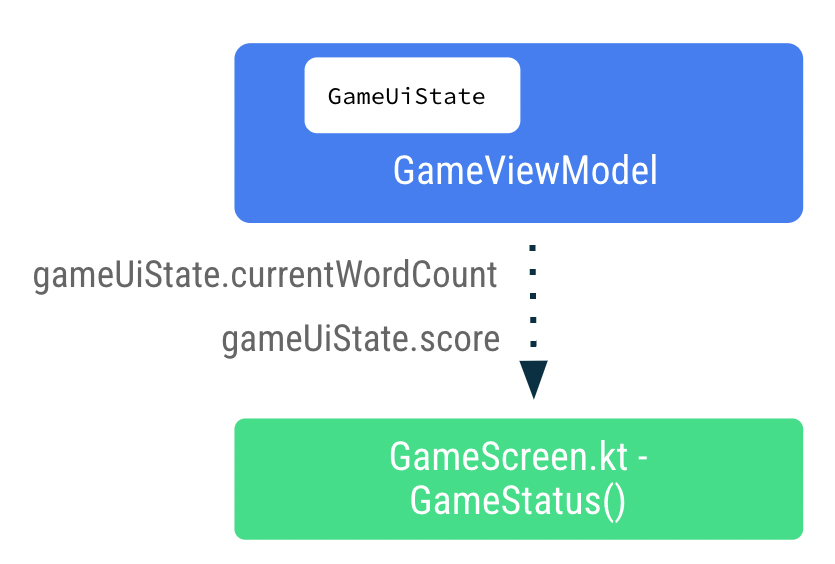
In
GameScreen.kt➜GameScreen():GameStatus(score = gameUiState.score, modifier = Modifier.padding(20.dp))
Handle last round of game
In
GameViewModel.kt➜class GameViewModel, this code ends the game afterMAX_NO_OF_WORDSwords have been shown to the user.private fun updateGameState(updatedScore: Int) { if (usedWords.size == MAX_NO_OF_WORDS){ // Last round, update isGameOver to true, don't pick a new word _uiState.update { currentState -> currentState.copy( isGuessedWordWrong = false, score = updatedScore, isGameOver = true ) } } else { // Normal round in the game // ... } }
Display game end dialog
A dialog is a small window that prompts the user to make a decision or enter additional information. Normally, a dialog does not fill the entire screen, and it requires users to take an action before they can proceed. Android provides different types of dialogs. In this codelab, you learn about Alert Dialogs.
Anatomy of alert dialog
An alert dialog:
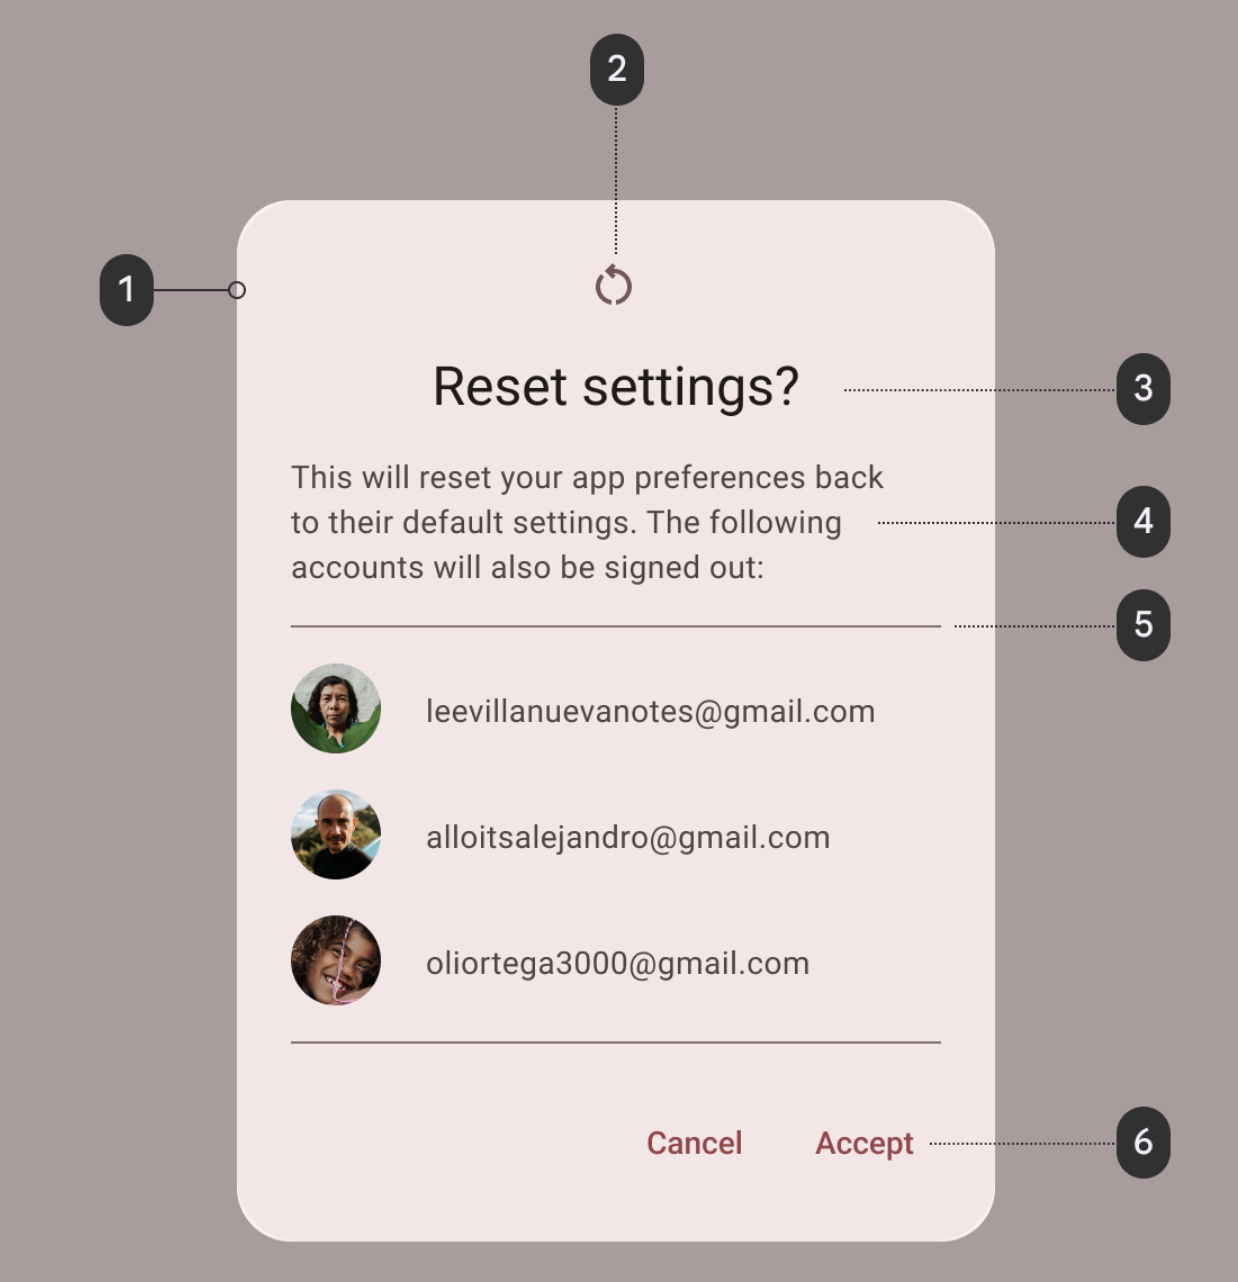
Container
Icon (optional)
Headline (optional)
Supporting text
Divider (optional)
Actions
This alert dialog shows options to end or restart the game.

The flow:
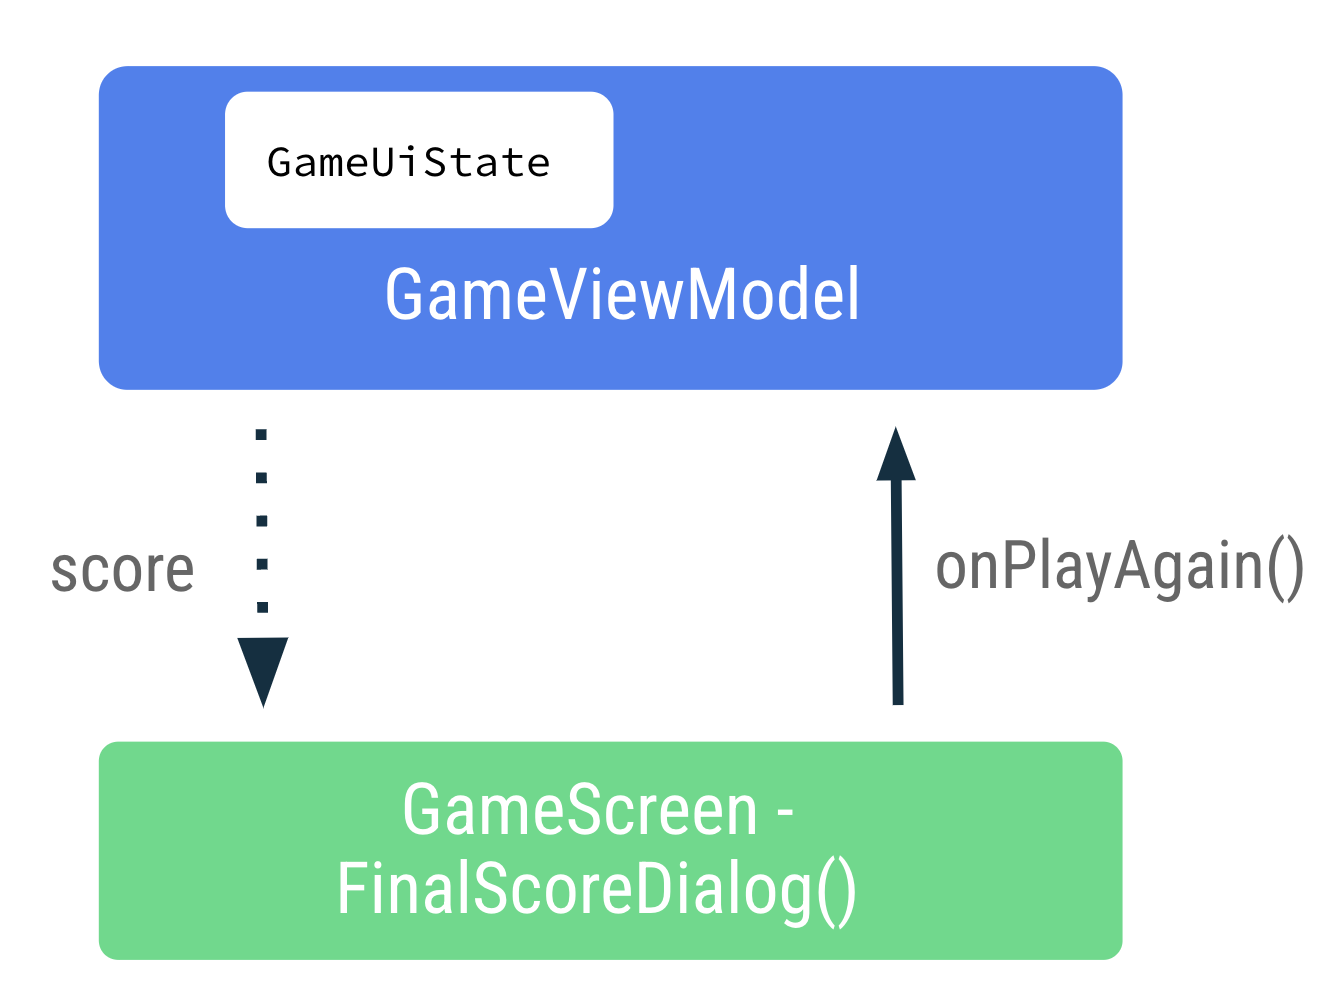
The code here displays the alert dialog.
@Composable
private fun FinalScoreDialog(
    score: Int,
    onPlayAgain: () -> Unit,
    modifier: Modifier = Modifier
) {
    val activity = (LocalContext.current as Activity)

    AlertDialog(
        onDismissRequest = {
            // Dismiss the dialog when the user clicks outside the dialog or on the back
            // button. If you want to disable that functionality, simply use an empty
            // onDismissRequest.
        },
        title = { Text(text = stringResource(R.string.congratulations)) },
        text = { Text(text = stringResource(R.string.you_scored, score)) },
        modifier = modifier,
        dismissButton = {
            TextButton(
                onClick = {
                    activity.finish()
                }
            ) {
                Text(text = stringResource(R.string.exit))
            }
        },
        confirmButton = {
            TextButton(onClick = onPlayAgain) {
                Text(text = stringResource(R.string.play_again))
            }
        }
    )
}
The
titleandtextparameters display the headline and supporting text in the alert dialog.The
dismissButtonandconfirmButtonare the text buttons.The
dismissButtonargument displays Exit and terminates the app by finishing the activity.The
confirmButtonargument restarts the game, and displays the text Play Again.
State in device rotation
When a configuration change occurs, Android restarts the activity from scratch, running all the lifecycle startup callbacks.
The
ViewModelstores the app-related data that isn’t destroyed when the Android framework destroys and recreates activity.ViewModelobjects are automatically retained and they are not destroyed like the activity instance during configuration change. The data they hold is immediately available after the recomposition.Run the app and play some words. Change the configuration of the device from portrait to landscape, or vice versa.
Observe that the data saved in the
ViewModel’s state UI is retained during the configuration change.
In-lesson practice: Add a ViewModel to Dessert Clicker
In this exercise, you will remove the state, data, and logic out of MainActivity and move it to a
ViewModel.Abstracting app logic away from the view and into a
ViewModelis a modern practice for Android development. This practice offers the following benefits:The code becomes more readable for other developers.
The code becomes more testable.
Multiple developers can work simultaneously on an app without interfering with other developers’ work.
Starter code: Dessert Clicker
Branch: main
Clone:
$ git clone https://github.com/google-developer-training/basic-android-kotlin-compose-training-dessert-clicker.git
$ cd basic-android-kotlin-compose-training-dessert-clicker
$ git checkout main
Set up dependencies
Add the following dependency to the
app/build.gradlefile:dependencies { // ... implementation "androidx.lifecycle:lifecycle-viewmodel-compose:2.5.1" // ... }
Create a UI state class
Currently, the
DessertClickerApp()composable in theMainActivitycontains the data and state that drive the UI.Create a new file
app/src/main/java/com/example/dessertclicker/data/DessertUiState.ktIn this file, create a data class that holds all the necessary data for the UI. The data within this class replaces the data that the
DessertClickerApp()composable currently manages.
Create a ViewModel
Create new file
app/src/main/java/com/example/dessertclicker/ui/DessertViewModel.ktIn this file, Create a
ViewModelclass.
Relocate the app logic and data to the ViewModel
Relocate the logic from the
MainActivityto theViewModeland make the UI state data accessible using the UI state class you created. Delete all the data and state management logic fromMainActivity.
Call the ViewModel
Use the data and methods that the ViewModel provides to drive the UI in the
MainActivity.
Solution code: Dessert Clicker (with ViewModel)
Starter code: https://github.com/google-developer-training/basic-android-kotlin-compose-training-dessert-clicker/tree/viewmodel
Branch: viewmodel
Clone:
$ git clone https://github.com/google-developer-training/basic-android-kotlin-compose-training-dessert-clicker.git
$ cd basic-android-kotlin-compose-training-dessert-clicker
$ git checkout viewmodel
Week 6 Blended Learning Questions
What to do?
Individual work: place your responses to the questions in your Personal RefleXions doc (no need to share with teacher).
Team work: share responses, resolve differences, produce one set of responses as a team, place them in the Team RefleXions doc (share with teacher).
Using an app on your phone, explain which app data belongs in the Data Layer, which belongs in a state holder, and which could belong to either.
example
Spotify:
Data Layer: song metadata, user preferences, app version.
State Holder: currently-playing song, playback status (playing/paused/stopped).