Unit 3 Pathway 1 Activity 2: Generics, Objects, Extensions
Introduction
Over the decades, programmers devised several programming language features to help you write better code — expressing the same idea with less code, abstraction to express complex ideas, and writing code that prevents other developers from accidentally making mistakes are just a few examples. The Kotlin language is no exception, and there are a number of features intended to help developers write more expressive code.
Unfortunately, these features can make things tricky if this is your first time programming. While they might sound useful, the extent of their usefulness and the problems they solve may not always be apparent. Chances are you’ve already seen some features used in Compose and other libraries.
While there’s no substitute for experience, this codelab exposes you to several Kotlin concepts that help you structure larger apps:
Generics
Different kinds of classes (enum classes and data classes)
Singleton and companion objects
Extension properties and functions
Scope functions
By the end of this codelab, you should have a deeper knowledge of the code you’ve already seen in this course, and learn some examples of when you’ll encounter or use these concepts in your own apps.
Prerequisites
Familiarity with object-oriented programming concepts, including inheritance.
How to define and implement interfaces.
What you’ll learn
How to define a generic type parameter for a class.
How to instantiate a generic class.
When to use enum and data classes.
How to define a generic type parameter that must implement an interface.
How to use scope functions to access class properties and methods.
How to define singleton objects and companion objects for a class.
How to extend existing classes with new properties and methods.
What you’ll need
A web browser with access to the Kotlin Playground.
Make a reusable class with generics
Let’s say you’re writing an app for an online quiz. There are various types of quiz questions, such as fill-in-the-blank, or true/false. An individual quiz question can be represented by a class, with several properties.
The question text in a quiz can be represented by a string. Quiz questions also need to represent the answer. However, different question types — such as true/false — may need to represent the answer using a different data type. Let’s define three different types of questions.
Fill-in-the-blank: The answer is a word represented by a
String.True/false: The answer is represented by a
Boolean.Math problems: The answer is a numeric value, represented by an
Int.
In addition, quiz questions also have a difficulty rating. The difficulty rating is represented by a string with three possible values:
"easy","medium", or"hard".Let’s define classes to represent each type of quiz question.
Navigate to the Kotlin playground.
Above
main(), define a class for fill-in-the-blank questions namedFillInTheBlankQuestion:class FillInTheBlankQuestion( val questionText: String, val answer: String, val difficulty: String )
Below the
FillInTheBlankQuestionclass, define another class namedTrueOrFalseQuestion:class TrueOrFalseQuestion( val questionText: String, val answer: Boolean, val difficulty: String )
Finally, below the other two classes, define a
NumericQuestionclass:class NumericQuestion( val questionText: String, val answer: Int, val difficulty: String )
Do you notice the repetition?
class FillInTheBlankQuestion( val questionText: String, val answer: String, val difficulty: String ) class TrueOrFalseQuestion( val questionText: String, val answer: Boolean, val difficulty: String ) class NumericQuestion( val questionText: String, val answer: Int, val difficulty: String )
All three classes have the exact same properties. The only difference is the data type of the
answerproperty.You might think that the obvious solution is to create a parent class with the
questionTextanddifficulty, and each subclass defines theanswerproperty. However, using inheritance has the same problem as above. Every time a new type of question is added, theanswerproperty also needs to be added with a different data type. It also looks strange to have a parent classQuestionthat doesn’t have ananswerproperty.When you want a property to have differing data types, subclassing is not the answer. Instead, Kotlin provides something called generic types that allow you to have a single property that can have differing data types, depending on the specific use case.
What is a generic data type?
Generic types, or generics for short, allow a data type, such as a class, to specify an unknown placeholder data type that can be used with its properties and methods. What exactly does this mean?
In the above example, instead of defining an answer property for each possible data type, you can create a single class to represent any question, and use a placeholder name for the data type of the
answerproperty. The actual data type —String,Int,Boolean, wtv — is specified when that class is instantiated. Wherever the placeholder name is used, the data type passed into the class is used instead. The syntax for defining a generic type for a class is shown below:
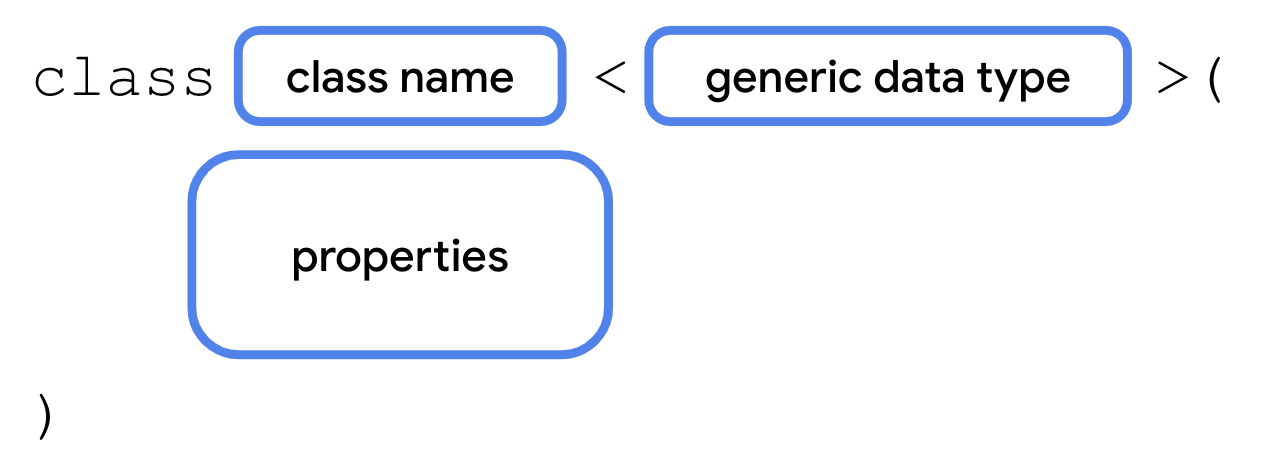
A generic data type is provided when instantiating a class, so it needs to be defined as part of the class signature. After the class name comes a
<, followed by a placeholder name for the data type, followed by a>.The placeholder name can then be used wherever you use a real data type within the class, such as for a property.
This is identical to any other property declaration, except the placeholder name is used instead of the data type.
How would your class ultimately know which data type to use? The data type that the generic type uses is passed as a parameter in angle brackets when you instantiate the class.

After the class name comes a
<, followed by the actual data type:String,Boolean,Int, etc, followed by a>. The data type of the value that you pass in for the generic property must match the data type in the angle brackets. You’ll make the answer property generic so that you can use one class to represent any type of quiz question, whether the answer is aString,Boolean,Int, or any arbitrary data type.
Note
The generic types passed in when instantiating a class are also called “parameters”, although they’re part of a separate parameter list than the property values placed inside the parentheses.
Note
Like the example above, you’ll often see a generic type named T (short for type), or other capital letters if the class has multiple generic types. However, there is definitely not a rule and you’re welcome to use a more descriptive name for generic types.
Refactor your code to use generics
Let’s refactor your code to use a single class named
Questionwith a generic answer property.Remove the class definitions for
FillInTheBlankQuestion,TrueOrFalseQuestion, andNumericQuestion.Create a new class named Question, with a generic type parameter
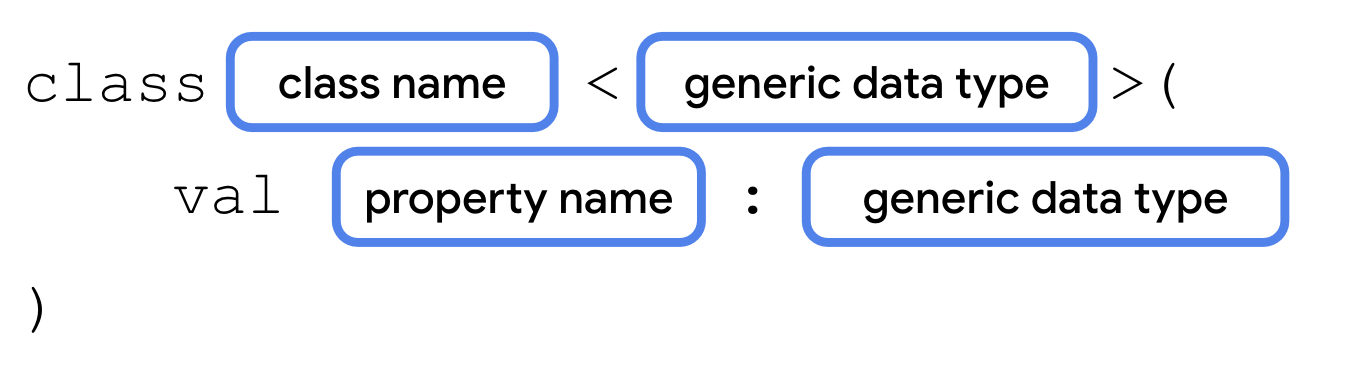
Tclass Question<T>()
Add the
questionText,answer, anddifficultyproperties. Theansweris of typeT, because its data type is specified when instantiating theQuestionclass.class Question<T>( val questionText: String, val answer: T, val difficulty: String )
To see how this works, create three instances of the Question class in
main().fun main() { val question1 = Question<String>("Quoth the raven ___", "nevermore", "medium") val question2 = Question<Boolean>("The sky is green. True or false", false, "easy") val question3 = Question<Int>("How many days are there between full moons?", 28, "hard") }
Run your code to make sure everything works. You should now have three instances of the
Questionclass — each with different data types foranswer. If you want to handle questions with a different answer type, you can reuse the same Question class.
Use an enum class
The
difficultyproperty has three possible values: “easy”, “medium”, and “hard”. There are a couple of problems.Accidentally mistyping one of the three possible strings could introduce bugs.
If the values change, for example,
"medium"is renamed to"average", then you need to update all usages of the string.Someone might accidentally using a different string that isn’t one of the three valid values.
The code is harder to maintain when more difficulty levels are added.
Kotlin helps you address these problems with a special type of class called an enum class. An enum class is used to create types with a limited set of possible values. In the real world, for example, the four cardinal directions — north, south, east, and west — could be represented by an enum class. The code shouldn’t allow any additional directions. The syntax for an enum class is shown below.
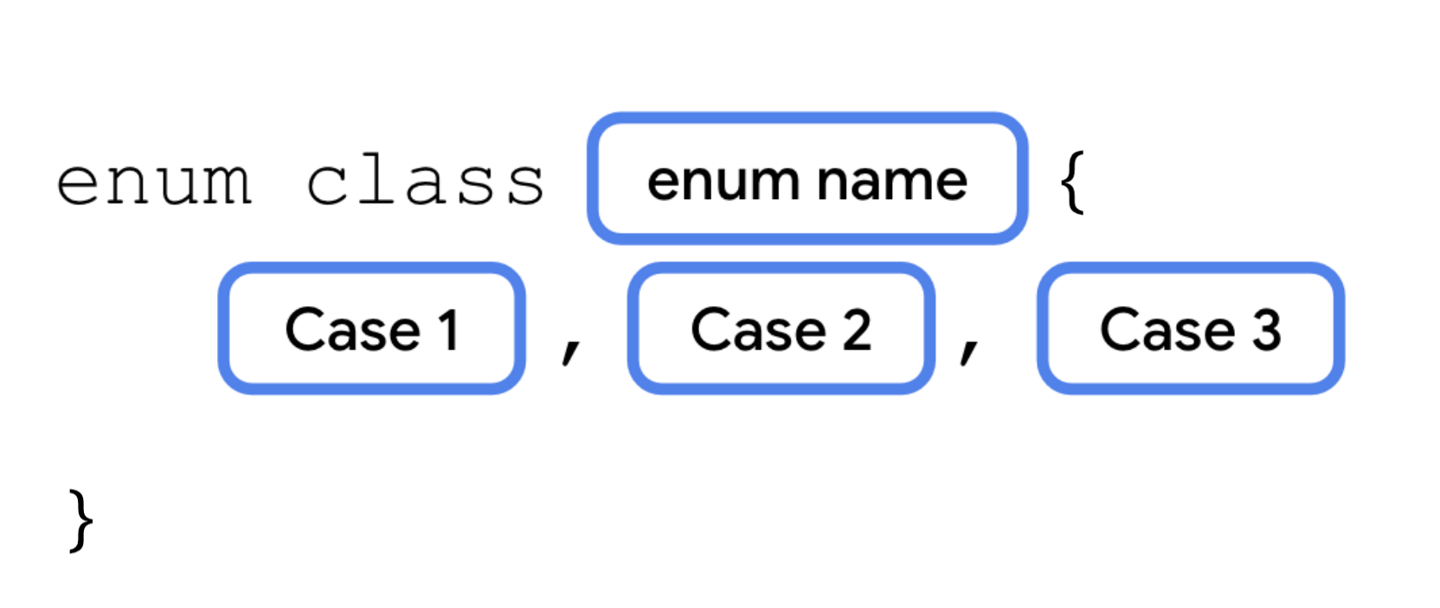
Each possible value of an enum is called an enum constant. Enum constants are placed inside the curly braces separated by commas. The convention is to capitalize every letter in the constant name.
Refer to enum constants using the
.operator.
Use an enum constant
Modify your code to use an enum constant, instead of a
String, to represent the difficulty.Below the
Questionclass, define an enum class called Difficulty.enum class Difficulty { EASY, MEDIUM, HARD }
In the
Questionclass, change the data type ofdifficultyfromStringtoDifficulty.class Question<T>( val questionText: String, val answer: T, val difficulty: Difficulty )
When initializing the three questions, pass in the enum constant for the difficulty.
val question1 = Question<String>("Quoth the raven ___", "nevermore", Difficulty.MEDIUM) val question2 = Question<Boolean>("The sky is green. True or false", false, Difficulty.EASY) val question3 = Question<Int>("How many days are there between full moons?", 28, Difficulty.HARD)
Use a data class
Many of the classes you’ve worked with so far, such as subclasses of
Activity, have several methods to perform different actions. These classes don’t just represent data, but also contain a lot of functionality.Classes like the
Questionclass, on the other hand, only contain data. They don’t have any methods that perform an action. These can be defined as a data class.Defining a class as a data class allows the Kotlin compiler to make certain assumptions, and to automatically implement some methods. For example,
toString()is called behind the scenes by theprintln()function. When you use a data class,toString()and other methods are implemented automatically based on the class’s properties.Define a data class using
data class
A data class needs to have at least one parameter in its constructor, and all constructor parameters must be marked with
valorvar. A data class also cannot beabstract,open,sealed, orinner.
Convert Question to a data class
First, you’ll see what happens when you try to call a method like
toString()on a class that isn’t a data class. Then, you’ll convertQuestioninto a data class, so that this and other methods will be implemented by default.In
main():fun main() { val question1 = Question<String>("Quoth the raven ___", "nevermore", Difficulty.MEDIUM) val question2 = Question<Boolean>("The sky is green. True or false", false, Difficulty.EASY) val question3 = Question<Int>("How many days are there between full moons?", 28, Difficulty.HARD) println(question1.toString()) }
Run the code. The output only shows the class name and a unique identifier for the object.
Question@37f8bb67
Make Question into a data class using the data keyword.
data class Question<T>( val questionText: String, val answer: T, val difficulty: Difficulty )
Run your code again. By marking this as a data class, Kotlin is able to determine how to display the class’s properties when calling
toString().Question(questionText=Quoth the raven ___, answer=nevermore, difficulty=MEDIUM)
When a class is defined as a data class, the following methods are implemented.
equals()hashCode()(for working with certain collection types)toString()componentN():component1(),component2(), etc.copy()
Use a singleton object
There are many scenarios where you want a class to only have one instance. For example:
Player stats in a mobile game for the current user.
Interacting with a single hardware device, like sending audio through a speaker.
An object to access a remote data source (such as a Firebase database).
Authentication, where only one user should be logged in at a time.
In the above scenarios, you’d probably need to use a class. However, you’ll only ever need to instantiate one instance of that class. If there’s only one hardware device, or only one user logged in at once, there would be no reason to create more than a single instance. Having two objects that access the same hardware device simultaneously could lead to some really strange and buggy behavior.
You can clearly communicate in your code that an object should have only one instance by defining it as a singleton. A singleton is a class that can only have a single instance. Kotlin provides a special construct, called an object, that can be used to make a singleton class.
Define a singleton object
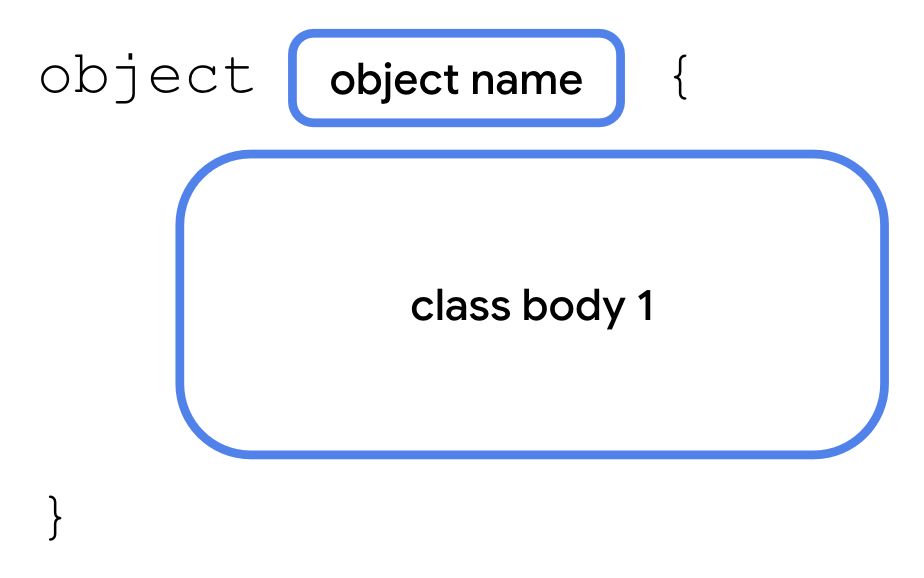
The syntax for an object is similar to that of a class. Simply use the
objectkeyword instead of theclasskeyword. A singleton object can’t have a constructor as you can’t create instances directly. Instead, all the properties are defined within the curly braces and are given an initial value.Some of the examples given earlier might not seem obvious, especially if you haven’t worked with specific hardware devices or dealt with authentication yet in your apps. However, you’ll see singleton objects come up as you continue learning Android development. Let’s see it in action with a simple example using an object for user state, in which only one instance is needed.
For a quiz, it would be great to have a way to keep track of the total number of questions, and the number of questions the student answered so far. You’ll only need one instance of this class to exist, so instead of declaring it as a class, declare it as a singleton object.
For this example, we’ll assume: 10 questions in total, and 3 of them are answered.
Create an object named
StudentProgresswith two properties.object StudentProgress { var total: Int = 10 var answered: Int = 3 }
Access a singleton object
There’s only one instance of a singleton in existence at any one time. Access its properties like this:

Update
main()to access the properties of the singleton object. Inmain(), print the number of questions answered and the total number of questions:fun main() { ... println("${StudentProgress.answered} of ${StudentProgress.total} answered.") }
Run your code to verify that everything works.
... 3 of 10 answered.
Declare objects as companion objects
A singleton object can be declared inside another class. One way of doing this is to use a companion object. A companion object allows you to access its properties and methods from inside the class, if the object’s properties and methods belong to that class
This makes the syntax more concise. Example: a singleton object’s property can be accessed using
Class.SingletonObject.property. When using a companion object, you can just useClass.property.To declare a companion object:

In
main(), removeprintln(question1.toString()).You’ll create a new class called
Quizto store the quiz questions, and makeStudentProgressa companion object of theQuizclass.Below the
Difficultyenum, define a new class namedQuiz. Movequestion1,question2, andquestion3frommain()intoQuiz.class Quiz { val question1 = Question<String>("Quoth the raven ___", "nevermore", Difficulty.MEDIUM) val question2 = Question<Boolean>("The sky is green. True or false", false, Difficulty.EASY) val question3 = Question<Int>("How many days are there between full moons?", 28, Difficulty.HARD) }
Move the
StudentProgressobject into the Quiz class.class Quiz { val question1 = Question<String>("Quoth the raven ___", "nevermore", Difficulty.MEDIUM) val question2 = Question<Boolean>("The sky is green. True or false", false, Difficulty.EASY) val question3 = Question<Int>("How many days are there between full moons?", 28, Difficulty.HARD) object StudentProgress { var total: Int = 10 var answered: Int = 3 } }
Add a
println()to reference the properties.fun main() { println("${Quiz.StudentProgress.answered} of ${Quiz.StudentProgress.total} answered.") }
Run your code to verify the output.
3 of 10 answered.
Now, add the
companionkeyword to makeStudentProgressa companion object:class Quiz { val question1 = Question<String>("Quoth the raven ___", "nevermore", Difficulty.MEDIUM) val question2 = Question<Boolean>("The sky is green. True or false", false, Difficulty.EASY) val question3 = Question<Int>("How many days are there between full moons?", 28, Difficulty.HARD) companion object StudentProgress { var total: Int = 10 var answered: Int = 3 } }
Change the
println().fun main() { println("${Quiz.answered} of ${Quiz.total} answered.") }
Run your code to verify the output.
3 of 10 answered.
Extend classes with new properties and methods
When working with Compose, you may have noticed some interesting syntax when specifying the size of UI elements. Numeric types, such as
Double, appear to have properties likedpandspspecifying dimensions.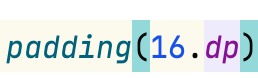
Why would the designers of the Kotlin language include properties and functions on built-in data types, specifically for building Android UI? Were they able to predict the future? Was Kotlin designed to be used with Compose even before Compose existed?
Of course not! When you’re writing a class, you often don’t know exactly how another developer will use it, or plans to use it, in their app. It’s not possible to predict all future use cases, nor is it wise to add unnecessary bloat to your code for some unforeseen use case.
What the Kotlin language does, is give other developers the ability to extend existing data types, adding properties and methods that can be accessed with dot syntax, as if they were part of that data type. A developer who didn’t work on the floating point types in Kotlin, for example, such as someone building the Compose library, might choose to add properties and methods specific to UI dimensions.
Since you’ve seen this syntax when learning Compose in the first two units, it’s about time for you to learn how this works under the hood. You’ll add some properties and methods to extend existing types.
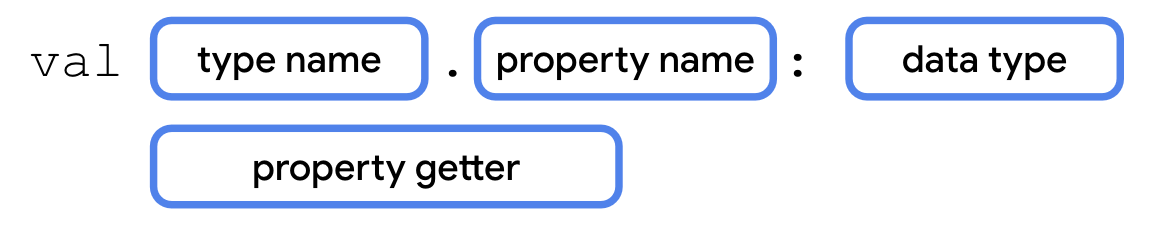
Add an extension property
To define an extension property:
You’ll refactor the code in
main()to print the quiz progress with an extension property.Below the
Quizclass, define an extension propertyQuiz.StudentProgress.progressText, with a getter method. Extension properties can’t store data, so they must be get-only.val Quiz.StudentProgress.progressText: String get() = "${answered} of ${total} answered"
Replace the code in
main()with code that printsprogressText.fun main() { println(Quiz.progressText) }
Run your code to verify it works.
3 of 10 answered.
Add an extension function
To define an extension function, add the type name and a dot operator (.) before the function name.
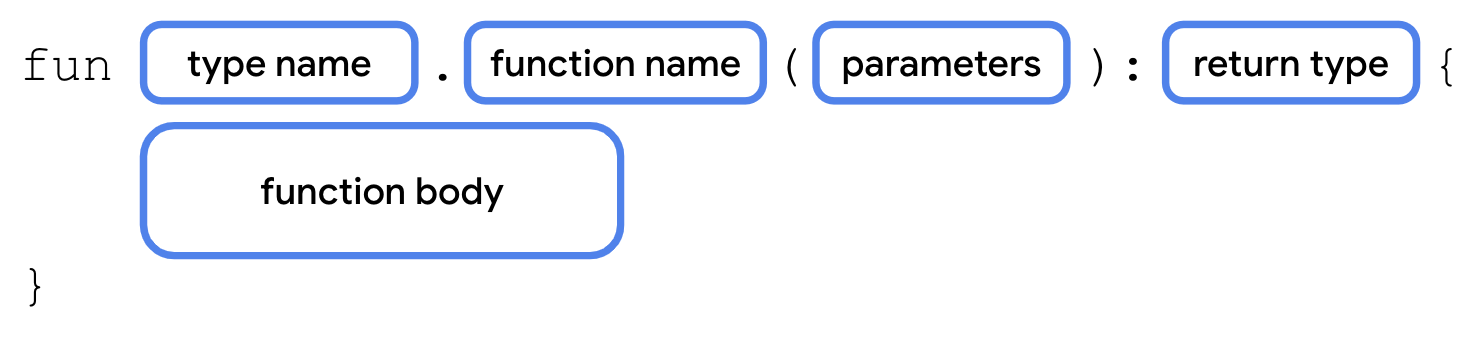
You’ll add an extension function to output the quiz progress as a progress bar.
Add an extension function
StudentProgress.printProgressBar().fun Quiz.StudentProgress.printProgressBar() { repeat(Quiz.answered) { print("▓") } // represents answered questions repeat(Quiz.total - Quiz.answered) { print("▒") } // represents unanswered questions println() println(Quiz.progressText) }
Update the code in
main()to call printProgressBar().fun main() { Quiz.printProgressBar() }
Run your code to verify the output.
▓▓▓▒▒▒▒▒▒▒ 3 of 10 answered.
Having the option of extension properties and methods gives you more options to expose your code to other developers. Using dot syntax on other types can make your code easier to read, both for yourself and for other developers.
Rewrite extension functions using interfaces
On the previous page, you saw how to add properties and methods to the
StudentProgressobject without adding code to it directly, using extension properties and extension functions.While this is a great way to add functionality to one class that’s already defined, extending a class isn’t always necessary if you have access to the source code. There are also situations where you don’t know what the implementation should be, only that a certain method or property should exist.
If you need multiple classes to have the same additional properties and methods, perhaps with differing behavior, you can define these properties and methods with an interface.
For example, in addition to quizzes, let’s say you also have classes for surveys, steps in a recipe, or any other ordered data that could use a progress bar. You can define an interface that specifies the methods and/or properties that each of these classes must include.
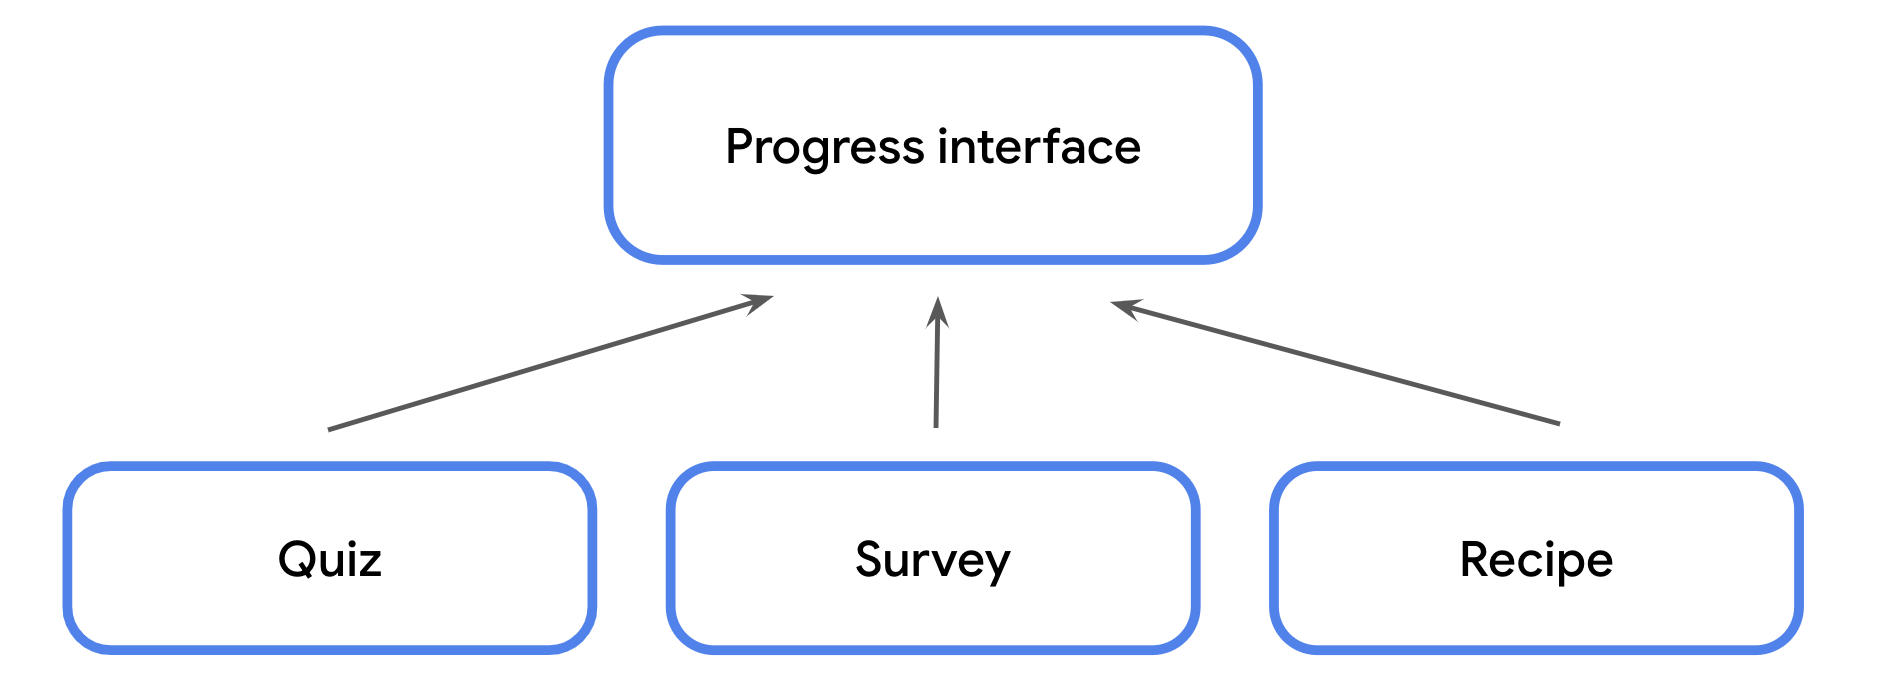
An interface is defined using the
interfacekeyword, followed by a name in UpperCamelCase, followed by opening and closing curly braces. Within the curly braces, you can define any method signatures or get-only properties that any class conforming to the interface must implement.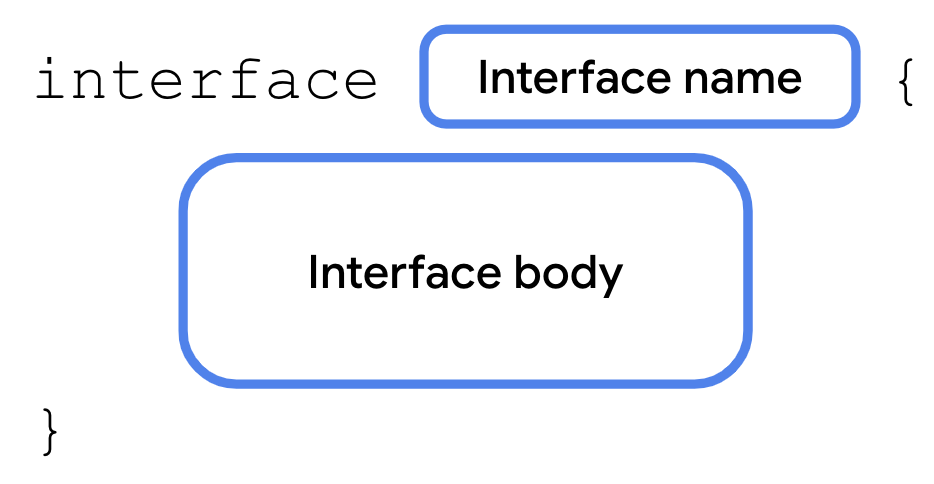
An interface is a contract. A class that conforms to an interface is said to extend the interface. A class can declare that it would like to extend an interface using:
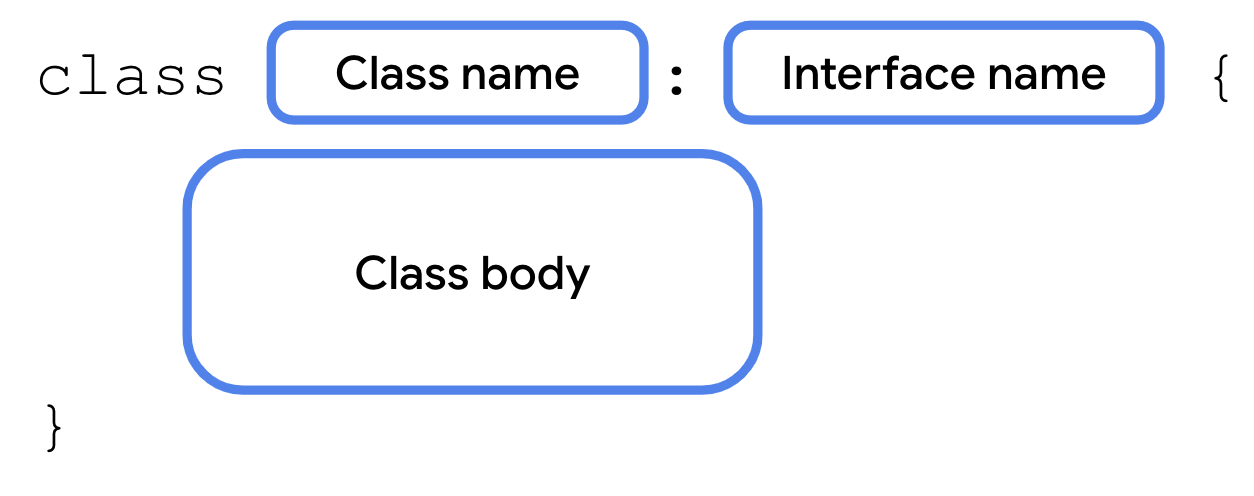
In return, the class must implement all properties and methods specified in the interface. This lets you easily ensure that any class that needs to extend the interface implements the exact same methods with the exact same method signature.
If you modify the interface in any way, such as add or remove properties or methods or change a method signature, the compiler requires you to update any class that extends the interface, keeping your code consistent and easier to maintain.
Interfaces allow for variation in the behavior of classes that extend them. It’s up to each class to provide the implementation.
Re-factoring the progress bar code to use an interface may look like this:
enum class Difficulty { EASY, MEDIUM, HARD } data class Question<T>( val questionText: String, val answer: T, val difficulty: Difficulty ) interface ProgressPrintable { val progressText: String fun printProgressBar() } // The ``Quiz`` class implements the ``ProgressPrintable`` interface class Quiz : ProgressPrintable { val question1 = Question<String>("Quoth the raven ___", "nevermore", Difficulty.MEDIUM) val question2 = Question<Boolean>("The sky is green. True or false", false, Difficulty.EASY) val question3 = Question<Int>("How many days are there between full moons?", 28, Difficulty.HARD) // use ``override`` because this is from the ProgressPrintable interface override val progressText: String get() = "${answered} of ${total} answered" // use ``override`` because this is from the ProgressPrintable interface override fun printProgressBar() { repeat(Quiz.answered) { print("▓") } repeat(Quiz.total - Quiz.answered) { print("▒") } println() println(progressText) } companion object StudentProgress { var total: Int = 10 var answered: Int = 3 } } fun main() { Quiz().printProgressBar() }
Run your code. The output is unchanged, but your code is now more modular. As your codebases grow, you can easily add classes that conform to the same interface to reuse code without inheriting from a superclass.
▓▓▓▒▒▒▒▒▒▒
3 of 10 answered.
There are numerous use cases for interfaces to help structure your code and you’ll start to see them used frequently in the common units. The following are some examples of interfaces you may encounter as you continue working with Kotlin.
Manual dependency injection. Create an interface defining all the properties and methods of the dependency. Require the interface as the data type of the dependency (activity, test case, etc.) so that an instance of any class implementing the interface can be used. This allows you to swap out the underlying implementations.
Mocking for automated tests. Both the mock class and the real class conform to the same interface.
Accessing the same dependencies in a Compose Multiplatform app. For example, create an interface that provides a common set of properties and methods for Android and desktop, even if the underlying implementation differs for each platform.
Several data types in Compose, such as
Modifier, are interfaces. This allows you to add new modifiers without needing to access or modify the underlying source code.
Use scope functions to access class properties and methods
Scope functions can eliminate repetitive object references
Scope functions: higher-order functions that allow you to access properties and methods of an object without referring to the object’s name.
They are called scope functions because the body of the function passed in takes on the scope of the object that the scope function is called with.
For example, some scope functions allow you to access the properties and methods in a class, as if the functions were defined as a method of that class. This can make your code more readable by allowing you to omit the object name when including it is redundant.
To better illustrate this, let’s take a look at a few different scope functions that you’ll encounter later in the course.
Use let() to replace long object names
let()allows you to refer to an object in a lambda expression using the identifierit. This can help you avoid using a long, more descriptive object name repeatedly when accessing more than one property. Thelet()function is an extension function that can be called on any Kotlin object using dot notation.For example, in the code below, the entire variable name is used each time. If the variable’s name changed, you’d need to update every usage.
fun printQuiz() {
    println(question1.questionText)
    println(question1.answer)
    println(question1.difficulty)
    println()
    println(question2.questionText)
    println(question2.answer)
    println(question2.difficulty)
    println()
    println(question3.questionText)
    println(question3.answer)
    println(question3.difficulty)
    println()
}
Instead, here’s an alternative using
let():fun printQuiz() { question1.let { println(it.questionText) println(it.answer) println(it.difficulty) } println() question2.let { println(it.questionText) println(it.answer) println(it.difficulty) } println() question3.let { println(it.questionText) println(it.answer) println(it.difficulty) } println() }
Use apply() to call an object’s methods without a variable
One of the cool features of scope functions is that you can call them on an object before that object has even been assigned to a variable. For example, the
apply()function is an extension function that can be called on an object using dot notation. Theapply()function also returns a reference to that object so that it can be stored in a variable.Example:
val quiz = Quiz()
quiz.printQuiz()
could be re-written as:
Quiz().apply {
    printQuiz()
}
Scope functions can make your code more concise and avoid repeating the same variable name.
The above code demonstrates just two examples, but you’re encouraged to bookmark and refer to the Scope Functions documentation as you encounter their usage later in the course.
Summary
You just got the chance to see several new Kotlin features in action. Generics allow data types to be passed as parameters to classes, enum classes define a limited set of possible values, and data classes help automatically generate some useful methods for classes.
You also saw how to create a singleton object which is restricted to one instance, how to make it a companion object of another class, and how to extend existing classes with new get-only properties and new methods.
Finally, you saw some examples of how scope functions can provide a simpler syntax when accessing properties and methods.
You’ll see these concepts throughout the later units as you learn more about Kotlin, Android development, and Compose. You now have a better understanding of how they work and how they can improve the reusability and readability of your code.