Unit 5 Pathway 1 Activity 2: Introduction to Coroutines in Kotlin Playground
Before you begin
This codelab introduces you to concurrency, which is a critical skill for Android developers to understand in order to deliver a great user experience. Concurrency involves performing multiple tasks in your app at the same time. For example, your app can get data from a web server or save user data on the device, while responding to user input events and updating the UI accordingly.
To do work concurrently in your app, you will be using Kotlin coroutines. Coroutines allow the execution of a block of code to be suspended and then resumed later, so that other work can be done in the meantime. Coroutines make it easier to write asynchronous code, which means one task doesn’t need to finish completely before starting the next task, enabling multiple tasks to run concurrently.
This codelab walks you through some basic examples in the Kotlin Playground, where you get hands-on practice with coroutines to become more comfortable with asynchronous programming.
Prerequisites
Able to create a basic Kotlin program with a
main()functionKnowledge of Kotlin language basics, including functions and lambdas
What you’ll build
Short Kotlin program to learn and experiment with the basics of coroutines
What you’ll learn
How Kotlin coroutines can simplify asynchronous programming
The purpose of structured concurrency and why it matters
What you’ll need
Internet access to use Kotlin Playground
Synchronous code
Simple Program
In synchronous code, only one conceptual task is in progress at a time. You can think of it as a sequential linear path. One task must finish completely before the next one is started. Below is an example of synchronous code.
Open Kotlin Playground.
Replace the code with the following code for a program that shows a weather forecast of sunny weather. In the
main()function, first we print out the text:Weather forecast. Then we print out:Sunny.fun main() { println("Weather forecast") println("Sunny") }
The output:
Weather forecast
Sunny
println()is a synchronous call: the task of printing the text to the output is completed before execution can move to the next line of code. Because each function call inmain()is synchronous, the entiremain()function is synchronous. Whether a function is synchronous or asynchronous is determined by the parts that it’s composed of.A synchronous function returns only when its task is fully complete. So after the last print statement in
main()is executed, all work is done. Themain()function returns and the program ends.
Add a delay
Now let’s pretend that getting the weather forecast of sunny weather requires a network request to a remote web server. Simulate the network request by adding a delay in the code before printing that the weather forecast is sunny.
Modify your code to add
delay(1000), which delays execution of the remainder of themain()function by 1000 milliseconds, or 1 second. Don’t run the code yet.// Coroutines library needed for delay() import kotlinx.coroutines.* fun main() { println("Weather forecast") delay(1000) println("Sunny") }
delay()is actually a special suspend function provided by the Kotlin coroutines library. Execution ofmain()suspends (pauses), and resumes once the specified duration of the delay is over (one second in this case).Running the code produces a compile error:
Suspend function 'delay' should be called only from a coroutine or another suspend function
For the purposes of learning coroutines within the Kotlin Playground, you can wrap your existing code with a call to the
runBlocking()function from the coroutines library.runBlocking()runs an event loop, which can handle multiple tasks at once by continuing each task where it left off when it’s ready to be resumed.The body of
runBlocking{}is executed in a new coroutine. Use this code:import kotlinx.coroutines.* fun main() { runBlocking { println("Weather forecast") delay(1000) println("Sunny") } }
runBlocking()is synchronous; it will not return until all work within its lambda block is completed. It will wait for the work indelay()to complete first, then continue withprintln("Sunny"). Once all the work in therunBlocking()function is complete, the function returns, which ends the program.Run the program. The output:
Weather forecast
Sunny
The output is the same as before. The code is still synchronous - it runs in a straight line and only does one thing at a time. However, the difference now is that it runs over a longer period of time due to the delay.
The “co-” in coroutine means cooperative. The code cooperates to share the underlying event loop. When it needs to wait for something, it suspends, which allows other work to be run in the meantime. (The “-routine” part in “coroutine” means “a set of instructions”, like a function.)
In this example, the coroutine suspends when it reaches the
delay()call. Other work can be done in that one second when the coroutine is suspended (even though in this program, there is no other work to do). Once the duration of the delay elapses, then the coroutine resumes execution and can proceed with printing Sunny to the output.Note
In general, only use
runBlocking()within amain()function like this for learning purposes. In your Android app code, you do not needrunBlocking()because Android provides an event loop for your app to process resumed work when it becomes ready.runBlocking()can be useful in your tests, however, and can let your test await specific conditions in your app before invoking the test assertions.
Suspending functions
If the actual logic to perform the network request to get the weather data becomes more complex, you may want to extract that logic out into its own function. Let’s refactor the code to see its effect:
import kotlinx.coroutines.*

fun main() {
    runBlocking {
        println("Weather forecast")
        printForecast()
    }
}

fun printForecast() {
    delay(1000)
    println("Sunny")
}
Running the program produces the same compile error you saw earlier. A suspend function can only be called from a coroutine or another suspend function, so define
printForecast()as a suspend function:import kotlinx.coroutines.* fun main() { runBlocking { println("Weather forecast") printForecast() } } suspend fun printForecast() { delay(1000) println("Sunny") }
delay()is a suspending function. NowprintForecast()is a suspending function too.A suspending function is like a regular function, but it can be suspended and resumed again later. To do this, suspend functions can only be called from other suspend functions.
A suspending function may contain zero or more suspension points. A suspension point is the place within the function where execution of the function can suspend. Once execution resumes, it picks up where it last left off in the code, and proceeds with the rest of the function.
Add another suspending function,
printTemperature():import kotlinx.coroutines.* fun main() { runBlocking { println("Weather forecast") printForecast() } } suspend fun printForecast() { delay(1000) println("Sunny") } suspend fun printTemperature() { delay(1000) println("30\u00b0C") // }
You can pretend that this does a network request to get the temperature data for the weather forecast. The escape sequence
"\u00b0"prints the degree symbol°.Call the new
printTemperature()function fromrunBlocking():import kotlinx.coroutines.* fun main() { runBlocking { println("Weather forecast") printForecast() printTemperature() } } suspend fun printForecast() { delay(1000) println("Sunny") } suspend fun printTemperature() { delay(1000) println("30\u00b0C") }
The output:
Weather forecast
Sunny
30°C
What happens within
runBlocking()?First,
printForecast()gets called. It suspends for 1000ms, resumes, and printsSunny. TheprintForecast()function then returns back to the caller.Next,
printTemperature()gets called. It suspends when it reachesdelay(1000), resumes one second later, and prints the temperature value to the output. SinceprintTemperature()has completed all work, it returns.In the
runBlocking()body, there are no further tasks to execute, so therunBlocking()function returns, and the program ends.
runBlocking()is synchronous and each call in the body will be called sequentially. Note that a well-designed suspending function returns only once all work has been completed. As a result, these suspending functions run one after another.To see how long it takes to execute this program, wrap the code in a call to
measureTimeMillis(), which will return the time it in milliseconds that it takes to run the code. Print out the execution time and divide by 1000.0 to convert milliseconds to seconds.import kotlin.system.* import kotlinx.coroutines.* fun main() { val time = measureTimeMillis { runBlocking { println("Weather forecast") printForecast() printTemperature() } } println("Execution time: ${time / 1000.0} seconds") } suspend fun printForecast() { delay(1000) println("Sunny") } suspend fun printTemperature() { delay(1000) println("30\u00b0C") }
Output:
Weather forecast
Sunny
30°C
Execution time: 2.128 seconds
It takes ≈2 seconds to execute. That seems reasonable because each of the suspending functions has a one-second delay.
So far, you’ve seen that the code in a coroutine is invoked sequentially by default. You have to be explicit if you want things to run concurrently, and you will learn how to do that in the next section. You will make use of the cooperative event loop to perform multiple tasks at the same time, which will speed up the execution time of the program.
Asynchronous code
launch()
The
launch()function launches a new coroutine. To execute tasks concurrently, use multiplelaunch()functions, so that multiple coroutines can execute concurrently, appearing to run at the same time.Coroutines in Kotlin follow a key concept called structured concurrency, where code is sequential by default, and cooperates with an underlying event loop, unless you explicitly ask for concurrent execution (e.g. using
launch()).The assumption is that if you call a function, it should finish its work completely by the time it returns, regardless of how many coroutines it may have used in its implementation details. Even if it fails with an exception, once the exception is thrown, there are no more pending tasks from the function. Hence, all work is finished once control flow returns from the function, whether it threw an exception or completed its work successfully.
Run this code, notice the use of
launch:import kotlinx.coroutines.* fun main() { runBlocking { println("Weather forecast") launch { printForecast() } launch { printTemperature() } } } suspend fun printForecast() { delay(1000) println("Sunny") } suspend fun printTemperature() { delay(1000) println("30\u00b0C") }
Run the program. Here’s the output:
Weather forecast
Sunny
30°C
The output is the same, but the program completes faster. Previously, you had to wait for
printForecast()to finish completely before moving on toprintTemperature(). NowprintForecast()andprintTemperature()can run concurrently because they are in separate coroutines.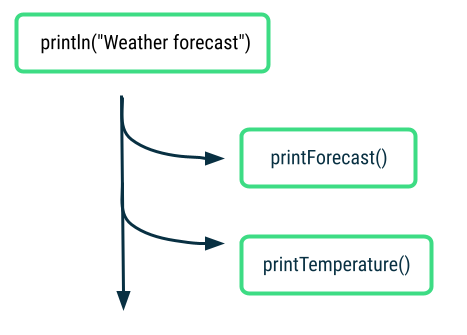
The call to
launch { printForecast() }can return before all the work inprintForecast()is completed. That is the beauty of coroutines. You can move onto the nextlaunch()call to start the next coroutine. Similarly, thelaunch { printTemperature() }also returns even before all work is completed.To see how much faster the program is now, add
measureTimeMillis():import kotlin.system.* import kotlinx.coroutines.* fun main() { val time = measureTimeMillis { runBlocking { println("Weather forecast") launch { printForecast() } launch { printTemperature() } } } println("Execution time: ${time / 1000.0} seconds") } suspend fun printForecast() { delay(1000) println("Sunny") } suspend fun printTemperature() { delay(1000) println("30\u00b0C") }
Output:
Weather forecast
Sunny
30°C
Execution time: 1.122 seconds
The execution time has gone down from ≈2 s to ≈1 s, so it’s faster to execute the program once you add concurrent operations! You can remove this time measurement code before moving on.
Modify the
runBlocking()code to add an additionalprintln():... fun main() { runBlocking { println("Weather forecast") launch { printForecast() } launch { printTemperature() } println("kthxbye") } } ...
The output:
Weather forecast
kthxbye
Sunny
30°C
After the two coroutines for
printForecast()andprintTemperature()are launched, the next instruction printskthxbyeimmediately. This demonstrates the “fire and forget” nature oflaunch(). You fire off a new coroutine withlaunch(), and don’t have to worry about when its work is finished.Later the coroutines will complete their work, and print the remaining output statements. Once all the work (including all coroutines) in the body of the
runBlocking()call have been completed, thenrunBlocking()returns and the program ends.Now you’ve changed your synchronous code into asynchronous code. When an asynchronous function returns, the task may not be finished yet. This is what you saw in the case of
launch(). The function returned, but its work was not completed yet. By usinglaunch(), multiple tasks can run concurrently in your code, which is a powerful capability to use in the Android apps you develop.
async()
In the real world, you won’t know how long the network requests for forecast and temperature will take. If you want to display a unified weather report when both tasks are done, then the current approach with
launch()isn’t sufficient. That’s whereasync()comes in.Use
async()if you care about when the coroutine finishes, and need a return value from it.async()returns aDeferredobject, which is like a promise that the result will be in there when it’s ready. You can access the result on theDeferredobject usingawait().Use this code, notice the
async()calls:import kotlinx.coroutines.* fun main() { runBlocking { println("Weather forecast") val forecast: Deferred<String> = async { getForecast() } val temperature: Deferred<String> = async { getTemperature() } // Using await() here makes the code wait until the values of forecast and temperature are available println("${forecast.await()} ${temperature.await()}") println("kthxbye") } } suspend fun getForecast(): String { delay(1000) return "Sunny" } suspend fun getTemperature(): String { delay(1000) return "30\u00b0C" }
After the two
async()calls, you can access the result of those coroutines by callingawait()on theDeferredobjects.Run the program. The output:
Weather forecast
Sunny 30°C
kthxbye
Neat! You created two coroutines that ran concurrently to get the forecast and temperature data. When they each completed, they returned a value. Then you combined the two return values into a single print statement:
Sunny 30°C.
Parallel Decomposition
We can take this weather example a step further and see how coroutines can be useful in parallel decomposition of work. Parallel decomposition involves taking a problem and breaking it into smaller subtasks that can be solved in parallel. When the results of the subtasks are ready, you can combine them into a final result.
Run this code:
import kotlinx.coroutines.*

fun main() {
    runBlocking {
        println("Weather forecast")
        println(getWeatherReport())
        println("kthxbye")
    }
}

suspend fun getWeatherReport() = coroutineScope {
    val forecast = async { getForecast() }
    val temperature = async { getTemperature() }
    // No need return keyword here, the last expression in a lambda block is returned
    "${forecast.await()} ${temperature.await()}"
}

suspend fun getForecast(): String {
    delay(1000)
    return "Sunny"
}

suspend fun getTemperature(): String {
    delay(1000)
    return "30\u00b0C"
}
Note
Another way of writing
getWeatherReport()issuspend fun getWeatherReport(): String { return coroutineScope { val forecast = async { getForecast() } val temperature = async { getTemperature() } // No need return keyword here, the last expression in a lambda block is returned "${forecast.await()} ${temperature.await()}" } }
coroutineScope()creates a local scope for this weather report task. The coroutines launched within this scope are grouped together within this scope, which has implications for cancellation and exceptions that you’ll learn about soon.
The output:
Weather forecast
Sunny 30°C
kthxbye
The output is the same, but there are some noteworthy takeaways here. First,
coroutineScope()will only return once all its work, including any coroutines it launched, have completed. In this case, both coroutinesgetForecast()andgetTemperature()need to finish and return their respective results. Then theSunnytext and30°Care combined and returned from the scope. TheSunny 30°Cgets printed to the output, and the caller can proceed to the last print statement ofkthxbye.With
coroutineScope(), even though the function is internally doing work concurrently, it appears to the caller as a synchronous operation becausecoroutineScopewon’t return until all work is done. From the POV of the caller, whethercoroutineScope()is synchronous or not, doesn’t matter. It’s just an “implementation detail” that the caller doesn’t need to know about. Analogy: when ordering a Big Mac Meal, you don’t need to know whether the fries, burger, and drink are prepared sequentially by 1 person, or in parallel by 3 people. All you know is after everything is prepared, you get your meal.The key insight here for structured concurrency is that you can take multiple concurrent operations and put it into a single synchronous operation, where concurrency is an “implementation detail”. The only requirement on the calling code is to be in a suspend function or coroutine. Other than that, the structure of the calling code doesn’t need to take into account the concurrency details.
Exceptions and cancellation
There are some situations where an error may occur, or some work may be cancelled.
Introduction to exceptions
An exception is an unexpected event that happens during execution of your code. You should implement appropriate ways of handling these exceptions, to prevent your app from crashing and impacting the user experience negatively.
Here’s an example of a program that terminates early with an exception. The program is intended to calculate the number of pizzas each person gets to eat, by dividing
numberOfPizzas / numberOfPeople. Say you accidentally forget to set the value of thenumberOfPeopleto an actual value.fun main() { val numberOfPeople = 0 val numberOfPizzas = 20 println("Slices per person: ${numberOfPizzas / numberOfPeople}") }
When you run the program, it will crash with an arithmetic exception because you can’t divide a number by zero.
Exception in thread "main" java.lang.ArithmeticException: / by zero
at FileKt.main (File.kt:4)
at FileKt.main (File.kt:-1)
at jdk.internal.reflect.NativeMethodAccessorImpl.invoke0 (:-2)
This issue has a straightforward fix, where you can change the initial value of
numberOfPeopleto a non-zero number. However, as your code gets more complex, there are certain cases where you can’t anticipate and prevent all exceptions from happening.What happens when one of your coroutines fails with an exception? Modify the code from the weather program to find out.
Exceptions with coroutines
Use this code. Note the exception thrown in the
getTemperature()function.import kotlinx.coroutines.* fun main() { runBlocking { println("Weather forecast") println(getWeatherReport()) println("kthxbye") } } suspend fun getWeatherReport() = coroutineScope { val forecast = async { getForecast() } val temperature = async { getTemperature() } "${forecast.await()} ${temperature.await()}" } suspend fun getForecast(): String { delay(1000) return "Sunny" } suspend fun getTemperature(): String { delay(500) throw AssertionError("Temperature is invalid") return "30\u00b0C" }
The exception simulates that 500 ms after fetching data from the server, an unexpected error happened.
The output:
Weather forecast
Exception in thread "main" java.lang.AssertionError: Temperature is invalid
at FileKt.getTemperature (File.kt:24)
at FileKt$getTemperature$1.invokeSuspend (File.kt:-1)
at kotlin.coroutines.jvm.internal.BaseContinuationImpl.resumeWith (ContinuationImpl.kt:33)
To understand this behavior, you’ll need to know that there is a parent-child relationship among coroutines. You can launch a coroutine (known as the child) from another coroutine (parent). As you launch more coroutines from those coroutines, you can build up a whole hierarchy of coroutines.
The coroutine executing
getTemperature()and the coroutine executinggetForecast()are child coroutines of the same parent coroutine. The behavior you’re seeing with exceptions in coroutines is due to structured concurrency. When one of the child coroutines fails with an exception, it gets propagated upwards. The parent coroutine is cancelled, which in turn cancels any other child coroutines (e.g. the coroutine runninggetForecast()in this case). Lastly, the error gets propagated upwards and the program crashes with theAssertionError.
Try-catch exceptions
If you know that certain parts of your code can possibly throw an exception, then you can surround that code with a try-catch block. You can catch the exception and handle it more gracefully in your app, such as by showing the user a helpful error message. Here’s a code snippet of how it might look:
try {
    // Some code that may throw an exception
} catch (e: IllegalArgumentException) {
    // Handle exception
}
This approach also works for asynchronous code with coroutines. You can still use a try-catch expression to catch and handle exceptions in coroutines. The reason is because with structured concurrency, the sequential code is still synchronous code so the try-catch block will still work in the same expected way.
...

fun main() {
    runBlocking {
        ...
        try {
            ...
            throw IllegalArgumentException("No city selected")
            ...
        } catch (e: IllegalArgumentException) {
            println("Caught exception $e")
            // Handle error
        }
    }
}

...
Here’s example code with a try-catch block. It prints the error that is caught, and a message that the weather report is not available.
import kotlinx.coroutines.*

fun main() {
    runBlocking {
        println("Weather forecast")
        try {
            println(getWeatherReport())
        } catch (e: AssertionError) {
            println("Caught exception in runBlocking(): $e")
            println("Report unavailable at this time")
        }
        println("kthxbye")
    }
}

suspend fun getWeatherReport() = coroutineScope {
    val forecast = async { getForecast() }
    val temperature = async { getTemperature() }
    "${forecast.await()} ${temperature.await()}"
}

suspend fun getForecast(): String {
    delay(1000)
    return "Sunny"
}

suspend fun getTemperature(): String {
    delay(500)
    throw AssertionError("Temperature is invalid")
    return "30\u00b0C"
}
Run the program. Now the error is handled gracefully, and the program can finish executing successfully.
Weather forecast
Caught exception in runBlocking(): java.lang.AssertionError: Temperature is invalid
Report unavailable at this time
kthxbye
If there’s a failure with getting the temperature, then there will be no weather report at all, even if a valid forecast was retrieved.
Here’s an alternative way where the weather report can still print the forecast, even if the temperature failed:
import kotlinx.coroutines.*

fun main() {
    runBlocking {
        println("Weather forecast")
        println(getWeatherReport())
        println("kthxbye")
    }
}

suspend fun getWeatherReport() = coroutineScope {
    val forecast = async { getForecast() }
    val temperature = async {
        try {
            getTemperature()
        } catch (e: AssertionError) {
            println("Caught exception $e")

            // No need return keyword here, the last expression in a lambda block is returned
            "(No temperature found)"
        }
    }

    // No need return keyword here, the last expression in a lambda block is returned
    "${forecast.await()} ${temperature.await()}"
}

suspend fun getForecast(): String {
    delay(1000)
    return "Sunny"
}

suspend fun getTemperature(): String {
    delay(500)
    throw AssertionError("Temperature is invalid")
    return "30\u00b0C"
}
Run the program.
Weather forecast
Caught exception java.lang.AssertionError: Temperature is invalid
Sunny (No temperature found)
kthxbye
Calling
getTemperature()failed with an exception, but the code withinasync()was able to catch that exception and handle it gracefully by having the coroutine still return a String that says the temperature was not found. The weather report is still able to be printed, with a successful forecast of Sunny. The temperature is missing in the weather report, but in its place, there is a message explaining that the temperature was not found. This is a better user experience than the program crashing with the error.A helpful way to think about this error handling approach is that
async()is the producer when a coroutine is started with it.await()is the consumer because it’s waiting to consume the result from the coroutine. The producer does the work and produces a result. The consumer consumes the result. If there’s an exception in the producer, then the consumer will get that exception if it’s not handled, and the coroutine will fail. However, if the producer is able to catch and handle the exception, then the consumer won’t see that exception and will see a valid result.Here’s the
getWeatherReport()code again for reference:suspend fun getWeatherReport() = coroutineScope { val forecast = async { getForecast() } val temperature = async { try { getTemperature() } catch (e: AssertionError) { println("Caught exception $e") "(No temperature found)" } } // No need return keyword here, the last expression in a lambda block is returned "${forecast.await()} ${temperature.await()}" }
In this case, the producer
async()was able to catch and handle the exception and still return(No temperature found). The consumerawait()receives thisStringresult and doesn’t even need to know that an exception happened. This is another option to gracefully handle an exception that you expect could happen in your code.Note
Exceptions are propagated differently for coroutines started with
launch()versusasync(). Within a coroutine started bylaunch(), an exception is thrown immediately so you can surround code with a try-catch block if it’s expected to throw an exception. See example.Warning
Within a
try-catchstatement in your coroutine code, avoid catching a generalExceptionbecause that includes a very broad range of exceptions. You could be inadvertently catching and suppressing an error that is actually a bug that should be fixed in your code. Another important reason is that cancellation of coroutines, which is discussed later in this section, depends onCancellationException. So if you catch any type ofExceptionincludingCancellationExceptionwithout rethrowing them, then the cancellation behavior within your coroutines may behave differently than expected. Instead, catch a specific type of exception that you expect may be thrown from your code.Exceptions propagate upwards in the tree of coroutines, unless they are handled. It’s also important to be careful when the exception propagates all the way to the root of the hierarchy, which could crash your whole app.
Learn more details about exception handling in the Exceptions in coroutines blogpost and Coroutine exceptions handling article.
Cancellation
A similar topic to exceptions is cancellation of coroutines. This scenario is typically user-driven when an event has caused the app to cancel work that it had previously started.
Example:
import kotlinx.coroutines.*

fun main() {
    runBlocking {
        println("Weather forecast")
        println(getWeatherReport())
        println("kthxbye")
    }
}

suspend fun getWeatherReport() = coroutineScope {
    val forecast = async { getForecast() }
    val temperature = async { getTemperature() }

    delay(200)
    temperature.cancel()

    "${forecast.await()}"
}

suspend fun getForecast(): String {
    delay(1000)
    return "Sunny"
}

suspend fun getTemperature(): String {
    delay(1000)
    return "30\u00b0C"
}
Output:
Weather forecast
Sunny
kthxbye
The weather report only consists of the weather forecast
Sunny, but not the temperature because that coroutine was cancelled.A coroutine can be cancelled, but it won’t affect other coroutines in the same scope and the parent coroutine will not be cancelled.
Note
You can learn more about Cancellation of Coroutines in this Android Developers blogpost. Cancellation must be cooperative, so you should implement your coroutine so that it can be cancelled.
In this section, you saw how cancellation and exceptions behave in coroutines and how that’s tied to the coroutine hierarchy. Let’s learn more of the formal concepts behind coroutines, so that you can understand how all the important pieces come together.
Coroutine concepts
When executing work asynchronously or concurrently, some questions arise: how will the work be executed? How long should the coroutine exist? What should happen if it gets cancelled or fails with an error?
Coroutines follow the principle of structured concurrency, which forces you to answer these questions when you use coroutines in your code using a combination of mechanisms.
Job
When you launch a coroutine with the
launch()function, it returns an instance ofJob. TheJobholds a reference to the coroutine, so you can manage its lifecycle.val job = launch { ... }
Note
The
Deferredobject that is returned from a coroutine started with theasync()function is aJobas well, and it holds the future result of the coroutine.The job can be used to control the life cycle, or how long the coroutine lives for, such as cancelling the coroutine if you don’t need the task anymore.
job.cancel()
With a job, you can check if it’s active, cancelled, or completed. The job is completed if the coroutine and any coroutines that it launched have completed all of their work. Note that the coroutine could have completed due to a different reason, such as being cancelled, or failing with an exception, but the job is still considered completed at that point.
Jobs also keep track of the parent-child relationship among coroutines.
Job hierarchy
When a coroutine launches another coroutine, the job that returns from the new coroutine is called the child of the original parent job.
val job = launch {
    ...

    val childJob = launch { ... }

    ...
}
These parent-child relationships form a job hierarchy, where each job can launch jobs, and so on.
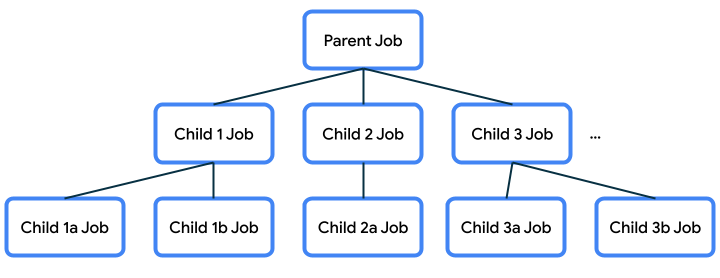
This parent-child relationship is important because it will dictate certain behavior:
If a parent job gets cancelled, then its child jobs also get cancelled.
When a child job is canceled using
job.cancel(), it terminates, but it does not cancel its parent.If a job fails with an exception, it cancels its parent with that exception. This is known as propagating the error upwards (to the parent, the parent’s parent, and so on).
CoroutineScope
Coroutines are typically launched into a
CoroutineScope. This ensures that we don’t have coroutines that are unmanaged and get lost, which could waste resources.launch()andasync()are extension functions onCoroutineScope. Calllaunch()orasync()on the scope to create a new coroutine within that scope.A
CoroutineScopeis tied to a lifecycle, which sets bounds on how long the coroutines within that scope will live. If a scope gets cancelled, then its job is cancelled, and the cancellation of that propagates to its child jobs. If a child job in the scope fails with an exception, then other child jobs get cancelled, the parent job gets cancelled, and the exception gets re-thrown to the caller.
CoroutineScope in Kotlin Playground
In this codelab, you used
runBlocking()which provides aCoroutineScopefor your program. You also learned how to usecoroutineScope { }to create a new scope within thegetWeatherReport()function.
CoroutineScope in Android apps
Android provides coroutine scope support in entities that have a well-defined lifecycle, such as
Activity(lifecycleScope) andViewModel(viewModelScope). Coroutines that are started within these scopes will adhere to the lifecycle of the corresponding entity, such asActivityorViewModel.For example, say you start a coroutine in an
Activitywith the provided coroutine scope calledlifecycleScope. If the activity gets destroyed, then thelifecycleScopewill get canceled and all its child coroutines will automatically get canceled too. You just need to decide if the coroutine following the lifecycle of theActivityis the behavior you want.In the Race Tracker Android app you will be working on, you’ll learn a way to scope your coroutines to the lifecycle of a composable.
Implementation Details of CoroutineScope
CoroutineScopeis declared as an interface, and it contains aCoroutineContextas a variable.The
launch()andasync()functions create a new child coroutine within that scope and the child also inherits the context from the scope. What is contained within the context?
CoroutineContext
The
CoroutineContextprovides information about the context in which the coroutine will be running in. TheCoroutineContextis essentially a key ➜ element map that stores elements. Each element has a unique key. These are not required fields, but here are some examples of what may be contained in a context:name - name of the coroutine, uniquely identifies it
job - controls the lifecycle of the coroutine
dispatcher - dispatches the work to the appropriate thread
exception handler - handles exceptions thrown by the code executed in the coroutine
Note
These are default values for the
CoroutineContext, which will be used if you don’t provide values for them:name:
coroutinejob: none
dispatcher:
Dispatchers.Defaultexception handler: none
Each of the elements in a context can be appended together with the
+operator. For example, oneCoroutineContextcould be defined as follows:Job() + Dispatchers.Main + exceptionHandler
If a name is not provided, the default coroutine name is used.
Within a coroutine, if you launch a new coroutine, the child coroutine will inherit the
CoroutineContextfrom the parent coroutine, but replace the job specifically for the coroutine that just got created. You can also override any elements that were inherited from the parent context by passing in arguments to thelaunch()orasync()functions for the parts of the context that you want to be different.scope.launch(Dispatchers.Default) { ... }
You can learn more about
CoroutineContextand how the context gets inherited from the parent in this KotlinConf conference video talk.You’ve seen the mention of dispatcher several times. Its role is to dispatch or assign the work to a thread. Let’s learn about threads and dispatchers in more detail.
Dispatcher
Coroutines use dispatchers to determine the thread to use for its execution. A thread can be started, does some work (executes some code), and then terminates when there’s no more work to be done.
When a user starts your app, the Android system creates a new process and a single thread of execution for your app, which is known as the main thread. The main thread handles many important operations for your app including Android system events, drawing the UI on the screen, handling user input events, and more. As a result, most of the code you write for your app will likely run on the main thread.
There are two terms to understand when it comes to the threading behavior of your code: blocking and non-blocking.
A regular function blocks the calling thread until its work is completed. That means it does not yield the calling thread until the work is done, so no other work can be done in the meantime.
Non-blocking code yields the calling thread until a certain condition is met, so you can do other work in the meantime. You can use an asynchronous function to perform non-blocking work because it returns before its work is completed.
In the case of Android apps, you should only call blocking code on the main thread if it will execute fairly quickly. The goal is to keep the main thread unblocked, so that it can execute work immediately if a new event is triggered. This main thread is the UI thread for your activities and is responsible for UI drawing and UI related events. When there’s a change on the screen, the UI needs to be redrawn. For something like an animation on the screen, the UI needs to be redrawn frequently so that it appears like a smooth transition. If the main thread needs to execute a long-running block of work, then the screen won’t update as frequently and the user will see an abrupt transition (known as “jank”) or the app may hang or be slow to respond.
Hence we need to move any long-running work items off the main thread and handle it in a different thread. Your app starts off with a single main thread, but you can choose to create multiple threads to perform additional work. These additional threads can be referred to as worker threads. It’s perfectly fine for a long-running task to block a worker thread for a long time, because in the meantime, the main thread is unblocked and can actively respond to the user.
There are some built-in dispatchers that Kotlin provides:
Dispatchers.Main: Use this dispatcher to run a coroutine on the main Android thread. This dispatcher is used primarily for handling UI updates and interactions, and performing quick work.Dispatchers.IO: This dispatcher is optimized to perform disk or network I/O outside of the main thread. For example, read from or write to files, and execute any network operations.Dispatchers.Default: This is a default dispatcher used when callinglaunch()andasync(), when no dispatcher is specified in their context. You can use this dispatcher to perform computationally-intensive work outside of the main thread. For example, processing a bitmap image file.
Note
There’s also
Executor.asCoroutineDispatcher()andHandler.asCoroutineDispatcher()extensions, if you need to make aCoroutineDispatcherfrom aHandlerorExecutorthat you already have available.Try the following example in Kotlin Playground to better understand coroutine dispatchers.
import kotlinx.coroutines.*

fun main() {
    runBlocking {
        launch {
            delay(1000)
            println("10 results found.")
        }
        println("Loading...")
    }
}
Now wrap the contents of the launched coroutine with a call to
withContext()to change theCoroutineContextthat the coroutine is executed within, and specifically override the dispatcher. Switch to using theDispatchers.Default(instead ofDispatchers.Mainwhich is currently being used for the rest of the coroutine code in the program).import kotlinx.coroutines.* fun main() { runBlocking { launch { withContext(Dispatchers.Default) { delay(1000) println("10 results found.") } } println("Loading...") } }
Switching dispatchers is possible because
withContext()is itself a suspending function. It executes the provided block of code using a new CoroutineContext. The new context comes from the context of the parent job (the outerlaunch()block), except it overrides the dispatcher used in the parent context with the one specified here:Dispatchers.Default. This is how we are able to go from executing work withDispatchers.Mainto usingDispatchers.Default.Run the program. The output should be:
Loading...
10 results found.
Add print statements to see what thread you are on by calling
Thread.currentThread().name.import kotlinx.coroutines.* fun main() { runBlocking { println("${Thread.currentThread().name} - runBlocking function") launch { println("${Thread.currentThread().name} - launch function") withContext(Dispatchers.Default) { println("${Thread.currentThread().name} - withContext function") delay(1000) println("10 results found.") } println("${Thread.currentThread().name} - end of launch function") } println("Loading...") } }
Run the program. The output should be:
main @coroutine#1 - runBlocking function
Loading...
main @coroutine#2 - launch function
DefaultDispatcher-worker-1 @coroutine#2 - withContext function
10 results found.
main @coroutine#2 - end of launch function
From this output, you can observe that most of the code is executed in coroutines on the main thread. However, for the portion of your code in the
withContext(Dispatchers.Default)block, that is executed in a coroutine on a Default Dispatcher worker thread (which is not the main thread).Notice that after
withContext()returns, the coroutine returns to running on the main thread (as evidenced by output statement:main @coroutine#2 - end of launch function). This example demonstrates that you can switch the dispatcher by modifying the context that is used for the coroutine.If you have coroutines that were started on the main thread, and you want to move certain operations off the main thread, then you can use
withContextto switch the dispatcher being used for that work. Choose appropriately from the available dispatchers:Main,Default, andIOdepending on the type of operation it is. Then that work can be assigned to a thread (or group of threads called a thread pool) designated for that purpose. Coroutines can suspend themselves, and the dispatcher also influences how they resume.Note that when working with popular libraries like Room and Retrofit (in this unit and the next one), you may not have to explicitly switch the dispatcher yourself if the library code already handles doing this work using an alternative coroutine dispatcher like
Dispatchers.IO
Now you’ve got a high-level overview of the important parts of coroutines and the role that
CoroutineScope,CoroutineContext,CoroutineDispatcher, andJobsplay in shaping the lifecycle and behavior of a coroutine.
Conclusion
Great work on this challenging topic of coroutines! You have learned that coroutines are very useful because their execution can be suspended, freeing up the underlying thread to do other work, and then the coroutine can be resumed later. This allows you to run concurrent operations in your code.
Coroutine code in Kotlin follows the principle of structured concurrency. It is sequential by default, so you need to be explicit if you want concurrency (e.g. using
launch()orasync()). With structured concurrency, you can take multiple concurrent operations and put it into a single synchronous operation, where concurrency is an implementation detail. The only requirement on the calling code is to be in a suspend function or coroutine. Other than that, the structure of the calling code doesn’t need to take into account the concurrency details. That makes your asynchronous code easier to read and reason about.Structured concurrency keeps track of each of the launched coroutines in your app and ensures that they are not lost. Coroutines can have a hierarchy—tasks might launch subtasks, which in turn can launch subtasks. Jobs maintain the parent-child relationship among coroutines, and allow you to control the lifecycle of the coroutine.
Launch, completion, cancellation, and failure are four common operations in the coroutine’s execution. To make it easier to maintain concurrent programs, structured concurrency defines principles that form the basis for how the common operations in the hierarchy are managed:
Launch: Launch a coroutine into a scope that has a defined boundary on how long it lives for.
Completion: The job is not complete until its child jobs are complete.
Cancellation: This operation needs to propagate downward. When a coroutine is canceled, then the child coroutines need to also be canceled.
Failure: This operation should propagate upward. When a coroutine throws an exception, then the parent will cancel all of its children, cancel itself, and propagate the exception up to its parent. This continues until the failure is caught and handled. It ensures that any errors in the code are properly reported and never lost.
Through hands-on practice with coroutines and understanding the concepts behind coroutines, you are now better equipped to write concurrent code in your Android app. By using coroutines for asynchronous programming, your code is simpler to read and reason about, more robust in situations of cancellations and exceptions, and delivers a more optimal and responsive experience for end users.
Summary
Coroutines enable you to write long running code that runs concurrently without learning a new style of programming. The execution of a coroutine is sequential by design.
Coroutines follow the principle of structured concurrency, which helps ensure that work is not lost and tied to a scope with a certain boundary on how long it lives. Your code is sequential by default and cooperates with an underlying event loop, unless you explicitly ask for concurrent execution (e.g. using
launch()orasync()). The assumption is that if you call a function, it should finish its work completely (unless it fails with an exception) by the time it returns regardless of how many coroutines it may have used in its implementation details.The
suspendmodifier is used to mark a function whose execution can be suspended and resumed at a later point.A
suspendfunction can be called only from another suspending function or from a coroutine.You can start a new coroutine using the
launch()orasync()extension functions onCoroutineScope.Jobs plays an important role to ensure structured concurrency by managing the lifecycle of coroutines and maintaining the parent-child relationship.
A
CoroutineScopecontrols the lifetime of coroutines through its Job and enforces cancellation and other rules to its children and their children recursively.A
CoroutineContextdefines the behavior of a coroutine, and can include references to a job and coroutine dispatcher.Coroutines use a
CoroutineDispatcherto determine the threads to use for its execution.