Unit 6 Pathway 2 Activity 4: Persist Data with Room
Before you begin
Most production-quality apps have data that the app needs to persist. For example, the app might store a playlist of songs, items on a to-do list, records of expenses and income, a catalog of constellations, or a history of personal data. For such use cases, you use a database to store this persistent data.
Room is a persistence library that’s part of Android Jetpack. Room is an abstraction layer on top of a SQLite database. SQLite uses a specialized language (SQL) to perform database operations. Instead of using SQLite directly, Room simplifies the chores of database setup, configuration, and interactions with the app. Room also provides compile-time checks of SQLite statements.
An abstraction layer is a set of functions that hide the underlying implementation/complexity. It provides an interface to an existing set of functionality, like SQLite in this case.
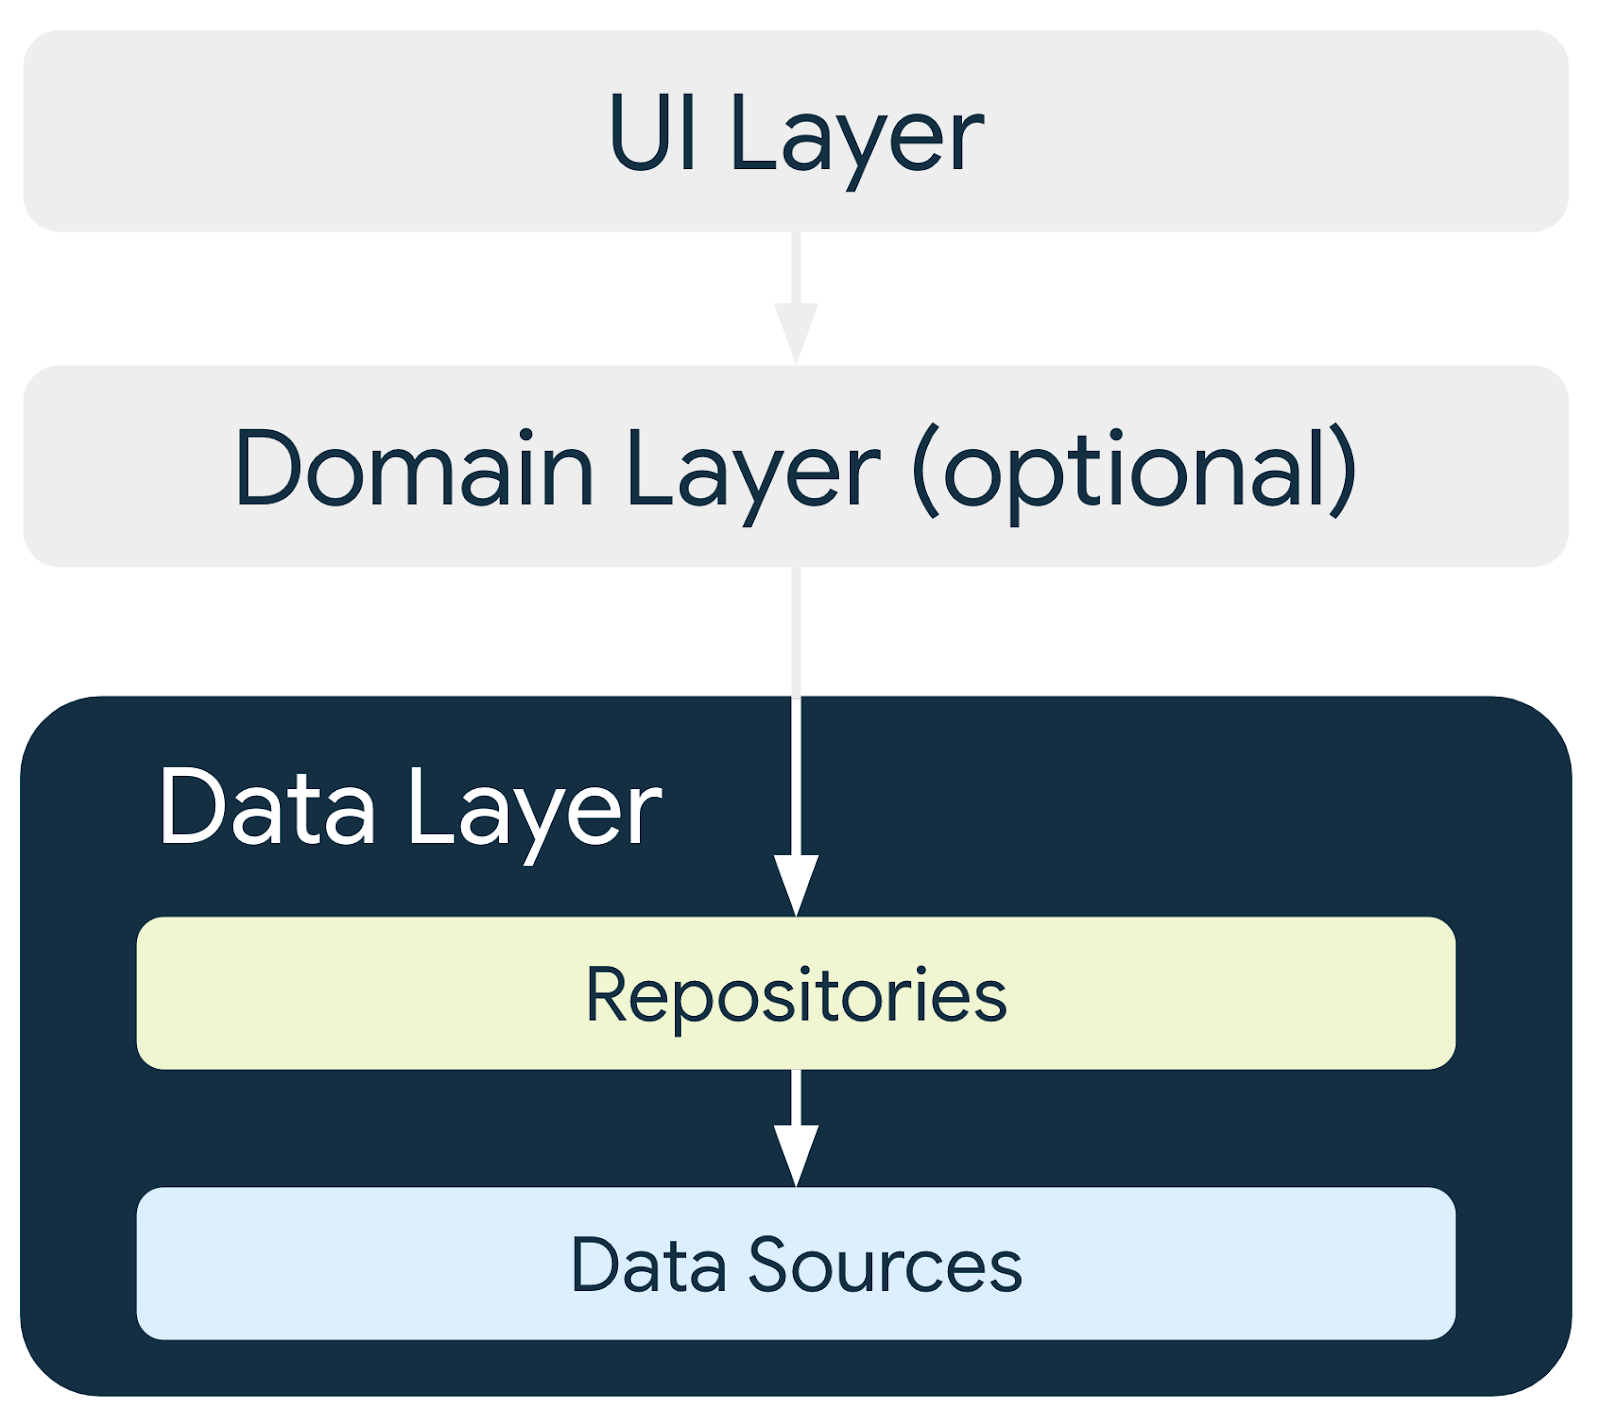
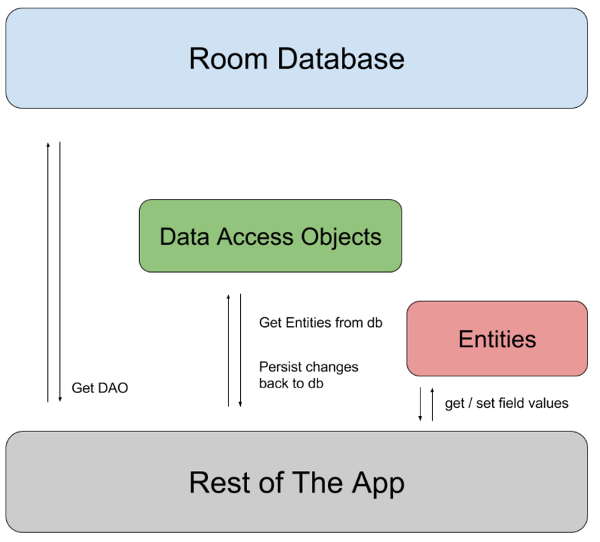
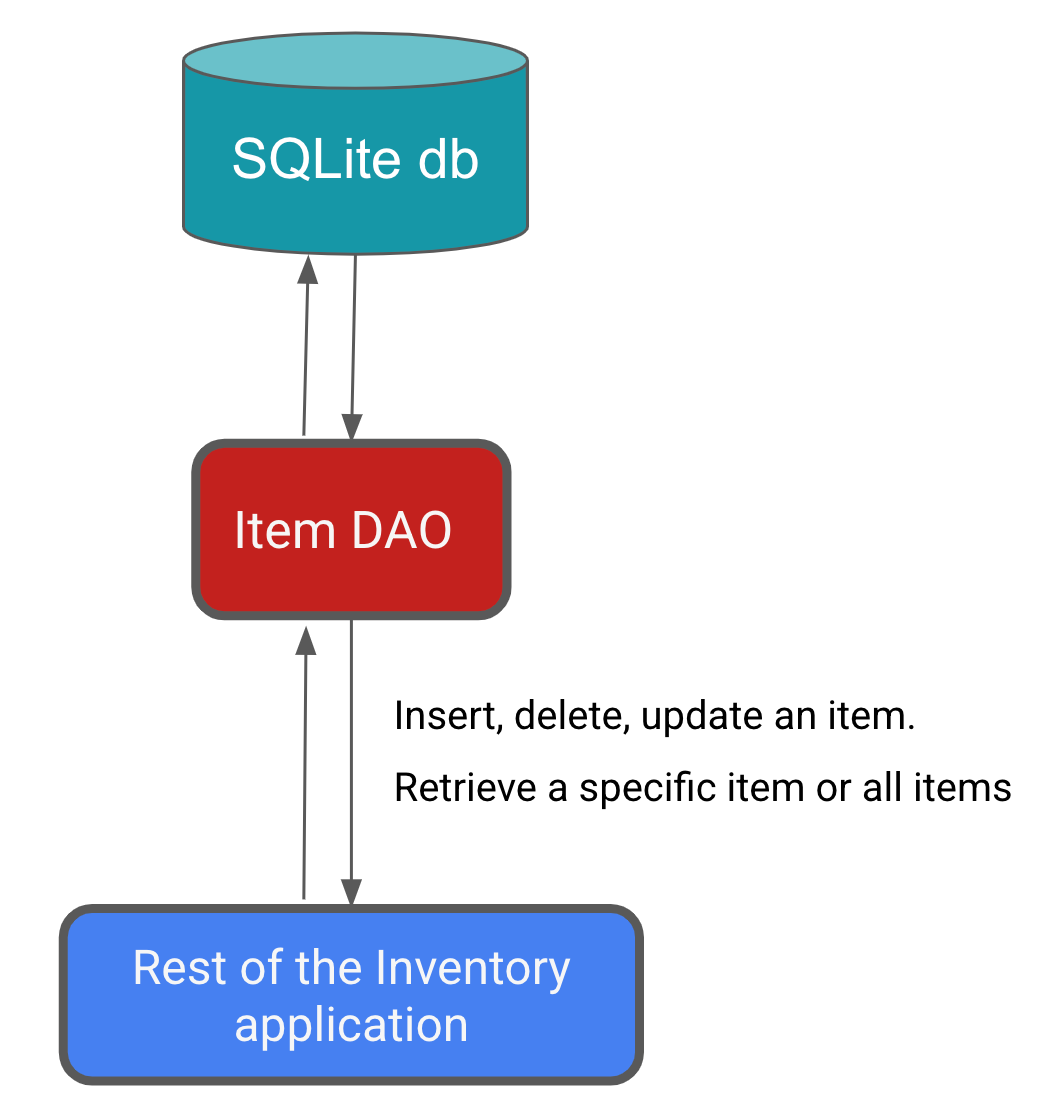
The image below shows how Room, as a data source, fits in with the overall architecture recommended in this course. Room is a Data Source.
Prerequisites
Ability to build a basic user interface (UI) for an Android app using Jetpack Compose.
Ability to use composables like
Text,Icon,IconButton, andLazyColumn.Ability to use the
NavHostcomposable to define routes and screens in your app.Ability to navigate between screens using a
NavHostController.Familiarity with the Android architecture component
ViewModel. Ability to useViewModelProvider.Factoryto instantiate the ViewModels.Familiarity with concurrency fundamentals.
Ability to use coroutines for long-running tasks.
Basic knowledge of SQLite databases and the SQL language.
What you’ll learn
How to create and interact with the SQLite database using the Room library.
How to create an entity, a data access object (DAO), and database classes.
How to use a DAO to map Kotlin functions to SQL queries.
What you’ll build
You’ll build an Inventory app that saves inventory items into the SQLite database.
What you need
Starter code for the Inventory app
A computer with Android Studio
Device or an emulator with API level 26 or higher
App overview
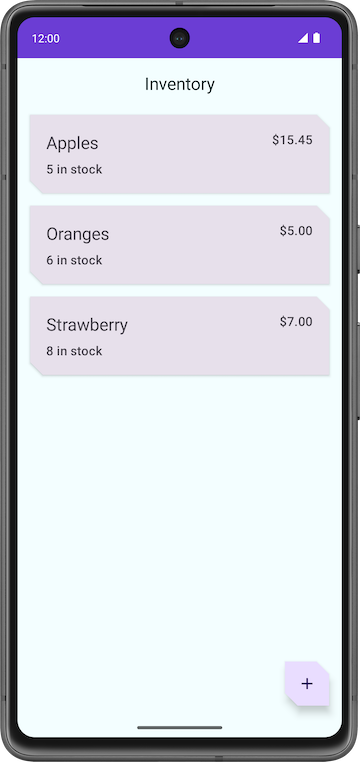
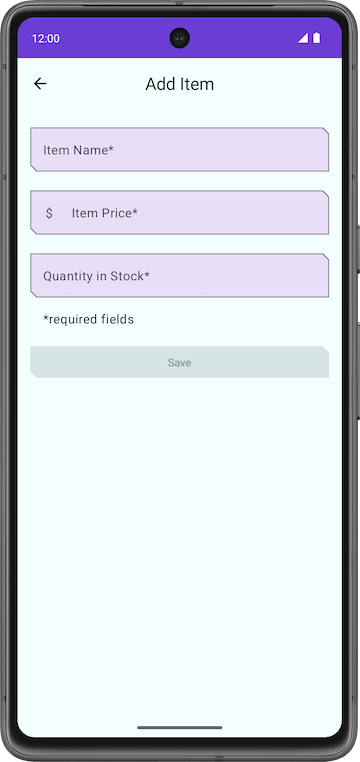
In this codelab, you work with a starter code of the Inventory app and add the database layer to it using the Room library. The final version of the app displays a list of items from the inventory database. The user has options to add a new item, update an existing item, and delete an item from the inventory database. For this codelab, you save the item data to the Room database. You complete the rest of the app’s functionality in the next codelab.

Note
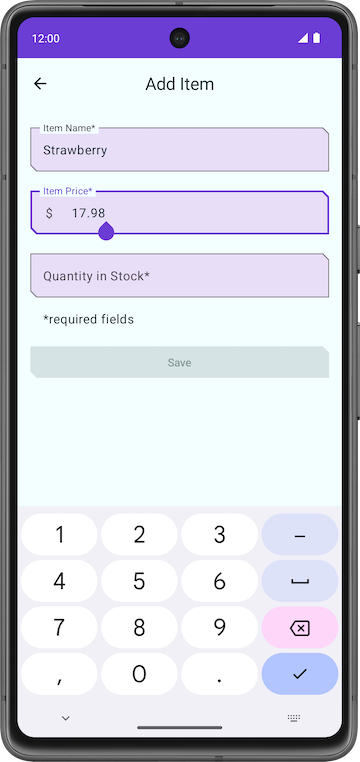
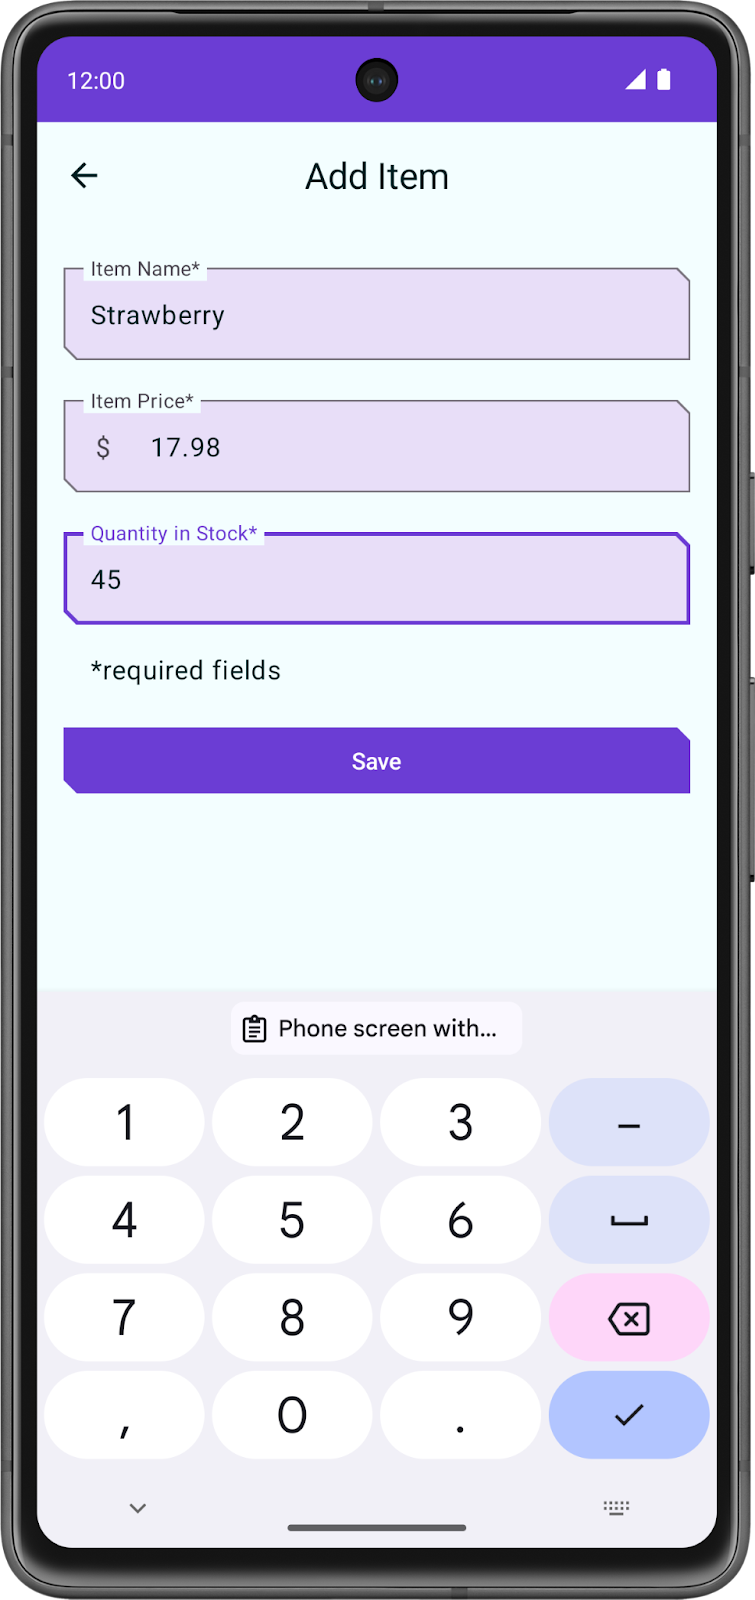
The above screenshots are from the final version of the app at the end of the pathway, not the end of this codelab. These screenshots give you an idea of the final version of the app.
Starter app overview
Branch: starter
Clone:
$ git clone https://github.com/google-developer-training/basic-android-kotlin-compose-training-inventory-app.git
$ cd basic-android-kotlin-compose-training-inventory-app
$ git checkout starter
Starter code overview
Open the project with the starter code in Android Studio.
Run the app on an Android device or an emulator. Make sure the emulator or connected device runs with an API level 26 or higher. Database Inspector works on emulators/devices that run API level 26 and higher.
Note
The Database Inspector lets you inspect, query, and modify your app’s databases while your app runs. The Database Inspector works with plain SQLite or with libraries built on top of SQLite, such as Room.
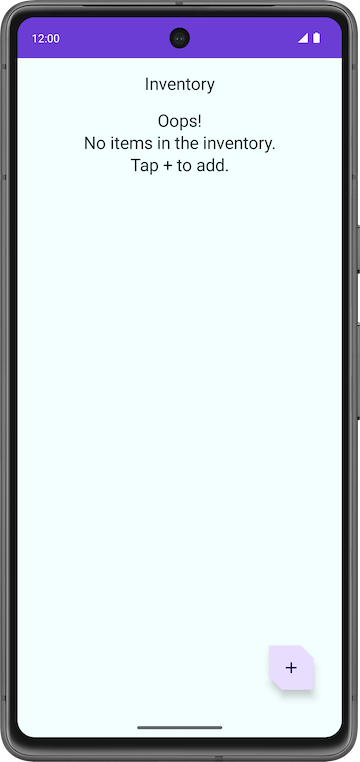
Notice that the app shows no inventory data.
Tap the floating action button (FAB) at the bottom right, which lets you add new items to the database.
The app navigates to a new screen where you can enter details for the new item.

Problems with the starter code
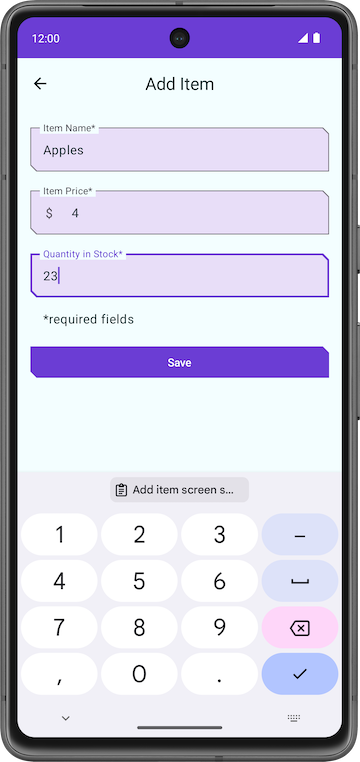
In the Add Item screen, enter an item’s details like name, price, and quantity of the Item.
Tap Save. The Add Item screen is not closed, but you can navigate back using the back key. The save functionality is not implemented, so the item details are not saved.
Notice that the app is incomplete and the Save button functionality is not implemented.
In this codelab, you add the code that uses Room to save the inventory details in the SQLite database. You use the Room persistence library to interact with the SQLite database.
Code walkthrough
The starter code you downloaded has pre-designed screen layouts for you. In this pathway, you focus on implementing the database logic. The following section is a brief walkthrough of some of the files to get you started.
ui/home/HomeScreen.kt: this file is the home screen, or the first screen in the app, which contains the composables to display the inventory list. It has a FAB+to add new items to the list.
ui/item/ItemEntryScreen.kt: this screen is similar toItemEditScreen.kt. They both have text fields for the item details. This screen is displayed when the FAB is tapped in the home screen. TheItemEntryViewModel.ktis the correspondingViewModelfor this screen.
ui/navigation/InventoryNavGraph.kt: this file is the navigation graph for the entire application.
Main components of Room
Kotlin provides an easy way to work with data through data classes. While it is easy to work with in-memory data using data classes, when it comes to persisting data, you need to convert this data into a format compatible with database storage. To do so, you need tables to store the data and queries to access and modify the data.
The following three components of Room make these workflows seamless.
Room entities represent tables in your app’s database. You use them to update the data stored in rows in tables and to create new rows for insertion.
Room Data Access Objects provide methods that your app uses to retrieve, update, insert, and delete data in the database.
Room Database class is the database class that provides your app with instances of the DAOs associated with that database.
You implement and learn more about these components later in the codelab. The following diagram demonstrates how the components of Room work together to interact with the database.
Add Room dependencies
First, we need to add the required Room dependencies.
In
build.gradle.kts (Module :app), in thedependenciesblock://Room implementation("androidx.room:room-runtime:${rootProject.extra["room_version"]}") ksp("androidx.room:room-compiler:${rootProject.extra["room_version"]}") implementation("androidx.room:room-ktx:${rootProject.extra["room_version"]}")
Create an item Entity
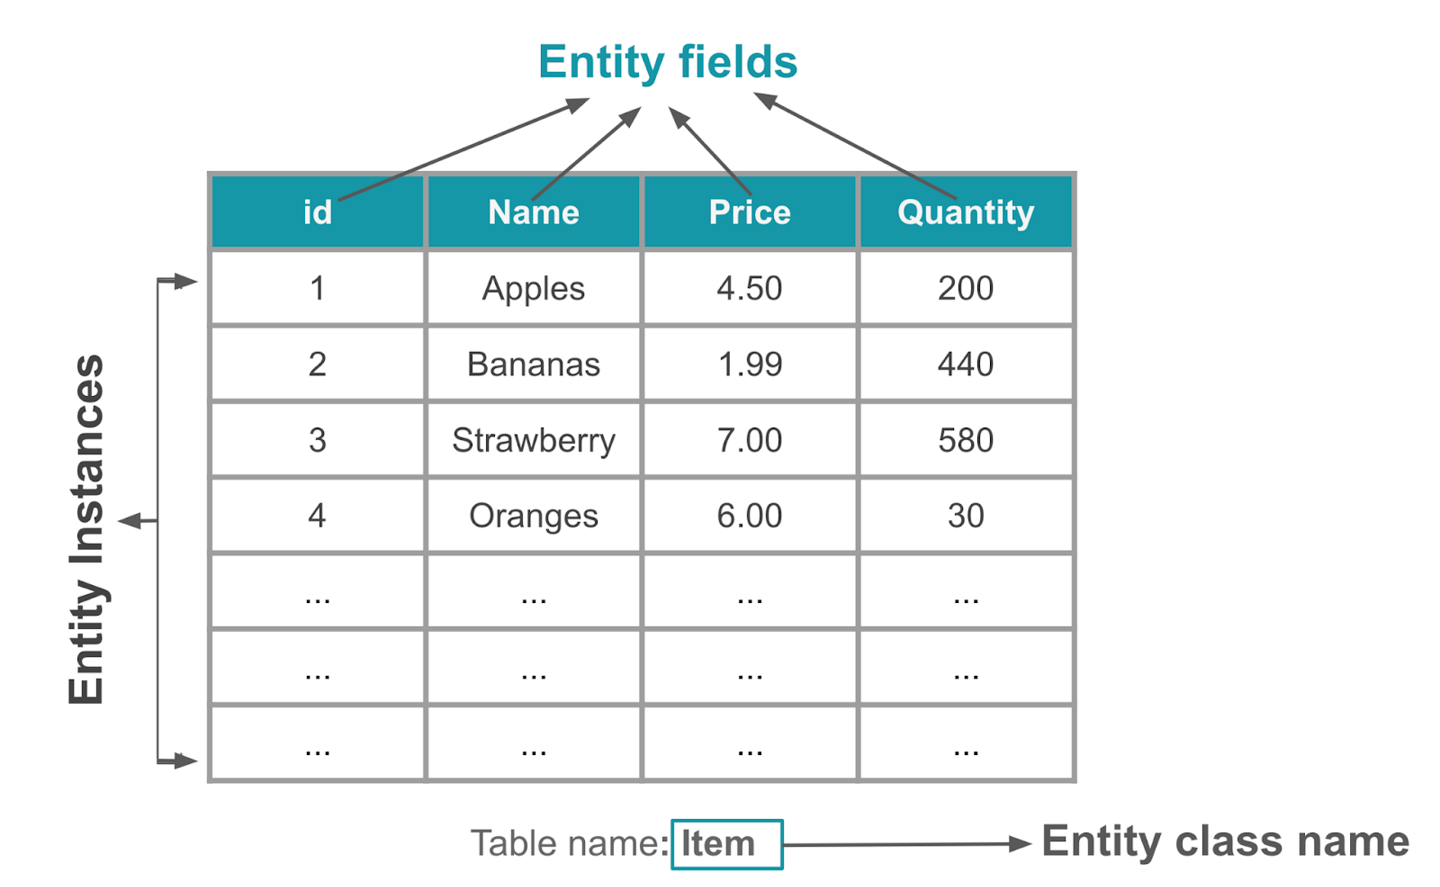
An Entity class defines a table.
Each instance of this class (i.e. an object) represents a row in the table.
The entity class has mappings to tell Room how it intends to present and interact with the information in the database. In your app, the entity holds information about inventory items, such as item name, item price, and quantity of items available.
The
@Entityannotation marks a class as a database Entity class. For each Entity class, the app creates a database table to hold the items. Each field of the Entity is represented as a column in the database, unless denoted otherwise.Every entity instance (i.e. a row) stored in the table must have a primary key. The primary key is used to uniquely identify every record/entry in your database tables. After the app assigns a primary key, it cannot be modified; it represents the entity object as long as it exists in the database.
We’ll create an Entity class to store inventory information. In
data/Item.kt, replace the contents with this code:package com.example.inventory.data import androidx.room.Entity import androidx.room.PrimaryKey /** * Entity data class represents a table (or a single row) in the database. */ @Entity(tableName = "items") data class Item( // Primary key @PrimaryKey(autoGenerate = true) val id: Int = 0, // Item name val name: String, // Item price val price: Double, // Quantity in stock val quantity: Int )
@Entity(tableName = "items")tells Kotlin that this Entity defines an SQLite table nameditemsThe code below tells Kotlin that the
idfield is the primary key, and makes Room automatically generate unique values for the primary key. The default value must be set to0to enable the auto-generation of primary key values.@PrimaryKey(autoGenerate = true) val id: Int = 0,
Great! Now that you have created an Entity class, you can create a Data Access Object (DAO) to access the database.
Create the item DAO
So far, we’ve created:
In
data/Item.kt: adata class Itementity, that represents the Items table. Each instance of this class represents a row inside the Items table.
The Data Access Object (DAO) is a pattern you can use to separate the persistence layer from the rest of the application by providing an abstract interface. This isolation follows the single-responsibility principle.
The DAO hides all the complexities involved in performing database operations in the underlying persistence layer, separate from the rest of the application. This lets you change the data layer independently of the code that uses the data.
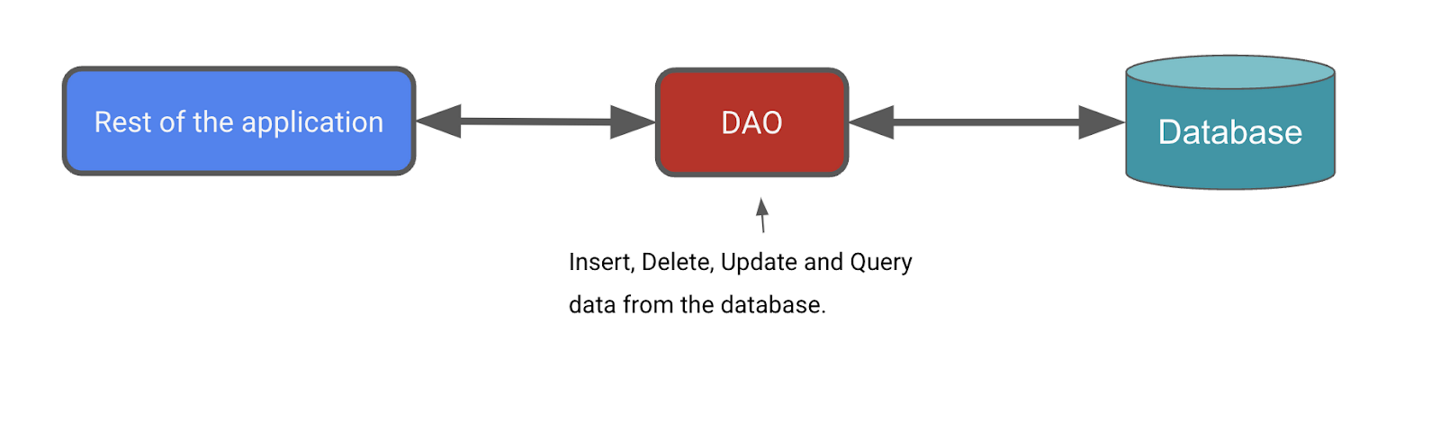
Next, we’ll define a DAO for Room. It will be a custom interface that provides convenience methods for querying/retrieving, inserting, deleting, and updating the database. Room generates an implementation of this class at compile time.
The
Roomlibrary provides convenience annotations, such as@Insert,@Delete, and@Update, for defining methods that perform simple inserts, deletes, and updates without requiring you to write a SQL statement.If you need to define more complex operations for insert, delete, update, or if you need to query the data in the database, use a
@Queryannotation instead.For the Inventory app, you need the ability to do the following:
Insert or add a new item.
Update an existing item to update the name, price, and quantity.
Get a specific item based on its primary key,
idGet all items so you can display them.
Delete an entry in the database.
To create the item DAO, create a new file,
data/ItemDao.kt, with this code:package com.example.inventory.data import androidx.room.Dao import androidx.room.Delete import androidx.room.Insert import androidx.room.OnConflictStrategy import androidx.room.Query import androidx.room.Update import kotlinx.coroutines.flow.Flow @Dao interface ItemDao { @Insert(onConflict = OnConflictStrategy.IGNORE) suspend fun insert(item: Item) @Update suspend fun update(item: Item) @Delete suspend fun delete(item: Item) @Query("SELECT * from items WHERE id = :id") fun getItem(id: Int): Flow<Item> @Query("SELECT * from items ORDER BY name ASC") fun getAllItems(): Flow<List<Item>> }
Database operations can take a long time to execute, so they need to run on a separate thread. Room doesn’t allow database access on the main thread. That’s why
insert(),update(), anddelete()are suspend functions.When using
insert()to insert items into the database, conflicts can happen. For example, the code may erroneously add two entities with the same primary key. In the Inventory app, we only insert the entity from one place, that is the Add Item screen, so we are not expecting any conflicts, and can set the conflict strategy to Ignore, meaning Room will not insert a new item if that new item causes a conflict. That’s@Insert(onConflict = OnConflictStrategy.IGNORE).Since this is just an interface, do we still need to write code to implement this interface? No. Room generates all the necessary code to insert the
iteminto the database. When you call any of the DAO functions that are marked with Room annotations, Room executes the corresponding SQL query on the database. For example, when you call the above method,insert()from your Kotlin code, Room executes a SQL query to insert the entity into the database.There is no convenience annotation for the remaining functionality, so
@Queryannotations are used to supply SQLite queries. CallinggetItem(WTV_ID)will cause the SQLite querySELECT * from items WHERE id = WTV_IDto be run.It is recommended to use
Flowin the persistence layer. WithFlowas the return type, you receive notification whenever the data in the database changes. Analogy: when following a content creator, you can turn on and receive notifications whenever they create a new post.Room keeps this
Flowupdated for you, which means you only need to explicitly get the data once, e.g. by callinggetItem()orgetAllItems(), and the data will be updated whenever it changes in the database. Because of theFlowreturn type, Room also runs the query on the background thread. You don’t need to explicitly make it asuspendfunction and call it inside a coroutine scope.Note
Flowin Room database can keep the data up-to-date by emitting a notification whenever the data in the database changes. This allows you to observe the data and update your UI accordingly.
Create a Database instance
So far, we’ve created:
In
data/Item.kt: adata class Itementity, that represents the Items table. Each instance of this class represents a row inside the Items table.In
data/ItemDao.kt: aninterface ItemDao, that contains methods to create, update, delete, and get items from the Items table. This is just an interface, the code for it will be provided by Room automatically.
In this task, we’ll create an
InventoryDatabaseclass, that uses thedata class Itemandinterface DAO. This class is responsible for creating the database, tables, and saving them to a file. This class isabstract, because Room will automatically generate most of the code needed, and we don’t have to code the implementation of this class ourselves.
Create a new file
data/InventoryDatabase.kt.Insert this code:
package com.example.inventory.data

import android.content.Context
import androidx.room.Database
import androidx.room.Room
import androidx.room.RoomDatabase

/**
* Database class with a singleton Instance object.
*/
@Database(entities = [Item::class], version = 1, exportSchema = false)
abstract class InventoryDatabase : RoomDatabase() {

    // This abstract function returns an ItemDao, no need to code the function body, Room will automatically generate the code.
    abstract fun itemDao(): ItemDao

    companion object {
        @Volatile
        private var Instance: InventoryDatabase? = null

        fun getDatabase(context: Context): InventoryDatabase {
            // if the Instance is not null, return it, otherwise create a new database instance.
            return Instance ?: synchronized(this) {
                Room.databaseBuilder(context, InventoryDatabase::class.java, "item_database")
                    .fallbackToDestructiveMigration()
                    .build()
                    .also { Instance = it }
            }
        }
    }
}
In this code:
@Database(entities = [Item::class], version = 1, exportSchema = false)
entities = [Item::class]tells Room that the database contains only 1 entity (table),ItemWhenever the schema of the database table changes,
versionmust be increased.exportSchema = falsedisables schema version history backups. If set totrue, Room will help to backup older versions of the schema into a folder.
The purpose of the companion object is to maintain one single instance of the database opened at a given time. A database object is computationally expensive to create and maintain, that’s why it’s preferred to only have one since instance.
@Volatilemeans that the value of that variable is never cached, and all reads and writes are to and from the main memory. These features help ensure the value ofInstanceis always up to date and is the same for all execution threads. It means that changes made by one thread toInstanceare immediately visible to all other threads.Multiple threads can potentially run
getDatabase()concurrently, which results in two database instances instead of one. This issue is known as a race condition. Usingsynchronized {}ensures that only one thread can enter this block of code at any time, which makes sure the database only gets initialized once. Usesynchronized {}to avoid race conditions.Room.databaseBuilder(context, InventoryDatabase::class.java, "item_database")creates the database inside a file nameditem_database. Thecontextis the “environment” in which the database is created.InventoryDatabase::class.javais the name of the database class,InventoryDatabase, with an additional::class.javaappended.fallbackToDestructiveMigration()causes the database to be destroyed and rebuilt whenever the schema changes, i.e. the entities (tables) changes. In this case, there is only one entity,Item. Example:The first time the app is run, it uses the
Itemdefinition to create a database and a table for the Items. At this point, theItemclass and the Items table are “in sync”, meaning they contain the same fields.Some data is added to the Items table inside the database.
The
Itemclass changes, causing theItemclass and the Items table to now have different fields. All rows in the Items table are deleted.The database is destroyed and rebuilt. The
Itemclass and Items table are now “in sync” again.
fallbackToDestructiveMigration()is suitable for a sample app but in real life, other strategies are more appropriate. See Migration for more.build()creates the database instance, and returns it.also { Instance = it }setsInstanceto the recently created database instance. It also returns the database instance thatbuild()returned.
Tip
You can use this code as a template for your future projects. Replace the entities and DAOs specific to your app.
Implement the Repository
So far, we’ve created:
In
data/Item.kt: adata class Itementity, that represents the Items table. Each instance of this class represents a row inside the Items table.In
data/ItemDao.kt: aninterface ItemDao, that contains methods to create, update, delete, and get items from the Items table. This is just an interface, the code for it will be provided by Room automatically.In
data/InventoryDatabase.kt: aclass InventoryDatabase, that “manages” the actual database. The actual database is stored inside a file. This class provides anItemDaoobject, that can be used to create, update, delete rows inside the Items table.
Now we’ll create a
class OfflineItemsRepositorythat provides an API for the app to call if the app needs to change some data. This class does not interact with the database directly, it needs to use anItemDaoobject to help it do so.Open
data/ItemsRepository.kt, replace the contents with the code below.package com.example.inventory.data import kotlinx.coroutines.flow.Flow /** * Repository that provides insert, update, delete, and retrieve of [Item] from a given data source. */ interface ItemsRepository { /** * Retrieve all the items from the the given data source. */ fun getAllItemsStream(): Flow<List<Item>> /** * Retrieve an item from the given data source that matches with the [id]. */ fun getItemStream(id: Int): Flow<Item?> /** * Insert item in the data source */ suspend fun insertItem(item: Item) /** * Delete item from the data source */ suspend fun deleteItem(item: Item) /** * Update item in the data source */ suspend fun updateItem(item: Item) }
This interface is very similar to
interface ItemDao. What’s the diff?interface ItemDaointeracts directly with the SQLite database. It executes SQL queries.interface ItemsRepositoryis a layer aboveinterface ItemDao. It works at a higher level. It provides an API for the rest of the app to call, so that the app doesn’t need to callinterface ItemDaomethods directly.
To implement the
ItemsRepositoryinterface, opendata/OfflineItemsRepository.kt, and replace the contents with this code:package com.example.inventory.data import kotlinx.coroutines.flow.Flow class OfflineItemsRepository(private val itemDao: ItemDao) : ItemsRepository { override fun getAllItemsStream(): Flow<List<Item>> = itemDao.getAllItems() override fun getItemStream(id: Int): Flow<Item?> = itemDao.getItem(id) override suspend fun insertItem(item: Item) = itemDao.insert(item) override suspend fun deleteItem(item: Item) = itemDao.delete(item) override suspend fun updateItem(item: Item) = itemDao.update(item) }
This code implements the
ItemsRepositoryinterface. It represents a repository that is offline, meaning no Internet connection is needed to use this repository.Why do it like this?
If the app calls the
interface ItemDaomethods directly, then if one day the database is removed and replaced with a cloud data source instead, many parts of the app need to be changed.By using
interface ItemsRepository, if one day the database is removed and replaced with a cloud data source instead, then only theOfflineItemsRepositoryneeds to be changed.
Implement AppContainer class
So far, we’ve created:
In
data/Item.kt: adata class Itementity, that represents the Items table. Each instance of this class represents a row inside the Items table.In
data/ItemDao.kt: aninterface ItemDao, that contains methods to create, update, delete, and get items from the Items table. This is just an interface, the code for it will be provided by Room automatically.In
data/InventoryDatabase.kt: aclass InventoryDatabase, that “manages” the actual database. The actual database is stored inside a file. This class provides anItemDaoobject, that can be used to create, update, delete rows inside the Items table.In
data/ItemsRepository.ktanddata/OfflineItemsRepository.kt: aclass OfflineItemsRepositorythat provides an API for the app to call if the app needs to change some data. This class does not interact with the database directly, it needs to use anItemDaoobject to help it do so.
Now, we’ll instantiate the database, and pass in an
ItemDaoto theOfflineItemsRepositoryclass.In
data/AppContainer.kt, replace the contents with this code:package com.example.inventory.data import android.content.Context /** * App container for Dependency injection. */ interface AppContainer { val itemsRepository: ItemsRepository } /** * [AppContainer] implementation that provides instance of [OfflineItemsRepository] */ class AppDataContainer(private val context: Context) : AppContainer { /** * Implementation for [ItemsRepository] */ override val itemsRepository: ItemsRepository by lazy { OfflineItemsRepository(InventoryDatabase.getDatabase(context).itemDao()) } }
InventoryDatabase.getDatabase(context)instantiates the database instance. Next, theitemDao()creates anItemDao, which is then passed to theOfflineItemsRepository.OfflineItemsRepositoryneeds thisItemDaoobject to help it create, update, delete, and get rows from the Items table.
Add the save functionality
To save the app’s transient data and to also access the database, the ViewModels must be updated. The ViewModels use the DAO to interact with the database, and provide data to the UI. All database operations need to be run outside of the main UI thread, using coroutines and
viewModelScope.
UI state class walkthrough
Open
ui/item/ItemEntryViewModel.kt. TheItemUiStatedata class represents the UI state of an Item. TheItemDetailsdata class represents a single item.The starter code provides three extension functions:
ItemDetails.toItem(): converts the ItemUiState UI state object to the Item entity type.Item.toItemUiState(): converts the Item Room entity object to the ItemUiState UI state type.Item.toItemDetails(): converts the Item Room entity object to the ItemDetails.
// No need to copy, this is part of starter code
/**
* Represents Ui State for an Item.
*/
data class ItemUiState(
    val itemDetails: ItemDetails = ItemDetails(),
    val isEntryValid: Boolean = false
)

data class ItemDetails(
    val id: Int = 0,
    val name: String = "",
    val price: String = "",
    val quantity: String = "",
)

/**
* Extension function to convert [ItemDetails] to [Item]. If the value of [ItemDetails.price] is
* not a valid [Double], then the price will be set to 0.0. Similarly if the value of
* [ItemDetails.quantity] is not a valid [Int], then the quantity will be set to 0
*/
fun ItemDetails.toItem(): Item = Item(
    id = id,
    name = name,
    price = price.toDoubleOrNull() ?: 0.0,
    quantity = quantity.toIntOrNull() ?: 0
)

fun Item.formatedPrice(): String {
    return NumberFormat.getCurrencyInstance().format(price)
}

/**
* Extension function to convert [Item] to [ItemUiState]
*/
fun Item.toItemUiState(isEntryValid: Boolean = false): ItemUiState = ItemUiState(
    itemDetails = this.toItemDetails(),
    isEntryValid = isEntryValid
)

/**
* Extension function to convert [Item] to [ItemDetails]
*/
fun Item.toItemDetails(): ItemDetails = ItemDetails(
    id = id,
    name = name,
    price = price.toString(),
    quantity = quantity.toString()
)
These are used by the ViewModels to read and update the UI.
Update the ItemEntry ViewModel
In this task, you pass in the repository to the
ItemEntryViewModel.ktfile. You also save the item details entered in the Add Item screen into the database.Open
ItemEntryViewModel.kt.Notice the
validateInput()private function:// No need to copy over, this is part of starter code private fun validateInput(uiState: ItemDetails = itemUiState.itemDetails): Boolean { return with(uiState) { name.isNotBlank() && price.isNotBlank() && quantity.isNotBlank() } }
The above function checks if the
name,price, andquantityare empty. It’s used to verify user input before adding or updating the entity in the database.Change the
ItemEntryViewModelclass to the below, but leave the code outside the class untouched./** * ViewModel to validate and insert items in the Room database. */ class ItemEntryViewModel(private val itemsRepository: ItemsRepository) : ViewModel() { /** * Holds current item ui state */ var itemUiState by mutableStateOf(ItemUiState()) private set /** * Updates the [itemUiState] with the value provided in the argument. This method also triggers * a validation for input values. */ fun updateUiState(itemDetails: ItemDetails) { itemUiState = ItemUiState(itemDetails = itemDetails, isEntryValid = validateInput(itemDetails)) } private fun validateInput(uiState: ItemDetails = itemUiState.itemDetails): Boolean { return with(uiState) { name.isNotBlank() && price.isNotBlank() && quantity.isNotBlank() } } suspend fun saveItem() { if (validateInput()) { itemsRepository.insertItem(itemUiState.itemDetails.toItem()) } } }
The constructor now takes in an
ItemsRepository, which the ViewModel uses to save items into the database.
In
ui/AppViewModelProvider.kt, modify theinitializer {}for ItemEntryViewModel to pass in the repository as a parameter:object AppViewModelProvider { val Factory = viewModelFactory { // ... // Initializer for ItemEntryViewModel initializer { ItemEntryViewModel(inventoryApplication().container.itemsRepository) } // ... } }
The
ItemEntryViewModelis now able to add entities to the database. Now, the UI must be updated the UI to useItemEntryViewModel.
ItemEntryBody() composable walkthrough
In
ui/item/ItemEntryScreen.ktfile, theItemEntryBody()composable is partially implemented in the starter code. Look at theItemEntryBody()composable in theItemEntryScreen()function call. Notice that the UI state and theupdateUiStatelambda are being passed as function parameters:// No need to copy over, part of the starter code ItemEntryBody( itemUiState = viewModel.itemUiState, // UI state passed as parameter onItemValueChange = viewModel::updateUiState, // updateUiState passed as parameter onSaveClick = { }, modifier = Modifier .padding( start = innerPadding.calculateStartPadding(LocalLayoutDirection.current), end = innerPadding.calculateEndPadding(LocalLayoutDirection.current), top = innerPadding.calculateTopPadding() ) .verticalScroll(rememberScrollState()) .fillMaxWidth() )
Look at the
ItemEntryBody()definition to see how the UI state is used.ItemEntryBody()displays anItemInputForm, and a Save button. TheItemInputForm()displays the item details. The Save button is only enabled if text is entered in the text fields.itemUiState.isEntryValidis true if the text in all the text fields is valid (not empty)// No need to copy over, part of the starter code @Composable fun ItemEntryBody( itemUiState: ItemUiState, onItemValueChange: (ItemUiState) -> Unit, onSaveClick: () -> Unit, modifier: Modifier = Modifier ) { Column( // ... ) { ItemInputForm( itemDetails = itemUiState.itemDetails, // UI state used to display item details onValueChange = onItemValueChange, modifier = Modifier.fillMaxWidth() ) Button( onClick = onSaveClick, enabled = itemUiState.isEntryValid, // UI state used to determine whether the Save Button is enabled or not shape = MaterialTheme.shapes.small, modifier = Modifier.fillMaxWidth() ) { Text(text = stringResource(R.string.save_action)) } } }
Add a click handler to the Save button
Next, to tie everything together, we’ll add a click handler to the Save button. Inside the click handler, launch a coroutine and call
saveItem()to save the data in the Room database.In
ItemEntryScreen.kt, inside theItemEntryScreencomposable function, add this code:val coroutineScope = rememberCoroutineScope()
imports
import androidx.compose.runtime.rememberCoroutineScope
Note
The
rememberCoroutineScope()is a composable function that returns aCoroutineScopebound to the composition where it’s called. You can use therememberCoroutineScope()composable function when you want to launch a coroutine outside of a composable, and ensure the coroutine is canceled after the scope leaves the composition. You can use this function when you need to control the lifecycle of coroutines manually, for example, to cancel an animation whenever a user event happens.Inside
ItemEntryBody(), add this code to launch a coroutine that saves the item and navigates back to the Inventory screenItemEntryBody( itemUiState = viewModel.itemUiState, onItemValueChange = viewModel::updateUiState, onSaveClick = { coroutineScope.launch { viewModel.saveItem() navigateBack() } }, // ...
Build and run your app.
Tap the + FAB.
In the Add Item screen, add the item details and tap Save. The app navigates back to the Inventory screen.
This action saves the data, but you cannot see the inventory data in the app. In the next task, you use the Database Inspector to view the data you saved.

View the database content using Database Inspector
The Database Inspector lets you inspect, query, and modify your app’s databases while your app runs. This feature is especially useful for database debugging. The Database Inspector works with plain SQLite and with libraries built on top of SQLite, such as Room. Database Inspector works best on emulators/devices running API level 26 and higher.
Note
The Database Inspector only works with the SQLite library included in the Android operating system on API level 26 and higher. It doesn’t work with other SQLite libraries that you bundle with your app.
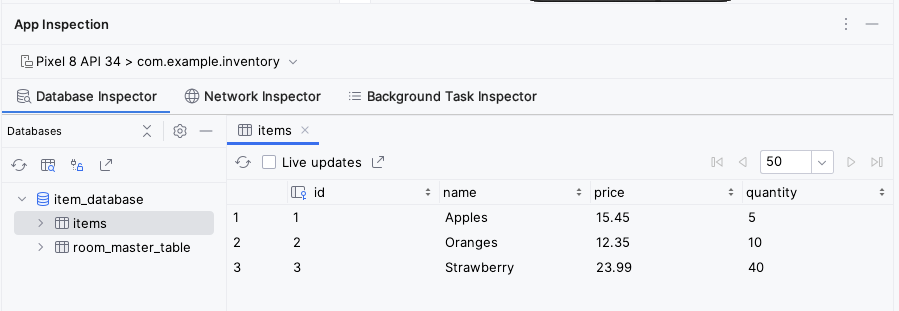
Select View ➜ Tool Windows ➜ App Inspection ➜ Database Inspector.
Just above the words Database Inspector, make sure com.example.inventory appears somewhere. The
item_databaseshould appear in the Databases pane.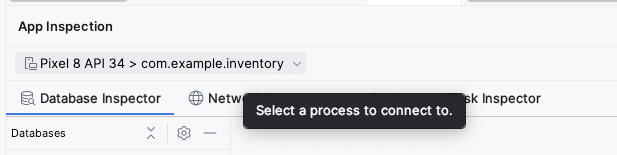
Expand the node for the item_database in the Databases pane and select Item to inspect.
Check the Live updates checkbox in the Database Inspector to automatically update the data it presents as you interact with your running app in the emulator or device.
Congratulations! You created an app that can persist data using Room. In the next codelab, you will add a lazyColumn to your app to display the items on the database, and add new features to the app, like the ability to delete and update the entities. See you there!
Solution code
Branch: room
Clone:
$ git clone https://github.com/google-developer-training/basic-android-kotlin-compose-training-inventory-app.git
$ cd basic-android-kotlin-compose-training-inventory-app
$ git checkout room
Summary
Define your tables as data classes annotated with
@Entity. Define properties annotated with@ColumnInfoas columns in the tables.Define a data access object (DAO) as an interface annotated with
@Dao. The DAO maps Kotlin functions to database queries.Use annotations to define
@Insert,@Delete, and@Updatefunctions.Use the
@Queryannotation with an SQLite query string as a parameter for any other queries.Use Database Inspector to view the data saved in the Android SQLite database.